Introduction
Welcome to our guide on how to connect your Bose speaker to Wi-Fi. Bose speakers are renowned for their high-quality audio and sleek design, and connecting them to your Wi-Fi network opens up a world of possibilities for streaming music and enjoying a seamless experience across different devices. Whether you have a Bose SoundTouch or a Bose Home Speaker, this guide will walk you through the steps to get your speaker connected and ready to rock!
Having a wireless connection allows you to stream music from popular services like Spotify, Apple Music, and Pandora, direct your speaker with voice assistants like Amazon Alexa or Google Assistant, and even link multiple speakers together for a synchronized audio experience throughout your home.
Before we dive into the step-by-step process, it’s important to note that the exact steps may vary depending on the specific model of your Bose speaker. However, the general principles discussed in this guide should apply across most Bose speaker models. It’s always a good idea to refer to the user manual for your specific speaker if you encounter any issues or need additional guidance.
So, let’s get started and get your Bose speaker connected to Wi-Fi!
Step 1: Check compatibility with your Bose speaker
Before you begin the process of connecting your Bose speaker to Wi-Fi, it’s important to ensure that your speaker is compatible with wireless connectivity. While most newer Bose speakers come with Wi-Fi capabilities, some older models may not support this feature. To check if your speaker is compatible, refer to the product specifications or the user manual.
If your Bose speaker is Wi-Fi compatible, you’ll need to determine if it supports the specific Wi-Fi standards used in your home. Most modern routers support 2.4GHz and 5GHz frequency bands, so it’s ideal if your speaker can connect to both. However, if your speaker only supports one of these frequencies, make sure it matches the frequency of your Wi-Fi network.
Besides Wi-Fi compatibility, it’s important to ensure that your Bose speaker firmware is up to date. Updates often include bug fixes, performance enhancements, and sometimes even new features. To check for updates, visit the Bose website and search for your specific speaker model. Download and install any available firmware updates to ensure that your speaker is running the latest software.
If, after checking compatibility and updating the firmware, you find that your speaker is not Wi-Fi compatible, don’t worry! There may still be alternative methods to connect your speaker to the internet, such as using Bluetooth or a wired connection. Refer to your user manual for instructions on alternative connectivity methods.
Once you’ve determined that your Bose speaker is Wi-Fi compatible and up to date, you’re ready to move on to the next step: preparing your speaker and source device for the connection process.
Step 2: Prepare your speaker and source device
Before connecting your Bose speaker to the Wi-Fi network, you’ll need to ensure that both your speaker and the source device you’ll be using are ready. Here are the essential steps:
1. Power on your Bose speaker: Make sure your speaker is plugged into a power source and turned on. Some speakers have a dedicated power button, while others may power on automatically when connected to power.
2. Place your speaker in range: Position your Bose speaker within a reasonable range of your Wi-Fi router to ensure a strong and stable connection. While Wi-Fi signals can penetrate walls and obstacles, placing your speaker closer to the router will minimize signal interference and improve connectivity.
3. Enable Wi-Fi on your source device: Ensure that Wi-Fi is enabled on the device you’ll be using to control your Bose speaker. This may be your smartphone, tablet, or computer. Go to the device’s settings menu and toggle the Wi-Fi option on.
4. Connect your source device to the same Wi-Fi network: It’s crucial that both your source device and your Bose speaker are connected to the same Wi-Fi network. Open the Wi-Fi settings on your source device and select your home network from the available list. Enter the Wi-Fi password, if prompted, to establish a connection.
5. Disable mobile data: To ensure a seamless connection between your source device and the Bose speaker, it’s recommended to disable mobile data or any other connections that may interfere with the Wi-Fi connection during the setup process.
By preparing your Bose speaker and source device, you’re setting the stage for a smooth and hassle-free connection process. Once everything is in order, it’s time to move on to the next step: connecting your Bose speaker to the Wi-Fi network.
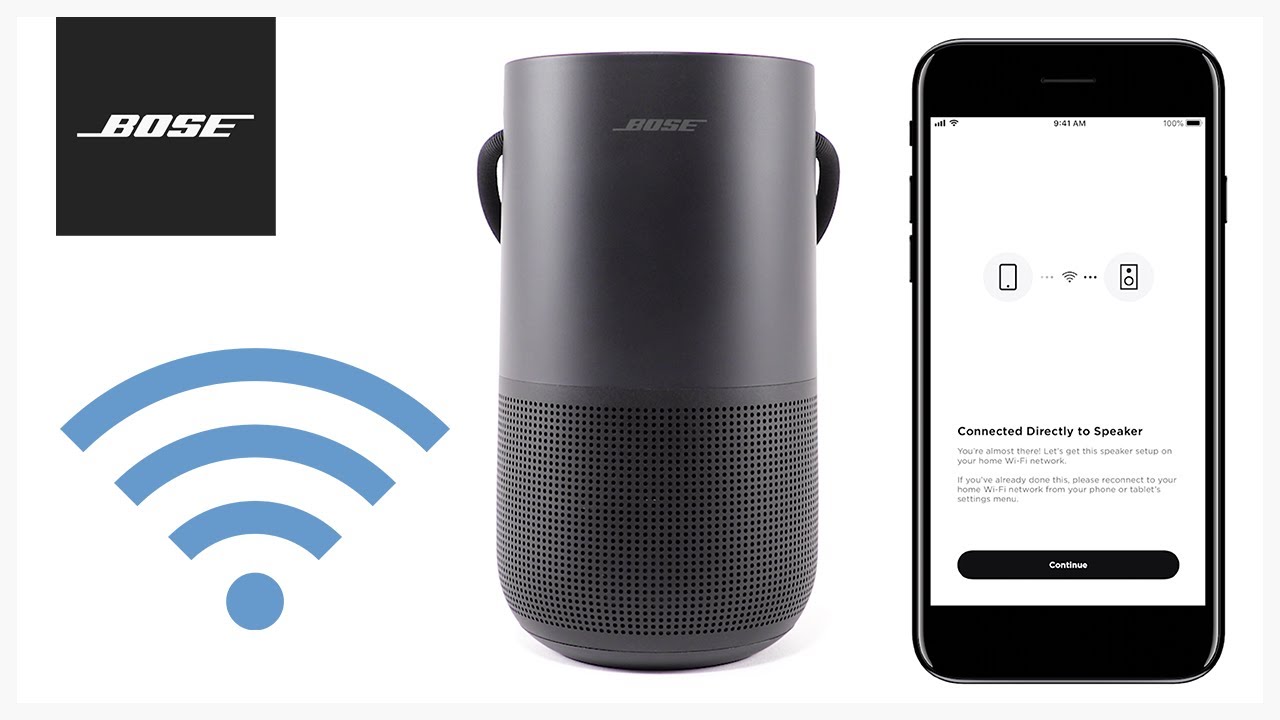
Step 3: Connect your Bose speaker to the Wi-Fi network
Now that your Bose speaker and source device are prepared, it’s time to connect your Bose speaker to the Wi-Fi network. Follow these steps:
1. Open the Bose Connect app or navigate to the speaker settings: Depending on your Bose speaker model, you may need to use the Bose Connect app to connect your speaker to Wi-Fi. If the app is not required, you can usually access the speaker’s settings through a physical control panel or a web-based interface. Consult your speaker’s user manual for specific instructions.
2. Select the Wi-Fi network: In the app or speaker settings, look for the Wi-Fi network settings. You will typically find an option to select a network from a list. Choose your home Wi-Fi network from the available options.
3. Enter the Wi-Fi network password: If your network is password-protected, you will be prompted to enter the Wi-Fi password. Carefully input the correct password using the on-screen keyboard or the physical controls, if applicable.
4. Wait for the connection confirmation: After entering the Wi-Fi password, your Bose speaker will attempt to connect to the network. Allow a few moments for the speaker to establish the connection. You may see a connection status indicator on your source device or hear an audio confirmation from your speaker when the connection is successful.
5. Test the connection: To ensure that your Bose speaker is successfully connected to the Wi-Fi network, play a sample audio or stream music from your source device. If you can hear the audio from your Bose speaker, it indicates that the connection is established and working correctly.
If you encounter any issues during this process, double-check the Wi-Fi network name and password for accuracy. Additionally, make sure your Wi-Fi network is functioning properly by connecting other devices to it. If necessary, restart your Bose speaker, source device, and Wi-Fi router to troubleshoot any connectivity problems.
Once your Bose speaker is successfully connected to the Wi-Fi network, you can continue setting up and customizing your speaker’s features using the Bose Connect app or the available settings.
Step 4: Download and install the Bose Connect app
To make the most of your Bose speaker’s features and functionalities, it’s recommended to download and install the Bose Connect app. The app serves as a central hub for controlling and managing your Bose speaker, allowing you to access additional settings, customize audio settings, and connect multiple speakers together. Follow these steps to download and install the app:
1. Check app compatibility: Ensure that your source device, whether it’s a smartphone or tablet, meets the requirements for running the Bose Connect app. The app is available for both iOS and Android devices, so make sure you have the necessary operating system version and storage space.
2. Open the app store: On your source device, open the respective app store for your operating system (such as the App Store for iOS or Google Play Store for Android). You can usually find these on your device’s home screen or through the app list.
3. Search for Bose Connect: In the app store’s search bar, enter “Bose Connect” and tap on the search icon. Look for the official Bose Connect app from Bose Corporation in the search results.
4. Download the app: Once you locate the Bose Connect app, tap on the “Download” or “Get” button to initiate the app download and installation process. Wait for the download to complete. Depending on your internet connection, this could take a few moments.
5. Install the app: After the download is complete, the app will automatically start installing on your device. Once the installation is finished, you’ll see the Bose Connect app icon appear on your device’s home screen or in the app list.
6. Open the Bose Connect app: Tap on the Bose Connect app icon to launch it. You may be prompted to grant certain permissions or sign in with your Bose account. Follow the on-screen instructions to complete the setup process.
With the Bose Connect app installed on your source device, you gain access to additional features and benefits. The app allows you to manage and control your speaker’s settings easily, connect to streaming services, create playlists, and even link multiple Bose speakers for a synchronized audio experience throughout your home.
Now that you have the Bose Connect app installed, you can proceed to the final step: setting up your speaker using the app.
Step 5: Set up your speaker using the Bose Connect app
Now that you have downloaded and installed the Bose Connect app, you can proceed to set up your speaker and customize its settings using the app. Here are the steps to follow:
1. Launch the Bose Connect app: Open the Bose Connect app on your source device. If you haven’t signed in already, you may be prompted to do so using your Bose account. Sign in or create an account if required.
2. Connect your speaker to the app: Ensure that your Bose speaker is turned on and in range of your source device. The app should automatically detect and display your speaker as an available device. Tap on the speaker’s name to connect it to the app.
3. Follow the on-screen instructions: The Bose Connect app will guide you through the initial setup process for your speaker. This typically involves selecting your preferred language, agreeing to terms of use, and setting up Wi-Fi connectivity if necessary. Follow the on-screen instructions carefully to proceed.
4. Customize your speaker settings: Once your speaker is successfully connected to the app, you can access a range of settings to personalize your audio experience. Adjust the equalizer settings, set up voice assistants like Amazon Alexa or Google Assistant, enable multi-room functionality, and explore other features available for your specific Bose speaker model.
5. Explore music streaming options: The Bose Connect app provides convenient access to popular music streaming services. Browse through the available options and sign in to your preferred services to enjoy seamless music streaming directly from the app to your Bose speaker.
6. Test your speaker: To ensure that your speaker is properly set up and functioning, play some music or audio content through the app. You should hear the sound output from your Bose speaker, indicating that the setup is successful.
By using the Bose Connect app, you can take full advantage of the features and functionalities offered by your Bose speaker. The app allows you to customize audio settings, manage connected devices, and explore a variety of streaming options, all from the convenience of your source device.
With your speaker set up using the Bose Connect app, you’re now ready to enjoy your favorite music, podcasts, and audio content with exceptional sound quality and an optimized listening experience.
Troubleshooting common connectivity issues
While connecting your Bose speaker to Wi-Fi is typically a straightforward process, you may encounter some common connectivity issues along the way. Here are a few troubleshooting tips to help you resolve these issues:
1. Check your Wi-Fi signal: Ensure that your Bose speaker is within range of your Wi-Fi router and that there are no physical obstacles causing signal interference. Weak Wi-Fi signals can lead to connectivity problems, so consider relocating your speaker or adjusting your router’s position for better signal strength.
2. Restart your devices: If you’re experiencing connectivity issues, try restarting your Bose speaker, source device, and Wi-Fi router. This can help clear any temporary glitches that may be affecting the connection.
3. Verify Wi-Fi network credentials: Double-check that you have entered the correct Wi-Fi network name (SSID) and password during the setup process. Typos or incorrect credentials can prevent the speaker from connecting to the network.
4. Update firmware and app: Ensure that both your Bose speaker’s firmware and the Bose Connect app are up to date. Outdated software can sometimes cause compatibility issues and hinder proper functionality. Check for updates on the Bose website or within the app, and install any available updates.
5. Reset your speaker: If you’re still experiencing connectivity problems, try resetting your Bose speaker. Consult the user manual or the Bose website for specific instructions on how to perform a reset. Keep in mind that resetting your speaker will erase any stored settings, so you may need to set it up again from scratch.
6. Contact Bose support: If all else fails and you’re unable to resolve the connectivity issues on your own, don’t hesitate to reach out to Bose customer support. They have knowledgeable representatives who can provide additional troubleshooting assistance and guide you towards a solution.
Remember, connectivity issues can sometimes be temporary and easily resolved with a few simple steps. By following these troubleshooting tips and being patient, you can often overcome any obstacles and successfully connect your Bose speaker to Wi-Fi.
With these troubleshooting strategies in mind, you can confidently troubleshoot and resolve common connectivity issues that may arise when setting up your Bose speaker.
Conclusion
Congratulations! You have successfully learned how to connect your Bose speaker to Wi-Fi. By following the steps outlined in this guide, you can now enjoy the benefits of wireless streaming and personalized audio experiences with your Bose speaker.
Remember to check the compatibility of your speaker, prepare it and your source device, and connect your speaker to the Wi-Fi network using the Bose Connect app. By downloading and installing the app, you gain access to additional features and settings that enhance your speaker’s functionality.
In the event that you encounter connectivity issues, don’t panic. Refer to the troubleshooting tips provided to identify and resolve common problems, such as Wi-Fi signal strength, incorrect network credentials, or outdated firmware or app versions.
If you need further assistance, don’t hesitate to reach out to Bose customer support, who are available to help you troubleshoot and address any lingering issues.
Now you can sit back, relax, and enjoy your favorite music, podcasts, and audio content with superb sound quality and the convenience of wireless streaming. Whether you’re hosting a gathering, unwinding after a long day, or simply indulging in a personal audio experience, your Bose speaker connected to Wi-Fi will elevate the way you enjoy your audio content.
We hope this guide has provided you with the necessary steps and insights to seamlessly connect your Bose speaker to Wi-Fi. So go ahead and enjoy the immersive audio experience that your Bose speaker brings to your home.