Introduction
Welcome to your guide on how to clean the memory of your tablet! As technology advances, our tablets have become essential tools for work, entertainment, and communication. However, over time, as we download apps, store files, and browse the internet, our tablet’s memory can become cluttered and slow down its performance.
Clearing the memory of your tablet is crucial for maintaining its speed and ensuring optimal performance. By removing unnecessary files, cache, and app data, you can free up valuable space and improve the overall functionality of your device. In this article, we will provide you with a step-by-step guide on how to clean the memory of your tablet effectively.
Before we dive into the cleaning process, it’s essential to understand why cleaning your tablet’s memory is necessary. As we use our tablets, various apps generate temporary files known as cache to store data temporarily. While these files are meant to enhance the app’s performance, they can accumulate over time and take up a significant amount of space.
When the memory becomes full, your tablet may start to experience sluggishness, app crashes, and decreased battery life. Additionally, a cluttered memory can negatively impact the overall user experience, making it challenging to find and access files quickly.
By following the steps outlined in this guide, you can effectively clean the memory of your tablet and reclaim valuable space for better performance. However, it’s essential to take some precautions before proceeding with the cleaning process to ensure the safety of your data and settings.
Why Clean Tablet Memory?
As mentioned earlier, cleaning the memory of your tablet is essential for maintaining optimal performance. Let’s take a closer look at why it is necessary to regularly clean the memory of your device:
- Improved Speed and Performance: Over time, as you download and use various apps, your tablet’s memory can become clogged with unnecessary files and data. This can slow down the device and lead to lagging, freezing, and delays in app responsiveness. By cleaning the memory, you can free up space and improve the overall speed and performance of your tablet.
- More Storage Space: Every tablet has a limited amount of storage space, and it can quickly fill up with app data, cached files, and other temporary files. By regularly cleaning your tablet’s memory, you can remove unnecessary clutter and create more room for important files, photos, and videos. This ensures that you have enough space for new apps and media without having to constantly delete files.
- Enhanced Battery Life: Unnecessary background processes, cached data, and unused apps can drain your tablet’s battery faster. By cleaning the memory, you can reduce the strain on your device’s resources and prolong the battery life. This is especially important when you’re on the go and rely on your tablet for extended periods.
- Optimized App Performance: Some apps accumulate a large amount of cached data, which can affect their performance. Cleaning the memory of your tablet removes these temporary files and can improve the speed and functionality of apps. This ensures a smoother and more enjoyable experience when using your favorite applications.
By regularly cleaning the memory of your tablet, you can optimize its performance, maximize storage capacity, extend battery life, and enhance the overall user experience. Now that we understand the importance of cleaning tablet memory, let’s explore the precautions you need to take before diving into the cleaning process.
Precautions Before Cleaning Tablet Memory
Before you proceed with cleaning the memory of your tablet, it’s essential to take a few precautions to ensure the safety of your data and settings. Here are some precautions you should consider:
- Backup Your Data: Before performing any memory cleaning process, it’s crucial to back up your important files, photos, documents, and any other data that you don’t want to lose. This ensures that in case something goes wrong during the cleaning process, you have a copy of your essential data.
- Review App Permissions: Some memory cleaning methods may require you to grant certain permissions or access to your device’s settings. Before proceeding, review the permissions you are granting and ensure that you are comfortable with the access levels requested by the cleaning tool or app.
- Check App Compatibility: If you are using a memory cleaner app, make sure that it is compatible with your tablet’s operating system and version. Check the app’s compatibility information in the app store or on the developer’s website to avoid any compatibility issues or potential conflicts.
- Research Cleaning Tools: If you choose to use a memory cleaner app, take some time to research and read reviews about the app before installing it. Look for reputable apps that have positive user feedback and high ratings. This will help ensure that you are using a reliable and secure tool.
- Close Unnecessary Apps: Before cleaning the memory, close any unnecessary apps running in the background. This prevents any conflict or interference with the cleaning process and allows for a smoother experience.
By following these precautions, you can minimize the risk of data loss, ensure compatibility with your device, and choose trustworthy cleaning tools or methods. Now that we’ve covered the necessary precautions, it’s time to delve into the step-by-step process of cleaning the memory of your tablet.
Clear Cache and App Data
One of the most effective ways to clean the memory of your tablet is by clearing the cache and app data. Here’s how you can do it:
- Go to Settings: Open the Settings app on your tablet. It can usually be found in the app drawer or in the notification panel.
- Find the Applications or Apps Manager: Look for the option called “Applications” or “Apps Manager” in the settings menu. The name may vary depending on your tablet’s manufacturer.
- Select an App: Inside the Apps Manager, you will see a list of installed apps on your tablet. Choose the app you want to clear the cache and data for.
- Clear Cache: Once you are inside the app settings, you will see an option to clear the cache. Tap on it to remove the temporary files stored by the app. This will free up some space in your tablet’s memory.
- Clear App Data: If you want to free up even more space, you can choose to clear the app data as well. Keep in mind that clearing app data will delete any personalized settings or saved data associated with the app. Only do this if you don’t mind losing that information.
- Repeat for Other Apps: Repeat the process for other apps that you want to clean the cache and data for. Remember to be selective and only clear cache and data for apps that you no longer use or that are taking up a significant amount of space.
Clearing the cache and app data regularly can help improve your tablet’s performance by freeing up memory space and reducing the load on the device. However, keep in mind that clearing app data will remove any stored preferences and user data associated with the app, so be cautious when choosing to clear app data. Now that you’ve learned how to clear cache and app data, let’s move on to the next step in cleaning your tablet’s memory.
Uninstall Unused Apps
One of the most effective ways to free up memory on your tablet is by uninstalling unused apps. Here’s how you can do it:
- Go to Settings: Open the Settings app on your tablet.
- Find the Applications or Apps Manager: Look for the option called “Applications” or “Apps Manager” in the settings menu.
- Select an App: Inside the Apps Manager, you will see a list of installed apps on your tablet. Choose the app you want to uninstall.
- Tap Uninstall: In the app settings, you will find an option to uninstall the app. Tap on it and confirm your selection when prompted.
- Repeat for Other Unused Apps: Go through the list of installed apps and uninstall any that you no longer use or need. Be cautious and ensure you are only uninstalling apps that are not essential to avoid accidentally removing important apps.
By uninstalling unused apps, you can reclaim valuable storage space on your tablet and improve its overall performance. Removing apps that you no longer use also helps with decluttering your device and making it easier to find the apps that you actually need.
It’s a good practice to regularly review the apps installed on your tablet and uninstall those that have become obsolete or are taking up unnecessary space. This will not only improve memory management but also help optimize battery life and streamline the overall functionality of your device.
Now that you’ve learned how to uninstall unused apps, let’s move on to the next step in cleaning your tablet’s memory.
Transfer Files to External Storage
If your tablet has limited internal storage, transferring files to external storage can help free up space and optimize the memory. Here’s how you can do it:
- Connect External Storage: Depending on your tablet’s available ports, connect an external storage device such as a USB flash drive or an SD card using the appropriate cable or adapter.
- Access File Manager: Open the file manager app on your tablet. If you don’t have a file manager app installed, you can download one from the app store.
- Navigate to Files: Locate the files or folders that you want to transfer to external storage. You can find them in different locations like the Downloads folder, Camera folder, or specific apps.
- Select Files: Tap and hold on a file to select it. You can also tap on multiple files or folders to select them all at once.
- Transfer Files: Look for the option to “Move” or “Copy” the selected files to the external storage. The specific wording and options may vary depending on the file manager app you are using.
- Choose External Storage: When prompted, select the external storage device as the destination location for the files. This will begin the transfer process.
- Repeat for Other Files: Repeat the process for any additional files or folders that you want to transfer. Organize them in appropriate folders on the external storage device as needed, making it easier to access them later.
By transferring files to external storage, you can free up space on your tablet’s internal memory and keep important files readily accessible when needed. This is especially useful for large files like videos, photos, and documents that take up a significant amount of space.
Remember to periodically review the files stored on your tablet and transfer those that you no longer need immediate access to. This will help keep your tablet’s internal storage clean and optimize its memory for better performance.
Now that you know how to transfer files to external storage, let’s move on to the next step in cleaning your tablet’s memory.
Remove Browser History and Cookies
Clearing your browser history and cookies can help improve the performance and privacy of your tablet. Here’s how you can do it:
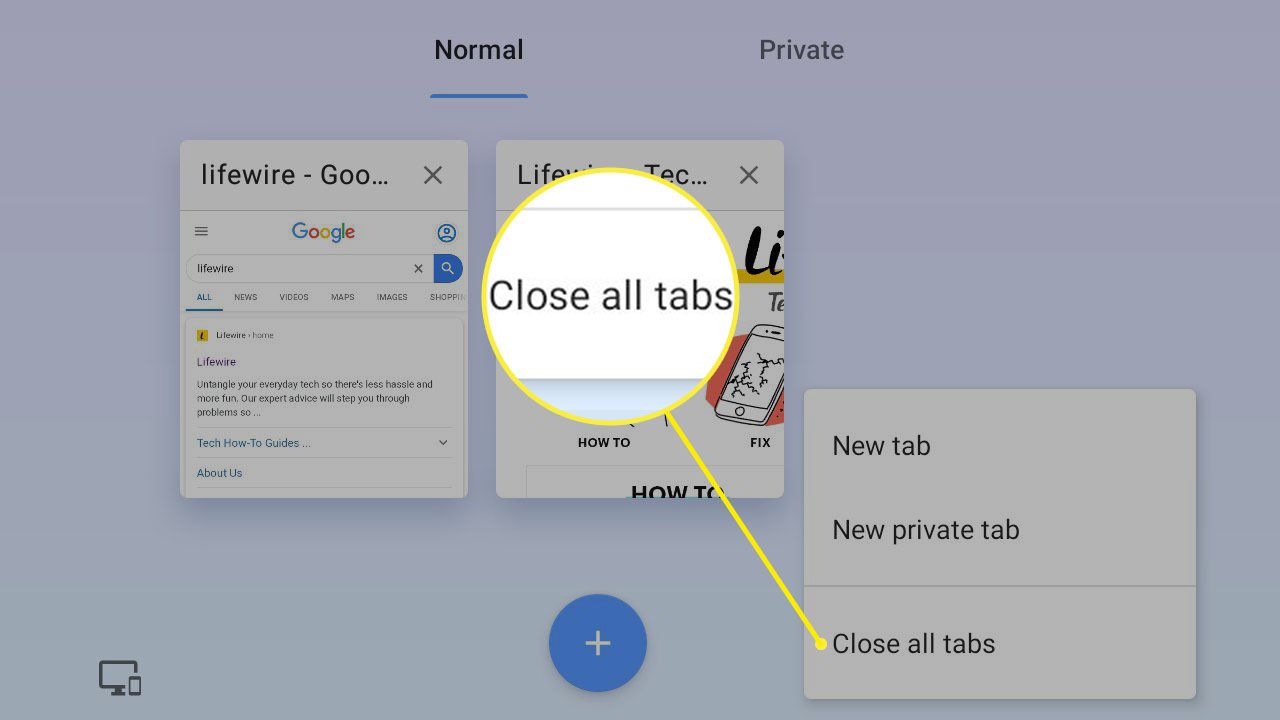
- Open Your Web Browser: Launch the web browser app on your tablet. This could be Chrome, Firefox, Safari, or any other browser you have installed.
- Access Browser Settings: Look for the settings menu within your browser. Typically, you can find this by tapping the three-dot menu icon in the top-right corner or by accessing the browser’s settings from the browser menu.
- Find Privacy or History Options: In the browser settings, look for options related to privacy, browsing history, or cache. The specific location and wording may vary based on the browser you are using.
- Clear Browsing History: Tap on the option to clear your browsing history. This will remove the record of websites you have visited, freeing up storage space and improving browser performance.
- Clear Cookies and Site Data: Look for an option to clear cookies and site data. This will delete information stored by websites on your tablet, such as login credentials and preferences. Clearing cookies can help protect your privacy and may also improve website loading times.
- Confirm the Clearing Process: When prompted, confirm that you want to clear your browsing history, cookies, and site data. Note that this action, once confirmed, cannot be undone, so ensure that you have saved any important information if needed.
By regularly clearing your browser history and cookies, you can enhance your tablet’s performance, maintain privacy, and ensure a smoother browsing experience. This is particularly important if you use your tablet extensively for web browsing, as accumulated browser data can often take up a significant amount of memory.
Remember to clear your browser history and cookies periodically, or you can also adjust the settings in your browser to clear them automatically at regular intervals. This way, you can enjoy a clutter-free browsing experience on your tablet.
Now that you’ve learned how to remove browser history and cookies, let’s move on to the next step in cleaning your tablet’s memory.
Disable or Limit Background App Refresh
Disabling or limiting background app refresh can help conserve memory and optimize the performance of your tablet. Here’s how you can do it:
- Go to Settings: Open the Settings app on your tablet.
- Find the Apps or Applications Setting: Look for the option called “Apps” or “Applications” in the settings menu. The name may vary depending on your tablet’s manufacturer and operating system.
- Select an App: Inside the Apps settings, you will see a list of installed apps on your tablet. Choose the app for which you want to manage the background refresh.
- Disable Background Refresh: Look for an option called “Background App Refresh” or similar. Toggle the switch to turn off background refresh for the selected app. This prevents the app from using memory and processing power when not in use.
- Limit Background Refresh (if available): Some tablets may provide the option to limit background refresh instead of disabling it completely. If available, use this setting to allow background refresh only when connected to Wi-Fi or at specific intervals.
- Repeat for Other Apps (optional): If desired, repeat the process for other apps to disable or limit background app refresh as needed. Focus on apps that run in the background unnecessarily or that consume significant resources.
By disabling or limiting background app refresh, you can prevent apps from using unnecessary memory and processing power when they are not actively being used. This can help improve the overall performance and battery life of your tablet.
Keep in mind that some apps rely on background refresh to deliver timely updates or notifications. So, be selective when disabling or limiting background refresh and consider your usage patterns and the importance of receiving real-time information.
Now that you know how to disable or limit background app refresh, let’s move on to the next step in cleaning your tablet’s memory.
Delete Old Messages and Emails
Deleting old messages and emails is an effective way to free up memory and declutter your tablet. Here’s how you can do it:
- Open your Messaging or Email App: Launch the messaging or email app on your tablet. This could be the default app that came with your device or a third-party app that you have installed.
- Select Messages or Emails: In the app, navigate to the messages or emails that you want to delete. You can swipe left or right on individual messages or emails to reveal the delete option, or select multiple messages or emails at once by tapping on them.
- Delete Selected Messages or Emails: Look for the trash bin or delete icon/button within the app. Tap on it to delete the selected messages or emails from your tablet’s memory. Confirm the deletion if prompted.
- Repeat for Other Conversations or Email Threads: Continue the process for other conversations or email threads that you want to delete. Be cautious and ensure that you don’t delete any important messages or emails that you might need in the future.
Deleting old messages and emails not only helps free up storage space but also helps you organize your inbox and messages more effectively. It reduces the load on your messaging or email app and improves its overall performance and responsiveness.
If you have messages or emails that you want to keep but do not need immediate access to, consider archiving them instead of deleting. Archiving allows you to remove them from your main inbox but still retain them for future reference.
Regularly reviewing and deleting old messages and emails can help keep your tablet’s memory optimized and ensure that you have sufficient space for new incoming messages and emails. Now that you know how to delete old messages and emails, let’s move on to the next step in cleaning your tablet’s memory.
Use a Memory Cleaner App
Using a memory cleaner app can provide a convenient and efficient way to clean and optimize the memory of your tablet. Here’s how you can use a memory cleaner app:
- Research and Download a Trusted Memory Cleaner App: Search for reputable memory cleaner apps in your device’s app store. Read reviews and check ratings to ensure you choose a reliable and effective app.
- Install the Memory Cleaner App: Once you have selected a memory cleaner app, download and install it on your tablet. Follow the installation prompts and grant any necessary permissions.
- Launch the Memory Cleaner App: Open the memory cleaner app on your tablet. It may have a dedicated icon on your home screen or a shortcut in your app drawer.
- Scan for Memory Cleaning: Start the memory cleaning process by tapping on the “Scan” or “Clean” button within the app. The app will analyze your tablet’s memory usage and identify files, cache, and processes that can be safely removed or optimized.
- Review and Confirm Cleaning: Once the scan is complete, the memory cleaner app will present a list of files or processes that it recommends cleaning. Review the list and make sure you’re comfortable with the cleaning actions.
- Start the Cleaning Process: Tap on the “Clean” or “Optimize” button to initiate the memory cleaning process. The app will delete unnecessary files, clear cache, and terminate background processes that are consuming memory.
- Regularly Use the Memory Cleaner App: To maintain optimal performance, consider using the memory cleaner app on a regular basis. This will help keep your tablet’s memory clean and efficient over time.
Using a memory cleaner app saves you the hassle of manually identifying and deleting unnecessary files and processes. It automates the cleaning process, allowing for a more thorough and efficient memory optimization on your tablet.
However, it’s important to use a reputable and trusted memory cleaner app from a reliable developer. Be cautious of apps that make unrealistic promises or require excessive permissions. Always read reviews and do some research before selecting a memory cleaner app for your tablet.
Now that you know how to use a memory cleaner app, let’s move on to the next step in cleaning your tablet’s memory.
Restart or Reset Your Tablet
If you’ve tried all the previous steps and still find that your tablet’s memory is not optimized, restarting or resetting your tablet can help resolve any underlying issues. Here are two options you can consider:
- Restart Your Tablet: Simply restarting your tablet can clear temporary files and refresh the device’s memory. To restart your tablet, press and hold the power button until the power menu appears. Then, select the restart option and wait for the device to reboot.
- Reset Your Tablet: If restarting doesn’t improve the memory performance, you can consider resetting your tablet to its factory settings. However, keep in mind that this will erase all data and settings on your device, so be sure to back up your important files before proceeding. To reset your tablet, navigate to the settings menu and look for the option called “Backup & Reset” or “Reset.” Follow the prompts to initiate the reset process.
Resetting your tablet to its factory settings should be done as a last resort, as it will erase all data and settings on your device. Make sure you have a proper backup of all your important files and data before proceeding with a reset.
Restarting your tablet is a less invasive option that can often resolve minor memory and performance issues. It is recommended to restart your device periodically or whenever you notice a decline in performance.
If you choose to reset your tablet, it is important to note that you will need to set it up again as if it were brand new. This includes configuring language settings, connecting to Wi-Fi, and reinstalling apps. Only reset your tablet if you have exhausted all other options and are still experiencing severe memory issues.
Now that you know how to restart or reset your tablet, it’s time to apply these steps and optimize the memory of your device.
Conclusion
Cleaning the memory of your tablet is crucial for maintaining optimal performance and maximizing storage capacity. By following the steps outlined in this guide, you can effectively free up space, improve speed, and enhance the overall functionality of your device.
We started by understanding the importance of cleaning tablet memory and the various benefits it offers. Clearing cache and app data, uninstalling unused apps, transferring files to external storage, and removing browser history and cookies are effective ways to declutter your tablet’s memory.
In addition, disabling or limiting background app refresh, deleting old messages and emails, and using a memory cleaner app can further optimize your tablet’s performance by conserving memory and improving overall responsiveness.
Lastly, if you’ve tried all the previous steps and still find your tablet’s memory is not optimized, restarting or resetting your device can help resolve underlying issues, although a reset should be considered as a last resort due to data loss.
Remember to take precautions before cleaning your tablet’s memory, such as backing up important data and researching cleaning tools or apps. Regularly performing memory cleaning tasks will ensure that your tablet remains clutter-free and functions at its best.
Now that you have the knowledge and steps to clean your tablet’s memory, go ahead and apply these techniques to optimize the performance and extend the lifespan of your device. Enjoy a faster and more efficient tablet experience!