Introduction
Welcome to this guide on how to change a solid state drive (SSD) on an HP 17-B220 NR laptop. Upgrading the storage on your laptop can significantly enhance its performance and allows you to store more files, applications, and media. An SSD offers faster boot times, improved data transfer speeds, and better overall system responsiveness compared to traditional hard disk drives (HDDs).
Before we proceed, it’s important to note that replacing the SSD requires basic technical skills and careful handling of computer components. If you are unsure or uncomfortable performing the steps outlined in this guide, it is recommended to seek professional assistance.
In this tutorial, we will walk you through the process step-by-step, providing detailed instructions and useful tips to ensure a successful SSD replacement. We will list the tools and materials you’ll need, guide you through the necessary preparations, and explain each step along the way. So, let’s get started!
Required Tools and Materials
Before we begin replacing the solid state drive on your HP 17-B220 NR laptop, let’s gather all the necessary tools and materials. Here’s what you will need:
- Small Phillips screwdriver: This will be used to remove screws that secure the laptop’s bottom cover.
- Anti-static wrist strap: It’s essential to protect sensitive electronic components from static electricity during the replacement process.
- SSD: Make sure you have the new SSD that you plan to install. Ensure that it’s compatible with your laptop model and has the desired storage capacity.
- SSD bracket or adapter: In some cases, the new SSD might require a bracket or adapter to properly fit into the slot.
- External storage device: If you want to transfer data from the old SSD to the new one, you’ll need an external storage device such as a USB flash drive or external hard drive.
- Grounding mat or surface: To provide an additional safeguard against static electricity, consider using a grounding mat or working on a static-free surface.
It’s important to have all these tools and materials ready before you start the replacement process. This will help you work efficiently and minimize the risk of damaging any components. Take a moment to gather them all, ensuring that you have everything you need.
Once you have everything prepared, we can move on to the next step: preparing for the replacement.
Step 1: Prepare for the Replacement
Before diving into the actual SSD replacement process, it’s important to properly prepare for the task. Follow these steps to ensure a smooth and successful replacement:
- Backup your data: Before making any changes to your laptop’s storage, it’s crucial to backup all your important data. This step will prevent data loss in case of any unexpected issues during the replacement process.
- Power off and unplug your laptop: Turn off your laptop and disconnect it from any power source. This step is essential to avoid electrical shocks or damage to the device while working on its internal components.
- Find a clean and well-lit workspace: Choose a spacious and clean area to work on your laptop. Make sure the surface is stable and well-lit, allowing you to comfortably perform the replacement without any distractions.
- Wear an anti-static wrist strap: To protect your laptop from static discharge, wear an anti-static wrist strap and connect it to a grounded object. This will prevent any potential damage to the sensitive electronic components.
- Organize and layout your tools: Arrange all the required tools and materials nearby for easy access during the replacement process. This will save time and minimize the chances of misplacing any essential components.
By following these preparatory steps, you can ensure a safer and more organized SSD replacement. Taking the time to back up your data and set up a suitable workspace will help you approach the following steps with confidence and reduce the risk of encountering any unnecessary complications.
Once you have completed the preparation, you are ready to proceed to the next step: powering off the laptop.
Step 2: Power Off the Laptop
Now that you have prepared for the SSD replacement, it’s time to power off your laptop. Follow these steps to safely shut down your device:
- Save and close all open files and applications: Before powering off your laptop, make sure to save any unsaved work and close all running applications. This will help prevent data loss and ensure a smooth transition.
- Disconnect from any power source: Unplug your laptop from the power adapter if it’s connected. This step is crucial to avoid any electrical hazards during the SSD replacement process.
- Shut down your laptop: Depending on your operating system, you can either click on the “Start” button and select “Shut Down,” or use the keyboard shortcut (e.g., Ctrl + Alt + Delete) to access the shutdown options. Follow the prompts to shut down your laptop completely.
- Wait for the laptop to power off: Once you initiate the shutdown process, give your laptop some time to power off completely. You may notice the screen turning off and the device becoming silent.
- Confirm that the laptop is powered off: Check if there are no lights or sounds indicating that the laptop is still on. You want to ensure that all power has been properly cut off before proceeding to the next step.
By following these steps, you can safely power off your laptop in preparation for the SSD replacement. It’s crucial to disconnect the power source and ensure that the laptop is fully shut down to avoid any potential damage to the device or risk to your safety.
Once you have powered off the laptop, you are ready to move on to the next step: removing the bottom cover.
Step 3: Remove the Bottom Cover
With the laptop powered off, it’s time to remove the bottom cover to access the internal components. Follow these steps to safely remove the bottom cover:
- Flip the laptop upside down: Carefully turn your laptop over, so the bottom part is facing upwards. Place it on a stable surface to ensure stability during the removal process.
- Locate the screws securing the bottom cover: Look for small screws around the edges or corners of the bottom cover. These screws may have arrow indicators or small icons next to them to help identify their locations.
- Remove the screws: Using a small Phillips screwdriver, carefully unscrew and remove all the screws that secure the bottom cover. Keep the screws in a safe place, as you will need them later for reassembly.
- Gently remove the bottom cover: Once all the screws are removed, gently pry the edges of the bottom cover with your fingers or a plastic opening tool. Be cautious not to apply excessive force to avoid damaging the cover or any internal components.
- Set aside the removed bottom cover: Place the removed bottom cover in a safe and clean location. You may want to put it on a soft cloth or an antistatic surface to prevent scratches or static damage.
By following these steps, you can successfully remove the bottom cover of your laptop, providing access to the internal components, including the solid state drive. Remember to keep the screws organized and handle the bottom cover with care to avoid any accidental damage.
Once you have removed the bottom cover, you are ready to proceed to the next step: locating the solid state drive.
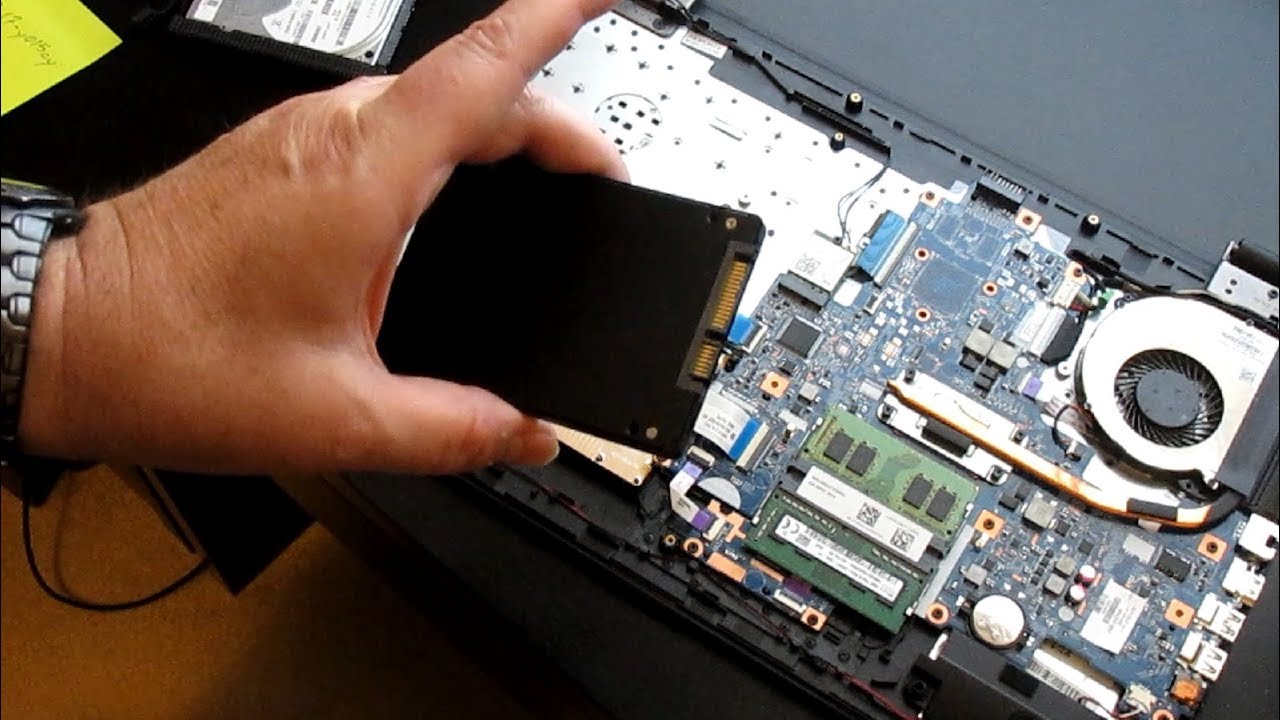
Step 4: Locate the Solid State Drive
Now that the laptop’s bottom cover is removed, it’s time to locate the solid state drive (SSD) inside your HP 17-B220 NR laptop. Follow these steps to find the SSD:
- Observe the internal components: Take a moment to observe the internal layout of your laptop. Look for any visible labels, markings, or indicators that could guide you to the location of the SSD. Keep in mind that the placement of components may vary depending on the specific laptop model.
- Refer to the laptop’s user manual: If you find it difficult to locate the SSD visually, consult the user manual or documentation provided with your laptop. The manual usually provides detailed information and diagrams illustrating the internal component locations.
- Search for the SSD slot: Look for a small rectangular slot that matches the size and shape of the SSD. It is typically positioned near the memory modules or close to the center of the laptop’s motherboard.
- Note any cables or connectors: Take note of any cables or connectors attached to the SSD. This will help you in the upcoming steps when it’s time to disconnect and remove the SSD.
Remember to approach this step with patience and caution. Take your time to locate the SSD accurately, ensuring that you don’t inadvertently disturb or damage any other components during the process.
Once you have successfully located the solid state drive, you are ready to proceed to the next step: disconnecting the SSD.
Step 5: Disconnect the SSD
With the solid state drive (SSD) located, it’s time to disconnect it from the laptop. Follow these steps to safely disconnect the SSD:
- Identify the connectors: Take a closer look at the SSD and locate the connectors. There are typically two connectors attached to the SSD: the power connector and the data connector.
- Disconnect the power connector: Gently pull the power connector away from the SSD to disconnect it. Be careful not to tug or pull forcefully to avoid damaging the connector or the SSD.
- Disconnect the data connector: Similarly, loosen and detach the data connector from the SSD. Use gentle force to wiggle it out if necessary. Take caution not to bend or misalign the connector pins during the process.
- Set the disconnected SSD aside: Place the disconnected SSD in a safe and static-free location. Handle it with care to prevent any physical damage.
It’s crucial to handle the SSD and its connectors delicately during the disconnection process. Applying unnecessary force or mishandling the connectors can result in damage or a poor reconnection later on. Take your time, be patient, and ensure a smooth disconnection.
Once the SSD is successfully disconnected, you are ready to proceed to the next step: removing the SSD from the bracket.
Step 6: Remove the SSD from the Bracket
With the solid state drive (SSD) disconnected, it’s time to remove it from the bracket. Follow these steps to safely remove the SSD from the bracket:
- Locate the SSD bracket: Take a look at the SSD and identify the bracket or frame that holds it in place. The bracket is typically secured by screws or small clips.
- Unscrew or unclip the bracket: If the bracket is held in place by screws, use a screwdriver to carefully remove them. If it’s secured by clips, gently manipulate and release them to detach the bracket from the SSD.
- Remove the SSD from the bracket: Once the bracket is detached, carefully slide or lift the SSD out from the bracket. Handle it with care to avoid dropping or damaging the SSD.
- Set aside the removed SSD and the bracket: Place the removed SSD and the bracket in a safe and clean location. Remember to keep them separate from any other components or clutter to avoid confusion during the reassembly process.
Take your time during this step to ensure a smooth removal of the SSD from the bracket. Double-check for any screws or clips that may still be holding the bracket in place before attempting to remove it. Patience and attention to detail will help avoid unnecessary complications.
Once the SSD is successfully removed from the bracket, you are ready to proceed to the next step: installing the new SSD.
Step 7: Install the New SSD
Now that the old SSD has been removed, it’s time to install the new solid state drive (SSD) in your HP 17-B220 NR laptop. Follow these steps to safely install the new SSD:
- Take the new SSD out of its packaging: Carefully unpack the new SSD and handle it with caution to avoid any damage.
- Align the new SSD with the bracket: If the new SSD requires a bracket or adapter, align it properly with the bracket or adapter. Make sure the screw holes on the SSD match the ones on the bracket or adapter.
- Secure the SSD to the bracket: If necessary, use screws or clips to secure the SSD to the bracket or adapter. Ensure a firm and stable connection.
- Align the SSD with the slot: Position the new SSD in alignment with the slot where the old SSD was located. Make sure it is properly aligned and seated in the slot.
- Push the SSD into the slot: Apply gentle pressure to slide the SSD into the slot until it is securely in place. Be careful not to force it or misalign it during this process.
Take your time during this step to ensure a proper installation of the new SSD. Check for any mismatched screw holes or misalignment issues before proceeding. Securely fitting the SSD into the slot will ensure a stable connection and optimal performance.
Once the new SSD is successfully installed, you are ready to proceed to the next step: reconnecting the SSD.
Step 8: Reconnect the SSD
With the new solid state drive (SSD) installed, it’s time to reconnect it to your HP 17-B220 NR laptop. Follow these steps to safely reconnect the SSD:
- Locate the connectors: Identify the power and data connectors on the SSD.
- Align the power connector: Align the power connector from the laptop with the corresponding port on the SSD.
- Connect the power connector: Gently insert the power connector into the port on the SSD until it is securely connected.
- Align the data connector: Align the data connector from the laptop with the corresponding port on the SSD.
- Connect the data connector: Carefully insert the data connector into the port on the SSD until it is securely connected.
During this step, it is important to handle the connectors with care to avoid bending or damaging them. Take your time to ensure proper alignment and a secure connection for both the power and data connectors.
Once the SSD is successfully reconnected, you are ready to proceed to the next step: replacing the bottom cover.
Step 9: Replace the Bottom Cover
With the solid state drive (SSD) reconnected, it’s time to replace the bottom cover of your HP 17-B220 NR laptop. Follow these steps to safely and securely replace the bottom cover:
- Retrieve the removed bottom cover: Pick up the bottom cover that you set aside earlier.
- Align the bottom cover: Position the bottom cover over the laptop’s chassis, ensuring it aligns with the screw holes and ports.
- Press down gently: Apply even pressure to the bottom cover, starting from the center and working your way around the edges. Make sure it is firmly seated and flush with the laptop’s chassis.
- Reinsert the screws: Using the small Phillips screwdriver, insert and tighten the screws into their respective screw holes. Start with the corner screws and work your way around, ensuring a secure fit without over-tightening.
Throughout this step, be careful not to damage any internal components or force the bottom cover into place. Take your time to properly align and secure the bottom cover, ensuring a snug fit that will protect the internal components of your laptop.
Once the bottom cover is successfully replaced and all screws are tightened, you are ready to proceed to the final step: powering on the laptop and testing the new SSD.
Step 10: Power On and Test the New SSD
With the bottom cover replaced, it’s time to power on your HP 17-B220 NR laptop and test the new solid state drive (SSD). Follow these steps to ensure the successful installation of the new SSD:
- Ensure the laptop is connected to power: Plug in the power adapter to provide a stable power source for the laptop.
- Press the power button: Locate the power button and press it to turn on the laptop.
- Observe the boot process: Pay attention to the startup screen and monitor the boot process. The laptop should start up smoothly and without any unusual errors or delays.
- Login and navigate through the operating system: Once the laptop finishes booting, log in to the operating system and navigate through different applications and files. Notice if the system feels faster and more responsive with the new SSD.
- Perform a speed test: To verify the improved performance of the new SSD, consider running a speed test or benchmark software specifically designed to measure storage drive performance. Compare the results with previous benchmarks if available.
- Transfer data (if needed): If you opted to keep the data from your previous SSD, you can now transfer it to the new SSD using an external storage device or other means.
During this final step, it is important to evaluate the performance of the new SSD and ensure that everything is functioning correctly. If you encounter any issues or abnormal behavior, double-check the connections and consult the user manual or manufacturer’s support documentation for troubleshooting steps.
Congratulations! You have successfully replaced the solid state drive on your HP 17-B220 NR laptop and tested the new SSD. Enjoy the improved performance and increased storage capacity that comes with the upgrade!
Conclusion
Congratulations! You have successfully completed the process of changing the solid-state drive (SSD) on your HP 17-B220 NR laptop. By following the step-by-step instructions outlined in this guide, you have upgraded your laptop’s storage, enhancing its performance and providing additional space for your files and applications.
Throughout the process, you backed up your data, prepared the necessary tools and materials, and carefully performed each step, including powering off the laptop, removing the bottom cover, locating and disconnecting the old SSD, installing the new SSD, reconnecting it, replacing the bottom cover, and finally, powering on and testing the new SSD.
Now, with the new SSD in place, you can enjoy faster boot times, improved data transfer speeds, and a more responsive system. Take the time to explore the enhanced performance of your laptop, navigate through the operating system, and run speed tests to verify the improved performance of the new SSD.
If you encounter any issues or have questions during the process or in the future, consult the user manual or reach out to the manufacturer’s support for assistance. They will be able to provide further guidance based on your specific laptop model.
Remember, upgrading the storage on your laptop is a valuable investment, providing long-lasting benefits for your computing experience. Enjoy the increased storage capacity, faster performance, and the opportunities it opens up for your work, entertainment, and creativity.
Thank you for following this guide, and we hope it has been informative and helpful. Happy computing with your new solid state drive!