Introduction
Welcome to this step-by-step guide on how to add a server rack to Visio. If you’re working on a network infrastructure project or need to create visual representations of server rooms or data centers, Visio is a powerful tool to help you design and diagram your technology infrastructure.
Adding a server rack to your Visio drawing allows you to accurately represent the physical layout of your servers, switches, and other network equipment. This not only makes your diagram more visually appealing but also helps in planning the placement and organization of your devices.
Whether you’re a network administrator, IT professional, or simply interested in learning how to use Visio for creating server diagrams, this guide will walk you through the process step-by-step.
In the following sections, we’ll cover everything from opening Visio and selecting the appropriate template to customizing the server rack shape, adding equipment, and labeling your diagram. By the end of this tutorial, you’ll have the skills and knowledge required to create professional-looking server rack diagrams in Visio.
So, without further ado, let’s dive into the world of Visio and learn how to add a server rack to your diagrams!
Step 1: Open Visio
The first step in adding a server rack to Visio is to open the Visio application on your computer. Visio is a part of the Microsoft Office suite and is commonly used for creating diagrams and visual representations of various processes and systems.
If you have Visio installed on your computer, simply locate the Visio icon in your list of applications or search for it using the search function in your operating system. Once you find the Visio application, click on it to open the program.
If you don’t have Visio installed on your computer, you will need to obtain a copy of the software. Visio is available as part of the Microsoft Office suite, or you can purchase it as a standalone product. Once you have obtained Visio, follow the installation instructions provided by Microsoft to install it on your computer.
After opening Visio, you will be greeted by the Visio Start screen. This screen provides various options for creating different types of diagrams. Here, you can either choose to create a new diagram or open an existing one. For our purpose of adding a server rack, select the option to create a new diagram.
Visio offers different templates for different types of diagrams. To add a server rack, we will use the predefined network template that provides shapes and stencils specifically designed for network infrastructure diagrams. Click on the “Network” category to view the available network templates.
Select the template that best fits your needs, such as “Basic Network Diagram” or “Detailed Network Diagram.” These templates already include the necessary shapes and stencils for creating server racks and other network equipment. Choose the template that suits your requirements and click “Create” to start your new diagram.
With Visio now open and a new diagram based on a network template created, we are ready to move on to the next step: locating the server rack shape.
Step 2: Choose a Template
Now that Visio is open and you have started a new diagram based on a network template, it’s time to choose the specific template that will provide you with the necessary shapes and stencils for adding a server rack to your diagram.
Visio offers a variety of network templates to choose from, each tailored for different types of network diagrams. To add a server rack, you’ll want to select a template that includes the appropriate shapes and stencils for representing network equipment.
When you’re on the Visio Start screen, look for the category labeled “Network” and click on it. This will show you all the available network templates that Visio offers.
Some popular network templates in Visio include:
- Basic Network Diagram: This template provides a simple and straightforward layout for creating network diagrams, including server racks.
- Detailed Network Diagram: This template offers a more extensive range of shapes and stencils, allowing for more detailed and intricate network diagrams.
- ITIL Process Map: If you are working within the ITIL framework, this template provides shapes and stencils specific to IT service management processes, including server racks.
These are just a few examples, and there are other network templates available in Visio. Take some time to explore the different templates and choose the one that best suits your needs.
Once you have decided on a template, click on it to select it. Visio will then open a new diagram based on the chosen template, with the relevant shapes and stencils readily available for you to use.
Choosing the right template is crucial because it ensures that you have the appropriate resources to create your server rack diagram efficiently. With the template selected, you are now ready to proceed to the next step: locating the server rack shape.
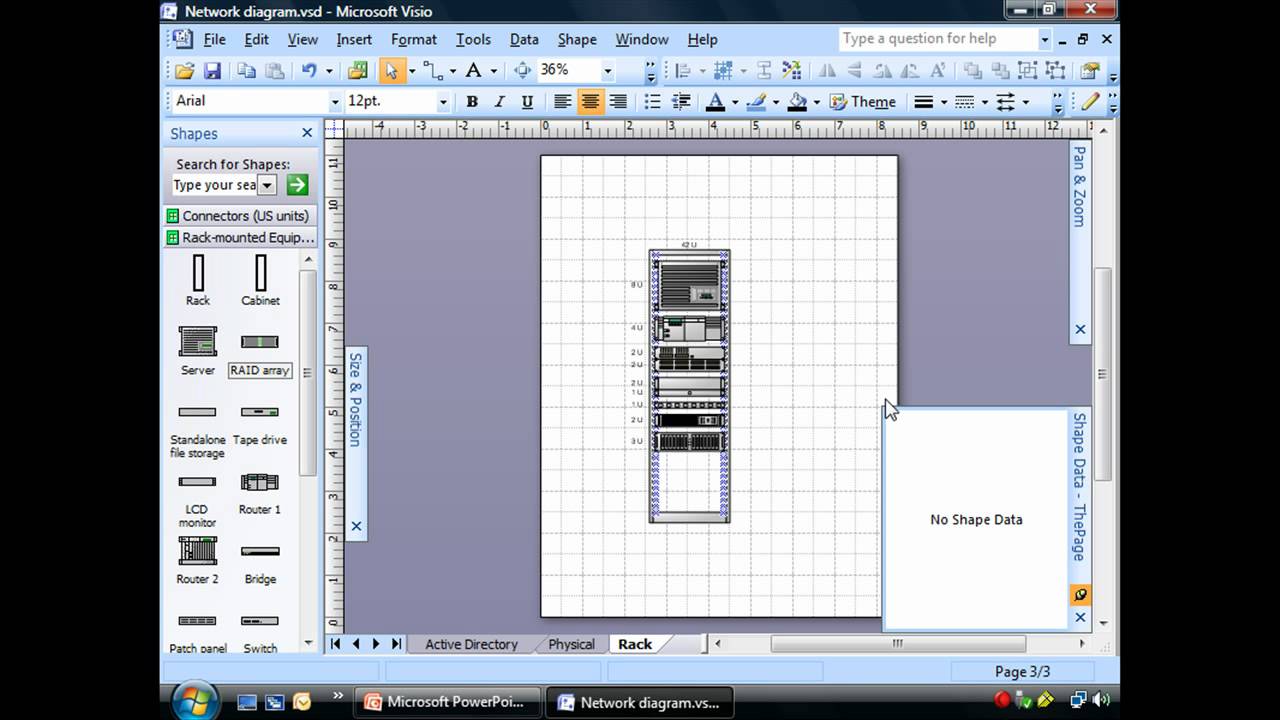
Step 3: Locate the Server Rack Shape
After selecting the appropriate template for your network diagram, the next step is to locate the server rack shape within Visio. The server rack shape is the fundamental element that you will use to represent your server rack in the diagram.
To find the server rack shape, you will need to navigate through the various stencils that are included within the chosen template.
In Visio, stencils are collections of related shapes that are grouped together. Stencils can be accessed from the left-hand side of the Visio workspace, usually in a pane called the “Shapes window” or the “Stencil window.”
Look for the stencil related to network equipment or server racks. The specific name or label of the stencil may vary depending on the template you have selected, but it is generally labeled intuitively to indicate its purpose.
If the stencil pane is not visible, you can easily open it by going to the “View” tab in the toolbar and clicking on the “Task Panes” option. This will display a drop-down menu where you can select the “Shapes” option to open the stencil pane.
Once the stencil pane is visible, browse through the available stencils until you find the one that contains the server rack shape. The shape might be labeled as “Server Rack” or “Rack Mount” or have a related term that clearly indicates it represents a server rack.
If you are unsure which stencil contains the server rack shape, you can use the search function within the stencil pane. Look for a search field or a search icon within the stencil pane, enter relevant keywords like “server rack,” and press Enter. Visio will filter the available shapes and stencils to display the ones that match your search criteria.
Once you have located the server rack shape within the stencil pane, you can proceed to the next step, which involves adding the server rack shape to your diagram.
Step 4: Add the Server Rack Shape to the Drawing
Now that you have located the server rack shape within the Visio stencil pane, it’s time to add it to your network diagram. Adding the server rack shape will create the foundation for representing your server rack in the diagram.
To add the server rack shape to your drawing, simply select it from the stencil pane. Click and drag the shape onto the drawing canvas, which is the white space in the center of the Visio workspace.
Position the server rack shape in the desired location on the canvas. You can move it around by clicking and dragging it with your mouse. Take into consideration the layout and organization of your network diagram, ensuring that the server rack is placed in a logical position.
Visio allows you to resize and reshape the server rack shape to better fit your diagram’s design. If you need to adjust the dimensions or proportions of the server rack, click on one of the selection handles on its edges or corners. Clicking and dragging on these handles will resize the server rack shape accordingly.
It’s important to note that the server rack shape in Visio is a basic representation of an actual server rack. Depending on the template you chose, it may vary in its level of detail and accuracy. Feel free to customize the server rack shape further in the next step to match your specific requirements.
Once you have added the server rack shape to your diagram and positioned it accordingly, you are ready to move on to the next step: customizing the server rack.
Step 5: Customize the Server Rack
Now that you have added the server rack shape to your network diagram, it’s time to customize it to match your specific requirements and make it visually appealing.
Visio provides several customization options that allow you to modify the appearance of the server rack shape. You can change its color, add text labels, adjust the spacing between rack units, and even add additional accessories or components.
To customize the server rack shape, start by selecting the shape on the drawing canvas. Click on the shape to highlight it, and you will notice handles or control points that allow for adjustment and customization.
To change the color of the server rack shape, you can use the formatting options available in the Visio toolbar. Navigate to the “Home” tab, and you will find various options to modify the shape’s fill color, outline color, and line weight.
To add text labels, double-click on the server rack shape, and a text box will appear. Enter the desired label or description for the server rack, such as its name or purpose. You can customize the font style, size, and alignment of the text by using the text formatting options provided in the toolbar.
If you want to adjust the spacing between rack units, you can do so by clicking on the server rack shape and selecting the “Shape Data” or “Property” option, depending on the version of Visio you are using. Look for the option that allows you to modify the rack unit height, and enter the desired value to increase or decrease the spacing between units.
Moreover, you can enhance the server rack shape by adding additional components or accessories, such as servers, switches, or cable management panels. Visio offers a wide range of pre-designed shapes and stencils for these devices. Simply locate the desired shape in the stencil pane, and drag and drop it onto the server rack shape in your diagram.
By customizing the server rack shape, you can create a diagram that accurately represents your specific server infrastructure, making it easier to understand and visually appealing.
Once you have finished customizing the server rack, you can proceed to the next step: adding equipment to the server rack.
Step 6: Add Equipment to the Server Rack
Now that you have customized the server rack shape in your Visio diagram, it’s time to populate it with the appropriate equipment that will be housed in your physical server rack.
Visio offers a wide range of pre-designed shapes and stencils for various network equipment, such as servers, switches, routers, and storage devices. These shapes can be easily added to the server rack shape in your diagram to represent the actual equipment that will be installed in your server rack.
To add equipment to the server rack, start by browsing through the available shapes and stencils in the Visio stencil pane. Look for the category that includes the specific equipment you want to add, such as “Servers,” “Switches,” or “Storage.”
Once you have located the desired equipment shape, simply click and drag it onto the server rack shape in your diagram. Position the equipment shape within the server rack, aligning it with the appropriate rack units and ensuring that it fits within the available space.
You can add multiple equipment shapes to the server rack, representing the different devices that will be housed in your physical server rack. Arrange them according to your desired configuration, considering factors such as power supply, cable management, and accessibility.
Visio also allows you to resize and reshape the equipment shapes to better match your specific requirements. Click on the equipment shape to select it, and use the selection handles on its edges or corners to adjust its dimensions as needed.
As you add equipment to the server rack, consider labeling each device to provide clarity and organization in your diagram. Double-click on the equipment shape, and a text box will appear. Enter the relevant information, such as the device’s name, model number, or function.
By adding equipment to the server rack in your Visio diagram, you can create an accurate representation of your physical server infrastructure. This not only helps in visualizing the layout of your equipment but also aids in troubleshooting, capacity planning, and documentation.
With the equipment added to the server rack, you are now ready to proceed to the next step: labeling the server rack and equipment.
Step 7: Label the Server Rack and Equipment
After adding equipment to the server rack in your Visio diagram, it is essential to label both the server rack itself and the individual equipment. Labeling provides important information and context, making it easier to understand and navigate the diagram.
To label the server rack, click on the shape to select it. Then, double-click on the server rack shape, and a text box will appear. Enter a descriptive label for the server rack, such as its location or purpose.
Additionally, you can customize the appearance of the server rack label by changing the font style, size, and alignment. Use the text formatting options provided in the Visio toolbar to make the label stand out and easily readable.
Next, label the individual equipment in the server rack. Select each equipment shape individually, and double-click on it to reveal a text box. Enter the relevant information for each piece of equipment, such as its name, IP address, or function.
Similar to the server rack label, you can customize the appearance of the equipment labels to enhance readability. Adjust the font style, size, and alignment to match your diagram’s design and ensure clarity.
Labeling the server rack and equipment serves multiple purposes. It helps you quickly identify and locate specific devices in the diagram, especially when troubleshooting or performing maintenance tasks. Moreover, it aids in documentation and communication by providing important information about the equipment housed in the server rack.
Remember to place the labels appropriately, ensuring they are positioned near the corresponding server rack or equipment shape, making the diagram clear and intuitive to follow.
With the server rack and equipment labeled in your Visio diagram, you can now move on to the final step: saving and exporting the drawing.
Step 8: Save and Export the Drawing
Now that you have completed creating your server rack diagram in Visio, it’s important to save your work and consider the various options for exporting and sharing the drawing.
To save your Visio drawing, navigate to the “File” tab in the Visio toolbar and click on the “Save” or “Save As” option. Choose a location on your computer or network where you want to store the file, provide a descriptive name, and select the appropriate file format (e.g., .vsdx for Visio files). Click “Save” to save your drawing.
Saving your Visio drawing allows you to come back to it later and make any necessary modifications or additions. You can also use the save feature to create different versions of the diagram as you make revisions or update the server rack configuration.
When it comes to sharing your Visio diagram with others who may not have Visio installed, you have several options for exporting the drawing to a different file format. Visio supports various file formats that are widely accessible, making it easier to share your diagram with colleagues, clients, or other stakeholders.
One common option is to export the diagram as a PDF (Portable Document Format) file. PDFs can be opened and viewed on most devices without requiring specialized software. To export your diagram as a PDF, go to the “File” tab, select “Save As,” and choose the PDF format from the available options.
You can also export your Visio diagram as an image file, such as JPEG or PNG, which can be easily inserted into other documents or presentations. To export your diagram as an image, go to the “File” tab, select “Save As,” and choose the desired image format from the available options.
Another option is to export the diagram as a web page, which allows for interactive navigation and exploration. To export your diagram as a web page, go to the “File” tab, select “Save As,” and choose the HTML format.
Considering the intended audience and purpose of sharing the diagram, choose the appropriate export option that best suits your needs.
By saving and exporting your Visio drawing, you can easily share your server rack diagram with others and collaborate effectively on network infrastructure projects or documentation.
With this final step completed, you have successfully learned how to add a server rack to Visio and create a detailed and visually appealing diagram to represent your technology infrastructure.
Conclusion
Congratulations! You have now learned how to add a server rack to Visio and create professional-looking diagrams for your network infrastructure projects. By following the step-by-step guide, you have gained the knowledge and skills to accurately represent the physical layout of your server rooms or data centers using Visio’s powerful visualization tools.
We began by opening Visio and selecting the appropriate template for our network diagram. Then, we located the server rack shape within the stencil pane and added it to the drawing canvas. Customization played a crucial role, allowing us to adjust the appearance, dimensions, and spacing of the server rack. We then went on to add equipment to the server rack, labeling each component for clarity and organization.
Finally, we saved our diagram to preserve our work and explored various export options for sharing it with others who may not have access to Visio. Whether exporting as a PDF, image file, or web page, we have the flexibility to share our diagram in a format that suits our audience and communication needs.
By utilizing Visio’s features and capabilities, you can create clear and comprehensive server rack diagrams that aid in planning, troubleshooting, and documentation. Visualizing your network infrastructure in this way ensures efficient communication and collaboration among team members, helping to streamline network management and maintenance.
Remember to practice and experiment with Visio’s features to further enhance your diagramming skills. Explore additional templates and shapes that are available to meet specific project requirements, and continue refining your diagrams for optimum clarity and visual impact.
Adding a server rack to Visio is just the beginning. With your newfound knowledge, you can delve deeper into the world of network diagramming, exploring other aspects of infrastructure visualization and expanding your proficiency in Visio. Keep exploring and utilizing this powerful tool to effectively communicate your network designs and strategies.
Now, go ahead and put your skills to use. Start creating impactful server rack diagrams with Visio and unlock new possibilities in network infrastructure planning and management!