Introduction
Chromebooks have gained popularity in recent years due to their affordability, simplicity, and fast performance. These lightweight laptops powered by Google’s Chrome OS provide a convenient and efficient way to browse the internet, create documents, and perform various tasks. However, one limitation of Chromebooks is their limited built-in storage capacity. Luckily, many Chromebooks come equipped with an SD card slot, which allows users to expand their storage space and access important files and media.
In this article, we will guide you through the process of accessing an SD card on your Chromebook. Whether you need to transfer photos, videos, or documents, or simply want to increase your available storage, accessing the SD card on your Chromebook is a straightforward process that can significantly enhance your device’s functionality. By following a few simple steps, you’ll be able to seamlessly view, manage, and transfer files between your Chromebook and SD card.
Before we dive into the steps, it’s important to note that the process may vary slightly depending on your specific Chromebook model and the version of Chrome OS you’re using. However, the general steps and concepts discussed in this guide should apply to most Chromebooks. Now, let’s get started on accessing that SD card!
Why access SD card on Chromebook?
There are several reasons why you may want to access an SD card on your Chromebook:
- Expanded storage: Chromebooks typically come with limited built-in storage space. By accessing an SD card, you can instantly expand your storage capacity and store more files, such as photos, videos, and documents.
- Portability: Extracting an SD card from another device, such as a digital camera or smartphone, and inserting it into your Chromebook allows you to access media files and documents on the go without having to carry multiple devices.
- Backup and file transfer: Accessing an SD card on your Chromebook enables you to back up important files, create duplicates, or transfer files between devices quickly and easily.
- Organized file management: The SD card provides a separate storage location, allowing you to organize files and keep them separate from your Chromebook’s internal storage. This can be particularly useful for users who require additional storage for specific purposes such as photography or video editing.
Whether you need more storage space, want to access files from other devices, or simply want to keep your files organized, accessing an SD card on your Chromebook provides the flexibility and convenience you need.
Now that we’ve explored the reasons for accessing an SD card on your Chromebook, let’s proceed to the step-by-step guide on how to access the SD card and manage your files effectively.
Step 1: Insert the SD card into your Chromebook
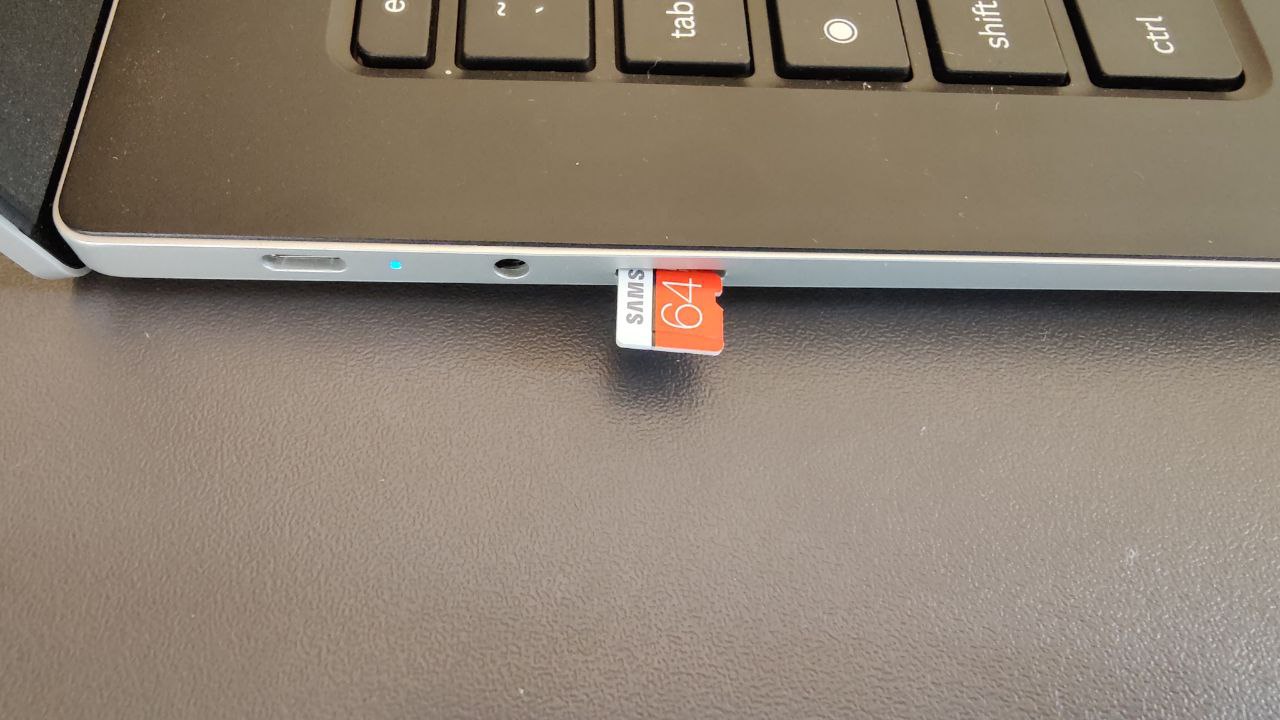
The first step in accessing the SD card on your Chromebook is to physically insert the SD card into the appropriate slot. Most Chromebooks come with a built-in SD card slot, usually located on the side or the back of the device. Here’s how to do it:
- Locate the SD card slot on your Chromebook. It is usually labeled with an SD card icon.
- Gently push the SD card into the slot until you hear a click or feel it securely in place.
- Ensure that the SD card is properly inserted and not protruding from the slot.
Once the SD card is inserted correctly, your Chromebook should recognize it and make it available for access. You are now ready to move on to the next step.
Note: If your Chromebook does not have a built-in SD card slot, you can use a USB SD card reader to insert the SD card into a USB port on the Chromebook. The rest of the steps will remain the same.
Let’s move on to the next step, where we will show you how to access the files on your SD card using the Files app on your Chromebook.
Step 2: Accessing the Files app
After inserting the SD card into your Chromebook, it’s time to access the files stored on the card. Chrome OS comes equipped with a built-in Files app that allows you to browse and manage files on your device, including the SD card. Follow these steps to access the Files app:
- Click on the “Launcher” button located in the bottom-left corner of your Chromebook’s screen. This is the circular button with a dot inside.
- In the search bar at the top of the Launcher, type “Files” and press Enter.
- The Files app will open, displaying your Chromebook’s internal storage and any attached external storage devices, including the SD card.
- Click on the name of the SD card to access its contents.
Once you’ve successfully accessed the Files app and the SD card contents, you can start viewing and managing the files stored on the card. In the next step, we will explore how to perform various actions, such as copying, moving, and deleting files on the SD card using the Files app.
Note: If you do not see the SD card listed in the Files app, try reinserting the SD card or restarting your Chromebook. If the issue persists, check if the SD card is properly formatted and compatible with your device.
Now that you’re in the Files app and have access to the SD card, let’s proceed to the next step where we’ll learn how to view and manage files on the SD card.
Step 3: Using the Files app to view and manage SD card files
Now that you have accessed the Files app and opened the SD card on your Chromebook, you can view and manage the files stored on the card. The Files app provides various options to help you organize and manipulate your files effectively. Follow the steps below to view and manage SD card files:
- In the Files app, you will see a list of files and folders stored on the SD card. To view the contents of a folder, simply click on its name.
- If you want to navigate back to the previous folder, you can click on the folder icon in the top-left corner of the Files app.
- You can sort the files by name, size, or modification date by clicking on the respective column header at the top of the file list.
- To select multiple files at once, hold down the “Ctrl” key on your keyboard and click on each file you want to select. Alternatively, you can use the “Shift” key to select a range of consecutive files.
- Once you have selected files, you can perform various actions on them. Right-click on the selected files to access the context menu, where you will find options such as copying, moving, renaming, and deleting files.
- If you want to create a new folder on the SD card to further organize your files, right-click in the Files app and select “New folder.” Give the folder a name and press Enter.
The Files app also allows you to preview certain file types, such as images and PDFs, by clicking on them. This can be useful for quickly checking the contents of a file without opening a separate application.
Now that you know how to use the Files app to view and manage files on your SD card, let’s move on to the next step, which covers transferring files to and from the SD card.
Step 4: Transferring files to and from the SD card
Transferring files between your Chromebook’s internal storage and the SD card is a straightforward process using the Files app. Follow these steps to transfer files to and from the SD card:
- In the Files app, navigate to the location where the file you want to transfer is stored. This could be in the internal storage or another external storage device.
- Select the file or files you want to transfer by clicking on them. To select multiple files, hold down the “Ctrl” key on your keyboard and click on each file.
- Right-click on the selected file(s) and choose “Copy” from the context menu. Alternatively, you can use the keyboard shortcut “Ctrl+C” to copy the file.
- Go back to the main Files app screen and click on the name of the SD card to access its contents.
- Right-click in the SD card folder where you want to transfer the file(s) and choose “Paste” from the context menu. Alternatively, you can use the keyboard shortcut “Ctrl+V” to paste the file.
The selected file(s) will now be transferred from the source location (internal storage or another external storage device) to the SD card.
To transfer files from the SD card to your Chromebook’s internal storage or another external storage device, follow the same steps, but reverse the source and destination locations.
It’s important to note that transferring large files or a large number of files may take some time, depending on the speed of the SD card and the file size. Be patient and let the transfer process complete before disconnecting or using the files.
Now that you know how to transfer files to and from the SD card, let’s move on to the final step, which covers safely ejecting the SD card from your Chromebook.
Step 5: Ejecting the SD card safely
Once you are done accessing and transferring files to and from the SD card on your Chromebook, it’s important to eject the SD card safely to prevent data loss or damage. Follow these steps to safely eject the SD card:
- Make sure all file transfer operations involving the SD card are complete.
- In the Files app, click on the arrow beside the name of the SD card in the sidebar on the left.
- A list of available external storage devices, including the SD card, will appear. Click on the eject icon beside the name of the SD card.
- A notification will pop up, indicating that it is safe to remove the SD card. It is essential to wait for this notification before physically removing the SD card from the slot.
- Once the notification appears, gently push the SD card to eject it from the slot or remove the USB SD card reader from the USB port.
By following these steps and safely ejecting the SD card, you ensure that all data has been written and saved properly before physically removing the card from your Chromebook. This helps prevent data loss or potential damage to the SD card.
Remember to handle the SD card with care and store it in a safe place when not in use. This can prolong its lifespan and protect the data stored on it.
With the SD card safely ejected from your Chromebook, you have completed all the steps necessary to access, manage, and transfer files on the SD card. Enjoy the expanded storage and convenience that comes with accessing an SD card on your Chromebook!
Conclusion
Accessing an SD card on your Chromebook expands your storage capacity and allows you to conveniently manage and access files. Throughout this guide, we have outlined the step-by-step process of accessing the SD card on your Chromebook, from inserting the card to safely ejecting it. Here is a quick recap of the steps:
- Insert the SD card into your Chromebook through the SD card slot or a USB SD card reader.
- Access the built-in Files app on your Chromebook to view and manage files on the SD card.
- Use the Files app to navigate through folders, sort files, and perform various file management actions.
- Transfer files to and from the SD card by copying and pasting them using the Files app.
- Eject the SD card safely by clicking on the eject icon in the Files app and waiting for the notification before physically removing the card.
By following these steps, you can make the most of your Chromebook’s storage capabilities and seamlessly manage your files. Whether you need additional storage space, want to backup important files, or organize your files more efficiently, accessing the SD card on your Chromebook offers a simple and practical solution.
Remember to handle the SD card with care and store it in a safe place when not in use to prolong its lifespan and protect your data. With the expanded storage and enhanced file management options provided by your Chromebook’s SD card, you can work, create, and enjoy multimedia content with ease.
Now that you have gained a comprehensive understanding of accessing the SD card on your Chromebook, you are ready to take full advantage of this additional storage resource and make the most of your device’s capabilities!


