Check Current Version of Safari
Before proceeding with any updates, it's crucial to verify the current version of Safari on your iPad. This simple step ensures that you have a clear understanding of the existing software and can take appropriate action to bring it up to date.
To check the current version of Safari on your iPad, follow these steps:
-
Open Settings: Locate the "Settings" app on your iPad's home screen and tap to open it.
-
Navigate to Safari Settings: Scroll down the left-hand menu until you find "Safari" listed. Tap on "Safari" to access its settings.
-
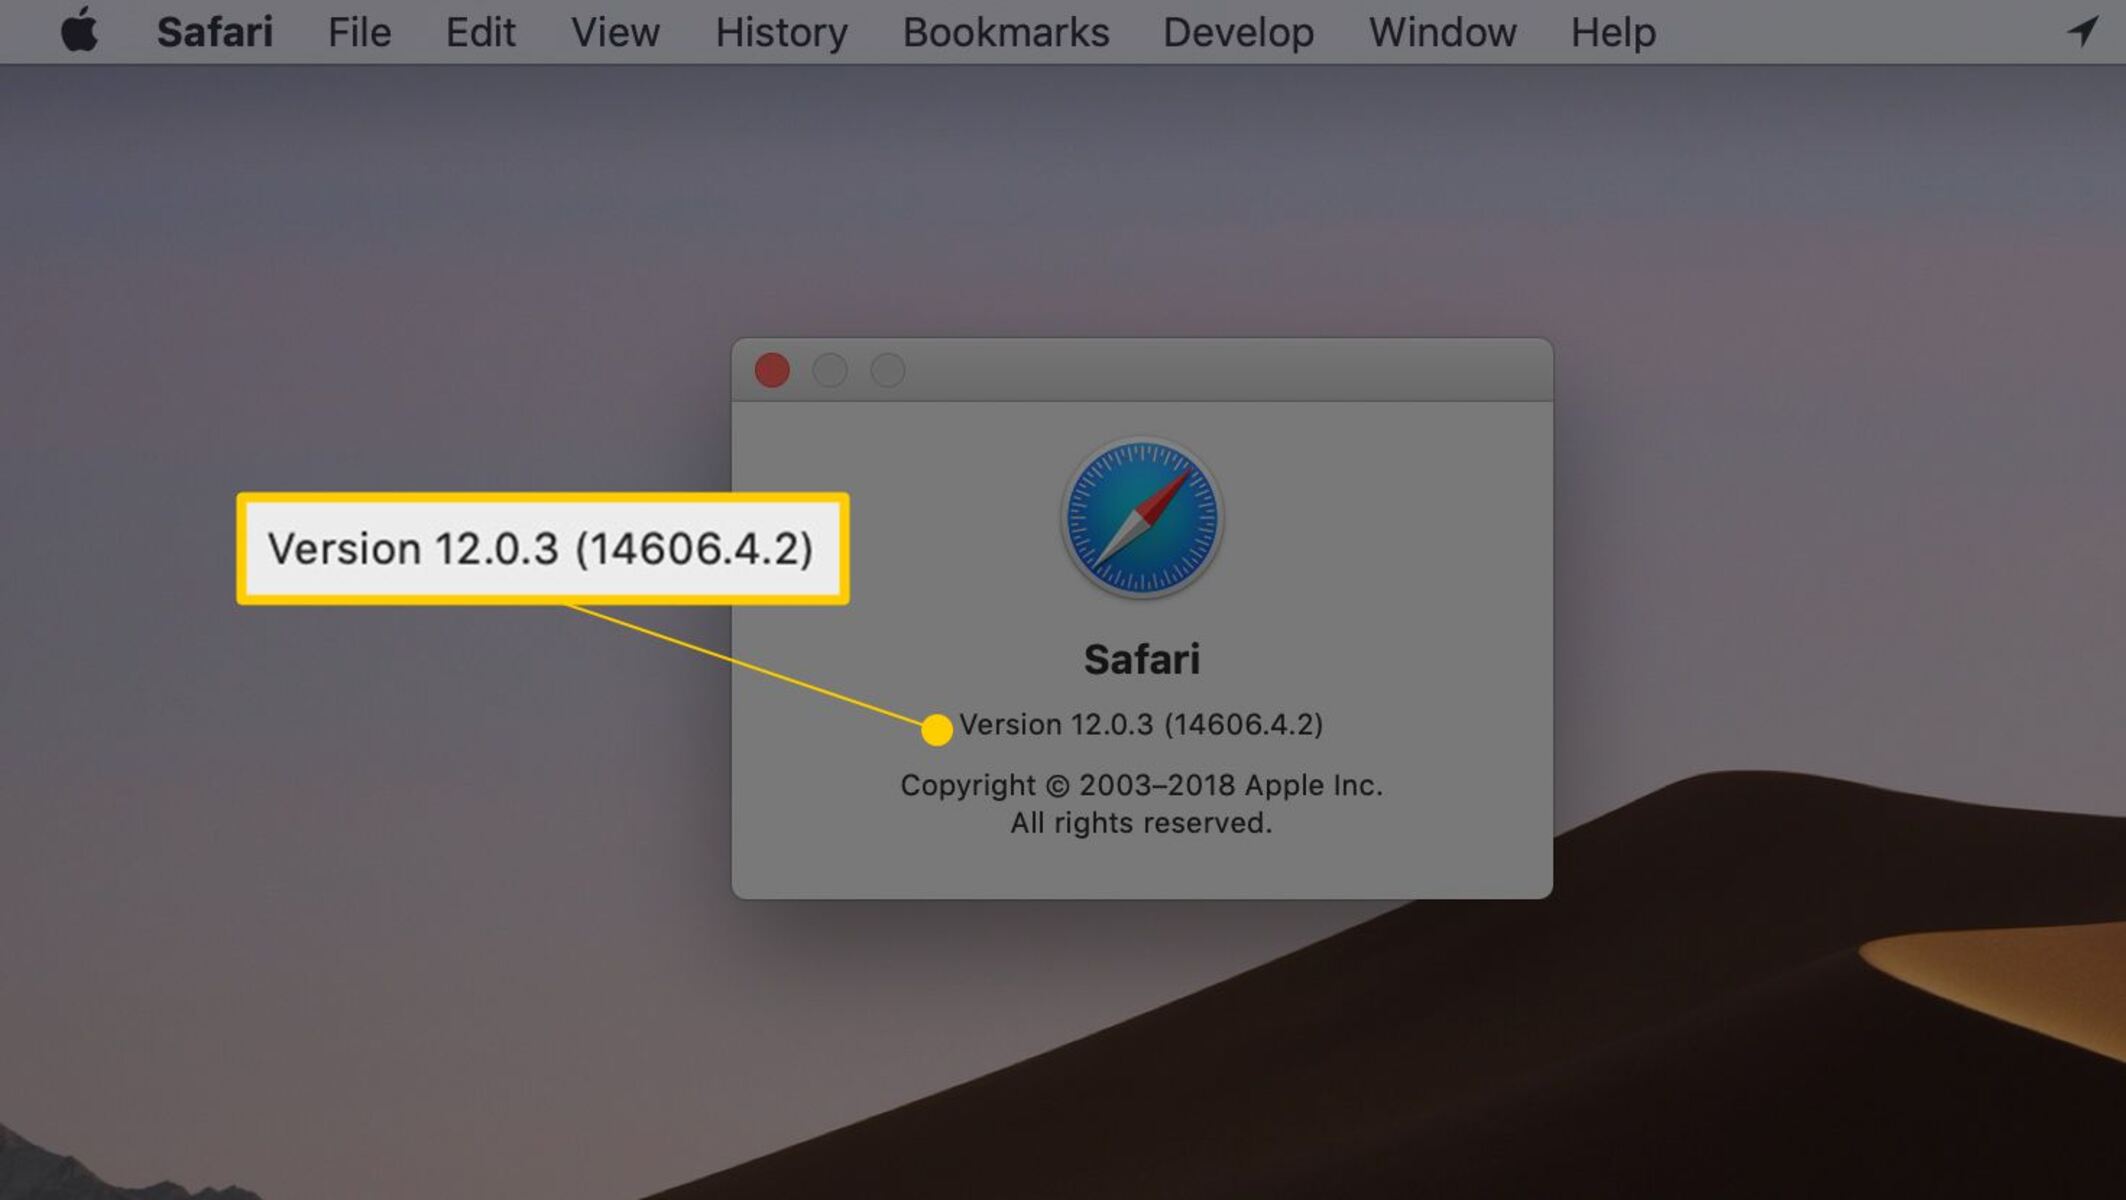
About Safari: Within the Safari settings, scroll down until you see "About Safari." Tap on this option to reveal detailed information about the current version of Safari installed on your iPad.
-
Check the Version: The "About Safari" section will display the current version number of Safari running on your iPad. Take note of this version number for reference.
By following these steps, you can easily determine the current version of Safari on your iPad. This information serves as a starting point for ensuring that your Safari browser is running the latest and most secure version available.
Once you have confirmed the current version of Safari, you can proceed with the necessary updates to ensure optimal performance and security for your browsing experience.
Update iPad Software
Updating the software on your iPad is a fundamental step in ensuring that all applications, including Safari, run smoothly and securely. Apple regularly releases software updates to enhance performance, introduce new features, and address potential vulnerabilities. By keeping your iPad's software up to date, you not only benefit from the latest improvements but also safeguard your device against security threats.
To update the software on your iPad, follow these steps:
-
Connect to a Stable Wi-Fi Network: Before initiating the software update, ensure that your iPad is connected to a stable Wi-Fi network. This is essential as software updates are typically large in size and may consume a significant amount of data.
-
Access the Settings Menu: From your iPad's home screen, locate and tap the "Settings" app to access the device's settings.
-
Navigate to General Settings: Within the Settings menu, scroll down and select "General" to access the general settings of your iPad.
-
Check for Software Update: In the General settings, tap on "Software Update." Your iPad will then check for available updates. If an update is available, you will be prompted to download and install it.
-
Download and Install the Update: If a software update is available, tap "Download and Install" to initiate the update process. Ensure that your iPad is sufficiently charged or connected to a power source to prevent any interruptions during the update.
-
Enter Passcode (if required): Depending on your iPad's settings, you may be prompted to enter your passcode to proceed with the update.
-
Agree to Terms and Conditions: Review the terms and conditions, and if you agree, tap "Agree" to commence the installation of the software update.
-
Wait for the Update to Complete: The update process may take some time, depending on the size of the update and the speed of your internet connection. It is important to be patient and allow the update to complete without interruption.
-
Restart Your iPad: Once the update is successfully installed, your iPad will restart to apply the changes. After the restart, your device will be running the latest version of the software.
By following these steps, you can ensure that your iPad's software is up to date, providing a stable and secure environment for all installed applications, including Safari. Regularly checking for and installing software updates is a proactive measure that contributes to the overall performance and security of your iPad.
Update Safari App from App Store
Updating the Safari app from the App Store is a crucial step in ensuring that you have the latest features, security enhancements, and bug fixes for an optimal browsing experience on your iPad. Apple frequently releases updates for its native apps, including Safari, to address performance issues, introduce new functionalities, and enhance security measures. By regularly updating the Safari app, you can stay ahead of potential vulnerabilities and benefit from the latest improvements.
To update the Safari app from the App Store on your iPad, follow these simple steps:
-
Open the App Store: Locate the App Store icon on your iPad's home screen and tap to open it. The App Store serves as the central hub for discovering, downloading, and updating applications on your device.
-
Navigate to the Updates Tab: Once the App Store is open, tap on the "Updates" tab located at the bottom of the screen. This tab displays a list of available updates for all installed apps, including Safari.
-
Find Safari in the Update List: Scroll through the list of available updates to locate the Safari app. If an update is available for Safari, it will be listed with an "Update" button next to it.
-
Initiate the Update: Tap the "Update" button next to the Safari app. This action will prompt the update process to begin. Depending on the size of the update and your internet connection speed, the download and installation process may take some time.
-
Enter Apple ID Password (if prompted): If prompted, enter your Apple ID password to authenticate the update. This step is necessary to ensure the security of your account and authorize the installation of the update.
-
Wait for the Update to Complete: Once the update is initiated, allow the App Store to download and install the latest version of the Safari app. It's important to remain connected to a stable Wi-Fi network throughout the update process.
-
Verify the Update: After the update is successfully installed, the "Update" button next to Safari will be replaced with an "Open" button, indicating that the app is now running the latest version.
By following these steps, you can easily update the Safari app from the App Store, ensuring that you have access to the most recent features and security enhancements. Keeping Safari up to date is essential for a seamless and secure browsing experience on your iPad. Regularly checking for updates in the App Store and installing them promptly is a proactive measure that contributes to the overall performance and security of the Safari browser.
Clear Safari Cache and Data
Clearing the cache and data in Safari on your iPad can significantly improve the browser's performance and resolve issues related to slow loading times, unresponsive pages, or excessive memory usage. The cache and data stored by Safari include temporary files, cookies, browsing history, and other website data. While these elements are designed to enhance the browsing experience by speeding up page loading and providing personalized content, they can accumulate over time and impact the browser's efficiency. Clearing the cache and data allows Safari to start fresh, potentially resolving any underlying issues and optimizing its functionality.
To clear the cache and data in Safari on your iPad, follow these steps:
-
Open the Settings App: Locate the "Settings" app on your iPad's home screen and tap to open it.
-
Access Safari Settings: Scroll down the left-hand menu until you find "Safari" listed. Tap on "Safari" to access its settings.
-
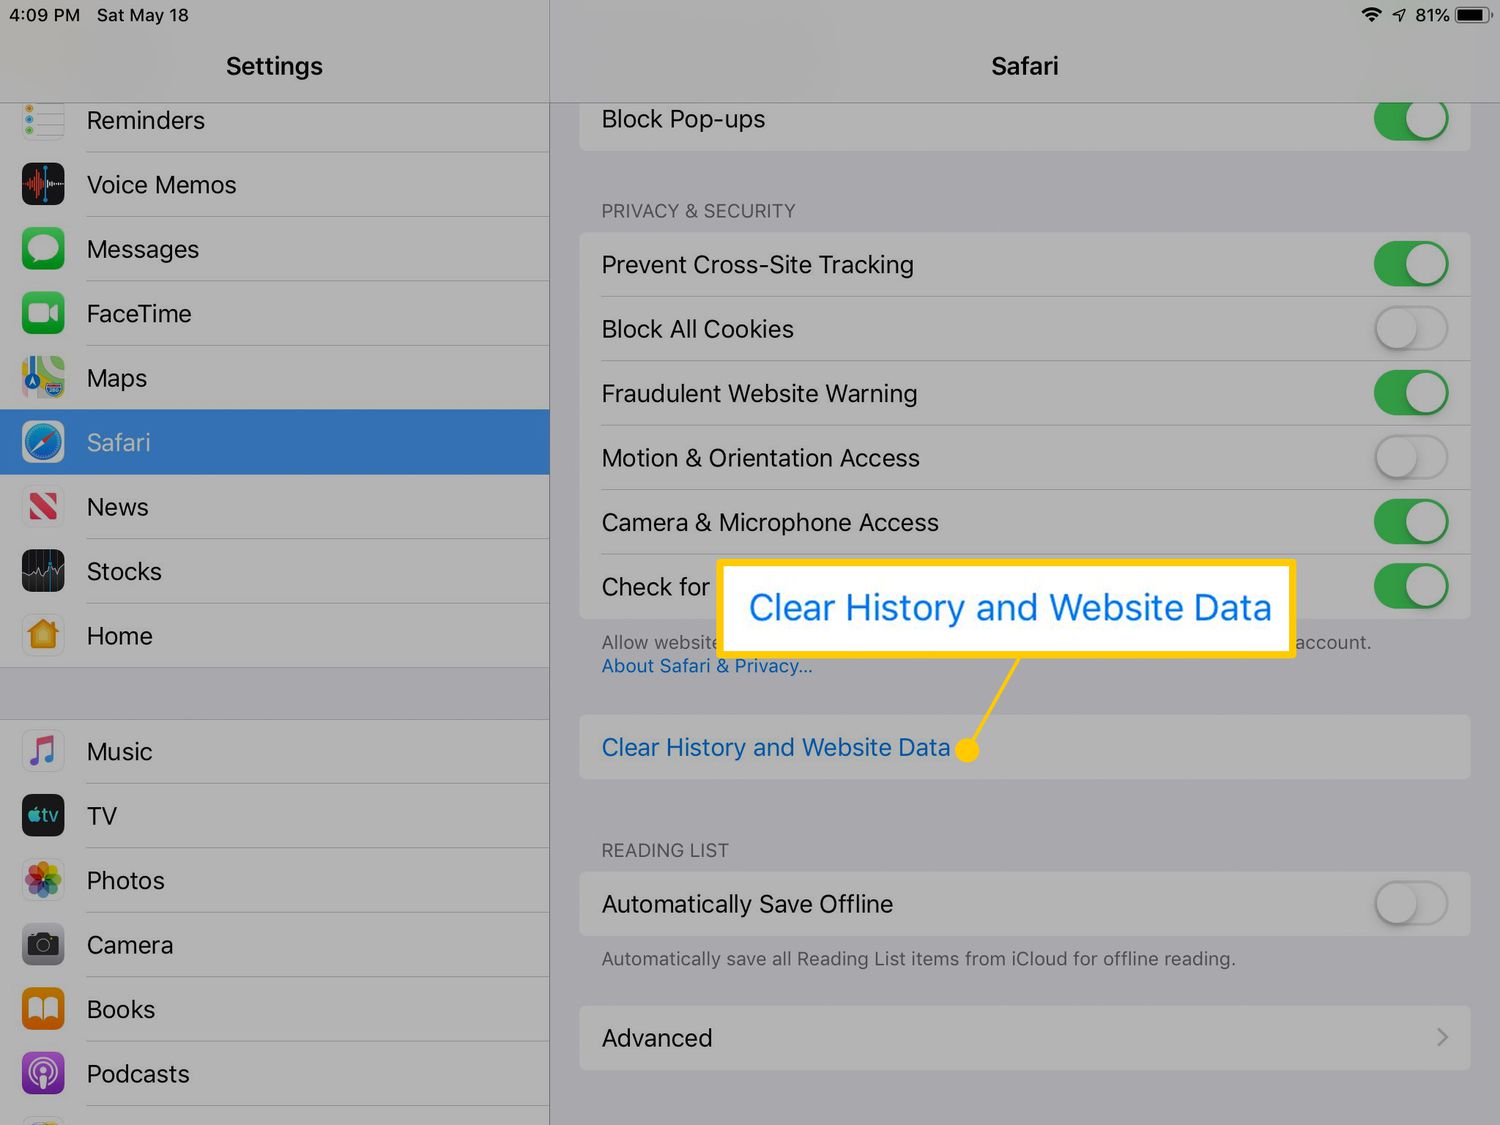
Clear History and Website Data: Within the Safari settings, tap on "Clear History and Website Data." A confirmation prompt will appear, asking if you want to clear history and data. Tap "Clear History and Data" to proceed.
-
Confirm the Action: Another confirmation prompt will appear, ensuring that you want to clear history and website data. Tap "Clear History and Data" to confirm the action.
By following these steps, you can effectively clear the cache and data in Safari on your iPad, providing a fresh start for the browser. It's important to note that clearing the cache and data will remove browsing history, cookies, and other website data stored by Safari. While this action may log you out of websites and remove personalized settings, it can help resolve performance issues and enhance the overall browsing experience.
Regularly clearing the cache and data in Safari is a proactive measure to maintain the browser's efficiency and address any potential issues that may arise from accumulated temporary files and website data. After clearing the cache and data, you may notice improved responsiveness, faster page loading times, and a more streamlined browsing experience on your iPad.
Restart iPad
Restarting your iPad is a simple yet effective troubleshooting step that can resolve various issues related to performance, connectivity, and software glitches. By restarting the device, you can refresh its system, clear temporary data, and potentially eliminate any underlying issues that may be affecting the functionality of Safari and other applications.
To restart your iPad, follow these straightforward steps:
-
Press and Hold the Power Button: Locate the power button, typically located on the top or side of your iPad. Press and hold this button until the "slide to power off" slider appears on the screen.
-
Slide to Power Off: Once the "slide to power off" slider appears, use your finger to slide it from left to right. This action initiates the shutdown process for your iPad.
-
Wait for the Device to Power Off: Allow your iPad to power off completely. You may notice the screen going dark, indicating that the device is shutting down.
-
Press and Hold the Power Button Again: After your iPad has powered off, press and hold the power button again until the Apple logo appears on the screen. This signifies that the device is restarting.
-
Release the Power Button: Once the Apple logo appears, release the power button and allow your iPad to complete the restart process.
By following these steps, you can effectively restart your iPad, providing a fresh start for the device's system and potentially resolving any underlying issues that may be impacting the performance of Safari and other apps.
Restarting your iPad is a proactive measure that can address a wide range of issues, including slow responsiveness, unresponsive apps, and connectivity problems. It allows the device to clear temporary data, refresh its system, and start anew, potentially resolving any software-related issues that may be affecting the browsing experience on Safari.
Incorporating the practice of restarting your iPad into your routine maintenance can contribute to a smoother and more reliable performance of the device and its applications. Whether you encounter specific issues or simply want to ensure optimal functionality, restarting your iPad is a quick and effective step to consider.