Introduction
Unlinking Safari from your iPhone to iPad can be a useful process, especially if you want to disassociate the browsing data and history between the two devices. This can be particularly important for privacy reasons or if you simply want to have separate browsing experiences on each device. Fortunately, the process to unlink Safari from your iPhone to iPad is straightforward and can be completed in just a few simple steps. In this guide, we will walk you through the process, ensuring that you can easily manage your browsing data across your Apple devices.
Unlinking Safari from your iPhone to iPad involves disabling the synchronization of browsing data through iCloud. By doing so, you can prevent the sharing of browsing history, bookmarks, and open tabs between your iPhone and iPad. This can be beneficial if you want to maintain separate browsing experiences on each device or if you wish to limit the access to your browsing history on one of the devices.
Whether you want to unlink Safari for privacy reasons, to streamline your browsing experience, or for any other purpose, understanding the steps involved is essential. By following the instructions provided in this guide, you will be able to effectively unlink Safari from your iPhone to iPad, giving you greater control over your browsing data and privacy.
Now, let's dive into the step-by-step process of unlinking Safari from your iPhone to iPad, empowering you to manage your browsing experience across your Apple devices with ease.
Step 1: Open the Settings app on your iPhone
To begin the process of unlinking Safari from your iPhone to iPad, you will first need to access the Settings app on your iPhone. The Settings app serves as the control center for various configurations and preferences on your device, allowing you to manage a wide range of settings, including those related to Safari and iCloud.
-
Locate the Settings App: On your iPhone's home screen, look for the Settings app. The icon resembles a gear and is typically found on one of the main screens or within a folder, depending on your personal organization of apps.
-
Tap to Open: Once you have located the Settings app, tap on the icon to open the app. This action will launch the Settings interface, providing you with access to a multitude of options for customizing and managing your device's settings.
-
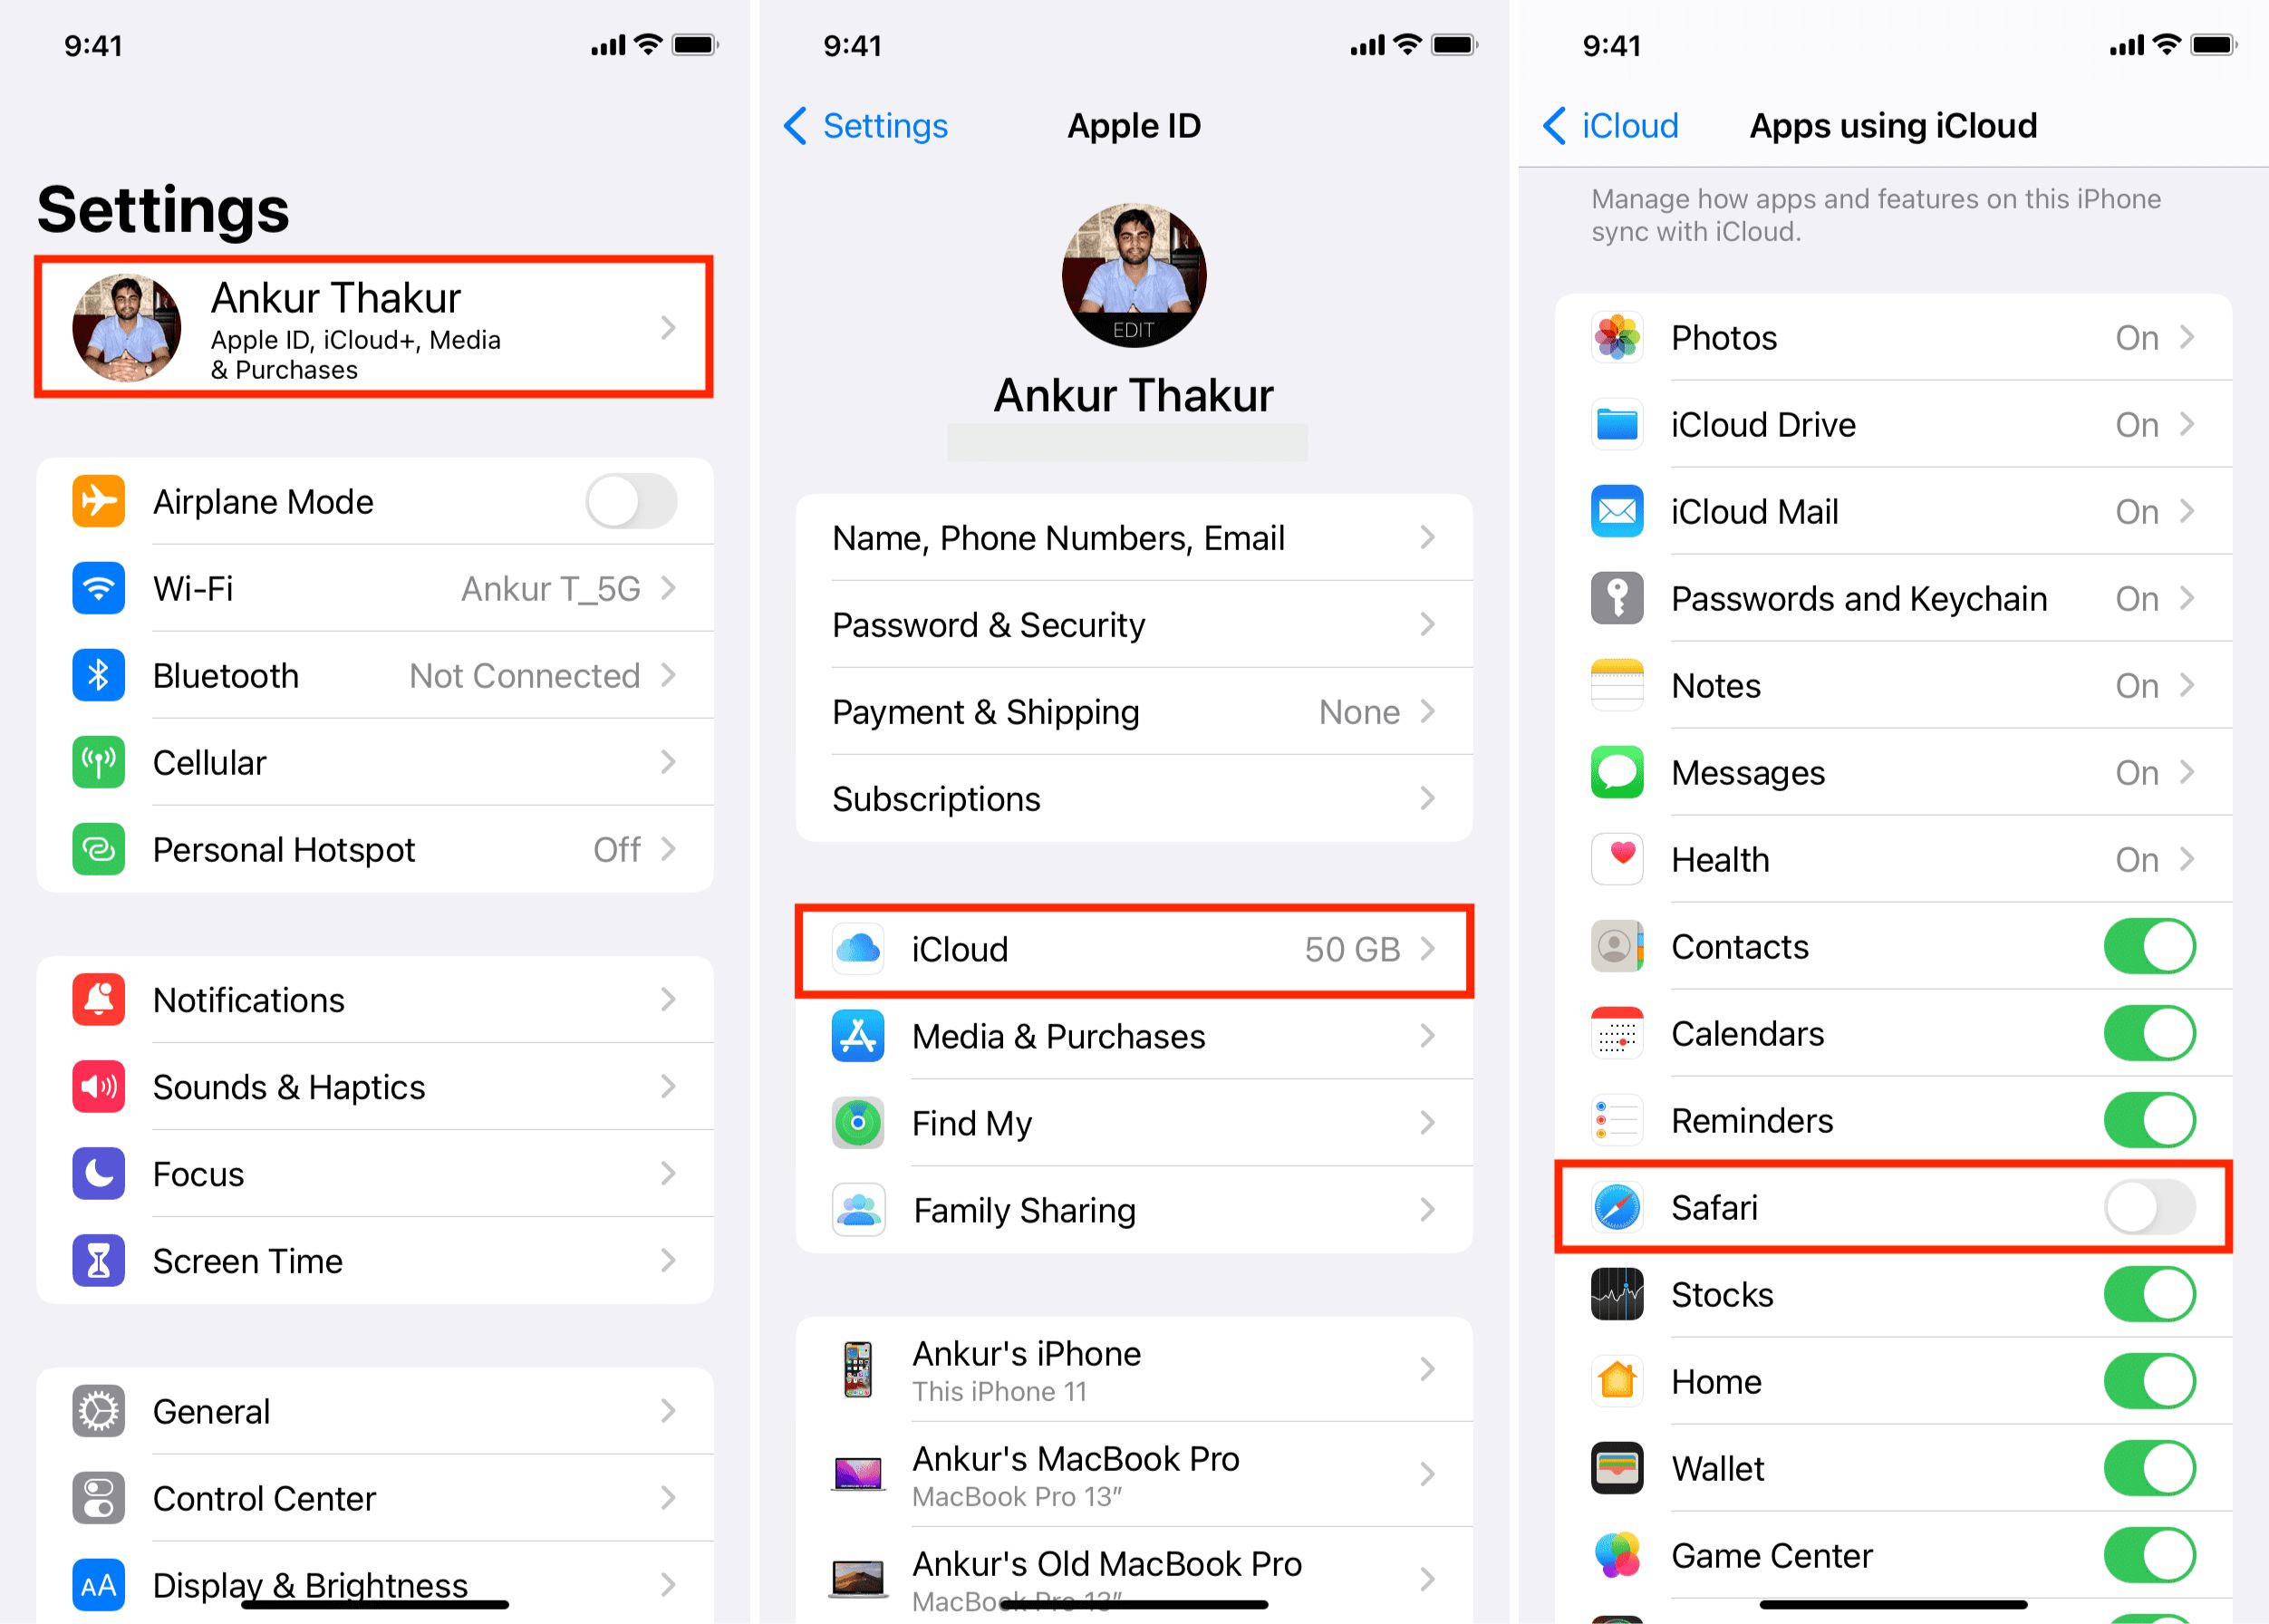
Navigate to the Apple ID Section (Optional): If you are using iOS 10.3 or later, you may need to tap on your Apple ID banner at the top of the Settings screen to access your account details. This step is necessary for certain versions of iOS and ensures that you can proceed to the subsequent steps seamlessly.
By opening the Settings app on your iPhone, you are taking the initial step towards unlinking Safari from your iPhone to iPad. This fundamental action sets the stage for the subsequent steps, allowing you to access the necessary settings and configurations to achieve the desired outcome.
With the Settings app now open on your iPhone, you are ready to proceed to the next step in the process of unlinking Safari from your iPhone to iPad. This simple yet crucial action paves the way for a seamless transition to the subsequent steps, enabling you to effectively manage the synchronization of browsing data across your Apple devices.
Step 2: Tap on your Apple ID at the top of the screen
Upon opening the Settings app on your iPhone, the next pivotal step in the process of unlinking Safari from your iPhone to iPad involves tapping on your Apple ID at the top of the screen. Your Apple ID serves as the gateway to a multitude of essential settings and configurations, including those related to iCloud and its synchronization capabilities.
When you tap on your Apple ID at the top of the screen within the Settings app, you are granted access to a comprehensive array of options and preferences that are directly linked to your Apple account. This includes the ability to manage your iCloud settings, which is crucial for controlling the synchronization of browsing data, such as history, bookmarks, and open tabs, between your iPhone and iPad.
By tapping on your Apple ID, you are essentially entering the realm of personalized settings and configurations that are specific to your Apple account. This action serves as the gateway to accessing and modifying various aspects of your account, providing you with the flexibility to tailor the synchronization of browsing data according to your preferences.
Upon tapping on your Apple ID, you may be prompted to enter your Apple ID password to authenticate your access. This additional layer of security ensures that only authorized individuals can make changes to the account settings, safeguarding the integrity of your personal data and preferences.
Once you have successfully tapped on your Apple ID and authenticated your access, you will be ready to proceed to the subsequent steps in the process of unlinking Safari from your iPhone to iPad. This pivotal action sets the stage for navigating through the account-specific settings, enabling you to make the necessary adjustments to the iCloud synchronization settings and effectively manage the sharing of browsing data between your Apple devices.
With the crucial step of tapping on your Apple ID now completed, you are poised to advance to the subsequent steps, empowering you to take full control of the synchronization of browsing data between your iPhone and iPad. This foundational action lays the groundwork for the seamless execution of the remaining steps, ensuring that you can efficiently manage the unlinking of Safari and tailor your browsing experience across your Apple devices to your exact specifications.
Step 3: Scroll down and tap on "iCloud"
After tapping on your Apple ID and entering the realm of personalized settings and configurations, the next crucial step in the process of unlinking Safari from your iPhone to iPad involves scrolling down within the Settings interface until you locate and tap on "iCloud." This pivotal action directs you to the specific settings associated with iCloud, the integral cloud storage and synchronization service provided by Apple.
Upon tapping on "iCloud," you gain access to a comprehensive suite of options and preferences that are directly linked to the synchronization of various data types across your Apple devices. This includes the synchronization of browsing data, such as history, bookmarks, and open tabs, which is pertinent to the process of unlinking Safari from your iPhone to iPad.
By scrolling down and tapping on "iCloud," you are effectively delving into the realm of cloud-based synchronization, where you can manage the sharing of data between your iPhone and iPad. This action serves as the gateway to accessing the specific settings that govern the synchronization of browsing data through iCloud, providing you with the flexibility to tailor this synchronization according to your preferences.
Within the "iCloud" settings, you will find a range of options related to data synchronization, including those specifically pertaining to Safari. By navigating to this section, you are poised to make the necessary adjustments to the synchronization settings, ultimately enabling you to unlink Safari from your iPhone to iPad and manage the sharing of browsing data in a manner that aligns with your individual needs and preferences.
As you scroll down and tap on "iCloud," you are taking a pivotal step towards gaining control over the synchronization of browsing data between your iPhone and iPad. This foundational action sets the stage for accessing the specific settings that govern the synchronization of Safari data through iCloud, empowering you to make the requisite adjustments and effectively manage the unlinking process with precision and ease.
With the critical step of scrolling down and tapping on "iCloud" now completed, you are well-positioned to proceed to the subsequent steps, allowing you to navigate through the iCloud settings and make the necessary modifications to achieve the desired outcome. This fundamental action lays the groundwork for seamlessly executing the remaining steps, ensuring that you can efficiently manage the unlinking of Safari and tailor your browsing experience across your Apple devices to your exact specifications.
Step 4: Toggle off the switch next to "Safari"
Upon accessing the iCloud settings within the Settings app on your iPhone, the next pivotal step in the process of unlinking Safari from your iPhone to iPad involves toggling off the switch next to "Safari." This critical action directly influences the synchronization of browsing data, allowing you to effectively manage the sharing of Safari-related information between your iPhone and iPad.
When you locate the "Safari" option within the iCloud settings, you will notice a switch positioned next to it. This switch serves as a control mechanism for enabling or disabling the synchronization of Safari data through iCloud. By toggling off this switch, you are essentially halting the sharing of browsing history, bookmarks, and open tabs between your iPhone and iPad, thereby unlinking Safari and establishing separate browsing experiences on each device.
To toggle off the switch next to "Safari," simply tap on the switch, causing it to transition from the "on" position to the "off" position. This straightforward action effectively disables the synchronization of Safari data through iCloud, ensuring that the browsing information on your iPhone and iPad remains independent and distinct from each other.
By toggling off the switch next to "Safari," you are taking a decisive step towards managing the synchronization of browsing data across your Apple devices. This pivotal action empowers you to exert precise control over the sharing of Safari-related information, enabling you to tailor your browsing experiences on your iPhone and iPad according to your specific preferences and requirements.
Upon toggling off the switch next to "Safari," you will effectively unlink Safari from your iPhone to iPad, ensuring that the browsing data remains segregated between the two devices. This fundamental action sets the stage for establishing distinct browsing experiences on each device, allowing you to maintain greater control over your browsing history and privacy.
With the critical step of toggling off the switch next to "Safari" now completed, you have successfully taken a significant stride towards managing the synchronization of browsing data between your iPhone and iPad. This foundational action lays the groundwork for achieving the desired outcome of unlinking Safari, empowering you to maintain separate and tailored browsing experiences across your Apple devices with precision and ease.
Step 5: Confirm the action
After toggling off the switch next to "Safari" within the iCloud settings, the final step in the process of unlinking Safari from your iPhone to iPad involves confirming the action. This critical confirmation ensures that the changes made to the synchronization settings take effect, effectively disassociating the browsing data between your iPhone and iPad.
Upon toggling off the switch next to "Safari," it is essential to verify and confirm the action to solidify the unlinking process. To confirm the action, simply navigate back to the previous screen or exit the iCloud settings, ensuring that the changes made to the synchronization settings are saved and implemented. This straightforward step serves as the final validation of your decision to unlink Safari from your iPhone to iPad, culminating in distinct and independent browsing experiences on each device.
By confirming the action, you are essentially affirming your choice to halt the synchronization of Safari data through iCloud, thereby establishing separate and isolated browsing environments on your iPhone and iPad. This confirmation is pivotal in ensuring that the browsing history, bookmarks, and open tabs remain exclusive to each device, providing you with enhanced control over your browsing data and privacy.
Upon confirming the action, it is advisable to verify the status of the synchronization settings to ensure that the changes have been successfully applied. This can be done by revisiting the iCloud settings and ensuring that the switch next to "Safari" remains in the "off" position, indicating that the unlinking process has been effectively executed.
With the action confirmed, you have successfully completed the process of unlinking Safari from your iPhone to iPad, empowering you to maintain distinct browsing experiences and exercise precise control over the synchronization of browsing data across your Apple devices. This final step solidifies the unlinking process, ensuring that the browsing history and preferences on your iPhone and iPad remain independent and tailored to your specific usage patterns and preferences.
By confirming the action, you have effectively achieved the desired outcome of unlinking Safari from your iPhone to iPad, establishing separate and personalized browsing environments on each device. This confirmation marks the culmination of the unlinking process, providing you with the assurance that the browsing data remains segregated and managed according to your individual needs and preferences.
Conclusion
In conclusion, the process of unlinking Safari from your iPhone to iPad is a straightforward yet impactful endeavor that empowers you to manage the synchronization of browsing data across your Apple devices with precision and ease. By following the step-by-step guide outlined in this article, you have gained the knowledge and insights necessary to effectively unlink Safari, establishing distinct and tailored browsing experiences on your iPhone and iPad.
Through the systematic execution of the essential steps, including opening the Settings app, tapping on your Apple ID, navigating to the iCloud settings, toggling off the switch next to "Safari," and confirming the action, you have successfully disassociated the sharing of browsing history, bookmarks, and open tabs between your iPhone and iPad. This fundamental process ensures that your browsing data remains independent and exclusive to each device, providing you with enhanced control over your privacy and browsing preferences.
By unlinking Safari from your iPhone to iPad, you have the flexibility to maintain separate browsing experiences, allowing you to customize your browsing history and preferences on each device according to your individual needs. Whether for privacy reasons, the desire for distinct browsing environments, or the need to manage browsing data independently, the ability to unlink Safari offers a valuable solution for tailoring your digital experiences across your Apple devices.
Furthermore, the completion of the unlinking process signifies a proactive approach to managing your digital footprint and privacy, enabling you to exert precise control over the synchronization of browsing data. This proactive stance aligns with the evolving landscape of digital privacy and personal data management, empowering you to make informed decisions about the sharing and management of your browsing history and preferences.
In essence, the process of unlinking Safari from your iPhone to iPad not only provides practical benefits in terms of tailored browsing experiences but also underscores the significance of individual agency and control in managing digital data. By leveraging the insights and instructions presented in this guide, you have effectively navigated the unlinking process, ensuring that your browsing data remains distinct and managed according to your specific usage patterns and preferences.
As you proceed with your digital journey, the ability to unlink Safari from your iPhone to iPad serves as a testament to your proactive approach to managing your digital experiences, underscoring the importance of personalized control and privacy in the realm of browsing data synchronization. With distinct browsing environments established on your iPhone and iPad, you are well-equipped to navigate the digital landscape with confidence, knowing that your browsing history and preferences are tailored to your individual needs and preferences.


