Introduction
Chrome notifications can be incredibly useful for staying updated with important information from websites and web applications. However, the constant barrage of notifications can sometimes become overwhelming, leading to distractions and interruptions. Fortunately, Chrome provides several methods to manage and control notifications, allowing users to tailor their browsing experience to suit their preferences.
In this article, we will explore three effective methods to turn off notifications in Chrome. Whether you want to disable notifications from specific websites, block notifications from all websites, or utilize Chrome's built-in settings to manage notifications more efficiently, we've got you covered. By following these methods, you can regain control over your browsing experience and minimize unnecessary interruptions, ultimately enhancing your productivity and focus while using Chrome.
Let's dive into the step-by-step processes for each method, empowering you to take charge of your Chrome notifications and customize your browsing environment to align with your needs and preferences. Whether you're a seasoned Chrome user or just getting started with this popular web browser, these methods will equip you with the knowledge and tools to effectively manage notifications and optimize your browsing experience.
Method 1: Turning off notifications for specific websites
Do you find yourself bombarded with notifications from certain websites that you visit frequently? Whether it's a news website, social media platform, or productivity tool, the constant stream of notifications can be disruptive. Fortunately, Chrome offers a straightforward method to turn off notifications for specific websites, allowing you to regain control over your browsing experience.
Step 1: Accessing Site Settings
To begin, open the Chrome browser on your computer and navigate to the website for which you want to disable notifications. Once you're on the site, look for the padlock icon or "Not secure" label next to the website's address in the address bar. Click on the padlock or "Not secure" label to reveal a dropdown menu.
Step 2: Managing Notifications
In the dropdown menu, locate and click on the "Site settings" option. This will direct you to the site settings page, where you can manage various permissions for the specific website. Scroll down to find the "Permissions" section, and then click on the "Notifications" dropdown menu.
Step 3: Blocking Notifications
Within the "Notifications" dropdown menu, you will see the current permission status for notifications on the website. To turn off notifications for this site, simply select the option to block or disallow notifications. Once you've made this selection, Chrome will no longer prompt you with notifications from the specific website, providing you with a more focused and uninterrupted browsing experience.
By following these simple steps, you can effectively turn off notifications for specific websites in Chrome, reducing distractions and allowing you to engage with online content on your own terms. This method empowers you to customize your browsing experience by selectively managing notifications from individual websites, ultimately enhancing your productivity and concentration while using the Chrome browser.
Method 2: Disabling notifications for all websites
Are you seeking a comprehensive solution to declutter your browsing experience by silencing all notifications across the board? Whether you're aiming to create a distraction-free environment or simply want to take a break from the constant influx of notifications, Chrome offers a convenient method to disable notifications for all websites. By implementing this approach, you can regain control over your browsing environment and enjoy uninterrupted online sessions.
Step 1: Accessing Chrome Settings
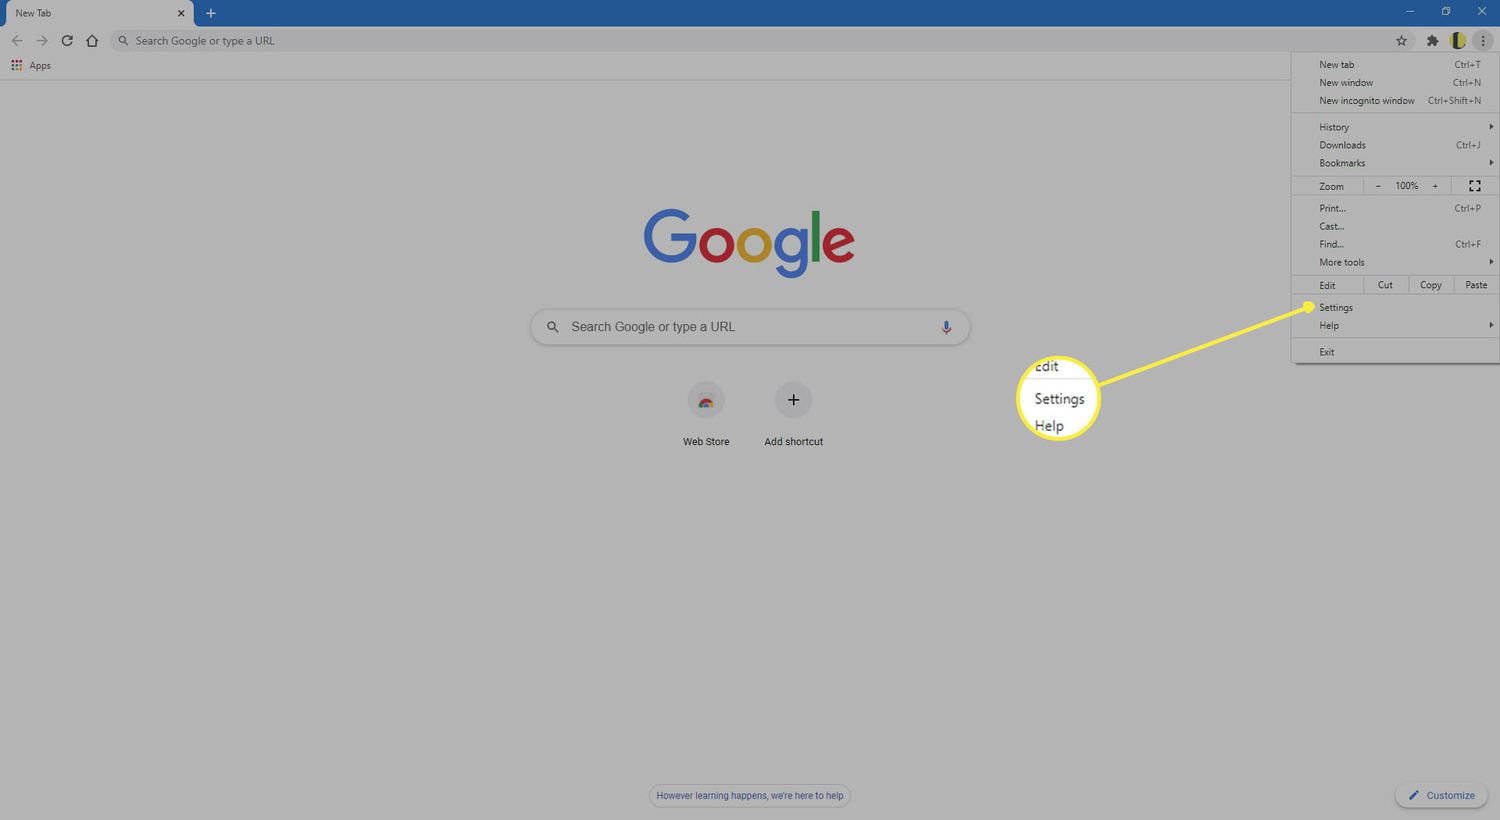
To initiate the process of disabling notifications for all websites, launch the Chrome browser on your computer. Next, click on the three-dot menu icon located in the top-right corner of the browser window. This will reveal a dropdown menu containing various options for customizing and managing Chrome's settings.
Step 2: Navigating to Site Settings
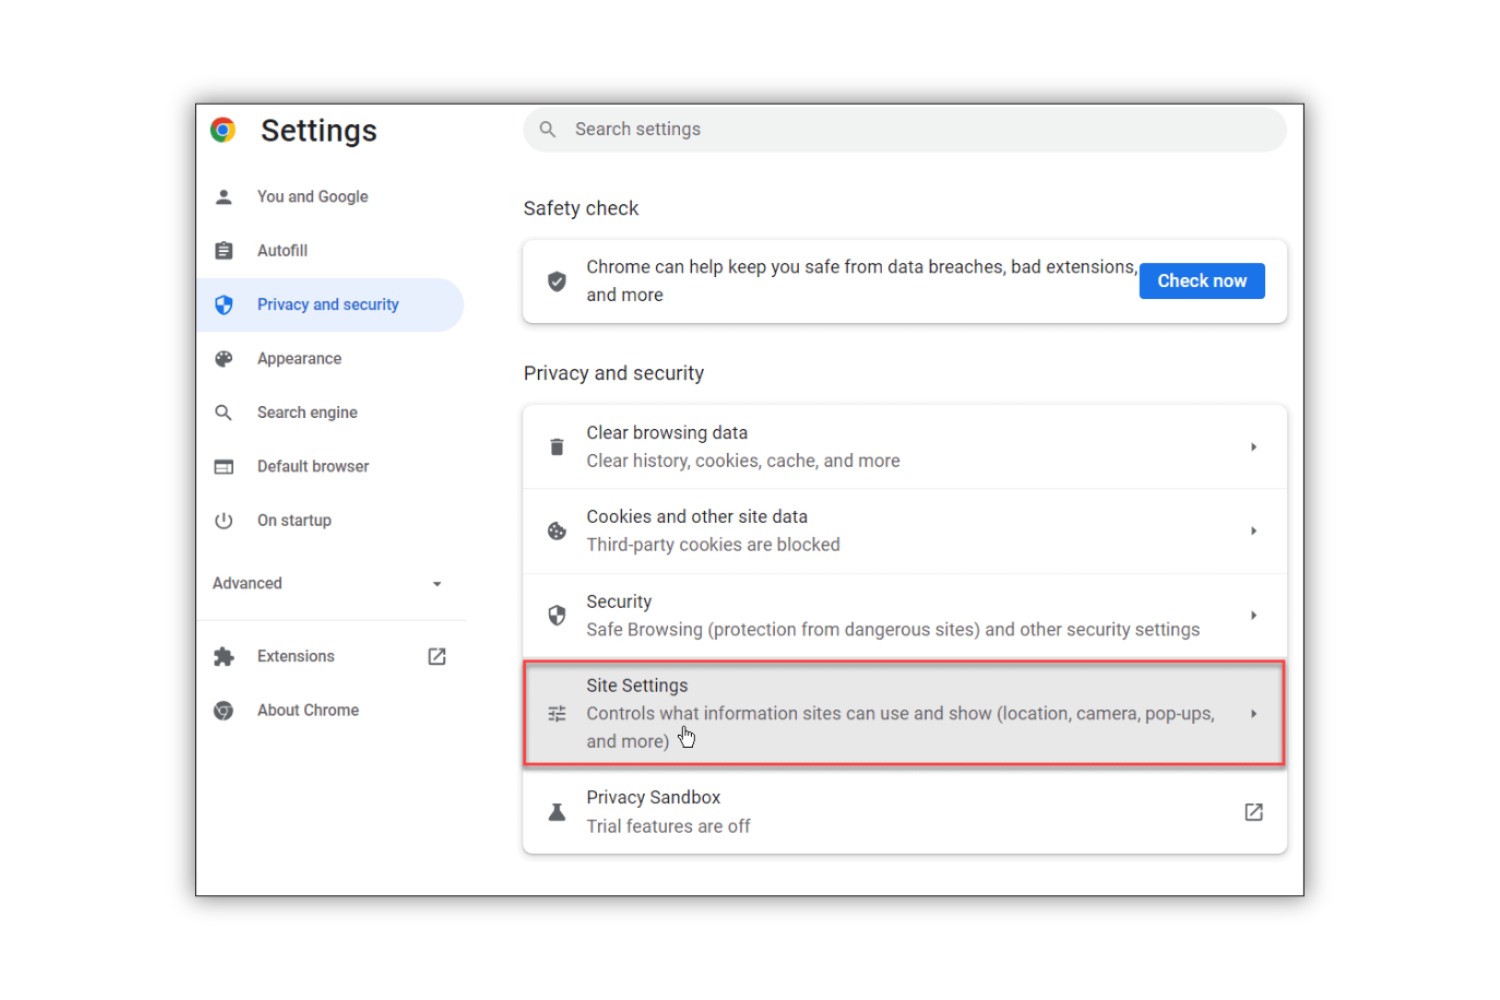
Within the dropdown menu, locate and click on the "Settings" option. This will redirect you to the Chrome settings page, where you can explore a wide range of customization and configuration options. Once you're on the settings page, scroll down and click on the "Privacy and security" section to access additional settings related to website permissions.
Step 3: Managing Notifications
Under the "Privacy and security" section, find and click on the "Site settings" option. This will lead you to a page where you can modify permissions for specific website features, including notifications. Look for the "Notifications" section and click on it to reveal the notification settings for all websites.
Step 4: Disabling Notifications
Upon accessing the notification settings, you will find an option to toggle the overall permission for notifications. To disable notifications for all websites, simply toggle off the switch or button associated with the "Sites can ask to send notifications" feature. By turning off this setting, you effectively block all websites from prompting you with notifications, creating a tranquil browsing environment free from interruptions.
By following these straightforward steps, you can seamlessly disable notifications for all websites in Chrome, granting yourself the freedom to engage with online content without the distraction of constant notifications. This method empowers you to tailor your browsing experience to align with your preferences, fostering a more serene and focused environment for your online activities.
Method 3: Using Chrome settings to manage notifications
Managing notifications through Chrome's settings provides a comprehensive approach to customizing your browsing experience. By leveraging the built-in notification management tools, you can fine-tune your preferences and establish a harmonious balance between staying informed and minimizing distractions. This method offers a versatile solution for users who seek granular control over their notification settings, allowing for a tailored approach to managing notifications across various websites.
Step 1: Accessing Chrome Settings
To begin, launch the Chrome browser on your computer and click on the three-dot menu icon located in the top-right corner of the browser window. From the dropdown menu, select the "Settings" option to navigate to the Chrome settings page.
Step 2: Navigating to Site Settings
Once you're on the settings page, scroll down and click on the "Privacy and security" section to access additional settings related to website permissions. Under this section, locate and click on the "Site settings" option to delve into the specific permissions and preferences for individual websites.
Step 3: Managing Notifications
Within the "Site settings" menu, find the "Notifications" section to explore the notification settings for all websites. Here, you can view a list of websites that have requested to send notifications and manage your preferences accordingly. You have the flexibility to allow or block notifications from specific websites, empowering you to curate a personalized notification experience tailored to your preferences.
Step 4: Customizing Notification Permissions
Chrome's notification settings also allow you to customize permissions for individual websites. You can modify the notification behavior for each website, choosing to allow or block notifications based on your preferences. This granular control enables you to strike a balance between staying informed and minimizing interruptions, ensuring that notifications align with your browsing habits and priorities.
By utilizing Chrome's settings to manage notifications, you gain the flexibility to tailor your browsing environment to suit your needs. Whether you prefer to receive notifications from select websites or maintain a serene, distraction-free experience, Chrome's notification management tools empower you to curate a personalized and optimized browsing experience.
This method equips you with the tools to navigate the intricate landscape of website notifications, enabling you to strike a harmonious balance between staying informed and maintaining a focused browsing environment. By leveraging Chrome's built-in settings, you can harness the power to manage notifications with precision and finesse, ultimately enhancing your browsing experience with tailored notification preferences.
Conclusion
In conclusion, Chrome provides a robust set of tools and methods to manage notifications, allowing users to tailor their browsing experience to align with their preferences and priorities. By exploring the three effective methods outlined in this article, users can regain control over their browsing environment, minimize distractions, and foster a more focused and productive online experience.
Whether it's turning off notifications for specific websites, silencing notifications across all websites, or utilizing Chrome's settings to fine-tune notification preferences, users have the flexibility to customize their interaction with online content. These methods empower users to curate a personalized notification experience, ensuring that notifications serve as valuable updates rather than disruptive interruptions.
By turning off notifications for specific websites, users can selectively manage their interaction with individual sites, reducing distractions and maintaining a more streamlined browsing experience. This method is particularly beneficial for individuals who frequent certain websites but prefer to limit the influx of notifications.
Disabling notifications for all websites offers a comprehensive solution for those seeking a tranquil and distraction-free browsing environment. By implementing this method, users can create a serene online space, free from the constant interruptions of website notifications, allowing for enhanced focus and productivity.
Utilizing Chrome's settings to manage notifications provides a versatile approach, granting users granular control over their notification preferences. This method empowers users to strike a harmonious balance between staying informed and minimizing interruptions, ensuring that notifications align with their browsing habits and priorities.
In essence, the ability to manage notifications in Chrome reflects the browser's commitment to empowering users with customizable features that enhance their browsing experience. Whether it's staying informed about important updates or creating a serene and focused environment, Chrome's notification management capabilities cater to a diverse range of user preferences and needs.
By leveraging these methods, users can navigate the intricate landscape of website notifications with precision and finesse, ultimately optimizing their browsing experience to align with their unique preferences. With the power to control notifications at their fingertips, users can engage with online content on their own terms, fostering a more harmonious and tailored browsing experience.