Introduction
WebGL, short for Web Graphics Library, is a powerful technology that brings hardware-accelerated 3D graphics to the web. It enables web developers to create visually stunning and interactive experiences directly within the browser, without the need for additional plugins or software. By harnessing the capabilities of the computer's GPU, WebGL empowers websites to render complex 3D graphics, animations, and visual effects with remarkable speed and efficiency.
As the web continues to evolve, WebGL has become an integral component of modern web development, driving the creation of immersive virtual reality experiences, interactive data visualizations, and engaging games. Its versatility and performance have made it a cornerstone of cutting-edge web applications, elevating the standard for web-based graphics and user experiences.
In this article, we will delve into the process of enabling WebGL on the popular web browser, Chrome. By following the steps outlined here, you will unlock the full potential of WebGL, allowing you to experience the rich array of 3D content and interactive applications available on the web. Whether you are a developer seeking to leverage WebGL for your projects or an enthusiast eager to explore the latest web-based experiences, enabling WebGL on Chrome will open the door to a world of captivating visual content and interactive possibilities.
Now, let's embark on this journey to unleash the power of WebGL within your Chrome browser. Whether you're a seasoned developer or a curious explorer, the steps provided here will equip you with the knowledge and tools to seamlessly enable WebGL and immerse yourself in the dynamic world of web-based 3D graphics and interactive content.
Checking WebGL Support
Before delving into the process of enabling WebGL on Chrome, it's essential to verify whether your browser supports this advanced web technology. Checking WebGL support is a straightforward process that ensures your browser is capable of rendering 3D graphics and interactive content with optimal performance.
To check WebGL support on Chrome, follow these simple steps:
-
Accessing the WebGL Support Page: Open your Chrome browser and navigate to the WebGL support page by entering the following URL in the address bar: chrome://gpu/. This specialized page provides detailed information about your browser's GPU and its compatibility with WebGL.
-
Verifying WebGL Availability: Upon reaching the WebGL support page, look for the "WebGL" section, which displays crucial details about WebGL support. You should see a line indicating "WebGL: Hardware accelerated" if WebGL is supported and enabled on your browser. This confirmation ensures that your browser can harness the full potential of hardware-accelerated 3D graphics for an immersive web experience.
-
Checking Graphics Feature Status: Additionally, you can review the "Graphics Feature Status" section on the same page to gain insights into the specific WebGL features supported by your browser. This comprehensive overview provides a detailed breakdown of the WebGL capabilities and associated features, offering valuable information about the extent of WebGL support on your Chrome browser.
By performing these steps, you can confidently determine whether your Chrome browser supports WebGL, laying the foundation for a seamless transition to enabling WebGL and embracing the captivating world of web-based 3D graphics and interactive content.
With WebGL support verified, you are now ready to proceed with the process of enabling WebGL on your Chrome browser, unlocking a realm of visually stunning and interactive web experiences that await your exploration and enjoyment.
Enabling WebGL on Chrome
Enabling WebGL on Chrome is a straightforward process that empowers you to harness the full potential of hardware-accelerated 3D graphics and interactive content within the browser. By following the steps outlined below, you can seamlessly activate WebGL, paving the way for a rich and immersive web experience.
-
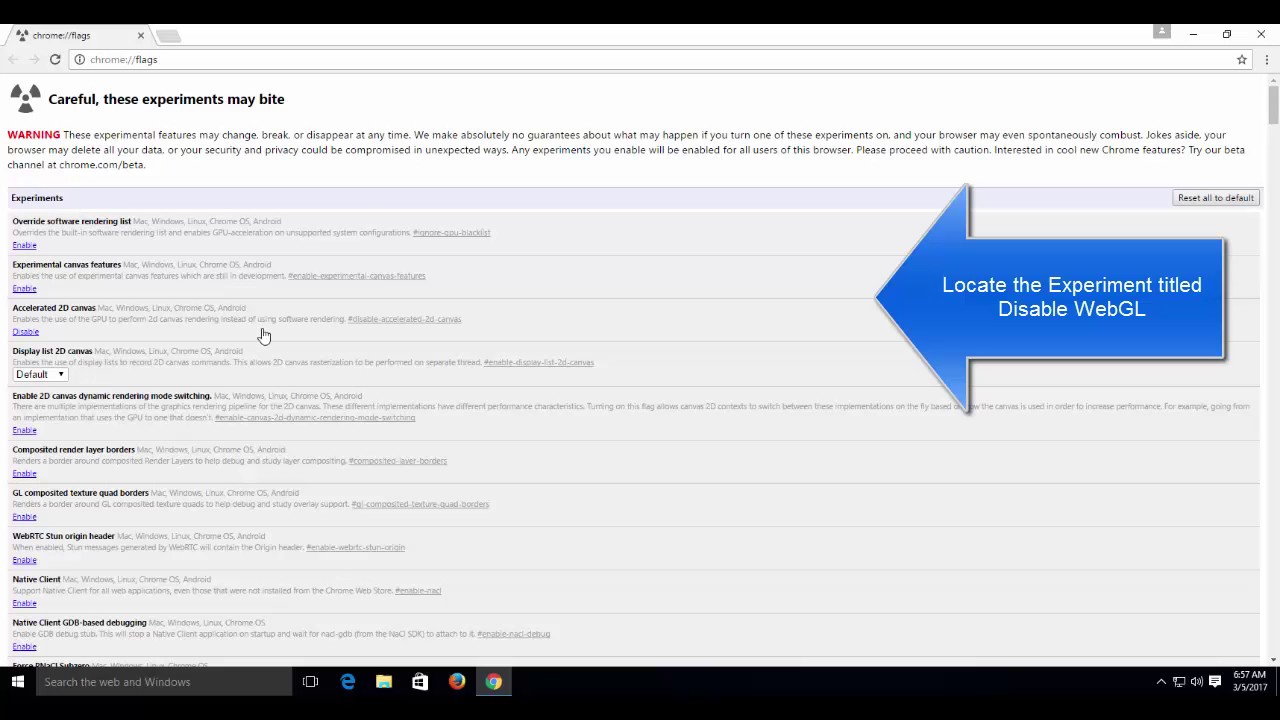
Accessing Chrome Settings: Begin by opening your Chrome browser and accessing the settings menu. You can do this by clicking on the three-dot icon located in the top-right corner of the browser window and selecting "Settings" from the dropdown menu.
-
Navigating to the Advanced Settings: Within the settings menu, scroll down to the bottom and click on the "Advanced" option. This will expand the settings menu to reveal additional advanced options and configurations.
-
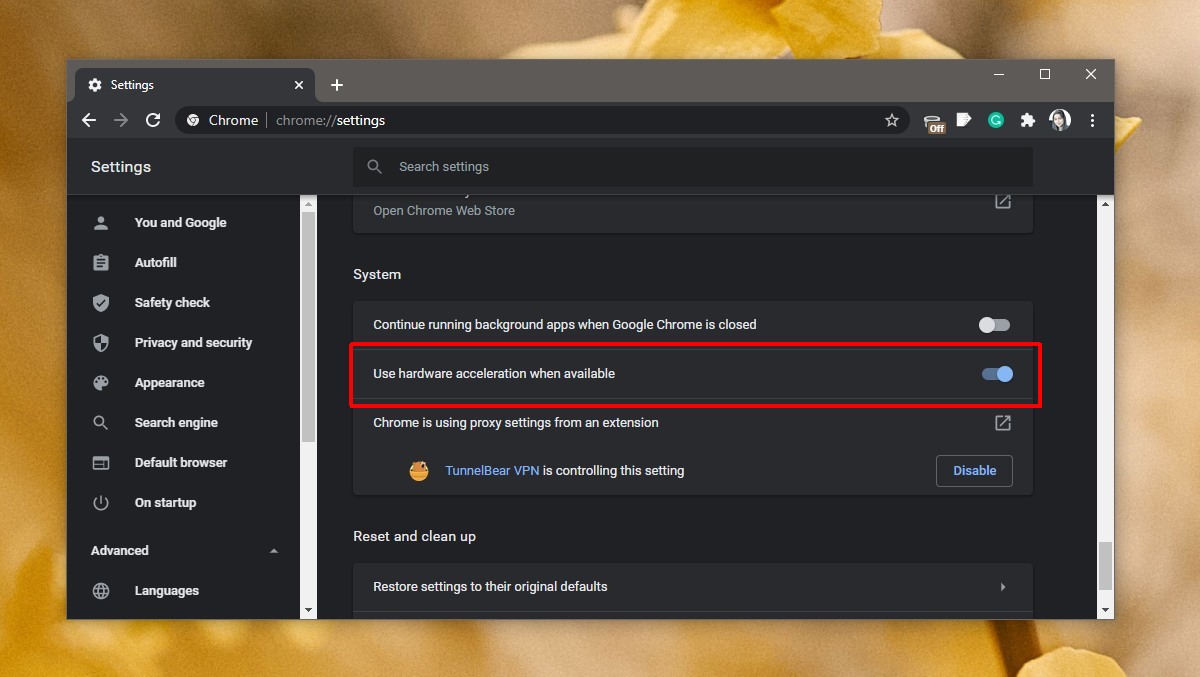
Locating the System Section: After accessing the advanced settings, navigate to the "System" section. This section contains various configurations related to the browser's system settings and performance.
-
Enabling Hardware Acceleration: Within the "System" section, you will find the option to "Use hardware acceleration when available." Toggle the switch next to this option to enable hardware acceleration, which is essential for unlocking the full capabilities of WebGL.
-
Relaunching Chrome: Once hardware acceleration is enabled, you will be prompted to relaunch the browser to apply the changes. Click on the "Relaunch" button to restart Chrome with hardware acceleration activated.
By following these steps, you have successfully enabled WebGL on your Chrome browser, setting the stage for a visually captivating and interactive web experience. With WebGL now activated, you can seamlessly explore a myriad of 3D graphics, immersive virtual reality environments, and interactive web applications that leverage the power of hardware-accelerated rendering.
Enabling WebGL on Chrome not only enhances your browsing experience but also opens the door to a diverse array of web-based content that pushes the boundaries of visual storytelling and interactive engagement. Whether you are a developer seeking to create compelling 3D web experiences or an enthusiast eager to immerse yourself in captivating virtual environments, the activation of WebGL on Chrome marks the beginning of an exciting journey into the dynamic realm of web-based 3D graphics and interactive content.
Verifying WebGL is Enabled
Once you have enabled WebGL on your Chrome browser, it's crucial to verify that the technology is indeed active and ready to deliver immersive 3D graphics and interactive content. This verification process ensures that WebGL is fully operational, allowing you to explore a wide range of visually captivating web experiences with confidence.
To confirm that WebGL is enabled on Chrome, follow these simple steps:
-
Accessing the WebGL Report: After relaunching Chrome with WebGL enabled, navigate to the following URL in the address bar: chrome://gpu/. This specialized page provides a comprehensive report on your browser's GPU and its compatibility with WebGL, offering valuable insights into the status of WebGL support.
-
Verifying WebGL Availability: Upon reaching the WebGL support page, locate the "WebGL" section, where you should see a line indicating "WebGL: Hardware accelerated." This confirmation serves as a clear indication that WebGL is indeed enabled and ready to leverage hardware-accelerated 3D graphics for an immersive web experience.
-
Reviewing Graphics Feature Status: In addition to verifying WebGL availability, you can explore the "Graphics Feature Status" section on the same page. This detailed overview provides a comprehensive breakdown of the specific WebGL features supported by your browser, offering valuable insights into the extent of WebGL support and the associated features that are actively enabled.
By following these steps, you can confidently verify that WebGL is enabled on your Chrome browser, ensuring that you are poised to explore a diverse array of visually stunning 3D graphics, interactive virtual environments, and engaging web applications. This verification process serves as a crucial checkpoint, affirming that WebGL is fully operational and ready to deliver a seamless and captivating web experience.
With WebGL successfully verified as enabled, you are now equipped to immerse yourself in the dynamic world of web-based 3D graphics and interactive content, leveraging the full potential of hardware-accelerated rendering to explore captivating virtual environments and visually rich web applications. This confirmation marks the culmination of the process to enable and verify WebGL on Chrome, setting the stage for an engaging and visually immersive browsing experience.
Troubleshooting WebGL Issues
While enabling WebGL on Chrome opens the door to a world of visually captivating 3D graphics and interactive web experiences, encountering issues with WebGL functionality can disrupt the seamless enjoyment of web-based content. Fortunately, troubleshooting WebGL issues on Chrome involves a systematic approach to identify and address potential obstacles, ensuring that you can fully leverage the capabilities of WebGL for an immersive browsing experience.
Clearing Browser Cache and Cookies
One common troubleshooting step involves clearing the browser cache and cookies, which can accumulate over time and potentially interfere with WebGL functionality. To perform this action in Chrome, navigate to the browser settings, access the "Privacy and security" section, and select "Clear browsing data." Ensure that the options to clear cache and cookies are selected, and proceed to clear the browsing data to eliminate any potential conflicts affecting WebGL performance.
Updating Graphics Drivers
Outdated or incompatible graphics drivers can hinder WebGL performance, leading to rendering issues and visual anomalies. To address this, ensure that your computer's graphics drivers are up to date. Visit the official website of your graphics card manufacturer to download and install the latest drivers, providing your system with the necessary updates to support WebGL rendering with optimal stability and performance.
Disabling Browser Extensions
Certain browser extensions may conflict with WebGL functionality, causing rendering errors and performance issues. Temporarily disable all extensions in Chrome and relaunch the browser to determine if any specific extension is impacting WebGL. If WebGL functions correctly after disabling extensions, gradually re-enable them one by one to identify the culprit and take appropriate action, such as updating or removing the problematic extension.
Checking WebGL Compatibility
In some cases, WebGL issues may arise due to hardware or software limitations. Verify that your computer's hardware meets the minimum requirements for WebGL support, including a compatible GPU and updated system specifications. Additionally, ensure that your Chrome browser is running the latest version, as outdated browser versions may exhibit compatibility issues with WebGL. Updating Chrome to the latest release can resolve potential compatibility-related WebGL issues.
Seeking Community Support
If persistent WebGL issues persist despite troubleshooting efforts, consider seeking assistance from the Chrome community or relevant web development forums. Engaging with knowledgeable individuals and seeking advice from the community can provide valuable insights and potential solutions to address complex WebGL issues, ensuring that you can overcome any obstacles hindering the optimal performance of WebGL on Chrome.
By systematically addressing potential obstacles and leveraging the troubleshooting steps outlined above, you can effectively resolve WebGL issues on Chrome, enabling you to immerse yourself in the visually captivating world of web-based 3D graphics and interactive content with confidence and seamless functionality.


