Introduction
Google Chrome is a popular web browser known for its speed, simplicity, and user-friendly interface. Over time, however, you may encounter issues such as slow performance, unresponsive tabs, or unexpected crashes. In such cases, performing a complete reset of Google Chrome can help resolve these issues and restore the browser to its default state. This comprehensive guide will walk you through the step-by-step process of completely resetting Google Chrome, ensuring that you can enjoy a seamless browsing experience once again.
Whether you're experiencing persistent glitches, encountering unwanted pop-ups, or simply want to start afresh with a clean slate, resetting Google Chrome can be a highly effective solution. By following the instructions outlined in this guide, you'll be able to reset the browser settings, clear browsing data, and even reinstall Chrome if necessary. This will not only address any existing issues but also optimize the browser's performance and enhance its overall stability.
So, if you're ready to bid farewell to frustrating browser hiccups and embark on a smooth, uninterrupted browsing journey, let's dive into the step-by-step process of completely resetting Google Chrome. Whether you're a tech-savvy enthusiast or a casual user, this guide is designed to make the process straightforward and accessible, empowering you to take control of your browsing experience and revitalize your interaction with the web.
Step 1: Accessing Chrome Settings
Accessing Chrome settings is the first crucial step in the process of completely resetting the browser. Whether you're using Chrome on a desktop or a mobile device, the settings menu serves as the gateway to various customization options and essential features. Here's how you can access Chrome settings on different platforms:
On Desktop:
-
Open Chrome: Launch the Google Chrome browser on your desktop or laptop.
-
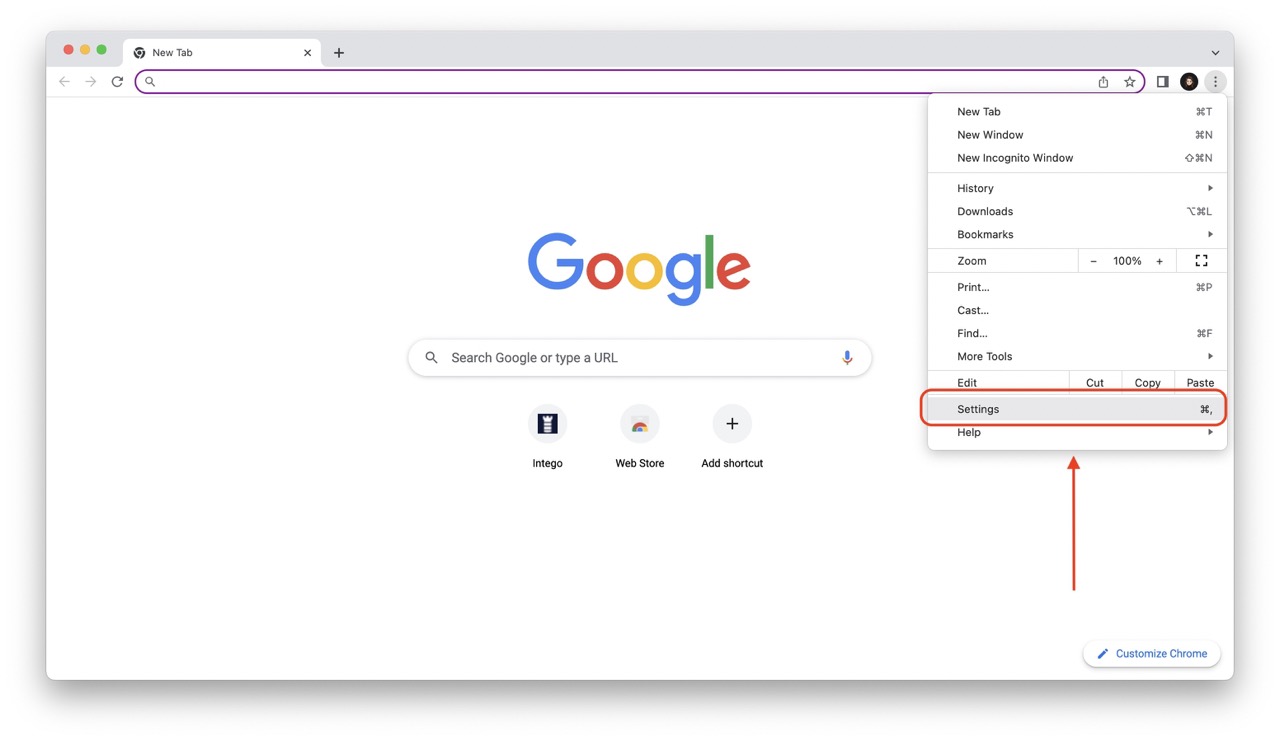
Access the Menu: Look for the three vertical dots located in the top-right corner of the browser window. This is the menu icon that provides access to a range of options.
-
Click on Settings: From the menu, click on "Settings." This will open a new tab displaying the browser settings and customization options.
On Mobile Devices:
-
Launch Chrome App: Open the Chrome app on your mobile device.
-
Access the Menu: Tap on the three vertical dots, typically located in the top-right corner of the screen, to open the menu.
-
Select Settings: Scroll through the menu options and tap on "Settings" to access the browser settings.
Once you've successfully accessed the settings, you'll be presented with a plethora of options to customize your browsing experience. From managing privacy and security settings to configuring site permissions and extensions, the settings menu serves as a control center for tailoring Chrome to your preferences.
By accessing Chrome settings, you're setting the stage for the subsequent steps in the reset process. This initial entry point allows you to navigate through the browser's configurations, making it possible to reset to default settings, clear browsing data, and perform other essential tasks that contribute to a comprehensive reset of Google Chrome.
In the next section, we'll delve into the process of resetting Chrome to its default state, paving the way for a refreshed and optimized browsing experience.
Step 2: Resetting Chrome to Default Settings
Resetting Google Chrome to its default settings can effectively address a wide range of issues, including performance slowdowns, unresponsive tabs, and unexpected errors. By restoring the browser to its original state, you can eliminate potential conflicts and irregularities that may have accumulated over time. Here's a detailed walkthrough of the process to reset Chrome to its default settings:
On Desktop:
-
Access Chrome Settings: After opening Chrome, click on the three vertical dots in the top-right corner to access the menu. From there, select "Settings" to open the browser settings page.
-
Navigate to Advanced Settings: Scroll down the settings page and click on "Advanced" to reveal additional configuration options.
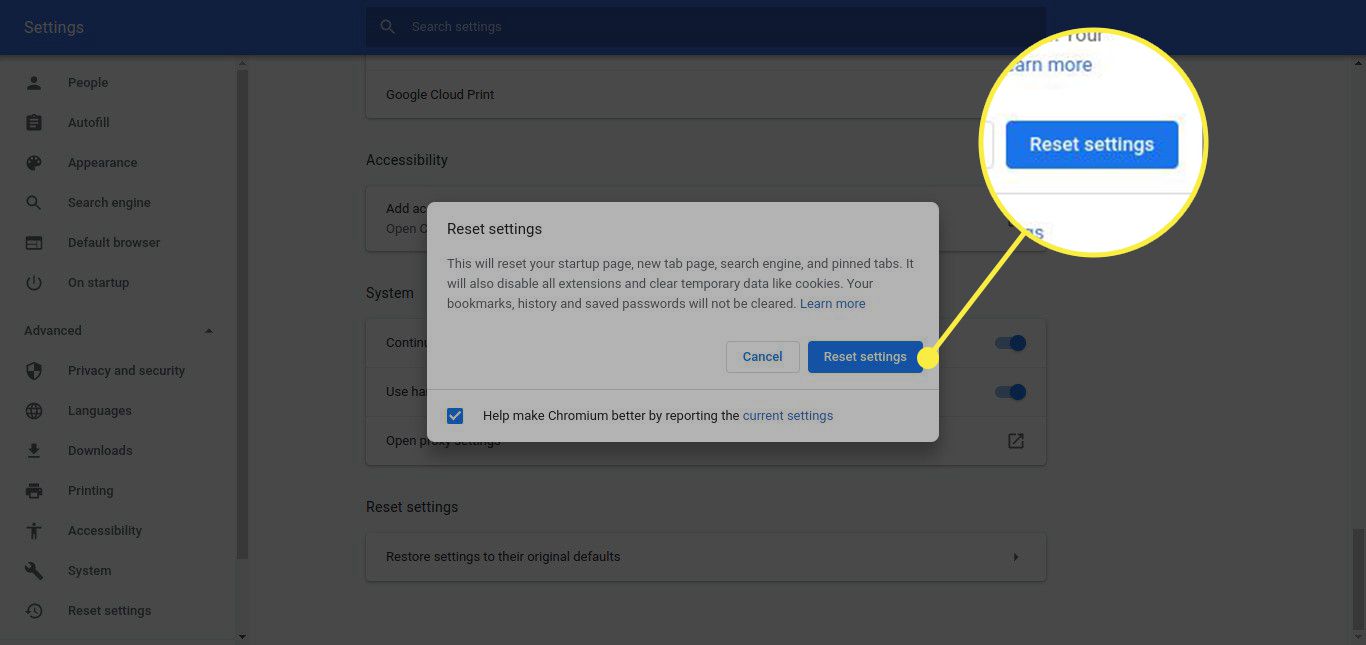
-
Reset Settings: Under the "Reset and clean up" section, click on "Restore settings to their original defaults." This action will prompt a confirmation dialog.
-
Confirm Reset: To proceed with the reset, click on "Reset settings." Chrome will then revert to its default state, including search engine, homepage, and startup tabs.
On Mobile Devices:
-
Access Chrome Settings: Open the Chrome app on your mobile device and tap on the three vertical dots to access the menu. From there, select "Settings" to enter the browser settings.
-
Navigate to Advanced Settings: Scroll through the settings options and tap on "Advanced" to reveal additional configurations.
-
Reset Settings: Within the "Advanced" section, tap on "Privacy" followed by "Clear browsing data." This will lead you to a screen where you can select "Reset to default settings."
-
Confirm Reset: After selecting "Reset to default settings," a confirmation prompt will appear. Proceed by tapping on "Reset settings" to initiate the reset process.
By following these steps, you can effectively reset Google Chrome to its default settings, ensuring that any customizations or modifications are reverted to the original configurations. This comprehensive reset can help eliminate persistent issues and streamline the browser's performance, providing a fresh start for your browsing experience.
In the next section, we'll explore the crucial process of clearing browsing data, which further contributes to the comprehensive reset of Google Chrome.
Step 3: Clearing Browsing Data
Clearing browsing data is a pivotal step in the process of completely resetting Google Chrome. Over time, the accumulation of browsing history, cookies, cached images and files, and other site data can not only consume valuable storage space but also impact the browser's performance. By clearing this data, you can effectively declutter Chrome and enhance its efficiency. Here's a detailed guide on how to clear browsing data in Google Chrome:
On Desktop:
- Access Chrome Settings: After opening Chrome, click on the three vertical dots in the top-right corner to access the menu. From there, select "Settings" to open the browser settings page.
- Navigate to Privacy and Security: In the settings menu, locate and click on "Privacy and security" in the left-hand sidebar to reveal the privacy settings options.
- Clear Browsing Data: Under the "Privacy and security" section, click on "Clear browsing data." This will open a new tab where you can select the types of data to clear, such as browsing history, cookies, and cached images and files.
- Choose Time Range and Data Types: You can choose the time range for which you want to clear the data, such as the past hour, day, week, or all time. Additionally, select the types of data you want to clear.
- Clear Data: After customizing your preferences, click on "Clear data" to initiate the process. Chrome will then remove the selected browsing data from your browser.
On Mobile Devices:
- Access Chrome Settings: Open the Chrome app on your mobile device and tap on the three vertical dots to access the menu. From there, select "Settings" to enter the browser settings.
- Navigate to Privacy and Security: Scroll through the settings options and tap on "Privacy" to reveal privacy-related configurations.
- Clear Browsing Data: Within the "Privacy" section, tap on "Clear browsing data." This will lead you to a screen where you can select the types of data to clear, such as browsing history, cookies, and cached images and files.
- Choose Time Range and Data Types: Similar to the desktop process, you can choose the time range and select the types of data you want to clear.
- Clear Data: After customizing your preferences, tap on "Clear data" to initiate the process. Chrome will then remove the selected browsing data from your browser.
By clearing browsing data, you can effectively remove clutter and optimize Chrome's performance, leading to a smoother and more efficient browsing experience. This step, when combined with resetting Chrome to its default settings, contributes to a comprehensive reset that can address various issues and enhance the browser's overall stability and responsiveness.
Step 4: Reinstalling Chrome (Optional)
In some cases, if you've encountered persistent issues with Google Chrome despite performing a complete reset, reinstalling the browser can serve as a viable solution. Reinstalling Chrome can effectively address underlying software conflicts, corrupted installation files, or other technical issues that may be impeding the browser's performance. While this step is optional and typically reserved for more severe or persistent problems, it can provide a fresh start and ensure that you're working with a clean, updated version of the browser.
Here's a detailed guide on how to reinstall Google Chrome on your desktop or mobile device:
On Desktop:
-
Uninstall Chrome: Begin by uninstalling the existing Chrome application from your computer. On Windows, you can do this by navigating to "Control Panel > Programs > Programs and Features," selecting Google Chrome from the list of installed programs, and clicking "Uninstall." On a Mac, simply drag the Chrome application from the "Applications" folder to the Trash.
-
Download the Latest Version: After uninstalling Chrome, visit the official Google Chrome website to download the latest version of the browser. Ensure that you download the appropriate version for your operating system.
-
Install Chrome: Once the download is complete, follow the installation prompts to reinstall Google Chrome on your computer. This will provide you with a fresh, updated version of the browser, free from any potential issues that may have affected the previous installation.
On Mobile Devices:
-
Uninstall Chrome: On your mobile device, locate the Chrome app and proceed to uninstall it. The exact method for uninstalling apps may vary depending on your device's operating system, but it typically involves long-pressing the app icon and selecting the uninstall option.
-
Download the Latest Version: Visit the respective app store for your mobile device (e.g., Google Play Store for Android or the App Store for iOS) and search for Google Chrome. Download and install the latest version of the Chrome app.
-
Reinstall Chrome: Once the installation is complete, open the newly installed Chrome app and proceed with the initial setup, including signing in to your Google account and customizing any preferences or settings.
By following these steps, you can effectively reinstall Google Chrome, providing a clean slate and ensuring that any underlying issues from the previous installation are resolved. While this step is optional and typically reserved for more severe or persistent issues, it can serve as a final measure to address any lingering problems and ensure a smooth, optimized browsing experience.
This optional step, when combined with the preceding steps of resetting Chrome to default settings and clearing browsing data, offers a comprehensive approach to addressing issues and optimizing the performance of Google Chrome.
Conclusion
In conclusion, the process of completely resetting Google Chrome is a powerful tool for addressing a myriad of issues and revitalizing the browsing experience. By following the step-by-step guide outlined in this article, users can effectively restore Chrome to its default state, clear accumulated browsing data, and even opt for a fresh reinstall if necessary. This comprehensive approach not only resolves existing issues but also contributes to optimizing the browser's performance and stability.
Through the initial step of accessing Chrome settings, users gain access to a wealth of customization options and essential features, setting the stage for the subsequent reset process. Resetting Chrome to its default settings serves as a foundational step, effectively eliminating potential conflicts and irregularities that may have accumulated over time. This action provides a fresh start, ensuring that any customizations or modifications are reverted to the original configurations.
Clearing browsing data further enhances the reset process by decluttering Chrome and optimizing its efficiency. By removing accumulated browsing history, cookies, and cached data, users can streamline the browser's performance, leading to a smoother and more efficient browsing experience. This step, when combined with resetting Chrome to default settings, contributes to a comprehensive reset that can address various issues and enhance the browser's overall stability and responsiveness.
Additionally, the optional step of reinstalling Chrome provides a final measure for addressing persistent or severe issues. While typically reserved for more challenging scenarios, reinstalling Chrome can effectively resolve underlying software conflicts and ensure a clean, updated version of the browser, free from any potential issues that may have affected the previous installation.
In essence, the process of completely resetting Google Chrome empowers users to take control of their browsing experience, address persistent issues, and optimize the browser's performance. Whether it's sluggish performance, unresponsive tabs, or unexpected errors, a comprehensive reset can breathe new life into Chrome, providing a refreshed and seamless browsing journey.
By leveraging the steps outlined in this guide, users can navigate the process of completely resetting Google Chrome with confidence, knowing that they have the tools to address a wide range of issues and revitalize their interaction with the web. Whether you're a tech enthusiast or a casual user, this guide is designed to make the reset process straightforward and accessible, ensuring that you can enjoy a seamless and optimized browsing experience with Google Chrome.