Introduction
Adding a new email account to Mozilla Thunderbird can be a seamless process that allows you to consolidate all your email correspondence in one convenient location. Whether you're setting up a personal email account or integrating a work-related email, Thunderbird offers a user-friendly interface and robust features to streamline your email management. By following a few simple steps, you can effortlessly configure your new email account and enjoy the benefits of Thunderbird's versatile email client.
Thunderbird, developed by the Mozilla Foundation, is a popular and free email application that provides a range of features to enhance your email experience. From customizable email organization to advanced search capabilities, Thunderbird offers a comprehensive platform for managing your email accounts efficiently. With its support for various email protocols, including IMAP and POP3, Thunderbird accommodates diverse email setups, making it a versatile choice for users with different email service providers.
In this guide, we will walk through the process of adding a new email account to Mozilla Thunderbird. Whether you're a seasoned Thunderbird user or exploring it for the first time, this step-by-step tutorial will equip you with the knowledge to seamlessly integrate your email account into Thunderbird's intuitive interface. By the end of this tutorial, you'll be ready to harness the full potential of Thunderbird's email management capabilities, ensuring that your email communication remains organized and accessible.
Now, let's dive into the steps required to add a new email account to Mozilla Thunderbird and unlock the convenience and efficiency it offers for managing your email correspondence.
Step 1: Open Mozilla Thunderbird
To begin the process of adding a new email account to Mozilla Thunderbird, the first step is to launch the Thunderbird application on your computer. You can typically find the Thunderbird icon on your desktop or in the applications folder on your system. Upon locating the Thunderbird icon, double-click on it to initiate the application.
As the Thunderbird application launches, you will be greeted by the main interface, which serves as the central hub for managing your email accounts, folders, and messages. The interface is designed to provide a user-friendly experience, allowing you to navigate through your email correspondence with ease.
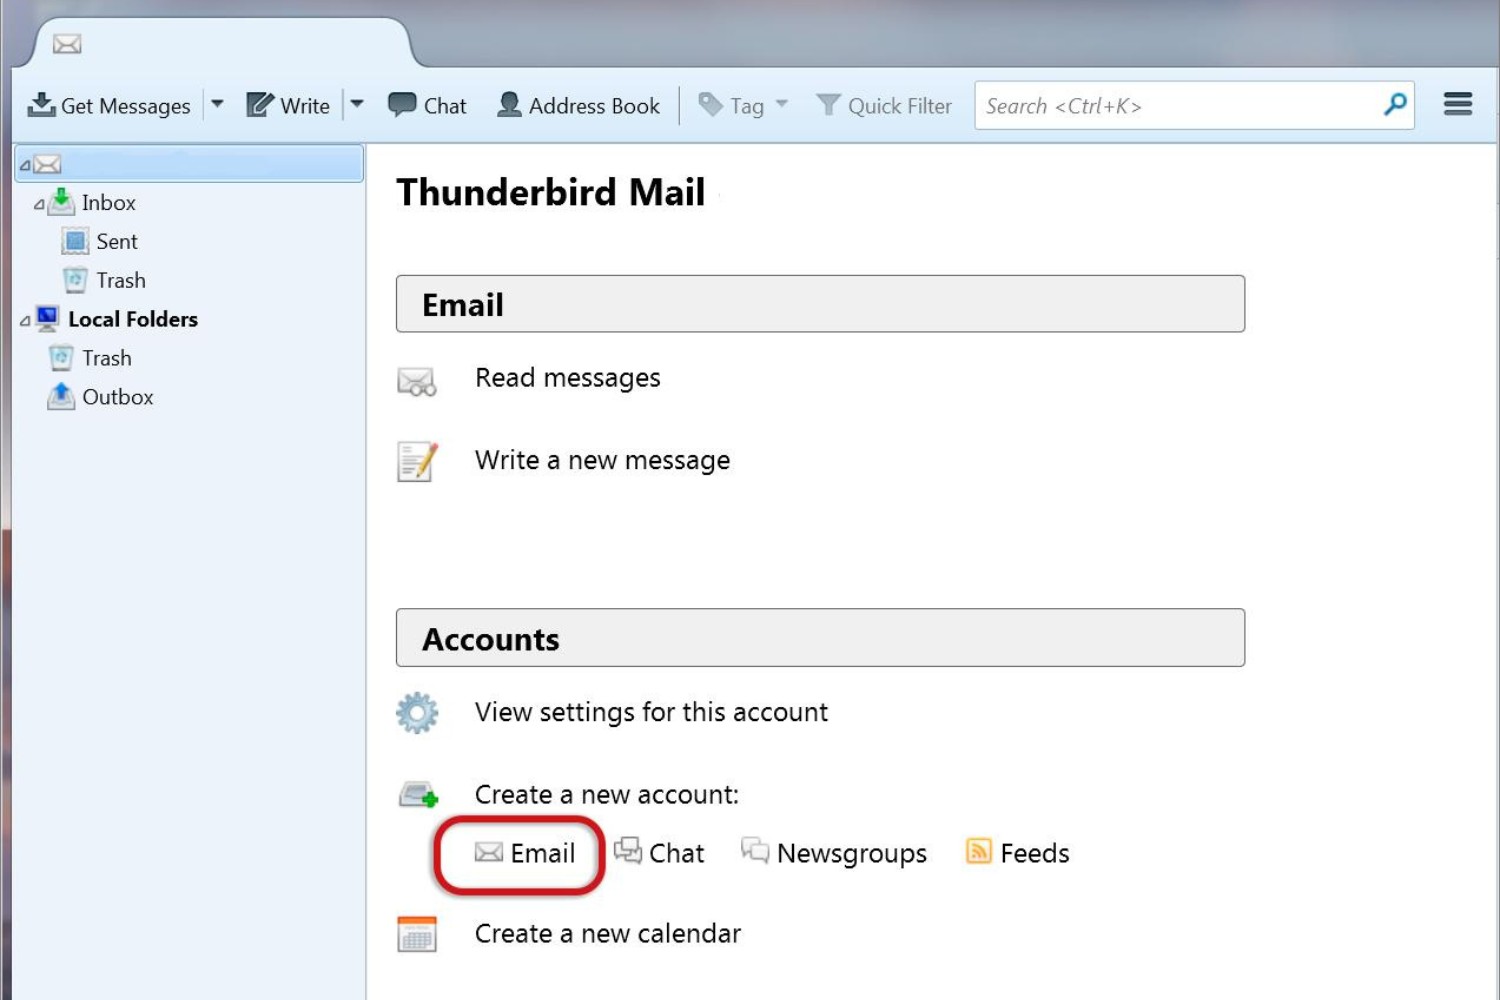
Upon opening Thunderbird, you will notice the primary navigation panel on the left-hand side, which displays your existing email accounts and folders. This panel enables you to switch between different email accounts and access specific folders within each account. Additionally, the top navigation bar offers quick access to essential features such as email composition, address book, and settings.
By opening Mozilla Thunderbird, you gain access to a versatile email management platform that empowers you to organize, send, and receive emails seamlessly. Whether you're a casual email user or rely on email for professional communication, Thunderbird's intuitive interface and robust features cater to a diverse range of email management needs.
With Thunderbird now open, you are ready to proceed to the next step in the process of adding a new email account. The familiar and user-friendly interface of Thunderbird sets the stage for a straightforward and efficient account setup process, ensuring that you can seamlessly integrate your new email account into the application.
As you embark on this journey to expand your email management capabilities with Thunderbird, the simple act of opening the application marks the beginning of a streamlined and organized approach to handling your email correspondence. With Thunderbird at your fingertips, you are well-positioned to harness the full potential of its features and optimize your email management experience.
Step 2: Click on "Account Settings"
After launching Mozilla Thunderbird, the next crucial step in adding a new email account is to access the "Account Settings" section. This pivotal feature serves as the gateway to configuring and managing your email accounts within Thunderbird's interface.
To navigate to the "Account Settings" section, direct your attention to the top navigation bar of the Thunderbird interface. Here, you will find a menu labeled "Tools." Click on this menu to reveal a dropdown list of options. Among these options, you will find "Account Settings." Click on "Account Settings" to access the dedicated area where you can manage your existing email accounts and add new ones.
Upon clicking "Account Settings," a new window will open, presenting a comprehensive overview of your current email accounts and their respective settings. This window serves as the central hub for managing all aspects of your email accounts within Thunderbird. From configuring server settings to customizing folder structures, the "Account Settings" section offers a range of options to tailor your email management experience to your specific preferences.
Within the "Account Settings" window, you will find a navigation panel on the left-hand side, displaying a list of your existing email accounts. This panel allows you to select a specific email account and modify its settings as needed. Additionally, the main area of the window presents a series of tabs, each corresponding to different aspects of email account management, such as server settings, composition and addressing, and copies & folders.
As you embark on the process of adding a new email account, the "Account Settings" section becomes a pivotal destination within Thunderbird, empowering you to seamlessly integrate your new email account into the application's framework. By providing a centralized platform for managing email accounts, Thunderbird streamlines the process of configuring and maintaining multiple email addresses, ensuring that you can effortlessly access and organize your email correspondence.
With the "Account Settings" section now accessible, you are poised to progress to the subsequent steps in adding a new email account to Mozilla Thunderbird. This foundational stage sets the stage for a seamless and efficient account setup process, underscoring Thunderbird's commitment to providing a user-friendly and comprehensive email management solution.
Step 3: Click on "Account Actions" and select "Add Mail Account"
Once you have accessed the "Account Settings" section within Mozilla Thunderbird, the next pivotal step in adding a new email account is to utilize the "Account Actions" feature and select "Add Mail Account." This essential functionality serves as the gateway to initiating the process of integrating your new email account into Thunderbird's intuitive interface.
To proceed with this step, direct your attention to the top portion of the "Account Settings" window. Here, you will find a button labeled "Account Actions." Clicking on this button reveals a dropdown menu containing a range of account-related actions. Among these options, you will find "Add Mail Account." Selecting this option triggers the commencement of the account setup process, allowing you to input the necessary details to configure your new email account within Thunderbird.
Upon selecting "Add Mail Account," a new window will prompt you to enter essential information, including your name, email address, and password. This straightforward and user-friendly interface streamlines the initial setup phase, enabling you to input the required details with ease. By providing a seamless entry point for adding a new email account, Thunderbird simplifies the process of expanding your email management capabilities within its platform.
The "Add Mail Account" feature within Thunderbird exemplifies the application's commitment to user convenience and accessibility. By consolidating the account setup process into a few simple steps, Thunderbird empowers users to seamlessly integrate new email accounts, fostering a cohesive and organized email management experience.
As you embark on the process of adding a new email account by clicking on "Account Actions" and selecting "Add Mail Account," Thunderbird's intuitive interface and streamlined workflow pave the way for a hassle-free setup process. This pivotal stage marks the beginning of a seamless integration process, positioning your new email account within Thunderbird's comprehensive framework.
With the initial setup phase initiated through the "Add Mail Account" feature, you are now poised to progress to the subsequent steps, further customizing and configuring your new email account within Mozilla Thunderbird. This foundational stage underscores Thunderbird's commitment to providing a user-centric email management solution, ensuring that users can effortlessly expand their email capabilities within the application's intuitive environment.
Step 4: Enter Your Name, Email Address, and Password
As you embark on the process of adding a new email account to Mozilla Thunderbird, the next crucial step involves entering your name, email address, and password. This pivotal stage serves as the initial point of contact for integrating your new email account into Thunderbird's versatile platform, laying the foundation for seamless communication and organization of your email correspondence.
Upon selecting "Add Mail Account" in the previous step, a new window will prompt you to input your personal information, including your name, email address, and password. This straightforward and user-friendly interface streamlines the initial setup phase, enabling you to input the required details with ease. By providing a seamless entry point for adding a new email account, Thunderbird simplifies the process of expanding your email management capabilities within its platform.
When entering your name, consider using the name you wish to display as the sender when composing emails. This could be your full name, a nickname, or any other identifier you prefer. Your chosen name will be visible to recipients when they receive emails from your new account, adding a personalized touch to your correspondence.
Next, input your email address, ensuring accuracy to facilitate seamless communication. Your email address serves as the unique identifier for your account, allowing Thunderbird to route incoming and outgoing messages effectively. Double-check the email address to avoid any potential errors that could hinder the functionality of your new account.
Finally, enter the password associated with your email account. This confidential credential serves as a crucial security measure, safeguarding access to your email correspondence. By inputting your password, you authenticate your identity and establish a secure connection between Thunderbird and your email service provider, ensuring the confidentiality and integrity of your communication.
As you progress through this stage, the act of entering your name, email address, and password signifies the establishment of a direct link between Thunderbird and your new email account. This foundational connection sets the stage for seamless communication and efficient email management within Thunderbird's intuitive interface, underscoring the application's commitment to user-centric design and functionality.
With your personal information and credentials securely inputted, you are now poised to progress to the subsequent steps, further customizing and configuring your new email account within Mozilla Thunderbird. This foundational stage underscores Thunderbird's commitment to providing a user-centric email management solution, ensuring that users can effortlessly expand their email capabilities within the application's intuitive environment.
Step 5: Click on "Continue"
After entering your name, email address, and password in the previous step, the next pivotal action is to click on "Continue" to proceed with the setup of your new email account in Mozilla Thunderbird. This straightforward and intuitive command serves as the catalyst for initiating the verification and configuration process, enabling Thunderbird to establish a secure connection with your email service provider and synchronize your account within its interface.
Upon clicking on "Continue," Thunderbird begins the process of validating the information you provided, ensuring the accuracy and integrity of the details entered. This verification step is essential for confirming the authenticity of your new email account and facilitating seamless communication and synchronization within Thunderbird's framework.
As Thunderbird progresses through the verification phase, it establishes a secure connection with the email server associated with your new account. This connection enables Thunderbird to retrieve essential account settings, such as server configurations and security protocols, ensuring that your email communication remains secure and reliable within the application.
The "Continue" command serves as a seamless bridge between the initial setup phase and the backend processes that enable Thunderbird to seamlessly integrate your new email account. By clicking on "Continue," you set in motion a series of background operations that culminate in the successful addition of your email account to Thunderbird's interface.
As Thunderbird finalizes the verification and configuration processes, you are one step closer to harnessing the full capabilities of your new email account within Thunderbird's intuitive environment. The simple act of clicking on "Continue" signifies the transition from the initial setup phase to the backend operations that ensure the seamless integration and functionality of your new email account.
With the verification and configuration processes initiated by clicking on "Continue," Thunderbird reaffirms its commitment to providing a user-friendly and efficient email management solution. By streamlining the account setup process and automating essential backend operations, Thunderbird empowers users to expand their email capabilities seamlessly, ensuring a cohesive and organized email management experience.
As Thunderbird progresses through the verification and configuration processes, you are now poised to progress to the subsequent steps, further customizing and configuring your new email account within Mozilla Thunderbird. This pivotal stage underscores Thunderbird's commitment to providing a user-centric email management solution, ensuring that users can effortlessly expand their email capabilities within the application's intuitive environment.
Step 6: Select the Type of Email Account (IMAP or POP3)
Once you have successfully initiated the setup process for your new email account in Mozilla Thunderbird, the next crucial step involves selecting the type of email account, specifically choosing between IMAP (Internet Message Access Protocol) and POP3 (Post Office Protocol 3). This pivotal decision determines the method through which Thunderbird interacts with your email server, influencing how your emails are retrieved, stored, and synchronized within the application.
Understanding IMAP and POP3
IMAP and POP3 represent two distinct protocols for managing email communication, each offering unique functionalities and implications for email management within Thunderbird. Understanding the differences between these protocols is essential for making an informed decision that aligns with your specific email management needs.
IMAP (Internet Message Access Protocol)
IMAP is a widely utilized email protocol that emphasizes synchronization and accessibility. When you opt for an IMAP configuration, Thunderbird establishes a dynamic and synchronized connection with your email server, enabling seamless access to your emails from multiple devices. With IMAP, emails remain stored on the server, allowing you to access your complete email history from any device with an internet connection. Additionally, changes made to emails, such as read/unread status and folder organization, are synchronized across all devices, ensuring a consistent email experience.
POP3 (Post Office Protocol 3)
POP3, in contrast, follows a more traditional approach to email retrieval and storage. When configuring your email account with POP3, Thunderbird retrieves emails from the server and stores them locally on your device. Unlike IMAP, POP3 does not emphasize synchronization, and emails are typically removed from the server once downloaded. This configuration is suitable for users who prefer to manage their emails primarily from a single device and prioritize local storage over server-based accessibility.
Making the Selection
When prompted to select the type of email account during the setup process, carefully consider your email management preferences and usage patterns. If you value accessibility and synchronization across multiple devices, IMAP offers a compelling solution, ensuring that your emails remain accessible and consistent regardless of the device you use. On the other hand, if you prioritize local storage and primarily access emails from a single device, POP3 may align more closely with your requirements.
By making an informed decision between IMAP and POP3, you tailor your email account configuration to suit your specific needs, ensuring that Thunderbird aligns with your preferred email management approach. This pivotal selection influences how Thunderbird interacts with your email server, shaping the accessibility, synchronization, and storage of your emails within the application.
As you progress through the setup process and select the type of email account that best aligns with your preferences, Thunderbird reaffirms its commitment to providing a versatile and customizable email management solution, empowering users to tailor their email experience to suit their individual needs and usage patterns.
Step 7: Enter the Incoming and Outgoing Server Settings
After selecting the type of email account that aligns with your preferences, the next pivotal step in adding a new email account to Mozilla Thunderbird involves entering the incoming and outgoing server settings. These essential configurations establish the communication channels through which Thunderbird interacts with your email server, enabling the seamless retrieval and transmission of your email correspondence.
Understanding Incoming Server Settings
The incoming server settings, often referred to as the IMAP or POP3 settings, dictate how Thunderbird connects to your email server to retrieve incoming messages. When configuring these settings, you will typically input the server address, port number, and security protocols associated with your email provider. These details ensure that Thunderbird can establish a secure and reliable connection to retrieve your incoming emails effectively.
Configuring Outgoing Server Settings
Similarly, the outgoing server settings, also known as the SMTP (Simple Mail Transfer Protocol) settings, facilitate the transmission of your outgoing emails through your email server. When configuring these settings, you will input the server address, port number, and security protocols relevant to your email provider. These details enable Thunderbird to securely send your emails, ensuring that your outgoing correspondence reaches its intended recipients without complications.
Inputting Server Details
When prompted to enter the incoming and outgoing server settings, it is crucial to refer to the documentation provided by your email service provider. This documentation typically includes the specific server addresses, port numbers, and security protocols required for seamless communication with your email server. By accurately inputting these details into Thunderbird's setup interface, you establish a secure and reliable connection that facilitates the seamless retrieval and transmission of your email correspondence.
Security Considerations
In addition to the server addresses and port numbers, the security protocols associated with your email server play a critical role in safeguarding the confidentiality and integrity of your email communication. Thunderbird supports various security protocols, including SSL/TLS encryption, ensuring that your email correspondence remains protected during transmission. By configuring the appropriate security protocols within the incoming and outgoing server settings, you reinforce the privacy and security of your email communication within Thunderbird.
Seamless Integration
As you input the incoming and outgoing server settings, Thunderbird solidifies its commitment to providing a user-friendly and comprehensive email management solution. By streamlining the configuration process and accommodating diverse email service providers, Thunderbird empowers users to seamlessly integrate their email accounts, ensuring a cohesive and organized email management experience within its intuitive interface.
By meticulously configuring the incoming and outgoing server settings, you establish a secure and reliable communication channel between Thunderbird and your email server, underscoring Thunderbird's commitment to providing a versatile and customizable email management solution.
Step 8: Click on "Done"
Upon completing the essential configurations for your new email account within Mozilla Thunderbird, the final and pivotal step involves clicking on "Done" to finalize the setup process. This simple yet significant action serves as the culmination of the account integration journey, signaling the successful addition of your email account to Thunderbird's intuitive interface.
By clicking on "Done," you affirm the completion of the setup process, indicating that all necessary details, including account credentials, server settings, and security configurations, have been accurately inputted and validated. This action triggers Thunderbird to save and apply the configured settings, ensuring that your new email account seamlessly integrates into the application's framework.
As you click on "Done," Thunderbird solidifies the connection between your email account and the application, enabling seamless access to your email correspondence, folders, and contacts within Thunderbird's user-friendly interface. This pivotal action marks the transition from the setup phase to the active utilization of your new email account, empowering you to send, receive, and manage emails efficiently within Thunderbird.
The act of clicking on "Done" signifies the achievement of a streamlined and organized email management experience within Thunderbird. By consolidating the setup process into a few simple steps and culminating in the "Done" command, Thunderbird underscores its commitment to providing a user-centric and efficient email client, ensuring that users can effortlessly expand their email capabilities within its intuitive environment.
With the setup process finalized through the click on "Done," you are now poised to harness the full potential of Thunderbird's robust features, including customizable email organization, advanced search capabilities, and seamless integration with diverse email service providers. This foundational stage sets the stage for a cohesive and efficient email management experience, ensuring that your email communication remains accessible and organized within Thunderbird's versatile platform.
As you click on "Done," Thunderbird reaffirms its commitment to providing a user-friendly and comprehensive email management solution, empowering users to seamlessly integrate their email accounts and optimize their email communication experience within its intuitive environment.