Introduction
Are you an iPhone user looking to download files onto your device? Whether it’s a document, photo, video, or any other file, the process might seem a bit tricky at first. However, with the right knowledge, downloading files on your iPhone can be a breeze.
In this article, we will guide you through the process of downloading files on your iPhone. We will explore various methods and tools that you can use to effortlessly save files from different sources onto your device. By the end of this article, you will have a clear understanding of how to download files on your iPhone and have them readily available for offline access.
Understanding the various file formats and sources is crucial before diving into the downloading process. Whether you need to download a file from a website, email attachment, or cloud storage service, having a strong grasp of the different file formats and sources will help you navigate the process effectively.
To download files on your iPhone, you can make use of Safari, the default web browser, as well as various third-party file management apps. Additionally, you can download files directly from email attachments and popular cloud storage services like iCloud, Google Drive, or Dropbox.
Downloading files onto your iPhone not only allows you to access them offline but also enables you to transfer and share them with others easily. So, without further ado, let’s delve into the various methods and techniques for downloading files on your iPhone.
Understanding File Formats
Before jumping into the process of downloading files on your iPhone, it is important to have a basic understanding of different file formats. This knowledge will help you determine the compatibility of files with your device and the appropriate apps required to open them.
Common file formats you might encounter include:
- PDF: Portable Document Format (PDF) is widely used for documents that need to be viewed and shared without losing formatting. You can easily view PDF files on your iPhone using the built-in Apple Books app or popular third-party PDF readers like Adobe Acrobat Reader.
- JPEG and PNG: These are image file formats commonly used for photos and graphics. The iPhone’s native Photos app can handle these file formats, allowing you to view and share images effortlessly.
- MP3 and AAC: These are audio file formats used for music and audio recordings. The default Music app on your iPhone supports these formats, allowing you to play downloaded music files directly on your device.
- MP4 and MOV: These are video file formats used for movies, videos, and recordings. The default Videos app on your iPhone can play these file formats, ensuring seamless playback of downloaded videos.
- ZIP and RAR: These are compressed file formats used to compress multiple files into a single archive, making it easier to download and share multiple files at once. There are several third-party apps available on the App Store that can help you extract files from these formats.
Understanding these file formats will enable you to choose the appropriate apps or tools to open and view downloaded files. Additionally, it’s important to note that some file formats might require specific apps or software that are not built into the iPhone. In such cases, you can find suitable apps on the App Store to handle those file formats.
Now that you have a basic understanding of different file formats, let’s move on to exploring the various methods for downloading files on your iPhone.
Finding the File to Download
To download a file on your iPhone, you first need to locate it. Depending on the source of the file, there are several ways to find the file you want to download.
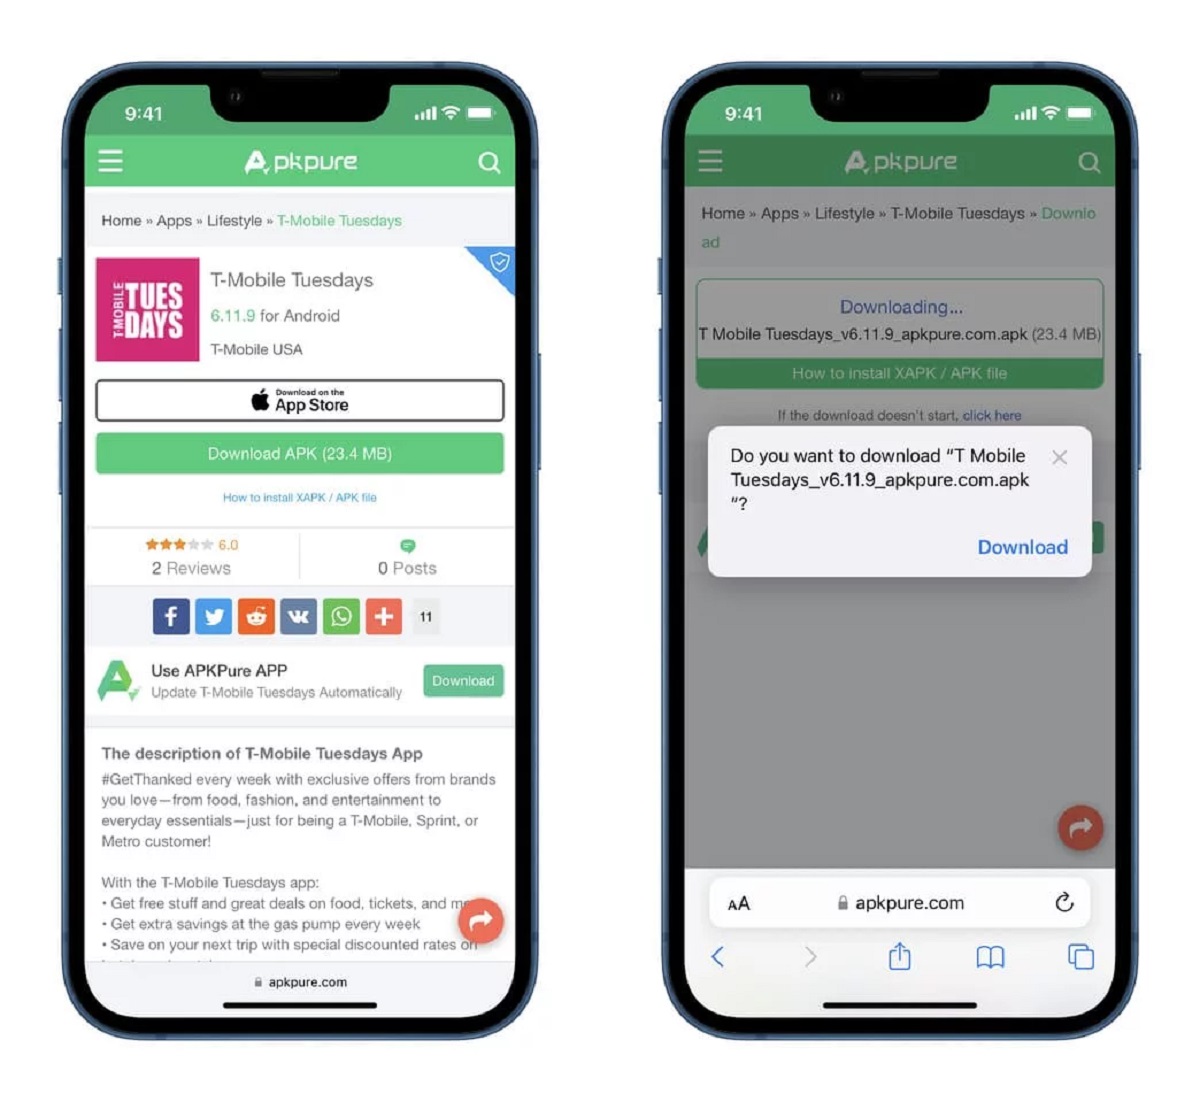
If you are downloading a file from a website, open the Safari browser on your iPhone and navigate to the webpage where the file is located. Once you are on the webpage, you can search for a download link or button that corresponds to the file you want to download. This link or button is usually labeled with words like “Download” or an icon that represents downloading.
If you are downloading a file from an email attachment, open the Mail app on your iPhone and find the email that contains the attachment. Tap on the email to open it, then locate the attachment within the email. It may be displayed at the bottom of the email or within the body of the email itself. Tap on the attachment to preview it, and you will see an option to download it. Tap on the download icon to initiate the download process.
If you are downloading a file from a cloud storage service, such as iCloud, Google Drive, or Dropbox, you will need to open the respective app on your iPhone. Once you are in the app, navigate to the file or folder that contains the file you want to download. Tap on the file, and you will see options to download or save the file for offline access. Select the appropriate option to begin the download process.
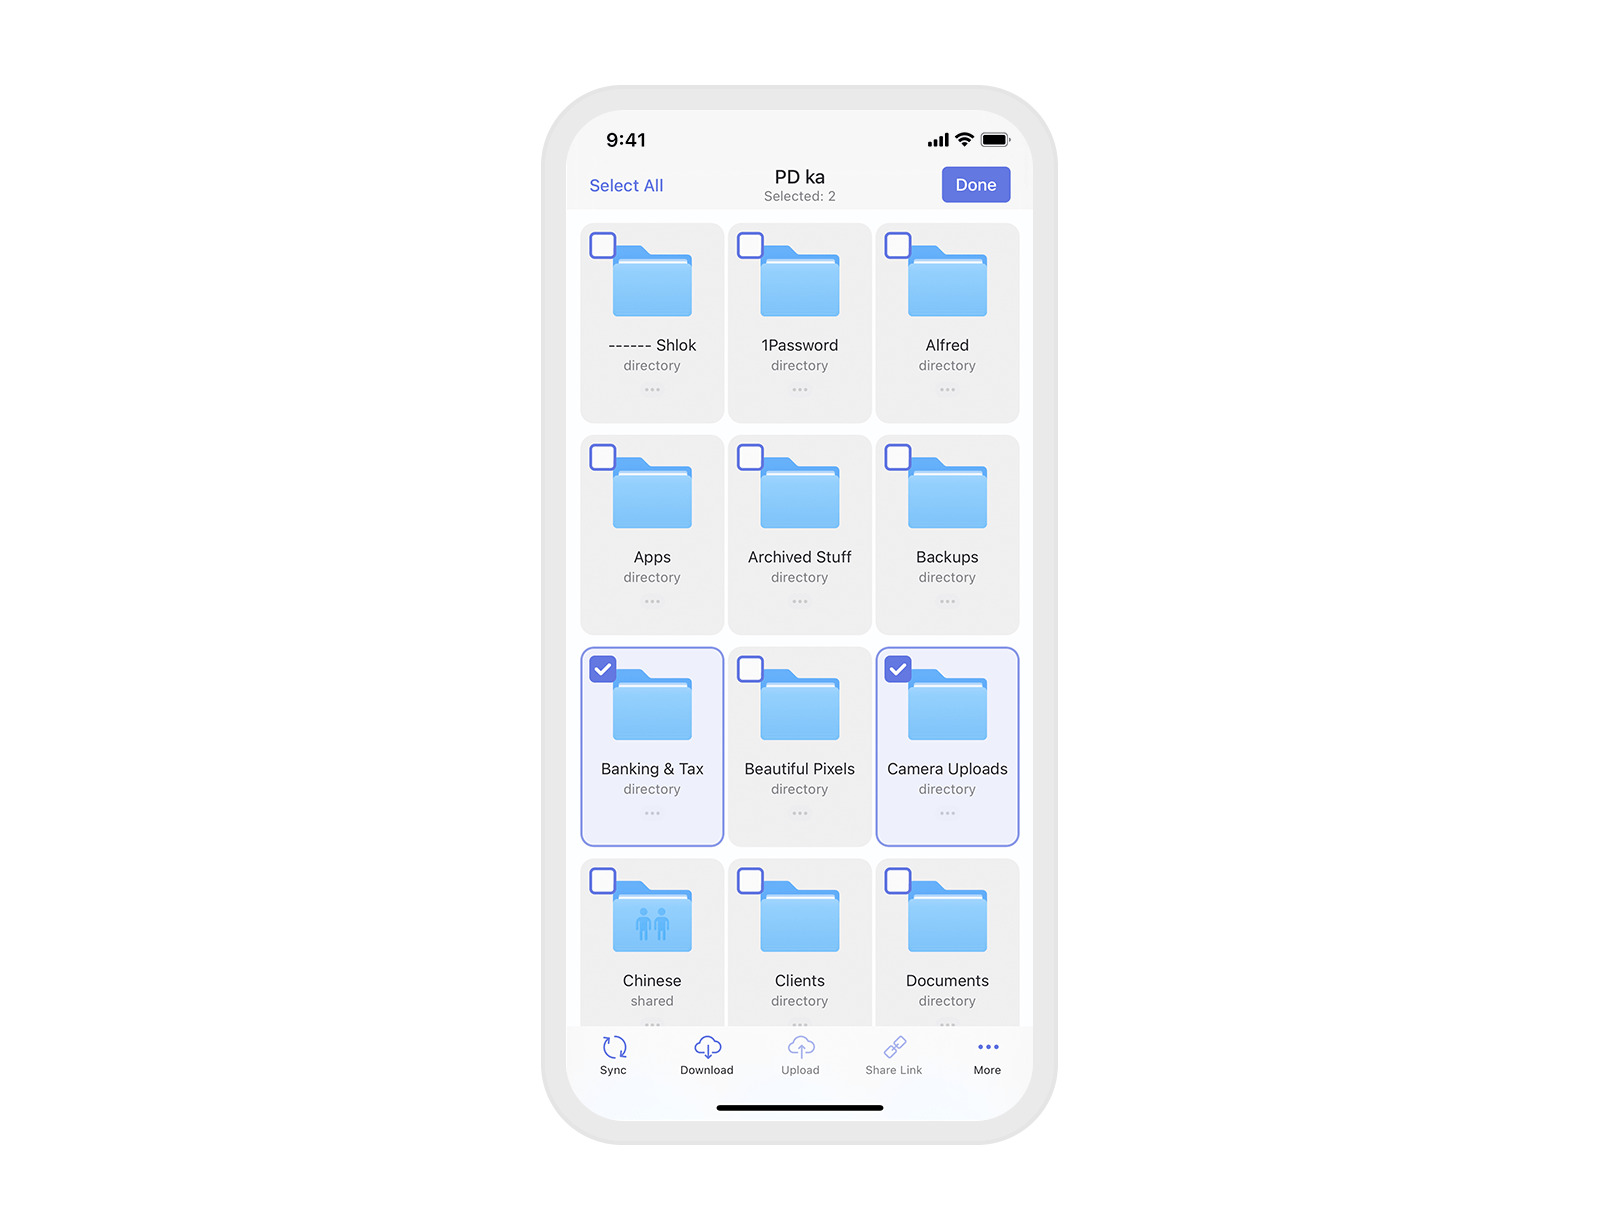
In some cases, you may have already downloaded a file on your iPhone but need to locate it within the device. To do this, use the Files app, which is the default file manager on iOS devices. Open the Files app and navigate to the appropriate location, such as “Downloads” or a specific folder where you saved the file. From there, you can view, organize, and manage your downloaded files.
Once you have located the file you want to download, it’s time to proceed with the actual downloading process. The next sections will cover various methods for downloading files on your iPhone using Safari, email attachments, cloud storage services, and file management apps.
Using Safari to Download Files
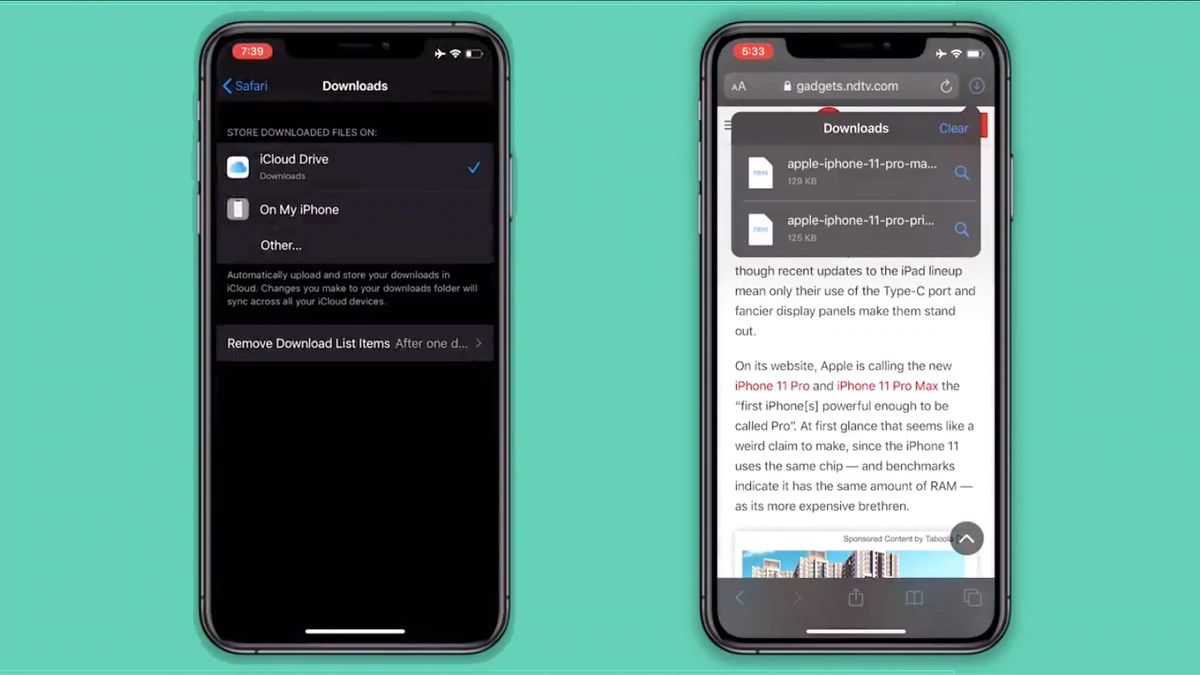
Safari, the default web browser on your iPhone, provides a straightforward method for downloading files directly from websites. Follow these steps to download files using Safari:
- Open Safari on your iPhone and navigate to the website that contains the file you want to download.
- Once you are on the webpage, locate the download link or button that corresponds to the file you want to download. It may be labeled as “Download” or represented by an icon such as an arrow pointing downwards.
- Tap on the download link or button, and Safari will initiate the download process. You will see a progress indicator at the top of the Safari window.
- Once the download is complete, you will see a notification at the top of the screen. You can tap on the notification to directly access the downloaded file, or you can find it in the Downloads folder within the Files app.
When downloading files using Safari, it’s important to note that certain file types might prompt additional actions after the download is complete. For example, downloading a PDF file might open the file in the Apple Books app for previewing or saving. Similarly, downloading a music or video file might prompt you to open it in the Music or Videos app for playback.
Additionally, Safari allows you to manage your downloaded files and remove them once they are no longer needed. To do this, open the Safari app and tap on the bookmarks icon (represented by an open book) at the bottom of the screen. Select the “Downloads” option, and you will see a list of all your downloaded files. From there, you can preview, share, or delete the downloaded files as needed.
Using Safari to download files on your iPhone is convenient and efficient. Whether you need to download documents, images, videos, or any other files, Safari provides a seamless experience for accessing and managing your downloaded files.
Downloading Files from Email Attachments
Email attachments are a common way to receive files on your iPhone. Whether it’s a document, photo, or any other file, you can easily download and access email attachments using the built-in Mail app. Here’s how to download files from email attachments on your iPhone:
- Open the Mail app on your iPhone and find the email that contains the attachment you want to download.
- Tap on the email to open it and scroll through the email content to locate the attachment. The attachment may be displayed at the bottom of the email or within the body of the email itself.
- Tap on the attachment to preview it. In some cases, you may see a download icon directly on the attachment, or you may need to tap on a button that says “Download” or “Save”.
- Once you tap on the download option, the attachment will be saved to your iPhone. You will receive a notification at the top of your screen once the download is complete.
- To access the downloaded file, you can tap on the notification to open it directly, or you can open the Files app on your iPhone and navigate to the appropriate location, such as the Downloads folder. From there, you can view, share, or manage the downloaded file.
It’s worth mentioning that depending on the file type, the downloaded attachment may open in a specific app on your iPhone. For example, a PDF attachment might open in the Apple Books app for reading, while an image attachment may open in the Photos app for viewing and editing.
Once you have downloaded the attachment, you can take further actions based on your needs. For instance, you can share the file with others via email, message, or cloud storage services. You also have the option to organize the downloaded file within the Files app by creating folders or categorizing them for easy access.
Downloading files from email attachments is a quick and efficient way to access important files sent to your iPhone. Whether it’s work-related documents or personal multimedia files, the Mail app simplifies the process of downloading and managing email attachments on your device.
Downloading Files from Cloud Storage Services
Cloud storage services, such as iCloud, Google Drive, and Dropbox, offer a convenient way to store and access your files across multiple devices. If you have files saved in these cloud storage accounts, you can easily download them onto your iPhone for offline access. Here’s how to download files from cloud storage services:
- Open the respective cloud storage app on your iPhone, such as iCloud, Google Drive, or Dropbox. Make sure you are logged in to your account.
- Navigate to the file or folder that contains the file you want to download. You may need to browse through different folders or use the search functionality within the app.
- Once you have located the file, tap on it to select it. Depending on the cloud storage app, you may see options like “Download”, “Save”, or an arrow pointing downwards.
- Tap on the appropriate option to initiate the download process. The file will be saved onto your iPhone, and a notification will appear once the download is complete.
- To access the downloaded file, you can either tap on the notification to open it directly, or you can open the Files app on your iPhone and navigate to the appropriate location. Within the Files app, you can organize, view, or share the downloaded file as needed.
It’s important to note that cloud storage services offer various additional features to enhance file management on your iPhone. For example, you can create folders, share files or folders with others, and even collaborate on documents in real-time. Exploring the different features and functionalities of each cloud storage app will enable you to make the most of your cloud storage service.
By downloading files from cloud storage services, you can have your important documents, photos, videos, and other files readily available on your iPhone, even when you don’t have an internet connection. This ensures seamless access to your files on the go, without the need for physical storage or constant internet connectivity.
Downloading Files using File Management Apps
In addition to the default iOS apps like Safari and Mail, there are also third-party file management apps available on the App Store that provide more advanced features and flexibility for downloading and managing files on your iPhone. These apps offer a range of functionalities, including the ability to download files from various sources, organize files into folders, and even connect to cloud storage services. Here’s how to download files using file management apps:
- Go to the App Store on your iPhone and search for file management apps. Some popular options include Files by Apple, Documents by Readdle, and File Manager & Browser by TapMedia.
- Once you’ve decided on a file management app, download and install it on your iPhone.
- Open the file management app and explore its features. Typically, you will find options to browse local files, connect to cloud storage services, and download files from various sources.
- If you want to download a file from a website, use the built-in web browser within the file management app to navigate to the webpage that contains the file. Look for a download link or button, and tap on it to initiate the download.
- If you have received a file as an email attachment, you can open the file management app and access your email account within the app. Locate the email and tap on the attachment to download it.
- Similar to cloud storage services, file management apps often provide integration with popular cloud storage services like iCloud, Google Drive, and Dropbox. You can sign in to your cloud storage account within the app and access your files, as well as download them for offline access.
- Once the file is downloaded, you can find it within the file management app’s directory structure. From there, you can organize, view, share, or perform other actions on the downloaded file.
File management apps offer a more comprehensive solution for downloading and managing files on your iPhone. They provide you with more control over your files, allowing you to easily access and organize them from one central app. With the ability to connect to various sources and services, these apps simplify the process of downloading files onto your iPhone.
Take advantage of the features offered by file management apps to streamline your file organization and access. You can leverage their powerful search capabilities, folder organization, and file tagging systems to quickly find and manage the files you need.
Saving Downloaded Files for Offline Access
Once you have downloaded files onto your iPhone, it’s essential to save them properly for offline access. Saving files ensures that you can access them even when you don’t have an internet connection. Here are some tips for saving downloaded files on your iPhone:
- Use the Files app: The Files app is the default file manager on iOS devices. It allows you to create folders, move files, and organize your downloaded files. Open the Files app and navigate to the location where you want to save the downloaded files. You can create a new folder specifically for downloaded files or save them in existing folders.
- Take advantage of apps’ built-in storage: Some apps have built-in storage features that allow you to save downloaded files within the app itself. For example, if you are using a document editing app, you can save downloaded documents directly in the app’s storage for easy access.
- Cloud storage services: If you regularly use cloud storage services like iCloud, Google Drive, or Dropbox, consider uploading your downloaded files to these services. This ensures that the files are securely backed up in the cloud and can be accessed from any device with an internet connection.
- Make use of offline reading apps: For documents, e-books, or articles that you want to read offline, consider using apps like Apple Books or Kindle. These apps allow you to save and categorize downloaded files for offline reading.
- Remember to back up your downloaded files: It’s important to regularly back up your downloaded files to prevent data loss. You can back up your iPhone using iCloud or iTunes to ensure that your files are safely stored and can be restored if needed.
By saving downloaded files properly, you can create an organized and easily accessible library of files on your iPhone. This ensures that you can access important documents, photos, and other files even when you are not connected to the internet.
Additionally, keep in mind that storage space on your iPhone is limited, so it’s a good idea to regularly review and delete unnecessary downloaded files. This helps optimize storage capacity and ensures that you have enough space for new downloads.
Now that you have learned how to download and save files for offline access, you can enjoy the convenience of having your important files available at your fingertips, regardless of your internet connectivity.
Conclusion
Downloading files on your iPhone can seem daunting at first, but with the right knowledge and tools, it becomes a simple and straightforward process. Understanding different file formats, knowing where to find the files you want to download, and utilizing various methods and apps will allow you to effortlessly download and access files on your iPhone.
In this article, we explored the process of downloading files using Safari, the default web browser, and downloading files from email attachments. We also discussed how to download files from popular cloud storage services and the benefits of using file management apps. Additionally, we highlighted the importance of saving downloaded files for offline access and backing up your files to ensure their safety and availability.
By following the steps outlined in this article, you can easily download and organize files on your iPhone. Whether it’s important documents, treasured photos, or entertaining videos, having downloaded files readily available on your device ensures that you can access and enjoy them anytime, anywhere.
Remember, the key to successful file downloading is to stay organized, regularly clean up unnecessary files, and make use of available storage and cloud storage options. With these practices in mind, you can make the most of your iPhone’s capabilities and enjoy a seamless file downloading experience.
So, go ahead and start downloading files on your iPhone today. Explore the different methods, apps, and services available, and make your iPhone a hub for all your digital content needs.