Beat Saber is a game a lot of VR enthusiasts are sinking their teeth and time into, and for good reason. It’s not only a great game but is also good exercise as many players swear by it. However, the song selection might be a bit on the soft side for some. We’re here to show you how to install new and custom songs on Beat Saber if you want to spice up your gameplay.
What is Beat Saber?

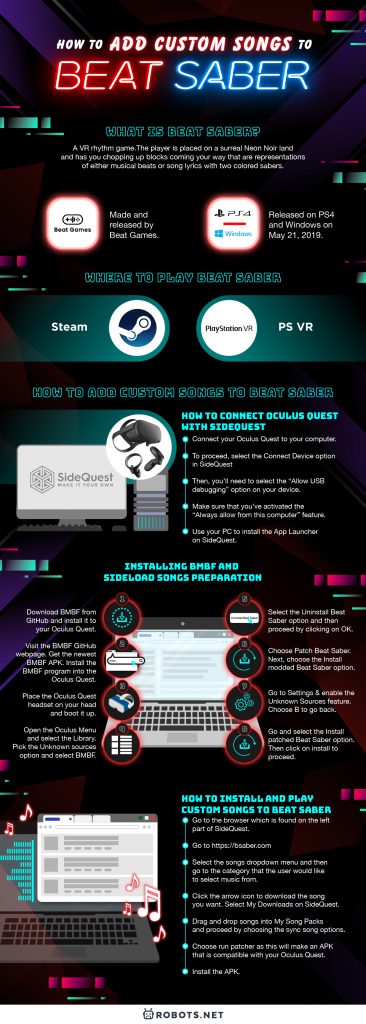
Beat Saber is a VR rhythm game made and released by Beat Games. The player is placed on a surreal Neon Noir land and has you chopping up blocks coming your way that are representations of either musical beats or song lyrics with two colored sabers.
After an early access release back in November 2018, Beat Saber was fully released to the gaming public on PS4 and Windows on the May 21, 2019. The game supports most of the currently available VR headsets such as the PS VR and Oculus Quest. If you’re looking for the best VR games on PC and the best VR headsets, we have articles that can help you out.
How to Play Beat Saber
The game has a good selection of songs from popular artists that you can play with up to five levels of varying difficulty, from Easy to Expert+. The player makes use of the VR motion controllers to use a pair of either normal red and blue blades, or, if you have them, lightsabers. When you start a song, the game immediately sends a barrage of blocks rapidly approaching your way.
These blocks are synchronized with the song’s beats and notes, which are located in 12 possible positions in a 4×3 grid. It also gives players the choice of playing songs using either a 360-degree or a 90-degree orientation. These orientations are where the blocks rapidly approach the player from either a half-circle or all directions.
Matching Colors
Blocks are colored in varied ways that match the color of the saber that has to be used to slice it. There’s also a chance that the blocks are marked with arrows that indicate eight possible directions where said block has to be slashed through. There are also blocks marked with dots instead of arrows. These blocks allow players to slice it from any angle.
When a corresponding block is cut properly by either of the two sabers, it’s immediately destroyed and a score is given to the player based on the sword swing’s length, angle, and accuracy. There are occasional mines that players should avoid hitting, Last but not the least, obstacles take the form of incoming walls that the player’s head should avoid by tilting from left to right.
Be Aware of the White Bar
Lastly, you might have noticed a white bar that can be found at the bottom of the VR Screen where the blocks go. This bar slowly begins to fill up as players cut the incoming blocks correctly. If players hit any of the blocks in a wrong manner or direction, this white bar will be reduced by a small amount. When a player misses a block completely or a block direction chain is not completed, the bar loses a huge chunk. If the bar’s completely gone, the song ends and the final score is given.
Where to Play Beat Saber

It’s best to play Beat Saber in a wide-open area so that you have ample space to move. Make sure that you take out things that could bump into you or disturb you when playing as it’ll break the immersion. You can play Beat Saber on Steam and PS VR.
How to Set Up Beat Saber
Beat Saber needs a few things to setup. For one, you need a VR headset to even start the VR component. After you’ve got an Oculus or any VR-capable headset, it’s important to have space where you can play the game without bumping into anything, preferably a cleared-out living room or a good-sized gaming room. Other than that, you’re good to go after some edits on the settings to maximize the game’s performance.
How to Add Custom Songs to Beat Saber
On Oculus Quest


Beat Saber is one of, if not the best, titles available on the Oculus Quest. Even if the game has a great selection of songs already built in and has more available through DLC, it’s still a bit lacking when it comes to some bands, tracks, and OSTs.
Thus, it’s a great thing that the game’s player base made custom song levels available for Beat Saber.
Preparing Your Oculus Quest for Sideloading
Sideloading content to your Oculus Quest is not as difficult as you think, thanks mostly to a program called SideQuest. We’ll show you how to install and do this below, but you need Oculus Quest to be able to sideload content.
The first thing that the user needs to do to make Oculus Quest be able to sideload apps is to make sure that the phone is on developer mode. Here’s how you can do this process.
- Launch your Oculus app.
- Choose the Settings option and select your Oculus Quest headset.
- Press the drop-down arrow for more options if said options that don’t show up right after selecting your device.
- Next, go and click on more settings.
- Then, you’ll have to select the developer mode option.
- Next, you’ll have to activate developer mode.
- This will lead the user to a website if you haven’t unlocked developer options on another Oculus device before.
- Next, go down and click the link. Create an organization.
- Sign in with an existing Oculus account.
- Rename the new “organization” to your liking.
- Select submit.
- Agree to the terms of the agreement.
- To proceed, you’ll need to relaunch the Oculus app.
- Click on the Settings option and select the Oculus Quest headset.
- Access the dropdown menu from earlier.
- Again, select Setting and Developer Mode. Then, proceed to activate the settings.
How to Set Up SideQuest on Your PC
Download and install SideQuest on your computer by getting the installer from GitHub. It’s easy to install and is available on Windows, Linux, and Mac. To help, here’s a step-by-step guide on installing SideQuest on Windows.
- Visit the SideQuest Github webpage and download SideQuest to your PC.
- Click on that file after downloading. A pop-up window will appear that says “Windows protected your PC.” Proceed by choosing the more info option.
- Select the “Run anyway” option and then Extract.
- Go to the folder that houses the extracted file.
- Look for a folder named “SideQuest-win32-x64” and select the Start SideQuest.exe option.
How to Connect Oculus Quest With SideQuest
Users need to connect their Oculus Quest systems with SideQuest to boot up the latter. Also, this process should be done for you to install any files or apps.
- Connect your Oculus Quest to your computer.
- To proceed, select the Connect Device option in SideQuest
- Then, you’ll need to select the “Allow USB debugging” option on your device.
- Make sure that you’ve activated the“Always allow from this computer” feature.
- Use your PC to install the App Launcher on SideQuest.
Then, the app launcher will create an Unknown Sources folder on the Oculus Quest library. This is for users to find apps and games that they’ve sideloaded. After this, users can now install APKs onto their Oculus Quest.
Creating a Backup
There have been no widespread issues when people sideload custom songs into their Oculus Quest. However, it’s always a good idea to create a backup.
SideQuest knows this and already has an built-in tool on their app to create and manage backups.
- Select browser.
- Go to My Downloads.
- Select backups.
- Go down and look for Beat Saber. Select the settings icon next.
- Lastly, all you need to do is to select the backup APK file option.
After this, users now have a usable backup of their Beat Saber APK in case anything about their sideloading songs goes wrong.
Users also can make use of this same capability of SideQuest to backup and manage backups of apps that users currently have on their Oculus Quest.
Installing BMBF and Sideload Songs Preparation
BMBF is a program that you can also use to sideload songs into Beat Saber. This is due to BeatOn and other methods that used to be available to sideload songs before, have now stopped working when Beat Saber made an update, and transitioned to version 1.6. If the user has a newer version of Beat Saber installed, they’ll need to use BMBF if they want to sideload and play songs, not in the base game.
- Download BMBF from GitHub and install it to your Oculus Quest.
- On your browser, visit the BMBF GitHub webpage.
- Get the newest BMBF APK file available.
- Install the BMBF program into the Oculus Quest by dragging the APK files into the SideQuest icon. You can also install the APK using the File Folder option.
- Place the Oculus Quest headset on your head and boot it up.
- Open the Oculus Menu and select the Library. Pick the Unknown sources option and select BMBF.
- Press on Continue to proceed.
- Select the Uninstall Beat Saber option and then proceed by clicking on OK.
- Choose Patch Beat Saber (this step takes a while to do).
- Next, choose the Install modded Beat Saber option.
- Take note that you might get a prompt about unknown sources.
- Go to Settings and enable the Unknown Sources feature.
- Choose B to go back.
- Go and select the Install patched Beat Saber option. Then click on install to proceed.
Thanks to this, user’s now ready to sideload tracks using BMBF.
Sideloading songs
After the user installs BMBF, the easiest way that they can sync songs on the Oculus Quest is through the use of SyncSaber. This program is built into BMBF, eliminating the need to install new software. However, it is important to know that you’ll need an existing SyncSaber account for it to work.
The first few steps are best done on a PC.
- Go to bsaber.com.
- Chose Log in.
- Type in the desired username and a valid e-mail address.
- Access the email address given in the registration. Inspect the latest email received. Click the link inside the mail to create your passcode.
- Launch your Oculus Quest and proceed by opening BMBF.
- Choose the SyncSaber tab that’s located at the top of the screen.
- Input your Beat Saber username.
Thanks to this, the user can now sideload songs! Follow the next set of steps to sideload tracks that you like.
- Go to the website by opening BMBF on your device.
- If you see a song that you like, proceed by selecting the “Download a zip file from Beat Saver” option.
- Once you’ve selected everything you would like to add, choose the Sync to Beat Saber option.
- Click the Start Beat Saber feature.
- First-time users will need to give storage permission for Beat Saber when prompted by the system.
Thanks to this, users can now install as well as play custom songs on Beat Saber thanks to BMBF.
How to Install and Play Custom Songs to Beat Saber
- Go to the browser which is found on the left part of SideQuest.
- Go to https://bsaber.com
- Select the songs dropdown menu and then go to the category that the user would like to select music from.
- Click the arrow icon to download the song you want.
- Select My Downloads on SideQuest.
- Drag and drop songs into My Song Packs and proceed by choosing the sync song options.
- Choose run patcher as this will make an APK that is compatible with your Oculus Quest.
- Install the APK.
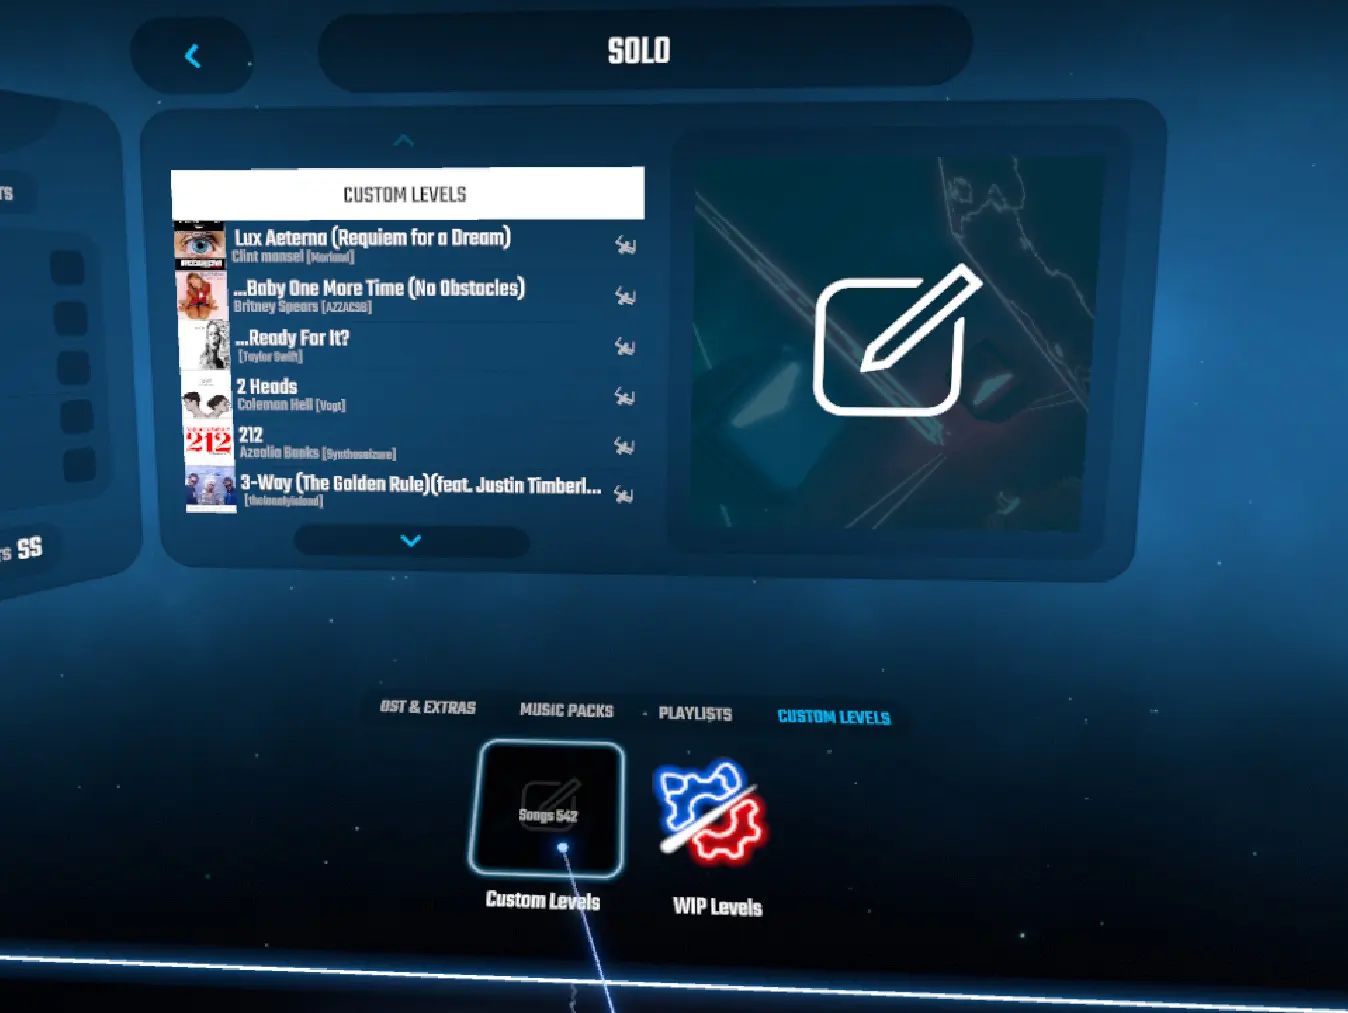
After this, the you’re good to go! All the custom songs that they want to play are now on their Oculus Quest. To play them, just go to custom maps on Beat Saber.
On PSVR
Unfortunately, Sony does not allow users to add in custom songs on their version of Beat Saber, Beat Saber PSVR. This is due to copyright restrictions that Sony fears would be leveled against them should they allow something like this. Thus, it’s typically recommended to only add in mods and custom songs for Beat Saber on PC.
Sites to Use for Beat Saber Mods


For those with the capability to add mods to Beat Saber, these sites might be good places to look for them. From new environments to custom songs, you can find your Beat Saber mod fix here:
BeastSaber
BeastSaber is one of the best websites to look for Beat Saber mods due to the numbers of mods it has on its servers. The layout is good for people who want to browse for songs immediately, and the site provides a place to download plugins for the game as well as tutorials to installing plugins and custom songs.
Beat Saver
Beat Saver is where users go when they want to get new Beatmaps. The site delivers some great ones for various songs as well. However, the site developers recently had to fix some issues about their hub. Users can still browse Beatmaps and search for them on the website, though.
