Why enter bank account information on Indiegogo?
Indiegogo, the popular crowdfunding platform, allows project creators to raise funds for their innovative ideas and products. If you are a project creator on Indiegogo and have successfully reached your funding goal, you will need to enter your bank account information. This is important because it enables you to receive the funds raised by your backers and helps you bring your project to life. Here are a few key reasons why entering your bank account information on Indiegogo is essential:
- Receive funds: By entering your bank account information, you can ensure that the funds raised by your backers are transferred securely and directly to your bank account. This eliminates the need for manual processes or delays in receiving your funds.
- Manage finances: Having your bank account connected to your Indiegogo account allows you to easily track and manage your finances related to your crowdfunding campaign. You can monitor incoming funds, view transaction details, and keep a record of all monetary activities.
- Withdraw funds: Once the funds are in your bank account, you can easily withdraw them and use them to fulfill your project goals. Whether it’s manufacturing, sourcing materials, or any other expenses, having the funds readily available in your bank account streamlines the process.
- Refunds and chargebacks: In certain cases, backers may request refunds or initiate chargebacks. Having your bank account information on Indiegogo allows for smoother handling of these situations, ensuring that refunds are processed accurately and chargebacks can be resolved efficiently.
Entering your bank account information on Indiegogo is a vital step in the crowdfunding process. It allows you to receive funds, manage your campaign finances, and smoothly handle any financial transactions throughout your project. With this information securely connected to your Indiegogo account, you can focus on bringing your innovative ideas to life while Indiegogo takes care of the financial aspects.
Step 1: Accessing your Indiegogo account
In order to enter your bank account information on Indiegogo, you first need to access your Indiegogo account. Here’s a step-by-step guide on how to do it:
- Visit the Indiegogo website: Open your preferred web browser and go to the Indiegogo website (www.indiegogo.com).
- Sign in to your account: If you already have an Indiegogo account, click on the “Sign In” button located at the top-right corner of the homepage. Enter your login credentials (email address and password), and click “Sign In.”
- Create a new account: If you don’t have an Indiegogo account yet, click on the “Sign Up” button at the top-right corner. Fill in the required information, including your name, email address, and password. Follow the steps to complete the account creation process.
- Access your account dashboard: Once you are signed in, you will be redirected to your account dashboard. This is the central hub where you can manage your projects, settings, and account information.
- Navigate to the settings: To access the settings of your Indiegogo account, look for your profile picture or initials at the top-right corner of the page. Click on it, and a dropdown menu will appear. Select “Settings.”
By following these steps, you will successfully access your Indiegogo account and be ready to proceed with entering your bank account information. It’s important to have your account credentials handy to save time during the sign-in process. Once you are logged in, you can further customize your account preferences and manage other aspects of your crowdfunding campaign.
Step 2: Navigating to the Bank Account page
After accessing your Indiegogo account, the next step is to navigate to the Bank Account page where you can enter your bank account information. Here’s how to find it:
- Go to your account settings: Once you are logged in to your Indiegogo account, locate your profile picture or initials at the top-right corner of the page. Click on it to open the dropdown menu and select “Settings.”
- Select the “Payments” tab: In the settings menu, you will see various tabs such as “Account,” “Profile,” and “Payments.” Click on the “Payments” tab to proceed to the payment settings page.
- Access the “Bank Account” section: On the payment settings page, you will find different payment options, including credit/debit cards and bank accounts. Locate the “Bank Account” section, or if it’s not immediately visible, look for a link or button that says something like “Add Bank Account” or “Manage Bank Account.”
- Click on the “Bank Account” section: Once you have found the “Bank Account” section, click on it to access the page specifically dedicated to entering and managing your bank account information.
Following these steps will take you to the Bank Account page on Indiegogo, where you can proceed with entering the necessary details. It’s important to ensure that you are on the correct page and that the website is secure before entering any sensitive information. Take your time to double-check the page’s URL and look for secure indicators, such as a padlock icon in the browser’s address bar, to verify the authenticity of the page.
Step 3: Entering your bank account details
Once you have navigated to the Bank Account page on Indiegogo, you can proceed with entering your bank account information. Here’s how to do it:
- Provide your bank account type: On the Bank Account page, you will typically see a dropdown menu where you can select the type of bank account you have, such as checking or savings.
- Enter your account holder name: In the designated field, input the name of the account holder as it appears on your bank account statement. Make sure to provide the correct information to avoid any potential issues with withdrawals.
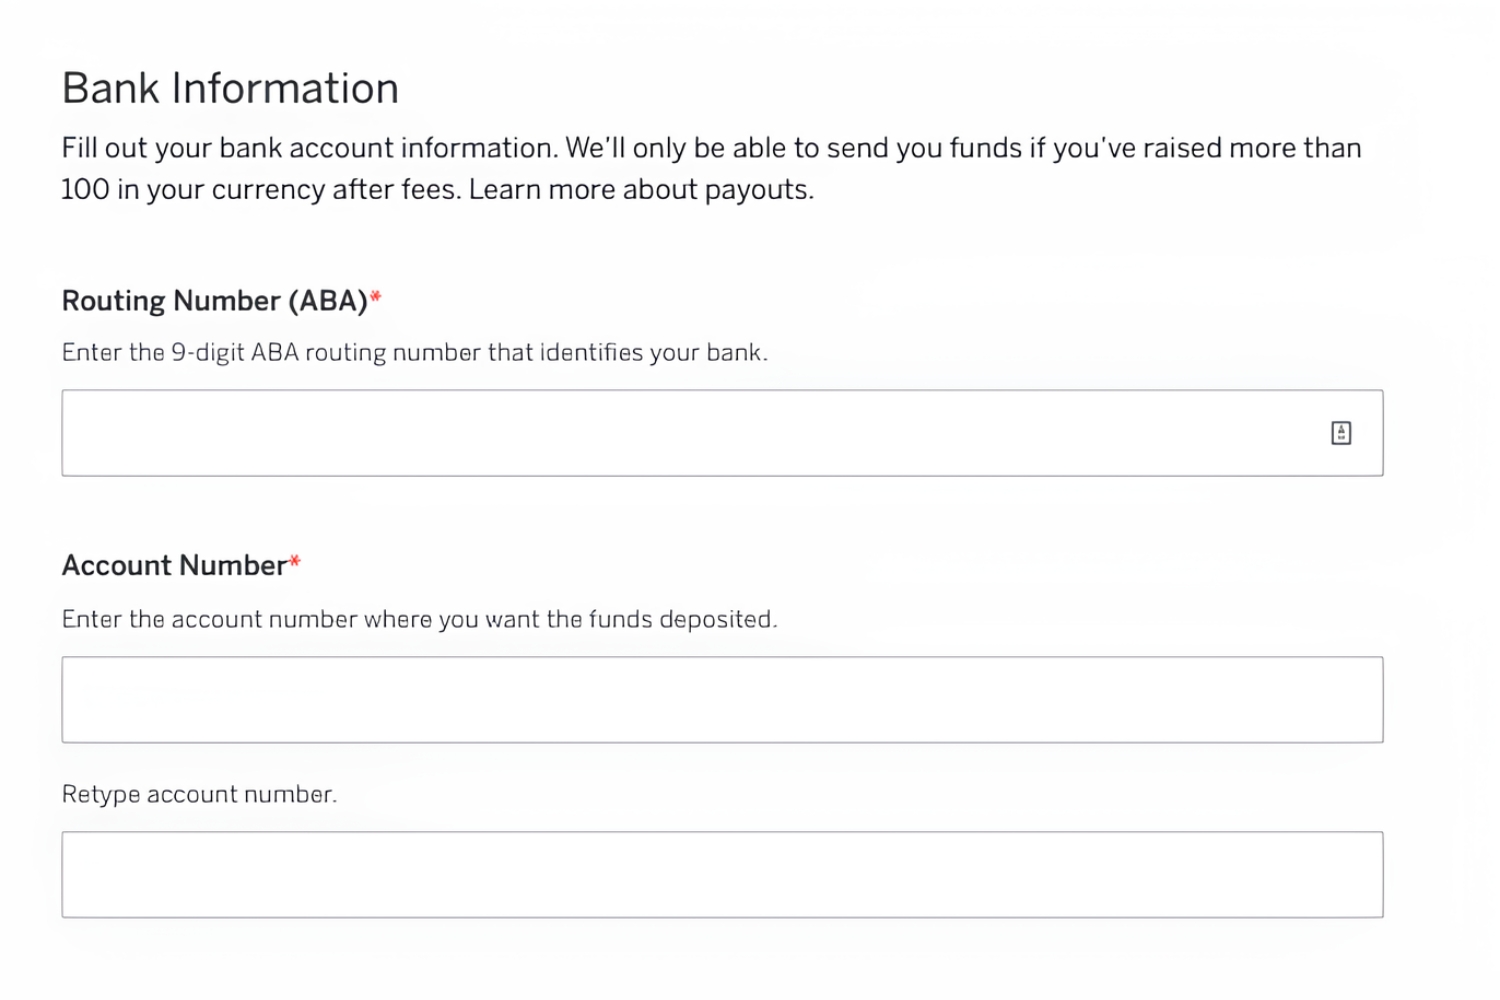
- Input your bank account number: Locate the field where you need to enter your bank account number. This is typically a series of digits that uniquely identifies your bank account. Double-check the number to ensure accuracy.
- Provide your bank’s routing number: Look for the field where you are required to input your bank’s routing number. This is a nine-digit code that identifies the financial institution where your bank account is held. Refer to your bank statement or contact your bank if you’re unsure of the routing number.
- Check for additional information: Depending on the platform and country, there may be additional fields or options to fill out, such as the bank’s branch code or an indication of whether the account is for personal or business use. If required, make sure to provide the necessary information accurately.
- Review and confirm your details: Before proceeding, carefully review all the information you’ve entered to ensure accuracy. Pay attention to any error messages or validation prompts that may appear before submitting your bank account details.
- Click “Save” or “Submit”: Once you are confident that all the details are correct, look for a “Save” or “Submit” button on the page. Click on it to save your bank account information.
By following these steps and entering your bank account details accurately, you will successfully link your bank account to your Indiegogo account. This allows you to receive funds raised from your crowdfunding campaign and take the necessary steps to bring your project to life.
Step 4: Verifying your bank account information
After entering your bank account details on Indiegogo, the next step is to verify the information to ensure it is accurate and complete. Here’s how you can verify your bank account information:
- Check for confirmation: After submitting your bank account details, Indiegogo may display a confirmation message indicating that your information has been received. Take note of this confirmation to ensure that your details have been successfully recorded.
- Review your entered information: Go back to the Bank Account page or payment settings page to review the bank account details you provided. Check for any spelling errors, incorrect numbers, or missing information. It’s crucial to have accurate information to avoid any issues with receiving funds or withdrawals.
- Verify with your bank: If you’re uncertain about the accuracy of your bank account information, consider contacting your bank to confirm the details. This can help you ensure that the account holder name, account number, and routing number you entered align with the information on file with your bank.
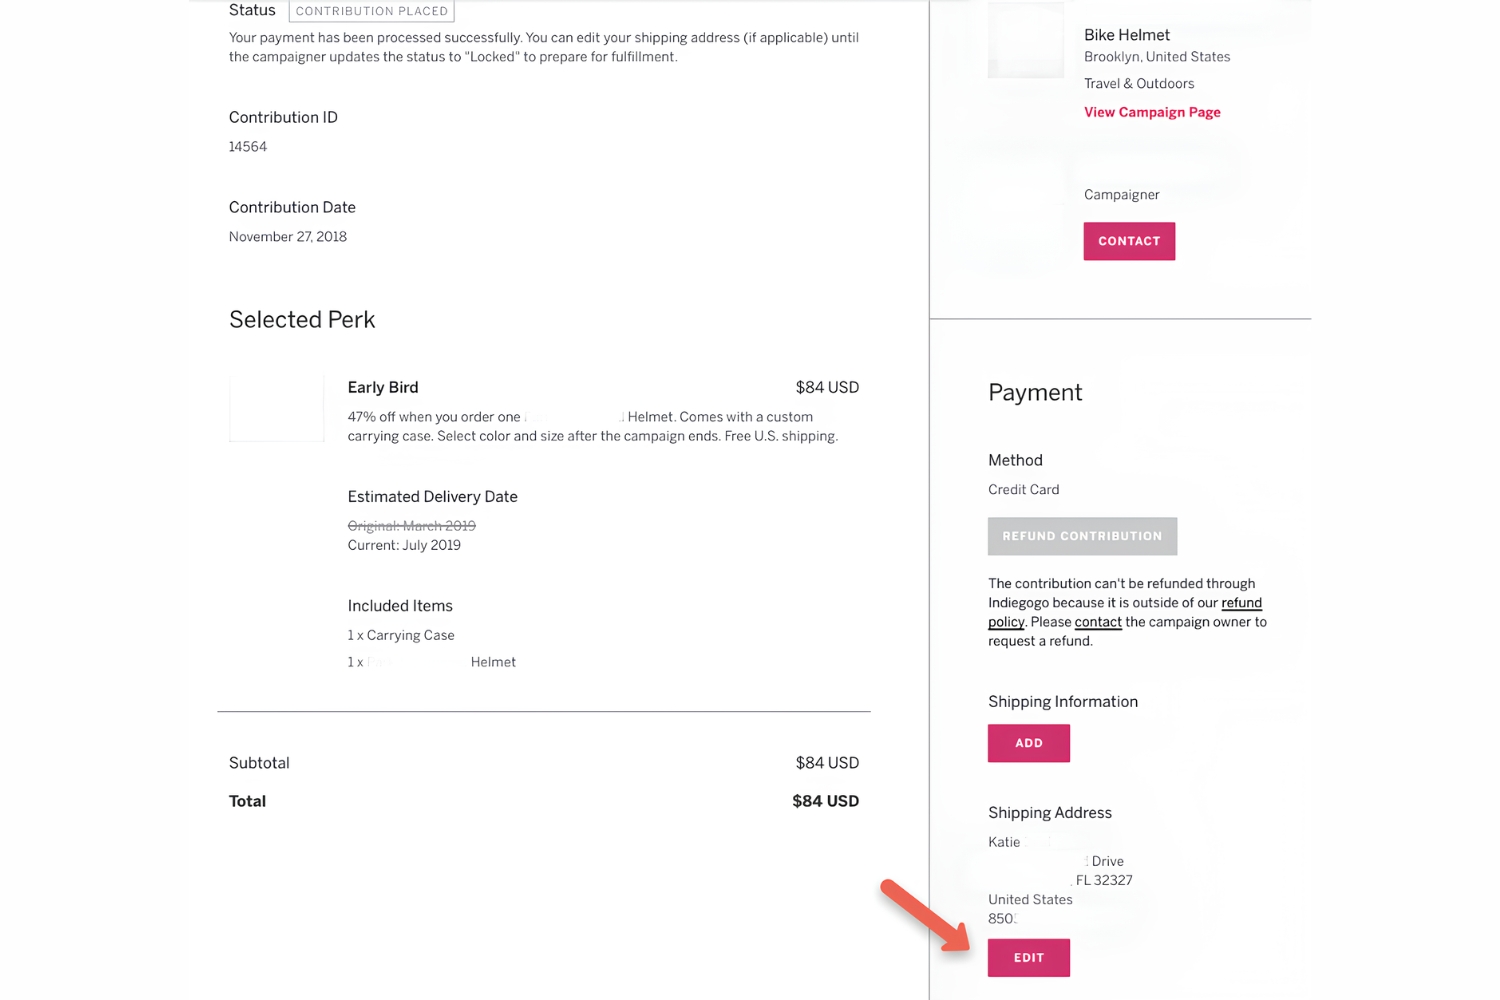
- Make necessary corrections: If you discover any mistakes or discrepancies with your bank account information, return to the Bank Account page or payment settings page and edit the relevant fields. Update the information with the correct details and save the changes.
- Confirm receipt of test deposits: In some cases, Indiegogo may initiate small test deposits to your bank account as a means of verification. Check your bank account statements or online banking platform regularly to see if these deposits appear. Once you see the test deposits, return to the Bank Account page on Indiegogo to confirm the amounts deposited. This step helps validate your ownership of the bank account.
- Follow any additional verification steps: Depending on your location and banking regulations, there may be additional verification steps required. Indiegogo might request additional documentation or information to ensure the legitimacy of the bank account. If prompted, provide the necessary details promptly to complete the verification process.
Verifying your bank account information on Indiegogo is crucial to ensure the accuracy and security of your financial transactions. By following these steps and double-checking the details, you can confidently proceed with your crowdfunding campaign, knowing that your funds will be properly transferred to your verified bank account.
Step 5: Setting up withdrawals
Once your bank account information is verified on Indiegogo, you can proceed to set up withdrawals. This step ensures that the funds raised from your crowdfunding campaign can be transferred from your Indiegogo account to your bank account. Follow these steps to set up withdrawals:
- Access the withdrawal settings: Login to your Indiegogo account and navigate to the payment settings or bank account page.
- Locate the withdrawal options: Look for the section that allows you to manage withdrawals. This section may be titled “Withdrawals,” “Payouts,” or similar.
- Choose your withdrawal method: Indiegogo typically offers different withdrawal methods, such as manual withdrawals or automatic scheduled withdrawals. Manual withdrawals allow you to initiate withdrawals at your convenience, while automatic scheduled withdrawals transfer funds on a predetermined schedule.
- Set the withdrawal amount: Specify the amount you want to withdraw from your Indiegogo account to your bank account. This can be the total funds raised or a specific portion of it. Keep in mind any applicable fees or minimum withdrawal requirements.
- Confirm the withdrawal: Review the withdrawal details, including the withdrawal amount and selected method, to ensure accuracy. Click on the “Confirm” or “Save” button to initiate the withdrawal process.
- Monitor withdrawal status: After initiating the withdrawal, monitor the status of your withdrawal request. Indiegogo may provide updates on the processing time or any additional steps required to complete the withdrawal.
- Receive funds in your bank account: Once the withdrawal is processed and approved, the funds will be transferred to your linked bank account. The time it takes for the funds to appear in your account may vary depending on the banking institution and other factors.
By following these steps, you can set up withdrawals from your Indiegogo account and ensure a smooth transfer of funds to your bank account. It’s essential to monitor your withdrawal requests and stay informed about any updates or notifications from Indiegogo to ensure a seamless and successful withdrawal process.
Step 6: Troubleshooting common issues
While setting up bank account information and withdrawals on Indiegogo is usually a straightforward process, there may be instances where you encounter common issues or face challenges. Here are some common troubleshooting steps to help resolve potential problems:
- Double-check entered information: If you encounter any errors or issues during the verification or withdrawal setup, verify that you entered your bank account details correctly. Check for typos, missing digits, or incorrect routing numbers.
- Ensure bank account compatibility: Indiegogo supports bank accounts from various countries and financial institutions. However, it’s essential to confirm that your bank and account type are compatible with Indiegogo’s requirements. Contact Indiegogo support if you’re unsure.
- Contact customer support: If you’re facing persistent issues or encountering technical difficulties, reach out to Indiegogo’s customer support for assistance. They can provide guidance, troubleshoot specific problems, or address any concerns you may have.
- Verify withdrawal minimums and fees: Indiegogo may have minimum withdrawal amounts or applicable fees for transferring funds to your bank account. Make sure you meet the minimum requirements and understand any associated fees that may be deducted from your withdrawal.
- Check withdrawal schedules: If you have opted for automatic scheduled withdrawals, ensure that the withdrawal schedule aligns with your requirements. If you prefer manual withdrawals, ensure that you initiate the withdrawals as needed.
- Stay informed about updates: Indiegogo occasionally updates its processes or implements changes related to bank account information and withdrawals. Stay informed by regularly checking your account dashboard or subscribing to Indiegogo’s newsletters or announcements.
Remember that troubleshooting and resolving issues may require unique solutions based on your specific circumstances. If the common troubleshooting steps don’t resolve your problem, don’t hesitate to seek assistance from Indiegogo’s support team. They have the expertise to guide you through any challenges and help ensure a smooth experience with your bank account information and withdrawals on the platform.
Conclusion
Entering and managing your bank account information on Indiegogo is a crucial step for project creators to receive funds from their crowdfunding campaigns. By following the steps outlined in this guide, you can successfully navigate the process and ensure a seamless experience. Remember the key points:
- Entering your bank account information allows you to receive funds securely and directly to your account.
- Managing your finances becomes easier when your bank account is connected to your Indiegogo account.
- Setting up withdrawals enables you to transfer funds from Indiegogo to your bank account for project-related expenses.
- Verification of your bank account information ensures accuracy and smooth transactions.
- Troubleshooting common issues, if encountered, can be overcome with assistance from Indiegogo’s customer support.
As an Indiegogo project creator, having your bank account information properly set up is essential for managing funds and bringing your ideas to life. By following the steps and tips provided in this guide, you can confidently navigate the process and ensure a seamless crowdfunding experience.
Remember to take necessary precautions to protect your personal information and verify the authenticity of the Indiegogo website before entering sensitive details. Regularly review your bank account information, withdrawal settings, and any notifications or updates from Indiegogo to stay informed and ensure the smooth functioning of your crowdfunding campaign.
Now that you have the knowledge to enter bank account information on Indiegogo, you can focus on achieving your crowdfunding goals and turning your innovative ideas into reality.