Introduction
Owning a DSLR camera offers a gateway to capturing breathtaking moments with unrivaled clarity and precision. However, to ensure that your device continues to deliver stunning images, it's crucial to keep it clean and well-maintained. Regular cleaning not only safeguards the camera's functionality but also prolongs its lifespan, saving you from costly repairs or replacements. Whether you're a photography enthusiast or a professional, learning how to clean your DSLR camera is an essential skill that can elevate the quality of your photographs. This comprehensive guide will walk you through the step-by-step process of cleaning your DSLR camera, empowering you to maintain your equipment in optimal condition.
Proper maintenance of your DSLR camera involves more than just wiping the lens. Dust, dirt, and smudges can accumulate on various components, including the lens, sensor, and camera body, compromising image quality and performance. By following the cleaning techniques outlined in this guide, you can effectively remove debris and maintain the integrity of your camera's components. Additionally, regular cleaning can prevent potential issues such as sensor spots, which can appear in your photographs as dark or discolored spots, detracting from the overall image quality.
Furthermore, keeping your DSLR camera clean enhances its resale value. Whether you eventually decide to upgrade to a new model or simply want to sell your current camera, a well-maintained and clean device will command a higher price in the second-hand market. By investing the time and effort into proper cleaning and maintenance, you can protect your valuable photography equipment and ensure that it continues to deliver exceptional results for years to come.
In the following steps, we will delve into the specific procedures for cleaning the various components of your DSLR camera, from the lens to the sensor. By following these instructions and incorporating regular cleaning into your photography routine, you can maximize the potential of your DSLR camera and capture stunning images with unparalleled clarity and sharpness. Let's embark on this journey to discover the art and science of maintaining a clean and pristine DSLR camera.
Step 1: Gather Your Cleaning Supplies
Before embarking on the cleaning process, it’s essential to gather the necessary supplies to ensure a thorough and effective cleaning session for your DSLR camera. The following items are indispensable for maintaining the cleanliness and functionality of your camera:
- Lens Cleaning Cloth: A microfiber cloth specifically designed for cleaning camera lenses is crucial for removing smudges, fingerprints, and dust without leaving scratches or residue.
- Lens Cleaning Solution: A high-quality, alcohol-free cleaning solution formulated for camera lenses is essential for tackling stubborn smudges and dirt without damaging the lens coatings.
- Air Blower: An air blower or bulb blower is instrumental in removing loose dust particles from the lens, camera body, and sensor without direct contact, minimizing the risk of scratches or damage.
- Camera Sensor Cleaning Kit: A sensor cleaning kit, comprising sensor swabs and a sensor cleaning solution, is vital for safely and effectively removing dust and debris from the camera’s sensor, ensuring pristine image quality.
- Cotton Swabs: Soft, lint-free cotton swabs can be utilized for intricate cleaning tasks, such as reaching tight spaces on the camera body or lens barrel.
- Lens Pen: A lens pen with a retractable brush and a cleaning tip is ideal for removing loose dust and particles from the lens surface before using a microfiber cloth and cleaning solution.
- Camera Body Cleaning Brush: A small, soft-bristled brush designed for cleaning camera bodies aids in removing dust, dirt, and debris from crevices and seams without causing damage.
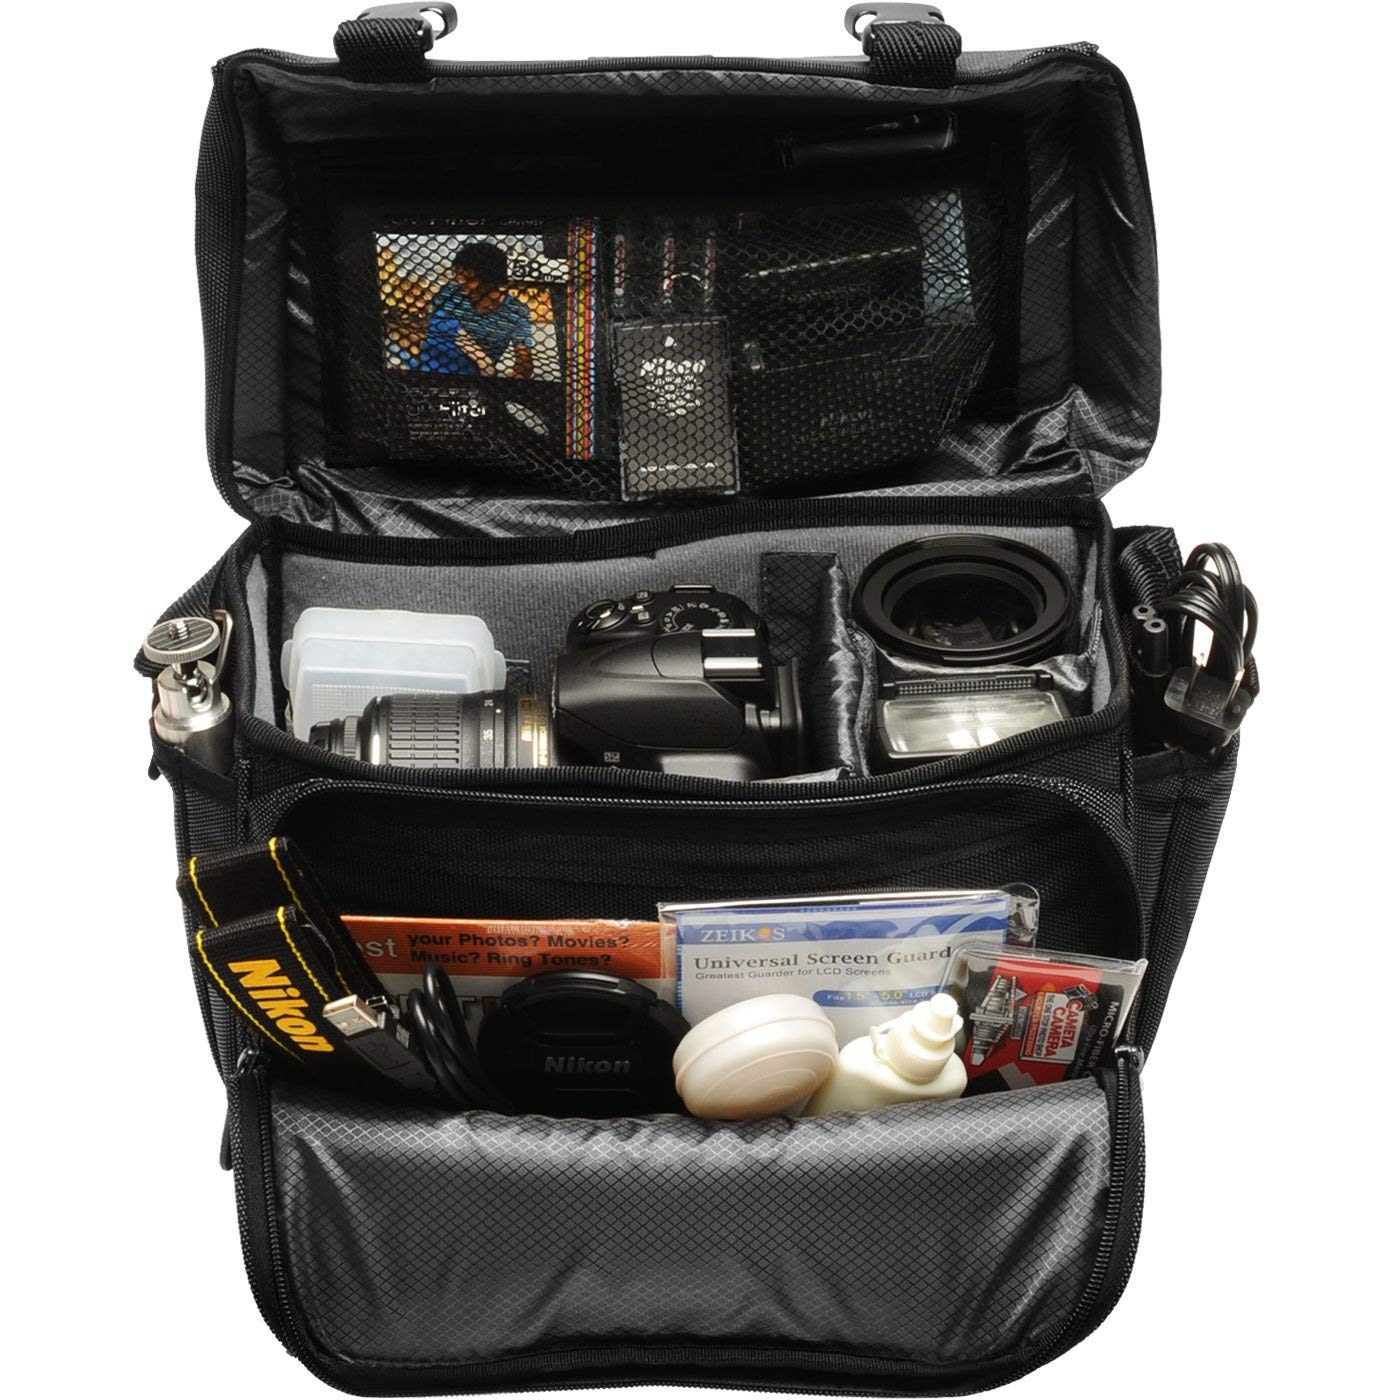
- Camera Bag or Case: A clean and protective camera bag or case is essential for storing your DSLR camera and cleaning supplies, safeguarding them from dust, moisture, and potential damage.
By assembling these essential cleaning supplies, you will be well-equipped to maintain the cleanliness and optimal performance of your DSLR camera. These tools and solutions are tailored to address specific cleaning needs, ensuring that your camera components, particularly the lens and sensor, remain free from contaminants that can compromise image quality and functionality.
Step 2: Turn Off Your Camera
Before initiating the cleaning process, it is imperative to power off your DSLR camera completely. Turning off the camera serves multiple purposes, ensuring both the safety of the equipment and the effectiveness of the cleaning procedure.
First and foremost, powering down the camera eliminates the risk of accidental activation of the shutter or other functions during the cleaning process. This prevents potential damage to the camera’s internal components and safeguards against unintended adjustments to settings or exposure parameters.
Furthermore, switching off the camera allows the sensor and other internal mechanisms to cool down, reducing the risk of static electricity buildup during the cleaning process. Static electricity can attract dust particles, making it more challenging to achieve a pristine cleaning outcome. By allowing the camera to cool and discharge any residual static charge, you can minimize the likelihood of dust and debris being drawn back onto the sensor or other sensitive areas.
Additionally, powering off the camera conserves battery life, especially if the cleaning process takes an extended period of time. This is particularly important when cleaning the sensor, as the camera’s battery should have sufficient power to support the sensor cleaning function, if available, or to keep the mirror in the raised position for manual sensor cleaning.
By adhering to this critical first step of turning off your DSLR camera, you establish a safe and optimal environment for the subsequent cleaning procedures. This simple yet crucial action sets the stage for a thorough and effective cleaning session, ensuring that your camera remains in prime condition for capturing stunning images with uncompromised quality and clarity.
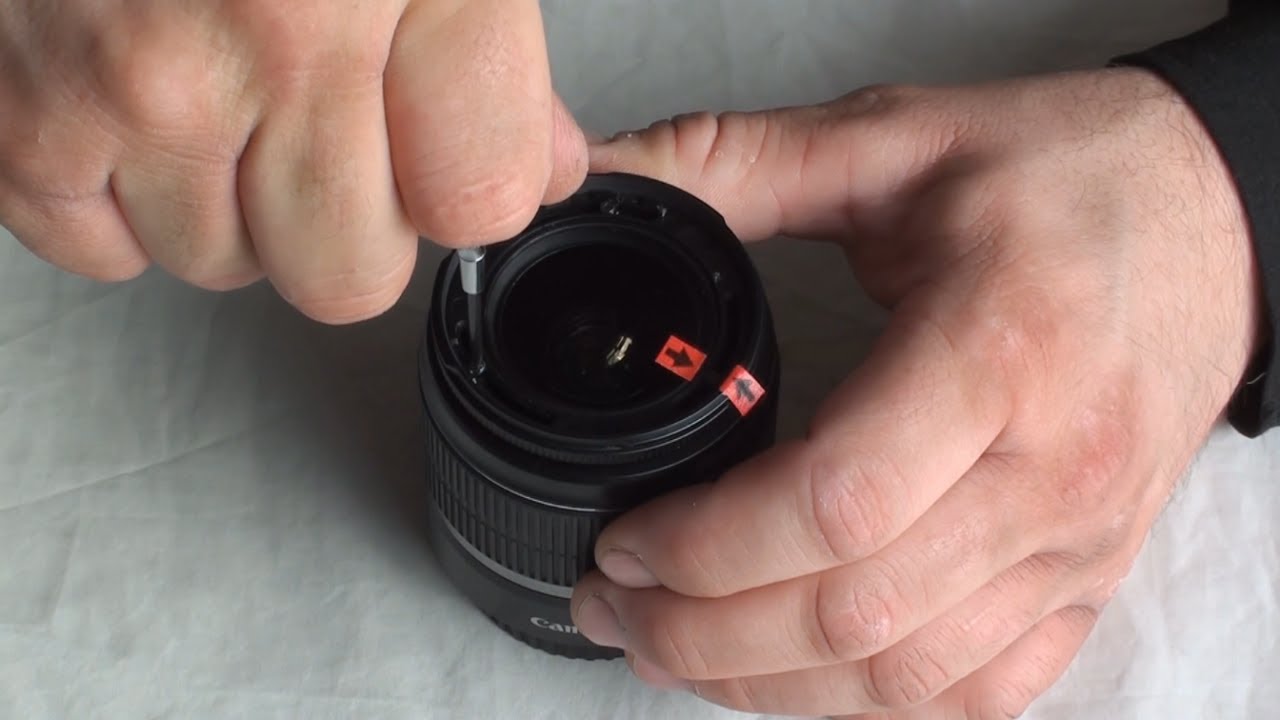
Step 3: Remove the Lens
When preparing to clean your DSLR camera, the next essential step is to carefully remove the lens from the camera body. This procedure is crucial for gaining unobstructed access to the lens and sensor, facilitating thorough cleaning and maintenance.
Before removing the lens, it is advisable to find a clean and stable surface to place the camera body, ideally with the lens mount facing downward to minimize the risk of dust or debris entering the camera. Once the camera is secured, gently press the lens release button, typically located near the lens mount, and rotate the lens counterclockwise to detach it from the camera body. Exercise caution and ensure a firm grip on both the lens and camera body to prevent accidental drops or damage during the removal process.
Removing the lens not only allows for comprehensive cleaning of its exterior surfaces but also facilitates access to the camera’s sensor, a critical component that requires periodic maintenance to ensure optimal performance. With the lens detached, you can inspect the lens mount and the rear element of the lens for any accumulated dust, dirt, or smudges that may hinder the quality of your photographs.
Furthermore, removing the lens provides an opportunity to inspect and clean the lens contacts on both the camera body and the lens itself. These electrical contacts facilitate communication between the camera and the lens, and any dirt or residue on these contacts can potentially disrupt the transmission of data and affect autofocus or aperture control. By carefully cleaning these contacts using a soft, dry cloth or a specialized contact cleaning tool, you can maintain seamless connectivity and functionality between the camera and lens.
By following this pivotal step of removing the lens, you pave the way for a comprehensive cleaning process that targets both the lens and the camera’s internal components. This meticulous approach ensures that your DSLR camera remains in optimal condition, ready to capture stunning images with precision and clarity.
Step 4: Use a Blower to Remove Dust
Once the lens has been removed, the next critical step in the cleaning process involves using a blower to remove dust and debris from the camera’s interior and sensitive components. Dust particles can accumulate on the camera’s sensor, mirror, and other internal surfaces, potentially impacting image quality and overall performance. Employing a blower is an effective and safe method to dislodge loose particles without direct contact, minimizing the risk of damage to delicate components.
Before commencing the dust removal process, it is essential to ensure a stable and dust-free environment to minimize the likelihood of contaminants re-entering the camera. Holding the camera with the lens mount facing downward, gently squeeze the blower to release a burst of clean, dry air onto the sensor and mirror chamber. It is crucial to exercise caution and avoid inserting the blower nozzle too deeply into the camera body to prevent accidental contact with internal components.
When directing the airflow onto the sensor, it is advisable to engage the camera’s sensor cleaning mode, if available, to raise the mirror and expose the sensor for optimal access. Alternatively, for cameras without a sensor cleaning function, the use of a blower can still effectively dislodge loose dust and particles from the sensor and mirror chamber. This process helps mitigate the presence of sensor spots, which can manifest as dark or discolored areas in captured images, detracting from their overall quality.
In addition to targeting the sensor and mirror chamber, using a blower to remove dust from other internal areas, such as the viewfinder and crevices within the camera body, contributes to maintaining a clean and functional DSLR camera. By incorporating this step into your cleaning routine, you can significantly reduce the presence of dust and debris that may compromise the integrity of your photographs and the camera’s performance.
By diligently employing a blower to remove dust from the camera’s interior, you establish a foundation for optimal image quality and operational excellence. This proactive measure ensures that your DSLR camera remains free from contaminants, empowering you to capture stunning photographs with precision and clarity.
Step 5: Clean the Lens
Cleaning the lens of your DSLR camera is a critical step in maintaining the quality of your photographs. Over time, lenses can accumulate dust, smudges, and other contaminants that can impact image clarity and sharpness. By following proper cleaning techniques, you can ensure that your lens remains free from obstructions and consistently delivers exceptional results.
Before initiating the cleaning process, it is essential to use a blower to gently remove any loose particles from the lens surface. This initial step helps minimize the risk of inadvertently scratching the lens during subsequent cleaning procedures. Once loose particles have been removed, a lens cleaning cloth specifically designed for camera lenses should be used to gently wipe the lens surface in a circular motion, starting from the center and moving outward. It is crucial to use a clean section of the cloth for each pass to avoid redistributing debris across the lens.
If stubborn smudges or fingerprints persist, a small amount of high-quality lens cleaning solution can be applied to the cleaning cloth. It is imperative to use a solution specifically formulated for camera lenses, as other cleaning agents may contain chemicals that can damage lens coatings. Carefully moisten the cloth with the cleaning solution and delicately remove the smudges or fingerprints from the lens surface, exercising caution to avoid excessive pressure that may cause damage.
In addition to cleaning the front and rear lens elements, attention should also be given to the lens barrel and mount. A lens pen with a retractable brush and a cleaning tip can be utilized to remove dust and debris from these areas, ensuring that the entire lens assembly remains free from contaminants that could potentially impact image quality.
By meticulously cleaning the lens of your DSLR camera, you safeguard the integrity of your photographs and the overall performance of your equipment. This proactive approach ensures that your lens remains free from obstructions and maintains its optical clarity, enabling you to capture stunning images with unparalleled sharpness and detail.
Step 6: Clean the Camera Body
In addition to maintaining the cleanliness of the lens and internal components, cleaning the exterior of your DSLR camera body is essential for preserving its functionality and aesthetic appeal. The camera body is susceptible to accumulating dust, dirt, and smudges, which, if left unaddressed, can compromise the overall condition of the equipment. By following proper cleaning techniques, you can ensure that your camera body remains free from contaminants and continues to serve as a reliable tool for capturing exceptional photographs.
Begin the cleaning process by using a soft-bristled brush specifically designed for camera bodies to gently remove dust and debris from the seams, buttons, and crevices of the camera. This meticulous approach helps prevent the accumulation of contaminants that can potentially infiltrate the internal components and compromise the camera’s performance.
Subsequently, a microfiber cloth can be employed to wipe the camera body’s surfaces, including the LCD screen, grip, and control dials, to remove fingerprints, smudges, and residual dust. It is imperative to use gentle, circular motions while cleaning to avoid scratching or damaging the camera’s exterior finish. Pay particular attention to areas that are frequently touched or exposed to environmental elements, as these regions are more prone to accumulating dirt and debris.
For stubborn smudges or marks, a small amount of a mild cleaning solution suitable for electronic devices can be applied to the microfiber cloth to facilitate the removal of persistent blemishes. It is crucial to exercise caution and use minimal moisture to prevent any liquid from seeping into the camera’s internal components.
Furthermore, the camera’s viewfinder and eyepiece should be inspected and cleaned using a specialized cleaning solution and a soft, lint-free cloth to ensure optimal visibility and prevent obstructed framing and composition during photography sessions.
By diligently cleaning the exterior of your DSLR camera body, you not only maintain its visual appeal but also safeguard its functionality and longevity. This proactive approach ensures that your camera remains free from external contaminants, empowering you to capture stunning images with a reliable and well-maintained tool.
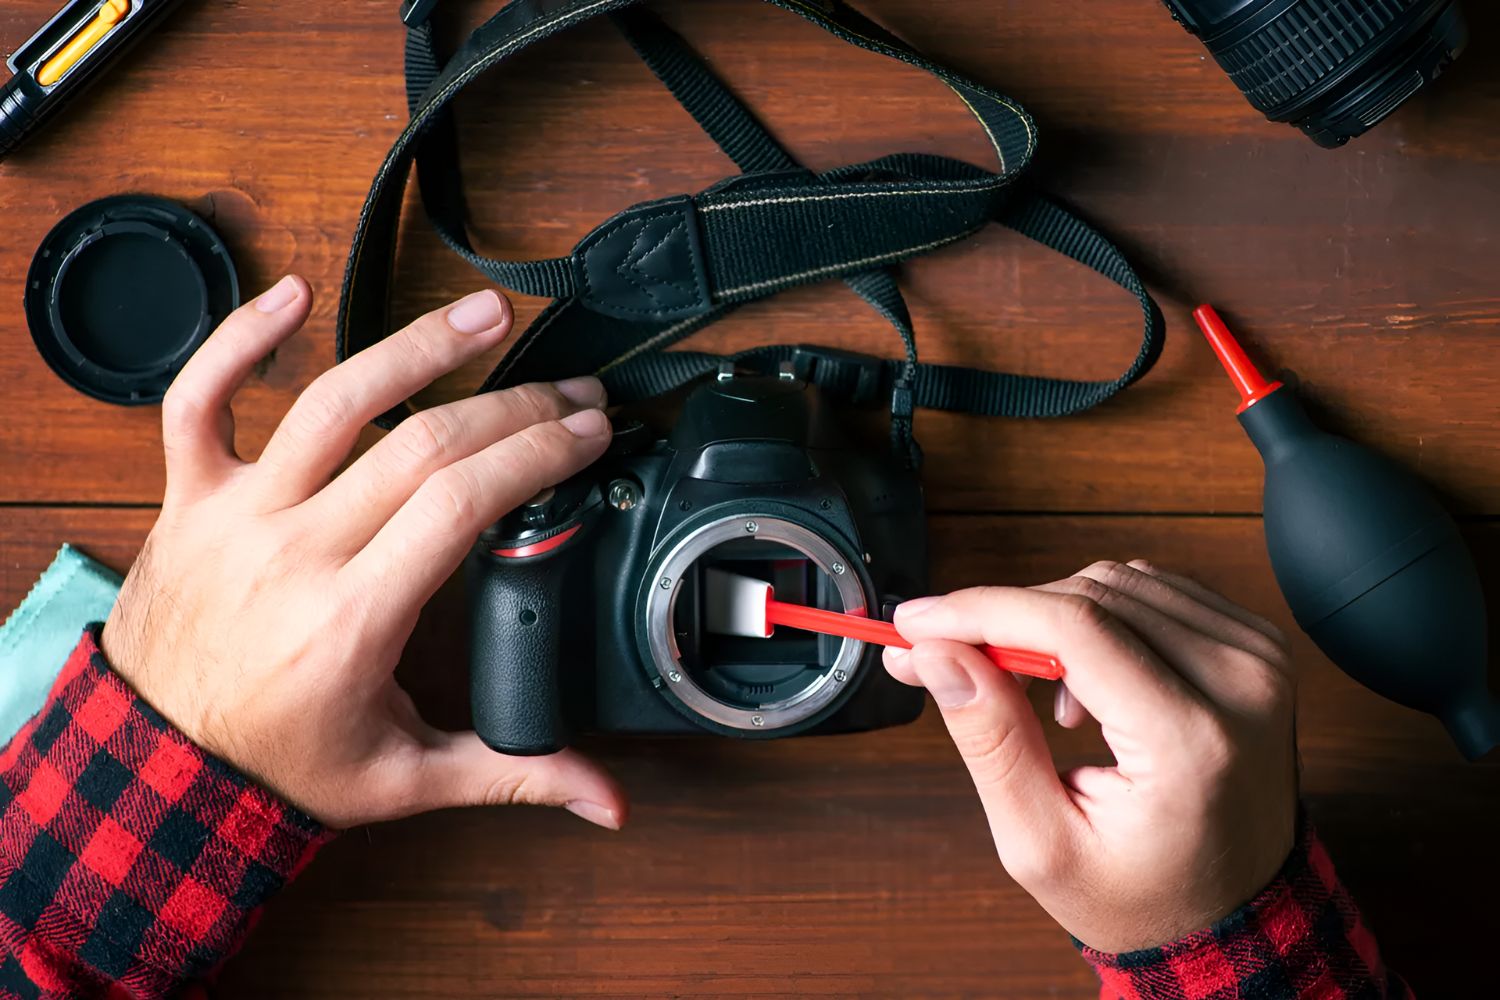
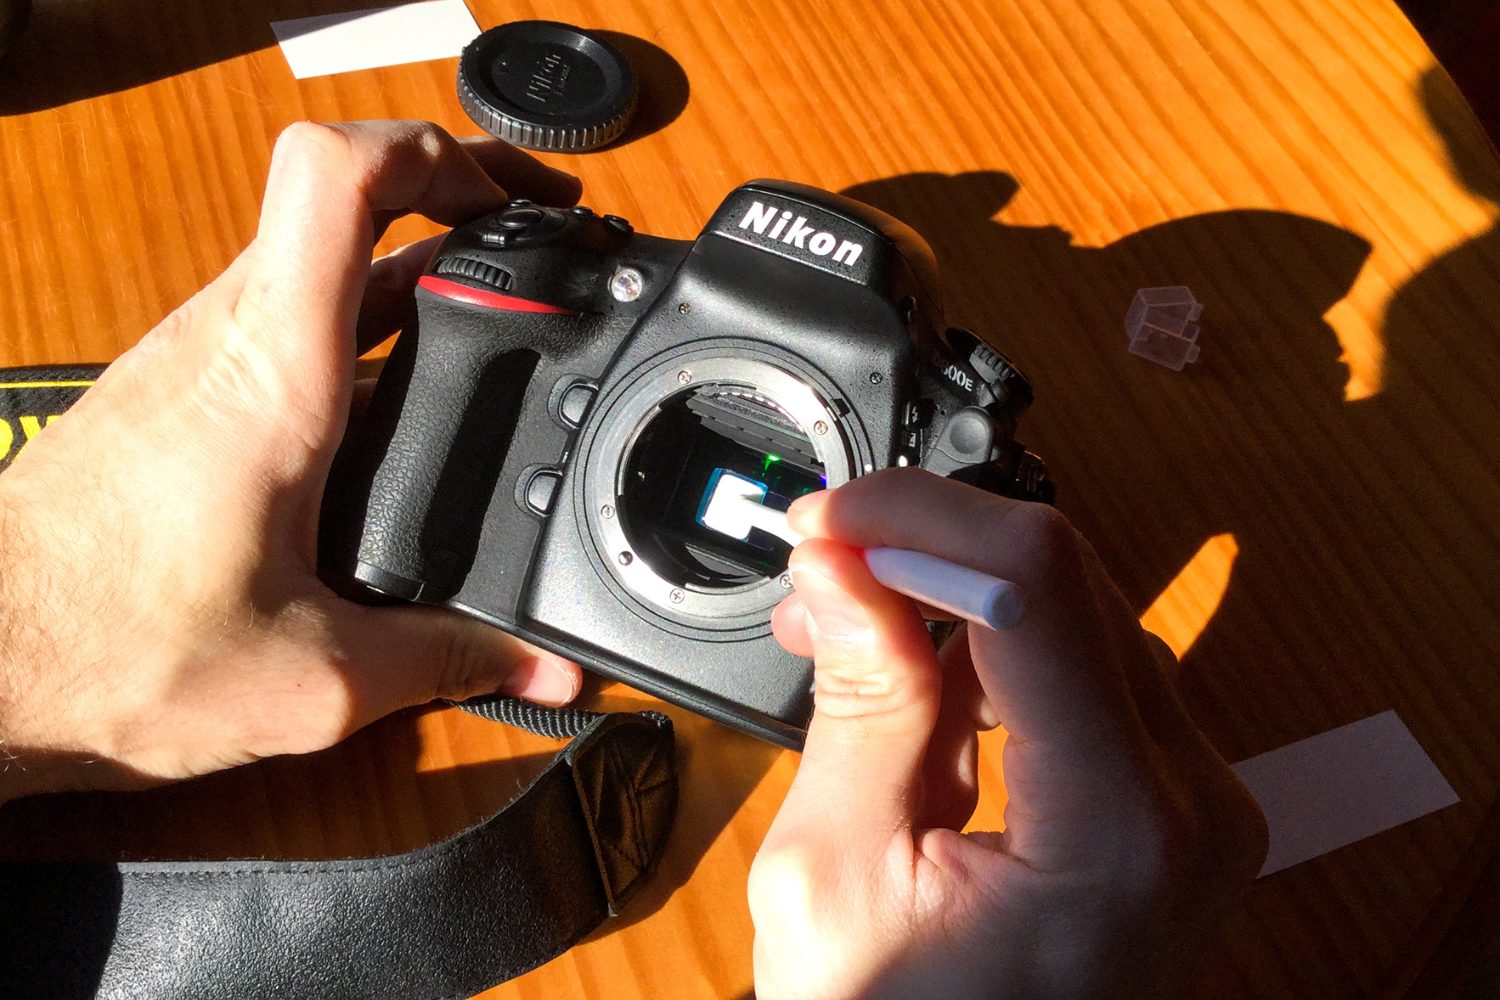
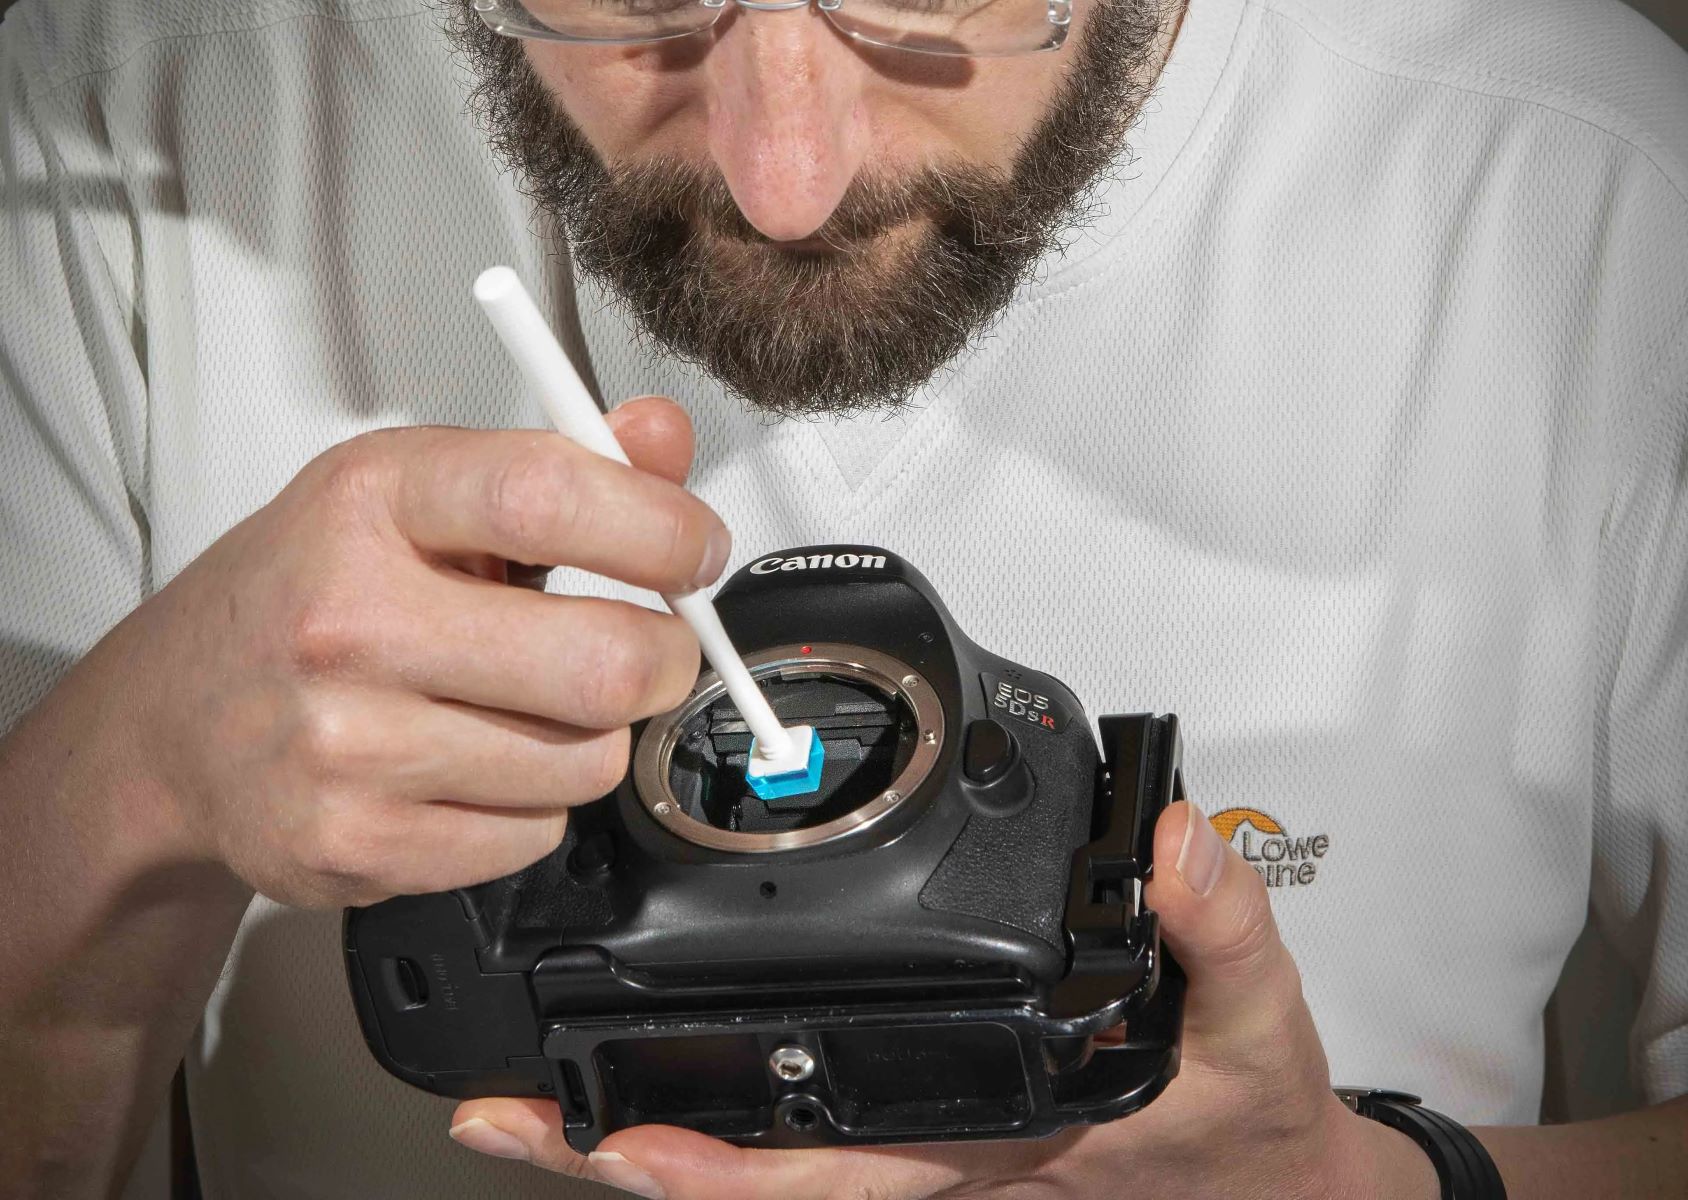
Step 7: Clean the Sensor
Cleaning the sensor of your DSLR camera is a crucial yet delicate task that directly impacts the quality of your photographs. Over time, dust and debris can accumulate on the sensor, leading to the appearance of sensor spots in images, which can detract from their overall clarity and sharpness. By employing proper sensor cleaning techniques, you can ensure that your camera’s sensor remains free from obstructions, allowing you to capture pristine and flawless photographs.
Before initiating the sensor cleaning process, it is imperative to ensure that the camera’s battery is sufficiently charged to support the sensor cleaning function, if available, or to keep the mirror in the raised position for manual sensor cleaning. Additionally, finding a clean and dust-free environment is essential to minimize the risk of contaminants re-entering the camera during the cleaning procedure.
There are several methods for cleaning the sensor, including the use of a specialized sensor cleaning kit comprising sensor swabs and a sensor cleaning solution. It is crucial to follow the manufacturer’s instructions and recommendations when selecting the appropriate sensor cleaning tools and solutions for your specific camera model.
When using a sensor cleaning kit, carefully follow the instructions to apply a minimal amount of sensor cleaning solution to the sensor swab and gently swipe the swab across the sensor surface in a single, smooth motion. It is essential to exercise caution and avoid excessive pressure to prevent damaging the sensor or its delicate coatings. Using a separate swab for each cleaning pass helps ensure that any loosened debris is effectively removed without reintroducing contaminants.
Alternatively, some DSLR cameras feature a built-in sensor cleaning function that utilizes ultrasonic vibrations or other mechanisms to dislodge dust and debris from the sensor. Engaging the camera’s sensor cleaning mode can be a convenient and effective method to address minor dust particles on the sensor surface.
By meticulously cleaning the sensor of your DSLR camera, you eliminate the presence of sensor spots and maintain the integrity of your photographs. This meticulous approach ensures that your sensor remains free from obstructions, enabling you to capture flawless images with uncompromised clarity and precision.
Step 8: Reattach the Lens
After completing the cleaning process for your DSLR camera’s sensor and other components, the next essential step is to reattach the lens to the camera body. Properly securing the lens ensures that the camera is fully operational and ready to capture stunning images with optimal clarity and precision.
When reattaching the lens, it is crucial to align the lens’s mounting index with the corresponding index on the camera body and gently rotate the lens clockwise until it locks into place with a distinct click. This secure attachment establishes seamless connectivity between the lens and the camera, enabling efficient communication and functionality during photography sessions.
Before fully securing the lens, it is advisable to inspect the lens mount and the rear element of the lens to ensure that they remain free from dust, debris, or smudges. Employing a blower and a microfiber cloth to remove any residual particles from these areas helps maintain the cleanliness of the lens assembly and prevents potential contaminants from entering the camera.
Once the lens is securely reattached, it is essential to perform a visual inspection to confirm that it is properly seated and aligned with the camera body. This meticulous approach ensures that the lens is ready for use, and the camera is equipped to deliver exceptional performance without any obstructions or connectivity issues.
By diligently reattaching the lens to your DSLR camera, you establish a critical link between the camera body and the lens, ensuring that your equipment is fully operational and poised to capture stunning images with uncompromised quality and precision.
Step 9: Store Your Camera Properly
After completing the cleaning process for your DSLR camera, it is essential to store the equipment properly to maintain its pristine condition and safeguard it from potential damage or contamination. Proper storage practices contribute to the longevity and performance of your camera, ensuring that it remains in optimal condition for capturing exceptional photographs.
When storing your DSLR camera, it is advisable to place it in a clean and dust-free environment, preferably within a dedicated camera bag or case. These protective enclosures shield the camera from environmental elements, such as dust, moisture, and physical impact, reducing the risk of damage and maintaining the cleanliness of the equipment.
Additionally, storing your camera in a controlled environment with moderate temperature and humidity levels helps preserve its internal components and external finish. Extreme temperatures and excessive humidity can adversely affect the camera’s electronic circuitry, lens coatings, and overall functionality. Therefore, selecting a suitable storage location, such as a dry and well-ventilated area, contributes to the longevity and operational excellence of your DSLR camera.
When placing your camera in a bag or case, it is beneficial to utilize dividers or compartments to prevent the equipment from shifting or colliding during transportation or storage. This organized approach minimizes the risk of accidental impact and ensures that the camera and its accessories remain securely positioned within the storage enclosure.
Furthermore, it is essential to store your camera away from direct sunlight and sources of intense heat, as prolonged exposure to these elements can potentially damage the camera’s components and degrade its performance over time. Shielding the camera from direct sunlight and heat sources helps preserve its integrity and functionality, extending its lifespan and maintaining its visual appeal.
By adhering to proper storage practices, you safeguard your DSLR camera from potential harm and preserve its pristine condition, ensuring that it remains a reliable tool for capturing exceptional photographs. This proactive approach contributes to the longevity and operational excellence of your camera, allowing you to continue producing stunning images with uncompromised quality and precision.