Introduction
So, you've got your hands on a shiny new USB microphone and you're itching to put it to good use in Reason. Whether you're a podcaster, musician, or content creator, using a USB microphone in Reason can take your recordings to the next level. With its user-friendly interface and powerful audio processing capabilities, Reason provides an ideal platform for harnessing the full potential of your USB microphone.
In this guide, we'll walk you through the process of setting up and using your USB microphone in Reason. From selecting your microphone as the input device to adjusting input levels and using it for recording, we'll cover everything you need to know to make the most of your USB microphone in Reason.
So, grab your USB microphone, fire up Reason, and let's dive into the world of professional-grade audio recording and production. Whether you're laying down vocals, capturing acoustic instruments, or recording podcasts, you'll soon be harnessing the full potential of your USB microphone within Reason.
Setting Up Your USB Microphone in Reason
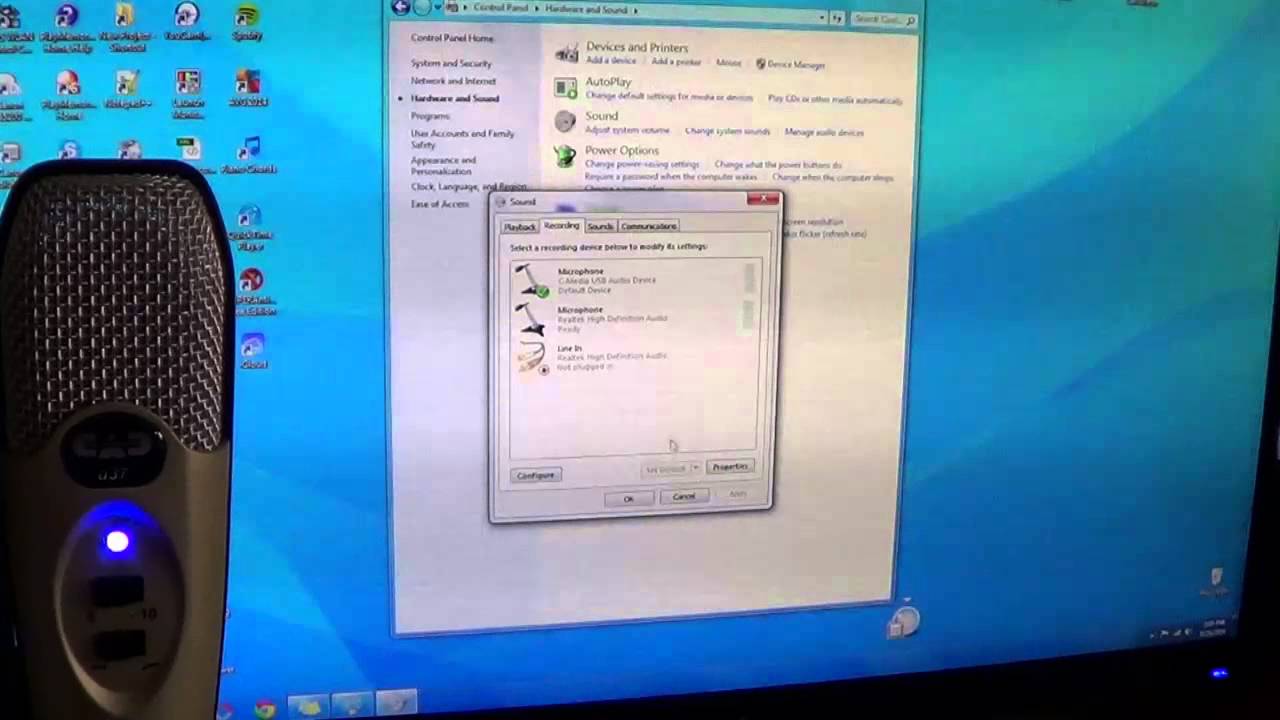
Before you can start using your USB microphone in Reason, you need to ensure that it is properly set up and recognized by the software. The first step is to connect your USB microphone to an available USB port on your computer. Once connected, Reason should automatically detect the microphone as an available audio input device.
Next, navigate to the preferences or settings menu in Reason and locate the audio settings. Here, you should be able to select your USB microphone as the input device. Once selected, Reason will route all incoming audio signals through your USB microphone, allowing you to capture high-quality recordings directly into the software.
It’s important to ensure that your USB microphone is properly connected and recognized by your computer’s operating system before attempting to use it in Reason. This may involve installing any necessary drivers or software that are provided by the microphone’s manufacturer. Once the microphone is successfully recognized by your computer, Reason should have no trouble detecting and utilizing it for audio input.
With your USB microphone now set up and ready to go, you’re one step closer to harnessing its full potential within Reason. Whether you’re using a condenser microphone for vocal recordings or a dynamic microphone for instrument capture, Reason provides a seamless platform for integrating your USB microphone into your recording and production workflow.
Selecting Your USB Microphone as Input Device
Once your USB microphone is connected and recognized by Reason, the next step is to ensure that it is selected as the primary input device for capturing audio. In Reason, this process is typically straightforward and can be accomplished within the software’s settings or preferences menu.
To select your USB microphone as the input device in Reason, start by accessing the audio settings or preferences. Here, you should see a list of available audio input devices, including your USB microphone. Select your USB microphone from the list to designate it as the primary input device for capturing audio within Reason.
It’s important to verify that your USB microphone is properly selected as the input device to avoid any potential issues with audio capture. By designating it as the primary input device, Reason will route all incoming audio signals through your USB microphone, ensuring that you capture high-quality recordings without any complications.
When selecting your USB microphone as the input device, you may also have the option to adjust additional settings such as sample rate, bit depth, and input channels. These settings can impact the overall quality and performance of your USB microphone within Reason, so it’s worthwhile to familiarize yourself with these options and make any necessary adjustments based on your recording requirements.
With your USB microphone now designated as the input device in Reason, you’re ready to start capturing pristine audio recordings directly into the software. Whether you’re tracking vocals, acoustic instruments, or any other audio source, Reason provides a seamless and intuitive platform for utilizing your USB microphone to its fullest potential.
Adjusting Input Levels
Once your USB microphone is selected as the input device in Reason, it’s essential to ensure that the input levels are properly adjusted to achieve optimal recording quality. Properly setting the input levels can prevent audio distortion, ensure a healthy signal-to-noise ratio, and capture clean, professional-grade recordings.
In Reason, adjusting the input levels for your USB microphone can typically be done within the software’s audio settings or mixer interface. Start by locating the input level controls for your USB microphone within Reason. These controls may include input gain, level meters, and peak indicators, allowing you to monitor and adjust the incoming audio signal.
When adjusting the input levels for your USB microphone, it’s crucial to strike a balance between achieving a healthy signal level and avoiding clipping or distortion. Begin by setting the input gain or level control to an initial position and then monitoring the level meters as you perform a sound check or test recording. Aim to set the input levels so that the audio signal registers within the optimal range on the level meters without peaking into the red zone.
It’s also important to consider the specific recording requirements and characteristics of the audio source when adjusting input levels. For example, capturing vocals may require different input level settings compared to recording loud instruments or sound effects. Take the time to fine-tune the input levels based on the unique attributes of the audio source to achieve the best possible recording results.
Additionally, Reason may provide features such as input level normalization, compression, or limiting to further refine and optimize the input levels for your USB microphone. These tools can help ensure consistent and controlled audio levels, making it easier to achieve professional-sounding recordings without the risk of clipping or excessive noise.
By carefully adjusting the input levels for your USB microphone in Reason, you can maximize the quality and clarity of your recordings, setting the stage for impressive audio production and mixing within the software.
Using Your USB Microphone for Recording in Reason
Now that your USB microphone is properly set up, selected as the input device, and the input levels are adjusted, you’re ready to dive into recording within Reason. Whether you’re capturing vocals, acoustic instruments, podcasts, or any other audio content, Reason provides a versatile and intuitive platform for leveraging the capabilities of your USB microphone.
To begin recording with your USB microphone in Reason, start by creating a new audio track within the software. Depending on your specific recording needs, you may choose to create a mono or stereo audio track to accommodate the input configuration of your USB microphone.
Once the audio track is created, ensure that the input source is set to your USB microphone. This step confirms that Reason will capture audio signals from your USB microphone and route them to the designated track for recording. With the input source properly configured, you’re now ready to arm the track for recording and start capturing your audio content.
As you begin recording with your USB microphone in Reason, take advantage of the software’s monitoring capabilities to listen to the incoming audio signal in real-time. Monitoring allows you to hear the audio being captured by your USB microphone, enabling you to make on-the-fly adjustments and ensure that the recording levels and performance meet your expectations.
During the recording process, consider utilizing Reason’s built-in features for audio processing, effects, and real-time monitoring to enhance the quality and character of the recorded audio. Whether it’s applying EQ, compression, reverb, or other effects, Reason provides a robust set of tools to elevate the sonic characteristics of your recordings while capturing them with your USB microphone.
Once you’ve completed the recording process, take advantage of Reason’s editing and mixing capabilities to refine and polish your captured audio content. Whether it’s comping vocal takes, editing instrument performances, or arranging podcast segments, Reason offers a comprehensive suite of tools for shaping and perfecting your recordings with your USB microphone.
By leveraging the power of Reason and your USB microphone, you can unleash your creativity and achieve professional-grade recordings that showcase the full potential of your audio content. Whether you’re a musician, podcaster, content creator, or audio enthusiast, Reason’s seamless integration with USB microphones opens up a world of possibilities for capturing and producing exceptional audio content.