Introduction
When it comes to enhancing your TV viewing experience, a soundbar can make a world of difference. Yamaha, renowned for their audio expertise, offers a range of high-quality soundbars that can take your TV’s audio to new heights. Connecting a Yamaha soundbar to your TV is a straightforward process that can be done using various connection methods.
In this guide, we will walk you through the steps on how to connect a Yamaha soundbar to your TV. Whether you have a Smart TV, an older model, or a budget-friendly option, we will cover different connection options to suit your needs. By following these steps, you’ll be able to enjoy immersive sound and elevate your home theater experience.
Before we dive in, it’s important to note that the connectivity options may vary depending on the specific models of both your Yamaha soundbar and your TV. It’s always a good idea to consult the user manuals of both devices for detailed instructions and compatibility information.
Now, let’s get started with the first step of connecting your Yamaha soundbar to your TV!
Step 1: Check the compatibility of your TV and Yamaha soundbar
Before connecting your Yamaha soundbar to your TV, it’s crucial to ensure that they are compatible with each other. This step will help avoid any potential issues and guarantee a seamless connection.
First, check the audio output options available on your TV. Most modern TVs come equipped with HDMI ARC (Audio Return Channel), optical, and RCA outputs. HDMI ARC is the preferred connection method as it allows for both audio and control signals to be transmitted through a single HDMI cable.
Next, refer to the user manual or product specifications of your Yamaha soundbar to identify the available input options. Ensure that your soundbar supports the same audio input options as your TV. For example, if your TV has HDMI ARC and optical outputs, make sure that your soundbar has corresponding HDMI ARC and optical inputs.
If your TV and soundbar have different input/output options, don’t worry! Adapters and converters are available in the market that can bridge the gap and allow you to connect your devices seamlessly.
Lastly, double-check the compatibility requirements mentioned in the user manuals of both devices. Look out for any specific instructions or limitations regarding the audio formats and signal types supported by your Yamaha soundbar and TV. This will help you avoid any potential compatibility issues and ensure that the devices work together flawlessly.
Once you have confirmed the compatibility between your TV and Yamaha soundbar, you are ready to proceed to the next step of gathering the necessary cables.
Step 2: Gather the necessary cables
Before you can connect your Yamaha soundbar to your TV, you’ll need to gather the necessary cables. The specific cables you’ll need will depend on the available ports and connections on both your soundbar and TV.
If your TV and soundbar both have HDMI ARC ports, you’ll need an HDMI cable. Make sure the HDMI cable is capable of transmitting audio and has ARC support. This will allow for a single cable connection that carries both audio and control signals between your devices.
Alternatively, if your TV and soundbar have optical audio ports, you’ll need an optical cable. The optical cable is capable of transmitting high-quality digital audio signals.
If your TV and soundbar have RCA ports, you’ll need a pair of RCA cables. The RCA cables consist of two connectors (one for the left audio channel and one for the right audio channel) and are commonly found on older TVs and soundbars.
When selecting your cables, consider the length that you’ll need to comfortably connect the devices without any strain or inconvenience. It’s always a good idea to go for high-quality cables to ensure optimal audio performance and longevity.
Once you have gathered the necessary cables, you’re ready to move on to the next step of connecting the soundbar to your TV.
Step 3: Connect the soundbar to your TV using HDMI ARC
If your TV and Yamaha soundbar have HDMI ARC ports, this is the recommended method for connecting them. HDMI ARC allows for a single cable connection, carrying both audio and control signals between the devices.
Here’s how to connect your soundbar to your TV using HDMI ARC:
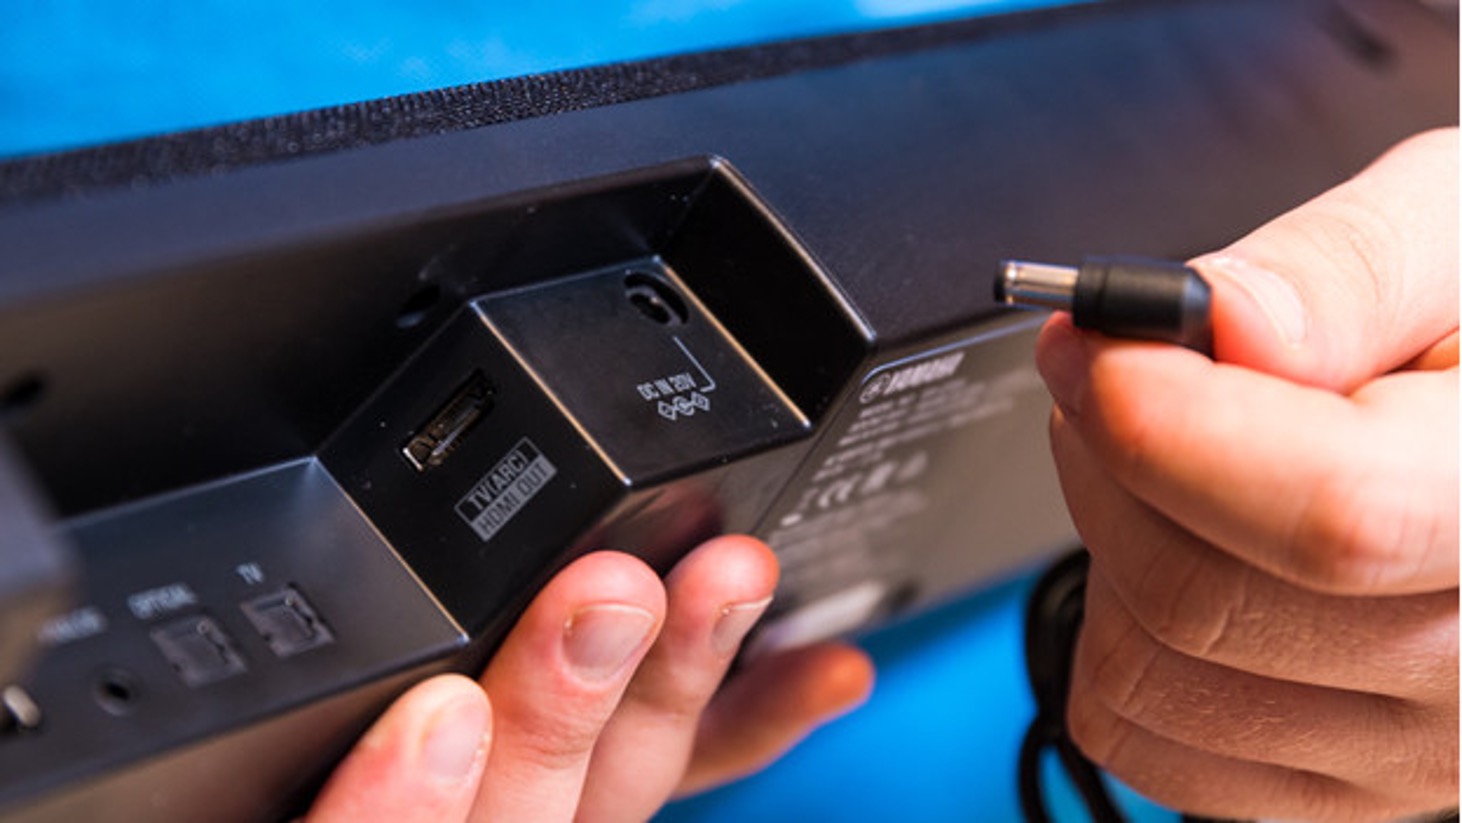
- Locate the HDMI ARC ports on both your TV and soundbar. These ports are usually labeled as HDMI ARC or have a specific ARC symbol next to them.
- Insert one end of the HDMI cable into the HDMI ARC port on your soundbar.
- Connect the other end of the HDMI cable to the HDMI ARC port on your TV.
- Power on both your TV and soundbar.
- Using your TV’s remote or on-screen menu, navigate to the audio settings.
- Select the HDMI ARC input option to enable the audio output through the soundbar.
- Adjust the volume on your soundbar and enjoy the enhanced audio experience!
It’s important to note that some TVs may require additional settings adjustments to enable HDMI ARC functionality. Refer to your TV’s user manual for specific instructions on how to enable HDMI ARC and make necessary audio settings.
If your TV does not have HDMI ARC but has a regular HDMI port, you can still use this method to connect your soundbar. However, you’ll need to connect an additional optical cable to transmit the audio signal from your TV to the soundbar.
With your Yamaha soundbar successfully connected to your TV via HDMI ARC, you can now move on to the next step of connecting them using an optical cable (if applicable).
Step 4: Connect the soundbar to your TV using optical cable
If your TV or Yamaha soundbar does not have HDMI ARC ports or if you prefer to use an alternative connection method, you can connect them using an optical cable. The optical cable can transmit high-quality digital audio signals.
Follow these steps to connect your soundbar to your TV using an optical cable:
- Locate the optical audio ports on both your TV and soundbar. These ports are usually labeled as “Optical” or “Digital Audio Out.”
- Insert one end of the optical cable into the optical port on your soundbar.
- Connect the other end of the optical cable to the optical port on your TV.
- Power on your TV and soundbar.
- Using your TV’s remote or on-screen menu, navigate to the audio settings.
- Set the audio output to “Optical” or “Digital Audio Out” to route the sound to your soundbar.
- Adjust the volume on your soundbar and start enjoying an enhanced audio experience.
It’s important to note that some TVs may require additional settings adjustments to enable the optical audio output. Refer to your TV’s user manual for specific instructions on how to enable the optical audio output and make necessary audio settings.
If your TV does not have an optical audio output, but it has a headphone jack, you can use a digital-to-analog audio converter to connect the soundbar via the headphone jack. This converter will convert the digital audio signal from your TV to an analog signal compatible with the RCA inputs on your soundbar.
With your Yamaha soundbar successfully connected to your TV using an optical cable, you’ve completed the setup and can move on to the next step of connecting them using RCA cables (if applicable).
Step 5: Connect the soundbar to your TV using RCA cables
If your TV or Yamaha soundbar does not have HDMI ARC or optical ports, or if you prefer to use an analog connection, you can connect them using RCA cables. RCA cables are a common analog audio connection method and are typically found on older TVs and soundbars.
Follow these steps to connect your soundbar to your TV using RCA cables:
- Locate the RCA audio output ports on your TV. These ports are usually labeled as “Audio Out” or “Line Out.” There will be two ports, one for the left audio channel (usually red) and one for the right audio channel (usually white).
- Insert one end of the RCA cables into the corresponding left and right audio output ports on your TV.
- Insert the other end of the RCA cables into the corresponding left and right audio input ports on your soundbar. These ports are usually located near the other audio input options.
- Power on your TV and soundbar.
- Using your TV’s remote or on-screen menu, navigate to the audio settings.
- Set the audio output to “External Speakers” or “Audio Out” to route the sound to your soundbar.
- Adjust the volume on your soundbar, and you’re ready to enjoy an improved audio experience.
While RCA cables can provide an analog audio connection, be aware that they may not offer the same audio quality as HDMI ARC or optical cables, especially for newer soundbars that excel with digital audio signals. However, RCA cables can still be a viable option if you don’t have other connection alternatives available.
With your Yamaha soundbar successfully connected to your TV using RCA cables, you have completed the connection setup. Now it’s time to move on to the next step and set up the audio settings on your TV.
Step 6: Set up the audio settings on your TV
After connecting your Yamaha soundbar to your TV, it’s important to properly configure the audio settings on your TV to ensure optimal performance. Here’s how to set up the audio settings on your TV:
- Using your TV remote or on-screen menu, navigate to the audio settings.
- Look for an option that allows you to select the audio output or audio format.
- Choose the appropriate audio output option that corresponds to your connected soundbar (e.g., HDMI ARC, optical, or external speakers).
- Depending on your TV, you may also have options for adjusting the sound mode or equalizer settings. Experiment with these settings to find the sound profile that best suits your preferences.
- If available, enable any additional audio enhancements or surround sound options that your TV may offer. These can further enhance your audio experience.
- Save the settings and exit the audio menu.
It’s worth noting that the specific audio settings and options may vary depending on your TV’s make and model. Refer to your TV’s user manual for detailed instructions on how to access and adjust the audio settings.
Once you have configured the audio settings, you’re ready for the final step: testing the soundbar and making any necessary adjustments.
Step 7: Test the soundbar and make necessary adjustments
Now that you have connected your Yamaha soundbar to your TV and set up the audio settings, it’s time to test the soundbar and make any necessary adjustments to ensure optimal sound quality. Follow these steps to test and fine-tune your soundbar:
- Play some audio or a video on your TV to test the soundbar. This can be a movie, a TV show, or even a music video.
- Make sure the soundbar is powered on and set to the appropriate input/source.
- Listen carefully to the audio coming from the soundbar. Pay attention to the volume levels and the clarity of the sound.
- If the audio is too low or too loud, adjust the volume using the soundbar’s remote or controls.
- If the sound seems unbalanced or there are issues with specific audio frequencies, consider accessing the soundbar’s audio settings and making adjustments such as bass, treble, or equalizer settings.
- Experiment with different sound modes or preset audio profiles that may be available on your soundbar. These can enhance the audio experience based on the content you are watching.
- Continue testing the soundbar with different types of audio content to ensure consistency and adjust settings as needed.
It’s important to note that the optimal sound settings may vary depending on personal preference and the specific soundbar model. Take the time to fine-tune the settings to your liking and enjoy the improved audio experience.
If you encounter any issues or are not satisfied with the sound quality, refer to the user manual of your Yamaha soundbar for troubleshooting tips or reach out to Yamaha’s customer support for further assistance.
With the soundbar tested and fine-tuned, you have successfully connected and optimized the audio output from your Yamaha soundbar to your TV. Sit back, relax, and enjoy a more immersive and satisfying viewing experience!
Conclusion
Connecting a Yamaha soundbar to your TV can greatly enhance your audio experience and take your home theater setup to the next level. Whether you choose to connect via HDMI ARC, optical cable, or RCA cables, the process is relatively straightforward and can be done with just a few simple steps.
By checking the compatibility of your TV and soundbar, gathering the necessary cables, and following the appropriate connection method, you can ensure a seamless and high-quality audio connection. Setting up the audio settings on your TV and testing the soundbar will further fine-tune the audio output to your liking.
Always refer to the user manuals for your specific TV and Yamaha soundbar to ensure you have the most accurate and up-to-date instructions and compatibility information. In case you encounter any challenges or have specific questions related to your devices, don’t hesitate to reach out to the manufacturer’s customer support.
With your Yamaha soundbar successfully connected to your TV, you can now fully immerse yourself in your favorite movies, TV shows, and music, enjoying enhanced sound clarity and depth. Sit back, relax, and indulge in an audio experience that complements and elevates your visual enjoyment.
So, go ahead and connect your Yamaha soundbar to your TV, and get ready to experience audio like never before!