Introduction
Welcome to the world of convenient and hassle-free payments with Zelle! In this digital age, managing your finances has become easier than ever. With just a few taps on your smartphone, you can send money to friends, family, and even pay your bills effortlessly. One of the features that sets Zelle apart is the ability to set up recurring payments.
Recurring payments are a game-changer when it comes to managing your regular expenses. Whether you need to pay your rent, utilities, or subscription services, setting up recurring payments on Zelle ensures that your payments are automatically sent out on a scheduled basis. No more worrying about missing due dates or setting reminders – Zelle takes care of it all for you.
In this article, we will guide you through the process of setting up recurring payments on Zelle. You’ll discover how to download the Zelle app, create your account, add recipients, and set up your recurring payments with ease. We’ll also discuss the benefits of using Zelle for recurring payments and how to manage and edit your existing recurring payments in case of any changes.
So, if you’re ready to take control of your finances and simplify your payment routine, let’s dive into the world of Zelle and learn how to set up recurring payments!
What is Zelle?
Zelle is a fast, secure, and convenient way to send and receive money directly between bank accounts in the United States. It is a digital payment network that allows users to transfer funds using just a mobile phone number or an email address. With Zelle, you can instantly pay friends, family, or businesses without the need for cash or checks.
Established in 2017, Zelle is backed by a network of renowned U.S. banks, making it a trusted and reliable platform for peer-to-peer transactions. It is available as a standalone mobile app and is also integrated into the banking apps of participating financial institutions, making it easily accessible to millions of users across the country.
What sets Zelle apart from other payment platforms is its speed and convenience. Unlike traditional methods that require several business days for funds to transfer between accounts, Zelle enables instant transfers, allowing you to send and receive money within minutes. This makes it ideal for splitting bills, repaying loans, sharing costs, and even sending monetary gifts on special occasions.
Moreover, Zelle eliminates the need for cash or checks, making transactions more secure and reducing the risk of loss or theft. With Zelle’s robust security measures, you can have peace of mind knowing that your money is transferred safely and confidentially.
It is important to note that to use Zelle, both the sender and the recipient must have a U.S. bank account. Additionally, the recipient must also be enrolled in Zelle or have access to Zelle through their bank’s mobile app. This ensures that the payment process is seamless and efficient for both parties involved.
Now that we have a better understanding of what Zelle is and its key features, let’s explore the benefits of setting up recurring payments with this innovative platform.
Benefits of Setting Up Recurring Payments on Zelle
Setting up recurring payments on Zelle offers numerous benefits that can greatly simplify your financial routine. Let’s take a look at some of the key advantages:
1. Convenience: With recurring payments on Zelle, you can automate your regular expenses, such as rent, mortgage, and utility bills. Once set up, the payments will be sent automatically based on your preferred schedule, saving you time and effort.
2. Avoid Late Payments: Missing due dates can result in late fees or even damage your credit score. By setting up recurring payments on Zelle, you ensure that your payments are made on time, eliminating the risk of late penalties or negative consequences.
3. Peace of Mind: With Zelle’s advanced security measures and encryption protocols, you can have peace of mind knowing that your transactions are secure. Zelle uses authentication and monitoring systems to safeguard your financial information and prevent unauthorized access.
4. Streamlined Budgeting: Recurring payments on Zelle allow you to better manage your budget by automating your regular expenses. This helps you track your cash flow, plan your spending, and ensure that you have sufficient funds allocated for your essential bills.
5. Flexibility: Zelle offers flexibility when it comes to choosing the frequency and amount of your recurring payments. Whether you need to make a monthly payment, bi-weekly, or on a custom schedule, Zelle allows you to tailor your payment plan to your specific needs.
6. Easy Setup and Management: Setting up recurring payments on Zelle is a straightforward process. Once you have added the recipient and set the payment frequency, Zelle takes care of the rest. You can conveniently manage and edit your recurring payments through the Zelle app, giving you full control over your financial obligations.
7. Reduce Paperwork: By opting for recurring payments on Zelle, you eliminate the need for paper checks or physical cash. This not only reduces clutter but also promotes a more environmentally friendly approach to managing your finances.
These advantages make setting up recurring payments on Zelle a smart choice for individuals looking to streamline their financial responsibilities. Now, let’s explore the step-by-step process of setting up recurring payments on Zelle.
Step 1: Download and Install the Zelle App
The first step in setting up recurring payments on Zelle is to download and install the Zelle app on your smartphone or tablet. Follow these simple steps to get started:
1.1. Check App Compatibility: Ensure that your mobile device meets the requirements for installing the Zelle app. Zelle is available for both iOS and Android devices, so make sure your device is compatible before proceeding.
1.2. Visit the App Store: On your iPhone or iPad, open the App Store. If you’re using an Android device, go to the Google Play Store. Search for “Zelle” in the search bar.
1.3. Select Zelle: Once you find the Zelle app in the search results, tap on it to open the app’s dedicated page.
1.4. Tap “Install”: On the Zelle app page, tap the “Install” button on Android or the “Get” button on iOS. This will initiate the download and installation process.
1.5. Wait for Installation: The app will begin downloading and installing onto your device. Depending on your internet connection, this process may take a few moments.
1.6. Open the App: Once the installation is complete, locate the Zelle app on your device’s home screen or app tray. Tap on the Zelle icon to open the app.
1.7. Log In or Sign Up: Upon opening the app, you will be prompted to sign in or create a new account. If you already have a Zelle account, enter your login credentials. If not, follow the prompt to sign up for a new account. You may need to verify your phone number or link your bank account during the registration process.
1.8. Grant Permissions: To access all the features of the Zelle app, you may need to grant certain permissions, such as access to your contacts or location. Follow the prompts to enable the necessary permissions.
Once you have completed these steps, you will have successfully downloaded and installed the Zelle app on your device. In the next step, we will guide you through the process of setting up your Zelle account.
Step 2: Set Up Your Zelle Account
Now that you have downloaded and installed the Zelle app, it’s time to set up your Zelle account. Follow these steps to get started:
2.1. Open the Zelle App: Locate the Zelle app on your device’s home screen or app tray. Tap on the Zelle icon to open the app.
2.2. Sign In: If you have already created a Zelle account, enter your login credentials and tap the “Sign In” button. If you are a new user, tap the “Sign Up” or “Get Started” button to create a new Zelle account.
2.3. Enter Personal Information: Regardless of whether you are signing in or signing up, you will be asked to enter your personal information. This typically includes your name, email address, phone number, and sometimes your date of birth.
2.4. Verify Your Identity: Depending on the bank you are associated with or Zelle’s verification process, you may be required to verify your identity. This can be done by confirming a code sent to your phone number or email, or by linking and verifying your bank account.
2.5. Set Up a Username and Password: To secure your Zelle account, create a unique and strong username and password. This will be used for future login attempts, so make sure to choose a password that is not easily guessable and contains a combination of letters, numbers, and special characters.
2.6. Review and Accept Terms: Before proceeding, take a moment to review Zelle’s terms and conditions. Ensure that you understand and agree to their terms of service, privacy policy, and any other applicable agreements.
2.7. Complete the Setup: Once you have entered all the required information and reviewed the terms, tap the “Complete Setup” or “Finish” button to finalize the process. Your Zelle account is now ready to use!
Congratulations! You have successfully set up your Zelle account. In the next step, we will guide you on how to add recipients to your Zelle contact list.
Step 3: Add Recipients to Your Zelle Contact List
Now that you have set up your Zelle account, it’s time to add recipients to your Zelle contact list. These recipients are the individuals or businesses you want to send recurring payments to. Follow these steps to add recipients:
3.1. Open the Zelle App: Locate the Zelle app on your device’s home screen or app tray. Tap on the Zelle icon to open the app.
3.2. Log In: Enter your Zelle account login credentials and tap the “Sign In” button to access your account.
3.3. Go to “Send Money”: Once logged in, you will be directed to the main screen of the Zelle app. Look for the option that says “Send Money,” “Send,” or a similar option and tap on it.
3.4. Select “Add Recipients”: Within the “Send Money” section, you will find an option to add recipients. Tap on “Add Recipients” or a similar option to proceed.
3.5. Choose a Contact: The Zelle app will provide you with various options to add recipients. You can choose to add a recipient using their phone number, email address, or by selecting their contact information from your phone’s address book. Select the option that best suits your needs.
3.6. Enter Recipient Information: Depending on the method you selected in the previous step, enter the recipient’s phone number, email address, or select their contact information from your phone’s address book. Double-check the accuracy of the information before proceeding.
3.7. Verify Recipient: In some cases, you may need to verify the recipient’s identity or confirm their details. Follow the prompts provided by the Zelle app to complete the verification process.
3.8. Save Recipient: Once you have entered all the required information and verified the recipient, tap the “Save” or “Add” button to save the recipient to your Zelle contact list.
You have successfully added a recipient to your Zelle contact list. Repeat these steps for each recipient you want to include in your recurring payment setup. In the next step, we will guide you through the process of setting up a recurring payment with Zelle.
Step 4: Set Up a Recurring Payment
Now that you have added recipients to your Zelle contact list, it’s time to set up a recurring payment. Follow these steps to configure your recurring payment:
4.1. Open the Zelle App: Launch the Zelle app on your mobile device by locating the Zelle icon on your home screen or app tray. Tap on the icon to open the app.
4.2. Log In: Enter your Zelle account login credentials to access your account. If you’re already logged in, skip this step.
4.3. Go to “Send Money”: Locate and tap on the option that says “Send Money” or a similar variation. This will take you to the section where you can initiate payment transactions.
4.4. Select a Recipient: From your Zelle contact list, choose the recipient you want to set up a recurring payment for. Tap on their name to proceed.
4.5. Choose “Recurring”: Within the recipient’s payment options, look for an option that says “Recurring” or something similar. Tap on this option to set your payment as recurring.
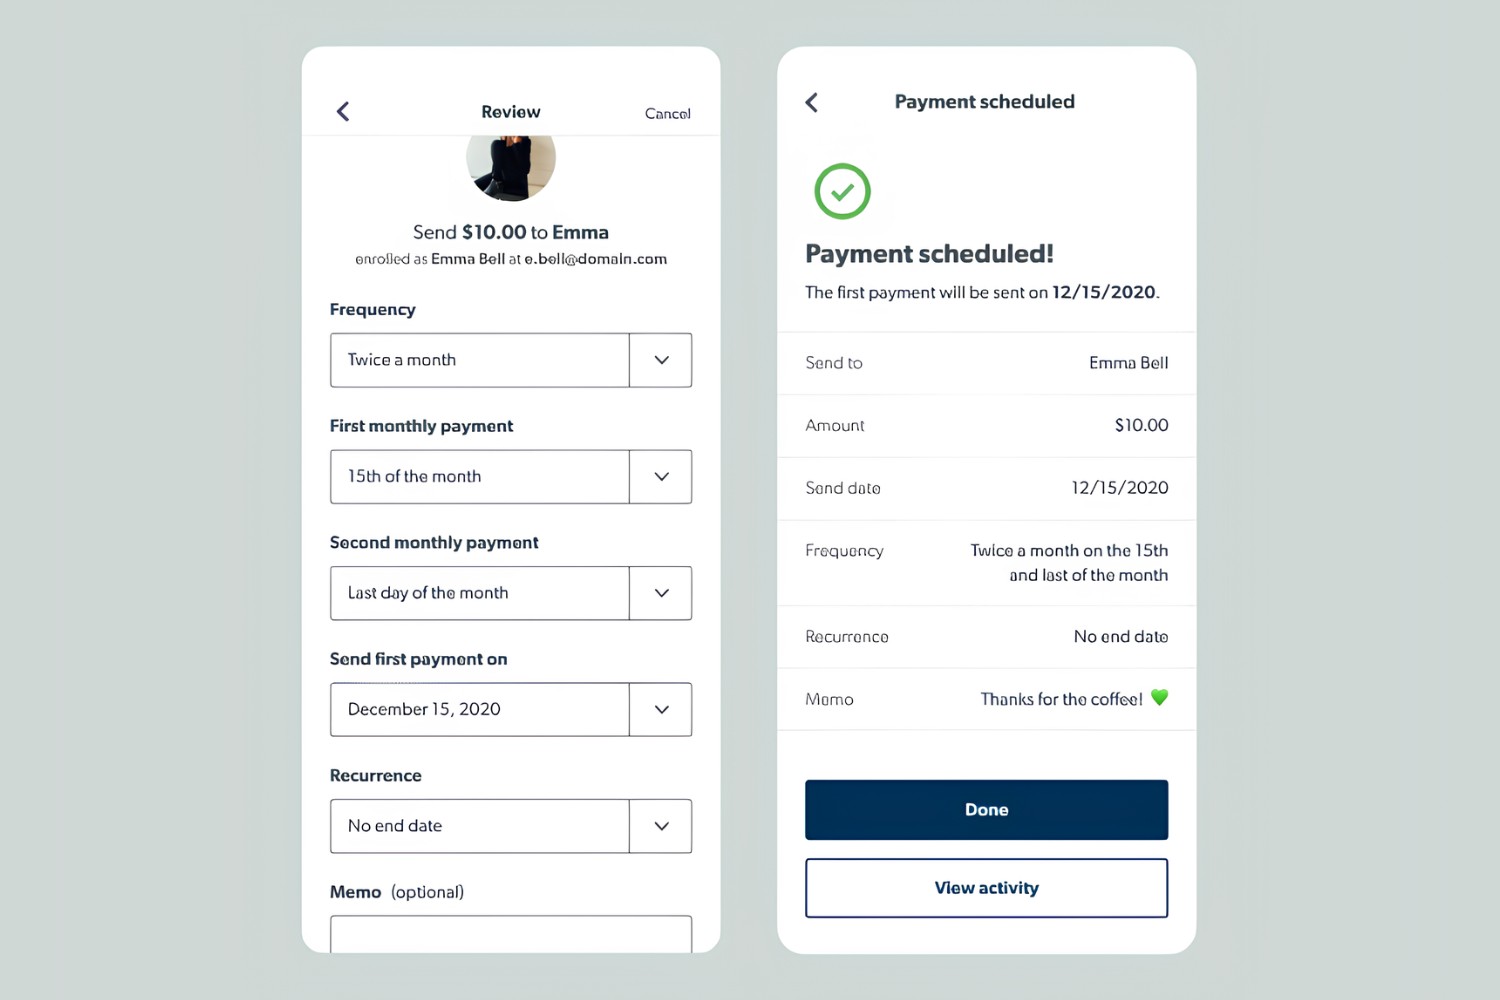
4.6. Select a Frequency: Choose the frequency at which you want the payment to recur – this can include options like weekly, bi-weekly, monthly, or custom schedules. Select the frequency that aligns with your payment needs.
4.7. Set the Payment Amount: Enter the amount you want to send for each recurring payment. Make sure to double-check the amount to ensure its accuracy.
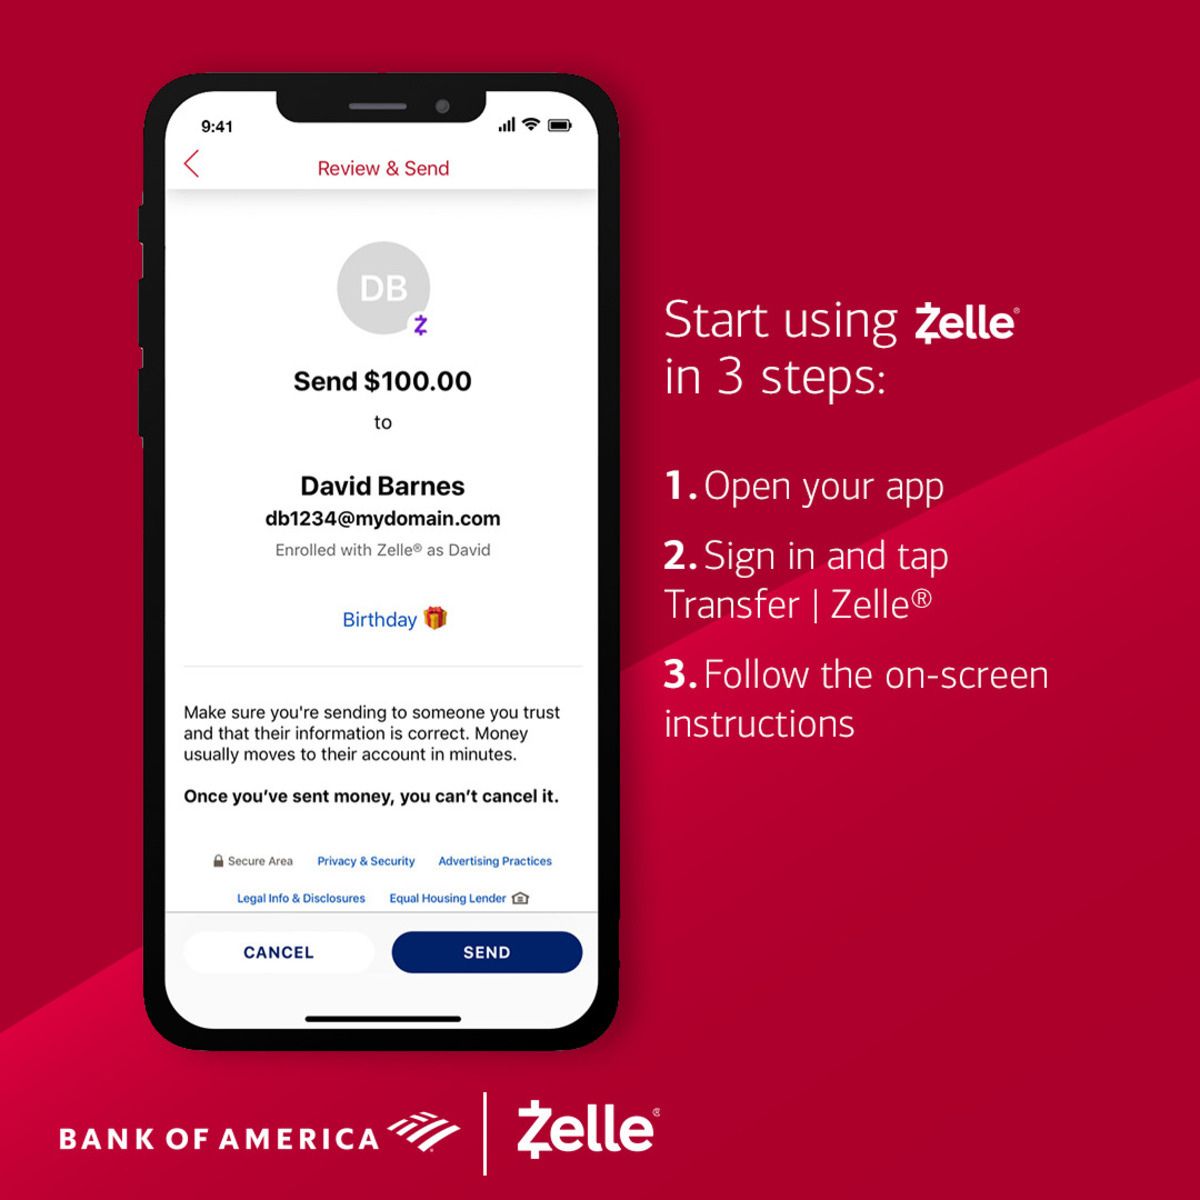
4.8. Review the Payment: Take a moment to review the recurring payment details before proceeding. Verify that the recipient, frequency, and amount are correct.
4.9. Confirm the Recurring Payment: Once you are satisfied with the payment details, tap on the “Confirm” or “Set Up Recurring Payment” button to finalize the setup process.
Congratulations! You have successfully set up a recurring payment on Zelle. The recurring payment will now be automatically sent to the designated recipient based on the frequency and amount you specified. In the next step, we will discuss how to manage and edit your recurring payments should the need arise.
Step 5: Choose the Frequency and Amount of the Recurring Payment
When setting up a recurring payment on Zelle, it’s important to choose the appropriate frequency and amount that align with your payment needs. Follow these steps to select the frequency and amount of your recurring payment:
5.1. Open the Zelle App: Launch the Zelle app on your mobile device by tapping on the Zelle icon located on your home screen or app tray.
5.2. Log In: Enter your Zelle account login credentials to access your account. If you’re already logged in, skip this step.
5.3. Go to “Send Money”: Look for the option that says “Send Money” or a similar variation within the Zelle app. Tap on this option to proceed.
5.4. Select a Recipient: From your list of Zelle contacts, choose the recipient for whom you want to set up the recurring payment. Tap on their name to continue.
5.5. Choose “Recurring”: Within the recipient’s payment options, find and tap on the option that says “Recurring” or a similar variation. This will allow you to set up a recurring payment for this particular recipient.
5.6. Select a Frequency: Choose the frequency at which you want the payment to recur. Zelle provides options such as weekly, bi-weekly, monthly, or custom schedules. Select the frequency that suits your payment needs.
5.7. Set the Payment Amount: Enter the amount you want to send for each recurring payment. Make sure to double-check the amount to ensure its accuracy.
5.8. Review the Payment: Take a moment to review the recurring payment details before proceeding. Verify that the recipient, frequency, and amount are correct.
5.9. Confirm the Recurring Payment: Once you are satisfied with the chosen frequency and amount, tap on the “Confirm” or “Set Up Recurring Payment” button to finalize the setup process.
By following these steps, you can set up the frequency and amount of your recurring payment on Zelle. The payment will now be automatically sent to the selected recipient based on the frequency and amount you specified. In the next step, we will discuss how to review and confirm your recurring payment.
Step 6: Review and Confirm the Recurring Payment
After selecting the frequency and amount of your recurring payment on Zelle, it’s important to review and confirm the details to ensure everything is accurate. Follow these steps to review and confirm your recurring payment:
6.1. Open the Zelle App: Launch the Zelle app on your smartphone or tablet by tapping on the Zelle icon located on your home screen or app tray.
6.2. Log In: Enter your Zelle account login credentials to access your account. If you’re already logged in, skip this step.
6.3. Go to “Send Money”: Within the Zelle app, locate and tap on the option that says “Send Money” or a similar variation. This will lead you to the section where you can initiate payment transactions.
6.4. Select the Recurring Payment: Choose the recipient for whom you set up the recurring payment. Tap on their name or any relevant options related to recurring payments.
6.5. Review the Details: Take a moment to carefully review the recurring payment details. Pay close attention to the recipient, frequency, and amount to ensure they are correct.
6.6. Edit if Necessary: If you spot any errors or need to make changes to the recurring payment details, look for an option to edit the details. Tap on it and make the necessary modifications.
6.7. Confirm the Recurring Payment: Once you are satisfied with the recurring payment details, tap on the “Confirm” or “Set Up Recurring Payment” button to finalize the setup process.
6.8. Save Confirmation: After confirming the recurring payment, Zelle may display a confirmation message indicating that the payment has been successfully set up. Take note of any reference number or confirmation details provided.
By following these steps, you can review and confirm your recurring payment on Zelle. Double-checking the payment details ensures that your recurring payment will be processed accurately and according to your preferences. In the next step, we will explore how to manage and edit your recurring payments if needed.
Step 7: Managing and Editing Recurring Payments
Once you have set up recurring payments on Zelle, it’s important to know how to manage and make changes to them if necessary. Follow these steps to effectively manage and edit your recurring payments:
7.1. Open the Zelle App: Launch the Zelle app on your mobile device by tapping on the Zelle icon located on your home screen or app tray.
7.2. Log In: Enter your Zelle account login credentials to access your account. If you’re already logged in, skip this step.
7.3. Go to “Send Money” or “Activity”: Look for the option that says “Send Money” or “Activity” within the Zelle app. Tap on this option to access your payment history and manage your transactions.
7.4. Find “Recurring Payments”: Within the “Activity” section, search for an option labeled “Recurring Payments” or something similar. Tap on it to access your list of recurring payments.
7.5. Select the Recurring Payment: Locate and tap on the recurring payment that you want to manage or edit. This will bring up the details of that specific recurring payment.
7.6. Manage or Edit: Depending on your needs, you can choose to manage or edit the recurring payment. Options may include modifying the payment amount, frequency, or recipient details.
7.7. Save Changes: After making the necessary changes to the recurring payment, tap on the “Save” or “Update” button to confirm and save the modifications.
7.8. Review the Changes: Take a moment to review the updated recurring payment details to ensure they reflect your desired modifications.
7.9. Monitor Your Recurring Payments: Regularly check your Zelle app and payment history to monitor the status and activity of your recurring payments. This allows you to stay informed and make any necessary adjustments if circumstances change.
By following these steps, you can effectively manage and edit your recurring payments on Zelle. Whether you need to make adjustments to the frequency, amount, or recipient details, knowing how to manage and modify your recurring payments gives you greater control over your financial obligations.
Conclusion
Setting up recurring payments on Zelle offers a convenient and hassle-free way to manage your regular expenses. Whether it’s your rent, utility bills, or subscription services, Zelle’s recurring payment feature ensures that your payments are automatically sent out on time, eliminating the stress of missed due dates and late fees.
In this guide, we walked you through the step-by-step process of setting up recurring payments on Zelle. We started by downloading and installing the Zelle app, followed by setting up your Zelle account and adding recipients to your contact list. We then discussed how to set up the frequency and amount of recurring payments, reviewed and confirmed the details, and covered how to manage and edit your recurring payments as needed.
By utilizing the benefits of Zelle’s recurring payment feature, you can enjoy the convenience of automated payments, ensuring that your financial obligations are met without the hassle of manual transactions. With Zelle’s robust security measures and user-friendly interface, you can have peace of mind knowing that your transactions are safe and secure.
Make the most of Zelle’s features and take control of your finances by setting up recurring payments. Save time, avoid late payments, streamline your budgeting, and simplify your financial routine with Zelle’s user-friendly interface and seamless payment experience.
So, why wait? Take the first step today and explore the world of recurring payments on Zelle. Simplify your financial responsibilities, stay organized, and enjoy peace of mind with Zelle’s convenient and secure platform.