Introduction
Welcome to the world of live streaming and high-quality video conferencing! If you’re tired of the mediocre video quality from your built-in webcam or are looking to level up your online meetings, using your Canon camera as a webcam is a game-changer. Canon cameras are renowned for their exceptional image quality and advanced features, making them perfect for creating professional-looking videos or engaging in virtual meetings.
However, using a Canon camera as a webcam requires a few extra steps to set up. In this guide, we will walk you through the process, step by step, so you can unlock the true potential of your camera.
Before we dive into the details, it’s essential to note that not all Canon cameras can be used as webcams directly out of the box. Canon has released a new software called the “EOS Webcam Utility” that allows compatible models to be used as webcams when connected to a computer. This utility is currently available for Windows and macOS operating systems, so make sure to check if your camera is supported before proceeding.
In this guide, we will cover everything you need to know to successfully use your Canon camera as a webcam. You will learn how to:
- Check camera compatibility and download the necessary software
- Connect your camera to your computer
- Configure camera settings for optimum performance
- Set up your preferred streaming or video conferencing software
By the end of this guide, you’ll be all set up and ready to enjoy crystal-clear video quality during your online meetings, live streams, or vlogs. So, let’s get started!
Step 1: Check Camera Compatibility
Before diving into the process of using your Canon camera as a webcam, it’s crucial to ensure that your specific camera model is compatible with this functionality. Not all Canon cameras support this feature, so it’s essential to verify this first.
To check if your camera is compatible, you’ll need to visit the Canon website. Canon has released a software called the “EOS Webcam Utility” that enables certain camera models to be used as webcams when connected to a computer. This utility is compatible with select Canon EOS and PowerShot cameras.
Visit the Canon website and search for the “EOS Webcam Utility” or “Canon Camera Compatibility” to find the official compatibility list. Check if your camera model is included in the supported models list. If your camera is listed, great news! You can proceed with the next steps. If your camera isn’t listed, unfortunately, it’s not compatible with this feature, and you may need to explore alternative options.
If your camera is compatible, make sure to download and install the EOS Webcam Utility software. The Canon website will provide a step-by-step guide on downloading and installing the software specific to your operating system. Follow the instructions carefully to ensure a successful installation.
It’s also worth noting that Canon regularly updates the compatibility list and releases new versions of the EOS Webcam Utility software. So, even if your camera isn’t initially compatible, keep checking for updates as Canon may add support for additional models in the future.
Once you have confirmed that your camera is compatible and installed the necessary software, you’re one step closer to using your Canon camera as a webcam. In the next step, we will cover how to connect your camera to your computer. So, let’s move on to Step 2!
Step 2: Install Necessary Software
Now that you’ve confirmed the compatibility of your Canon camera, the next step is to install the necessary software to enable it to function as a webcam. Canon provides a specific software called the “EOS Webcam Utility” that allows supported camera models to be recognized as webcams by your computer.
To install the EOS Webcam Utility, visit the Canon website and navigate to the download section. Locate the latest version of the software that corresponds to your operating system (Windows or macOS). Click on the download link, and the installation file will be saved to your computer.
Once the download is complete, locate the installation file and double-click on it to start the installation process. Follow the on-screen instructions provided by the installer to complete the installation. Ensure that you read and accept the terms and conditions before proceeding.
During the installation, you may be prompted to connect your Canon camera to your computer using a USB cable. Make sure to have your camera and USB cable ready. Connect the camera to your computer securely, and the installation process will detect the connected camera.
Follow any additional prompts or instructions to complete the installation. Once the installation is finished, you will have the EOS Webcam Utility installed on your computer, enabling your Canon camera to function as a webcam.
It’s crucial to note that the EOS Webcam Utility software is compatible only with specific Canon camera models. Therefore, if your camera is not included in the supported models list, you won’t be able to install this software. In that case, you may need to explore other alternatives or consider upgrading your camera to a compatible model if using it as a webcam is a priority for you.
With the necessary software installed, you’re ready to move on to the next step: connecting your camera to your computer. So, let’s proceed to Step 3!
Step 3: Connect the Camera to Your Computer
Now that you have the necessary software installed, it’s time to connect your Canon camera to your computer. This connection will allow your computer to recognize the camera as a webcam and utilize its high-quality video capabilities.
Before connecting, ensure that your camera is powered off. Then, locate the USB port on your Canon camera and connect one end of the USB cable to it. The other end of the cable should be connected to an available USB port on your computer.
Once the camera is connected, power it on. Your computer will recognize the connected camera as a new device and may automatically install any required drivers.
If your computer doesn’t install the necessary drivers automatically, you may need to download and install the specific drivers for your camera model from the Canon website. Refer to the camera’s user manual or the Canon website for instructions on locating and installing the appropriate drivers, if needed.
It’s essential to ensure a stable and secure connection between your camera and computer. Avoid using long or damaged USB cables, and make sure the cable is securely connected to both the camera and the computer.
Once the camera is connected, you’re ready to move on to the next step: configuring the camera settings. This step will allow you to optimize the camera’s performance for use as a webcam. So, let’s proceed to Step 4!
Step 4: Configure Camera Settings
Now that your Canon camera is connected to your computer, it’s time to configure its settings to ensure optimum performance as a webcam. By making a few adjustments, you can enhance video quality, adjust exposure settings, and customize the camera to suit your needs.
To configure the camera settings, you’ll need to open the EOS Webcam Utility software on your computer. Navigate to the software in your applications or programs folder and launch it.
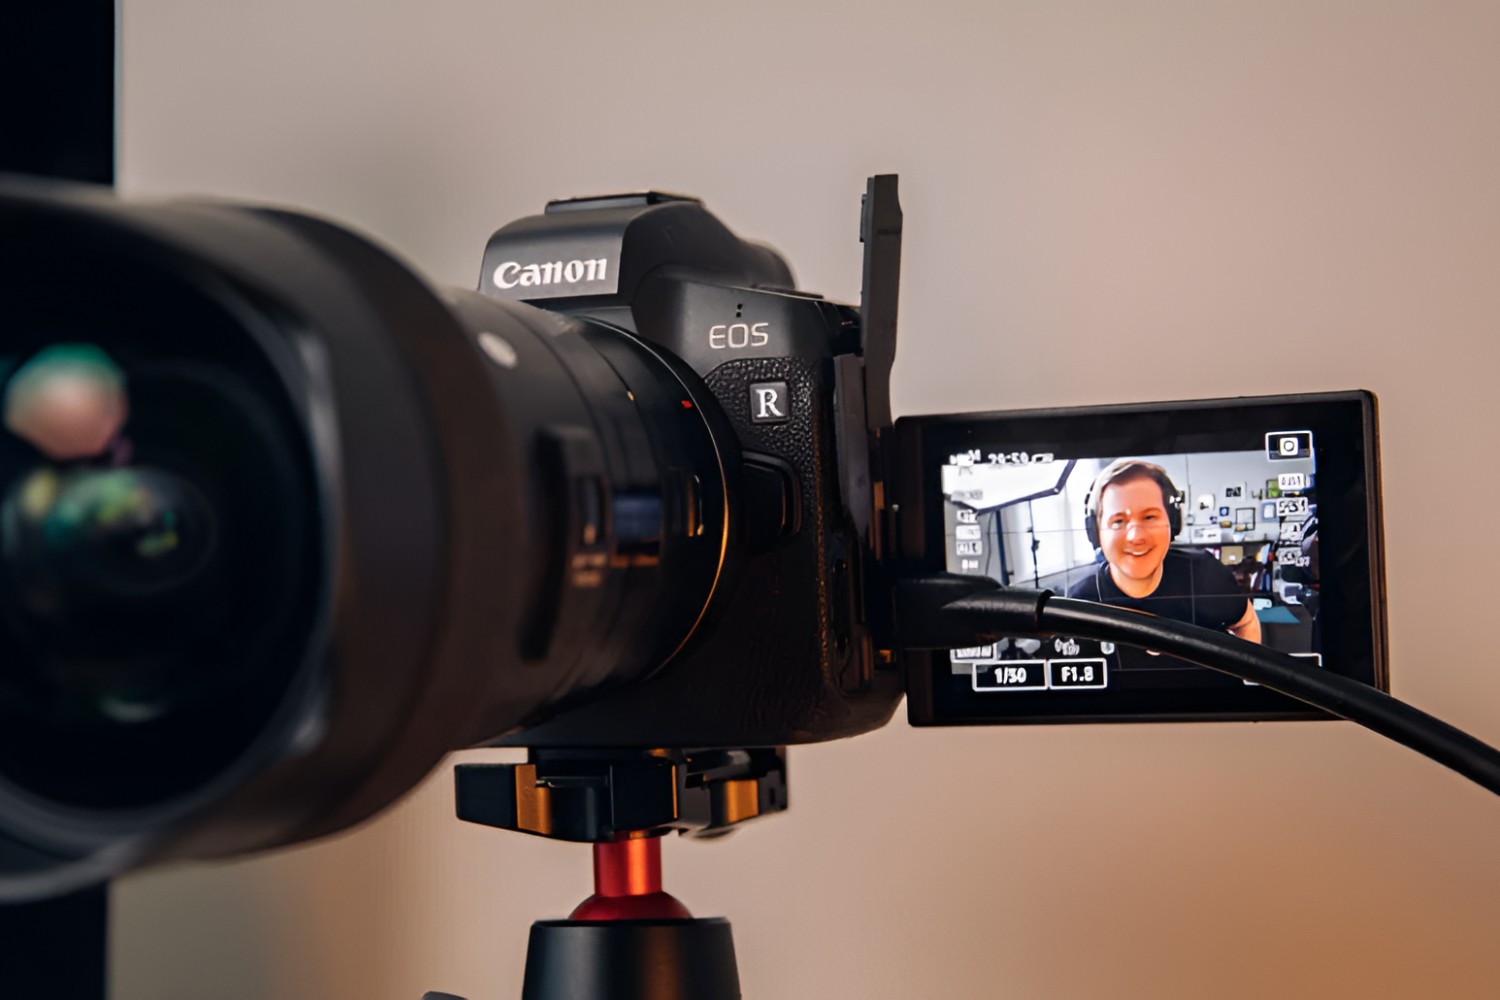
Once the software is open, you’ll see the live view from your Canon camera displayed on your computer screen. This confirms that the camera is properly connected and recognized as a webcam.
Within the EOS Webcam Utility software, you’ll find various options to adjust camera settings according to your preferences. These settings may include exposure, white balance, image resolution, and autofocus modes.
Take some time to explore the different settings and experiment with their adjustments. While the default settings may work well for most situations, customizing them can help you achieve the desired look and improve overall video quality.
In addition to the EOS Webcam Utility software, you can also access the camera’s native settings menu to make adjustments. Each Canon camera model may have a different process for accessing the settings menu, so refer to your camera’s user manual or the Canon website for specific instructions.
While configuring the camera settings, consider factors such as lighting conditions, background, and your intended use. Play around with the settings to find the optimal balance that suits your needs.
It’s important to note that the camera settings may vary depending on your particular model. Some advanced Canon cameras offer additional features, such as face tracking or manual exposure control, which can further enhance your webcam experience.
Once you’re satisfied with the camera settings, you’re ready to move on to the next step: setting up your preferred streaming or video conferencing software. So, let’s proceed to Step 5!
Step 5: Set Up Your Streaming or Video Conferencing Software
Now that your Canon camera is connected and configured, it’s time to set up your preferred streaming or video conferencing software to start using your camera as a webcam. Whether you’re live streaming on platforms like YouTube or Twitch, or having virtual meetings on software like Zoom or Microsoft Teams, the process is quite similar.
First, ensure that your desired streaming or video conferencing software is installed and up to date on your computer. If you haven’t installed it yet, visit the official website of the software and follow the instructions to download and install it.
Once your software is installed, open it and navigate to the settings or preferences menu. Look for the audio and video settings section, where you can select the camera input device.
In the camera input settings, you should see your Canon camera listed as an available option. Select your camera from the list to set it as the default video input device for your streaming or video conferencing software.
Depending on the software you’re using, you may also have the option to adjust video resolution, frame rate, and other advanced settings. Consider your requirements and the capabilities of your camera when making these adjustments.
It’s worth mentioning that while some streaming and video conferencing software automatically detect your Canon camera as a webcam, others may require you to restart the software or perform a system refresh for the changes to take effect. Follow any additional instructions provided by the software to ensure seamless integration with your camera.
Before going live or joining a video conference, it’s recommended to conduct a test call or stream to ensure that your camera is working as expected. Check the video quality, audio synchronization, and overall performance to make any necessary adjustments.
If you encounter any issues during the setup process or while using your Canon camera as a webcam with your chosen software, refer to the software’s support resources or community forums for troubleshooting guidance. You may also find helpful resources on the Canon website or by reaching out to their support team.
With the streaming or video conferencing software successfully set up, you’re now ready to enjoy the superior video quality and enhanced performance of your Canon camera. In the next step, we’ll recap the entire process and provide some final tips. So, let’s move on to Step 6!
Step 6: Start Using Your Canon Camera as a Webcam
Congratulations! You have successfully set up your Canon camera as a webcam and configured it with your preferred streaming or video conferencing software. Now it’s time to put your camera to use and enjoy the benefits of high-quality video for your online meetings, live streams, or vlogs.
Whenever you want to use your Canon camera as a webcam, make sure it is connected to your computer via the USB cable and powered on. Launch your streaming or video conferencing software and start a new meeting, stream, or recording session.
Within the software, select your Canon camera as the video input device, and you should see the live video feed from your camera on your screen. Adjust any additional settings, such as audio input sources or screen sharing options, as needed.
Position your camera at the desired angle, ensuring proper framing and lighting for the best video quality. Take advantage of the camera’s advanced features, such as autofocus or manual focus, to capture clear and sharp images.
During your online meetings or live streams, make sure to monitor the camera’s performance and adjust the settings if necessary. Pay attention to factors like exposure, white balance, and autofocus to ensure the best possible video quality for your viewers or meeting participants.
Additionally, consider using external microphones or audio devices for improved audio quality, as the built-in microphone on your camera may not provide the desired results for every situation.
Remember to also take breaks and give your camera and computer some rest to prevent overheating. Extended sessions of usage can put a strain on these devices, so it’s essential to practice proper care and maintenance.
By using your Canon camera as a webcam, you can elevate your online presence, whether it’s for professional purposes or personal enjoyment. Take advantage of the superior image quality and advanced capabilities of your camera to create engaging content and make a lasting impression.
Keep in mind that as technology evolves and new updates become available, there may be improvements or changes to the Canon camera or software. Stay up to date with the latest firmware updates for your camera and software versions to ensure optimal performance.
Now that you are equipped with the knowledge and steps to use your Canon camera as a webcam, go ahead and harness the power of high-quality video in your virtual endeavors. Enjoy the enhanced video experience and create memorable content with the help of your Canon camera!
Conclusion
Using your Canon camera as a webcam opens up a world of possibilities for improving your online meetings, live streams, or vlogs. By following the step-by-step process outlined in this guide, you can leverage the exceptional image quality and advanced features of your Canon camera to elevate your video content.
Throughout this guide, we covered the essential steps to successfully use your Canon camera as a webcam. We started by checking the camera’s compatibility and downloading the necessary software, followed by connecting the camera to your computer securely. Then, we discussed the importance of configuring the camera settings to optimize performance and customizing them according to your preferences. Finally, we set up your preferred streaming or video conferencing software to seamlessly integrate with your Canon camera.
Now that you have completed the setup process, you can start using your Canon camera as a webcam and enjoy the superior video quality it offers. Remember to monitor the camera’s performance, make necessary adjustments, and take breaks to ensure the longevity of your devices.
As you continue using your Canon camera as a webcam, stay informed about any firmware updates and software enhancements that may further enhance your experience. By staying up to date, you can make the most of your camera’s capabilities and take advantage of any new features or improvements.
So, go ahead and unlock the full potential of your Canon camera. Whether you’re participating in virtual meetings, streaming live events, or creating captivating vlogs, elevate your video to the next level with the help of your Canon camera as a webcam.
Thank you for following this guide, and we hope you enjoy your new webcam setup!