Introduction
HDMI Arc (Audio Return Channel) is a technology that allows you to have a simplified audio setup for your home entertainment system. Instead of using multiple cables to connect your TV and soundbar, HDMI Arc streams audio from your TV to your soundbar through a single HDMI cable. This eliminates the need for extra cables and provides a convenient and clutter-free setup.
Whether you’re a movie enthusiast, a music lover, or a avid gamer, having a seamless audio experience can greatly enhance your overall enjoyment. HDMI Arc is a key component in achieving this, as it allows you to listen to all the audio from your TV, including streaming services, Blu-ray discs, and gaming consoles, through your soundbar’s high-quality speakers.
In this article, we’ll guide you through the process of setting up HDMI Arc and show you how to configure it correctly for optimal performance. We’ll walk you through connecting your HDMI Arc-enabled devices, configuring the settings on your TV and soundbar, and troubleshooting common issues that may arise along the way.
With the rise of smart TVs and advanced audio technology, HDMI Arc has become a standard feature that many TVs and soundbars offer. Whether you’re upgrading your current system or setting up a new one, knowing how to utilize HDMI Arc will help you unlock the full potential of your home entertainment experience.
What is HDMI Arc?
HDMI Arc stands for Audio Return Channel and is a feature of HDMI (High-Definition Multimedia Interface) that allows for two-way communication between your TV and other audio devices, such as soundbars or AV receivers. In traditional setups, audio signals from your TV would need to be routed separately to the external audio device using an additional audio cable. However, HDMI Arc simplifies this process by allowing the audio to be sent back to the audio device through the same HDMI connection that is used to display video on the TV.
With HDMI Arc, you can enjoy high-quality audio output from your TV without the need for multiple cables cluttering your entertainment area. It provides a seamless and convenient way to connect and control audio devices, allowing for a more streamlined setup.
One of the key advantages of HDMI Arc is its ability to transmit not only standard stereo audio but also more advanced audio formats, such as Dolby Digital and DTS. This means that you can experience immersive surround sound from your TV content, providing a cinematic audio experience right in your own home.
Another benefit of HDMI Arc is its compatibility with CEC (Consumer Electronics Control), also known as HDMI-CEC. CEC enables you to control multiple devices connected via HDMI using a single remote control. For example, you can adjust the volume of your soundbar using your TV remote, eliminating the need to juggle multiple remotes for different devices.
It is worth noting that HDMI Arc has evolved over time, and its latest version, HDMI eARC (Enhanced Audio Return Channel), offers even more advanced features, such as support for high-resolution audio formats like Dolby TrueHD and DTS-HD Master Audio. However, both HDMI Arc and HDMI eARC provide substantial improvements over traditional audio setups and offer enhanced convenience and audio quality.
Now that you have a better understanding of what HDMI Arc is, let’s explore why you should consider using it for your home entertainment system.
Why use HDMI Arc?
HDMI Arc offers several benefits and conveniences that make it an ideal choice for connecting your audio devices to your TV.
First and foremost, HDMI Arc simplifies the setup process. With traditional audio setups, you would need to connect various cables from your TV to your soundbar or AV receiver. This can be time-consuming, and the cables can create a messy and cluttered look. HDMI Arc eliminates the need for extra cables by allowing audio signals to be transmitted back from the TV to the audio device through the same HDMI cable used for video.
Additionally, HDMI Arc provides a streamlined control experience. With CEC compatibility, you can control multiple devices connected via HDMI using a single remote control. This means you can adjust the volume, power, and other settings of your soundbar or AV receiver using your TV remote. It eliminates the hassle of switching between multiple remotes and offers a more user-friendly experience.
Another advantage of HDMI Arc is its ability to transmit high-quality audio formats. Whether you’re watching movies, playing video games, or streaming music, HDMI Arc ensures that you experience immersive sound with support for audio formats like Dolby Digital and DTS. This means you can enjoy rich, detailed sound that enhances your overall viewing and listening experience.
HDMI Arc also offers synchronization of audio and video. With traditional audio setups, there can sometimes be a delay between the audio and video, resulting in an out-of-sync experience. HDMI Arc eliminates this issue by synchronizing the audio and video signals, ensuring that what you see on the screen is perfectly matched with what you hear.
Furthermore, HDMI Arc is backward compatible with older HDMI versions. This means that even if your TV or audio device has an older HDMI version, you can still benefit from using HDMI Arc. It provides a seamless connection between your devices, regardless of their HDMI compatibility.
Overall, HDMI Arc offers a simplified, streamlined, and high-quality audio setup for your home entertainment system. By using HDMI Arc, you can eliminate cable clutter, enjoy convenient control with a single remote, experience immersive sound, and ensure synchronization between audio and video.
Now that you understand the advantages of HDMI Arc, let’s explore what you need to set it up.
What do you need to set up HDMI Arc?
Setting up HDMI Arc requires a few key components to ensure compatibility and functionality. Before getting started, make sure you have the following:
- HDMI Arc-enabled TV: The first and most important requirement is a TV that supports HDMI Arc. Most modern TVs have this feature, but it’s essential to check your TV’s specifications or user manual to confirm.
- HDMI Arc-enabled soundbar or AV receiver: Along with an HDMI Arc-enabled TV, you will need an audio device that also supports HDMI Arc. This can be a soundbar or an AV receiver. Ensure that your audio device has an HDMI Arc port or is labeled as HDMI Arc compatible.
- HDMI Cable: To connect your TV and audio device, you’ll need an HDMI cable. Preferably, use a high-speed HDMI cable that supports Ethernet. This will ensure optimal performance and compatibility with HDMI Arc.
- Power Cables: Make sure you have the necessary power cables for both your TV and audio device. HDMI Arc requires both devices to be powered on for proper functioning.
- Remote control(s): Have the remote control(s) for your TV and audio device handy. This will be useful during the setup process for configuring HDMI Arc and testing the connection.
It’s important to note that HDMI Arc is not limited to specific brands or models. As long as your TV and audio device support HDMI Arc, you can mix and match different brands to create your desired setup.
Once you have gathered all the necessary components, you’re ready to move on to the next steps of the setup process. In the following sections, we will guide you through connecting your HDMI Arc-enabled devices and configuring HDMI Arc on both your TV and soundbar.
Now that you know what you need, let’s proceed with the step-by-step setup process.
Step 1: Check your TV and Soundbar Compatibility
Before setting up HDMI Arc, it’s crucial to confirm that both your TV and soundbar are compatible with this feature. This will ensure a smooth and successful setup process. Here are the steps to check compatibility:
- Review the TV and soundbar specifications: Check the user manuals or official websites of your TV and soundbar to verify if they support HDMI Arc. Look for terms like “HDMI ARC,” “Audio Return Channel,” or “ARC” in the specifications section.
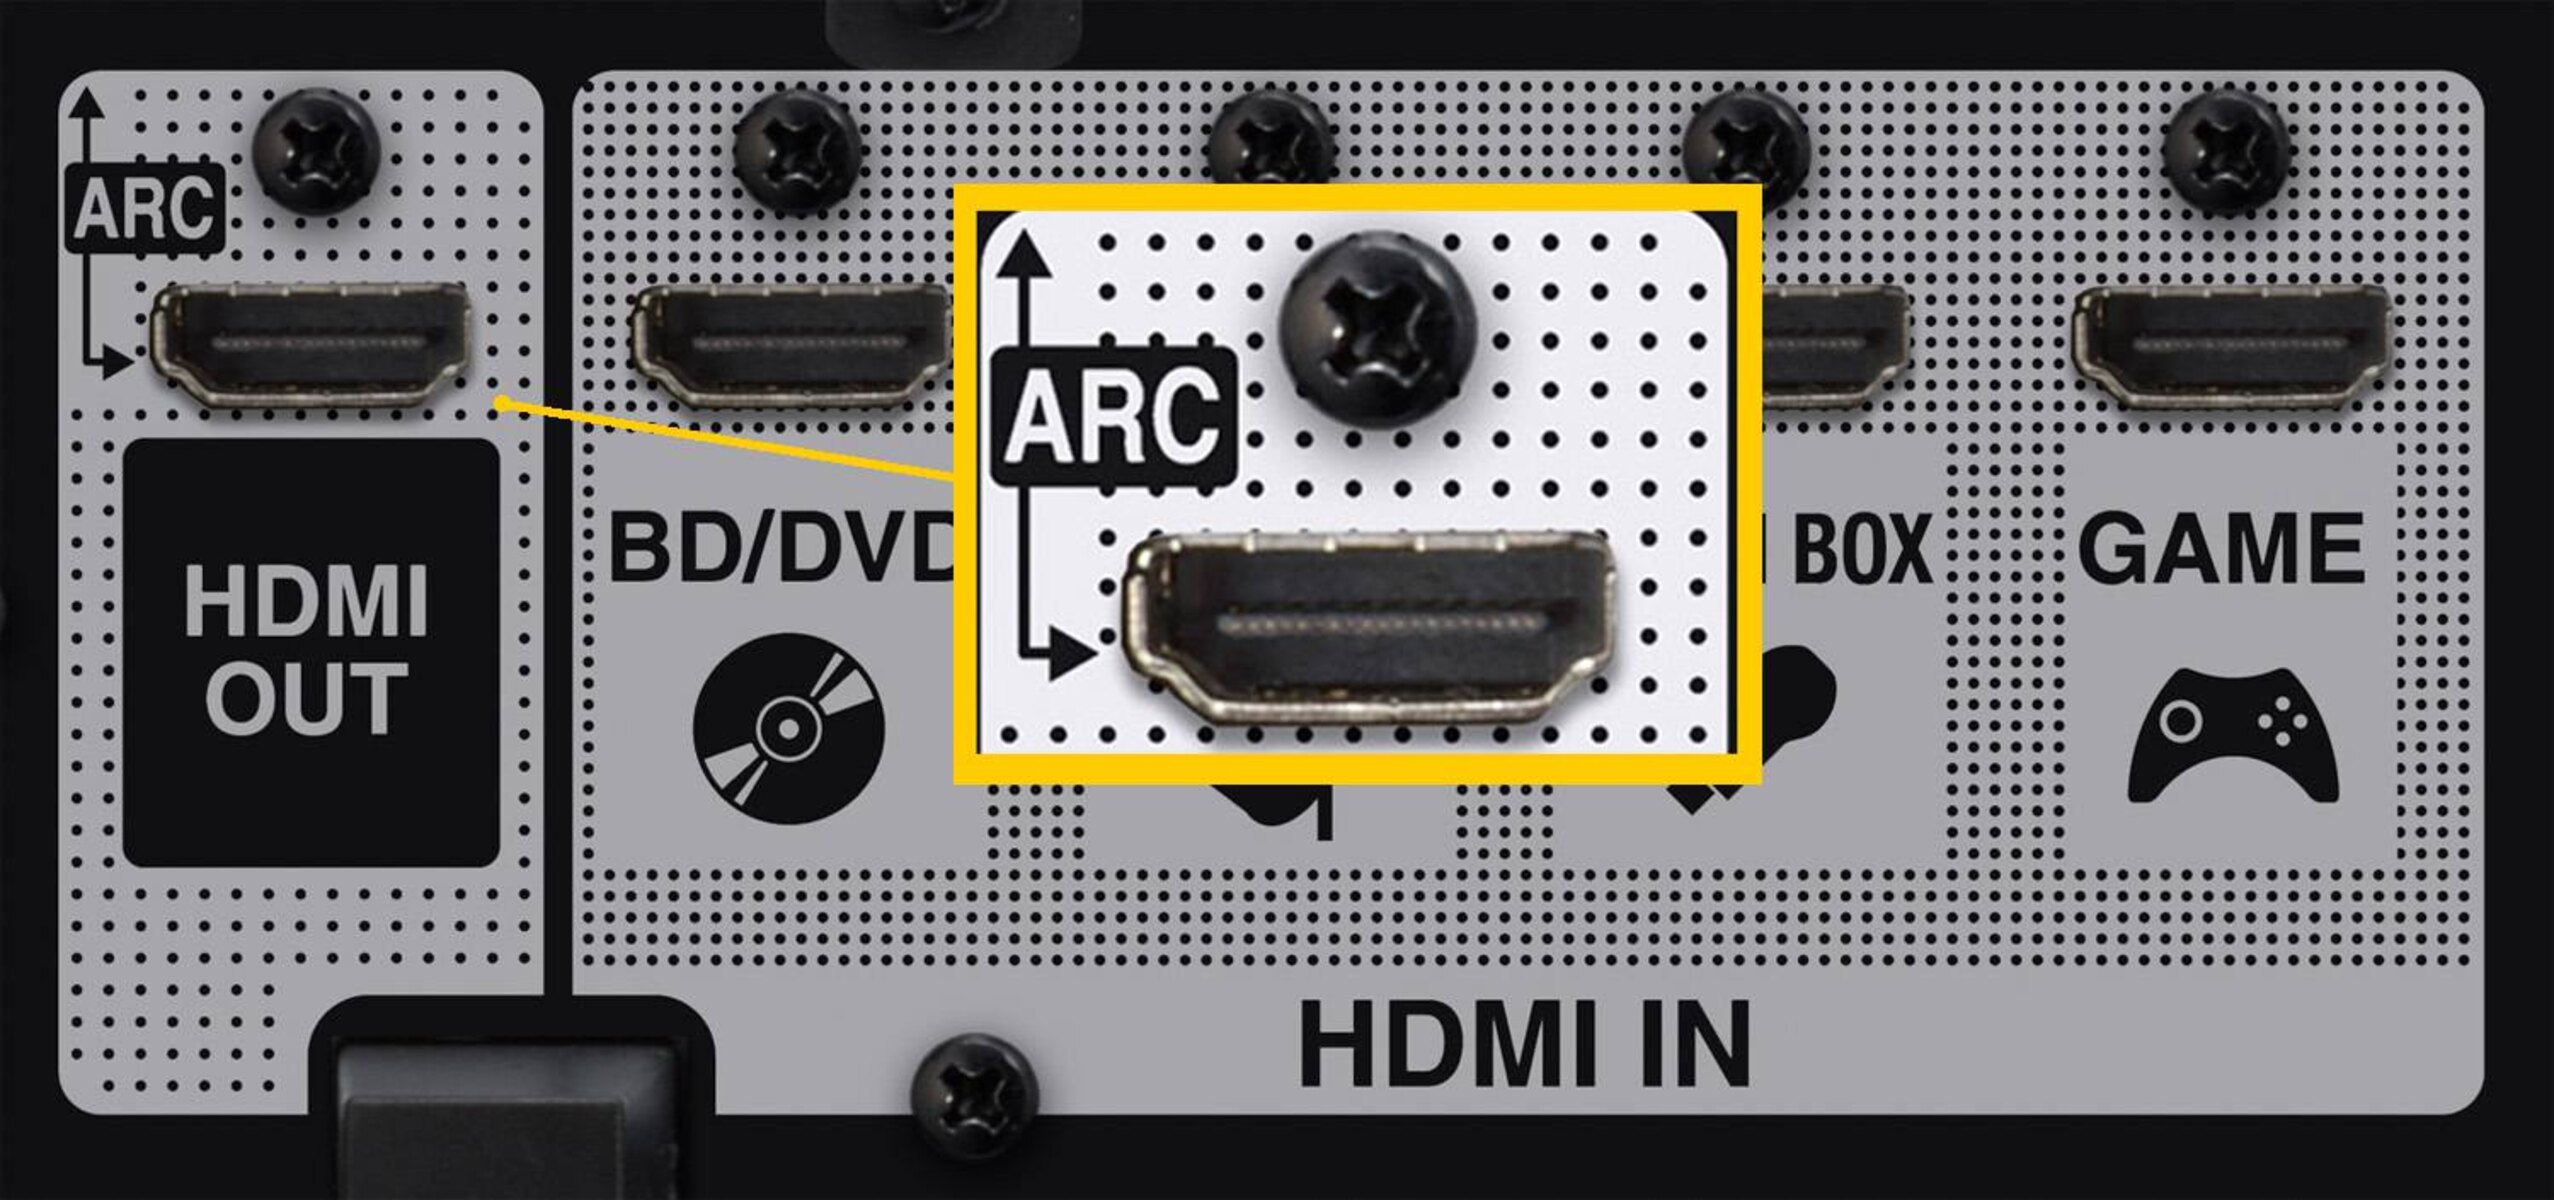
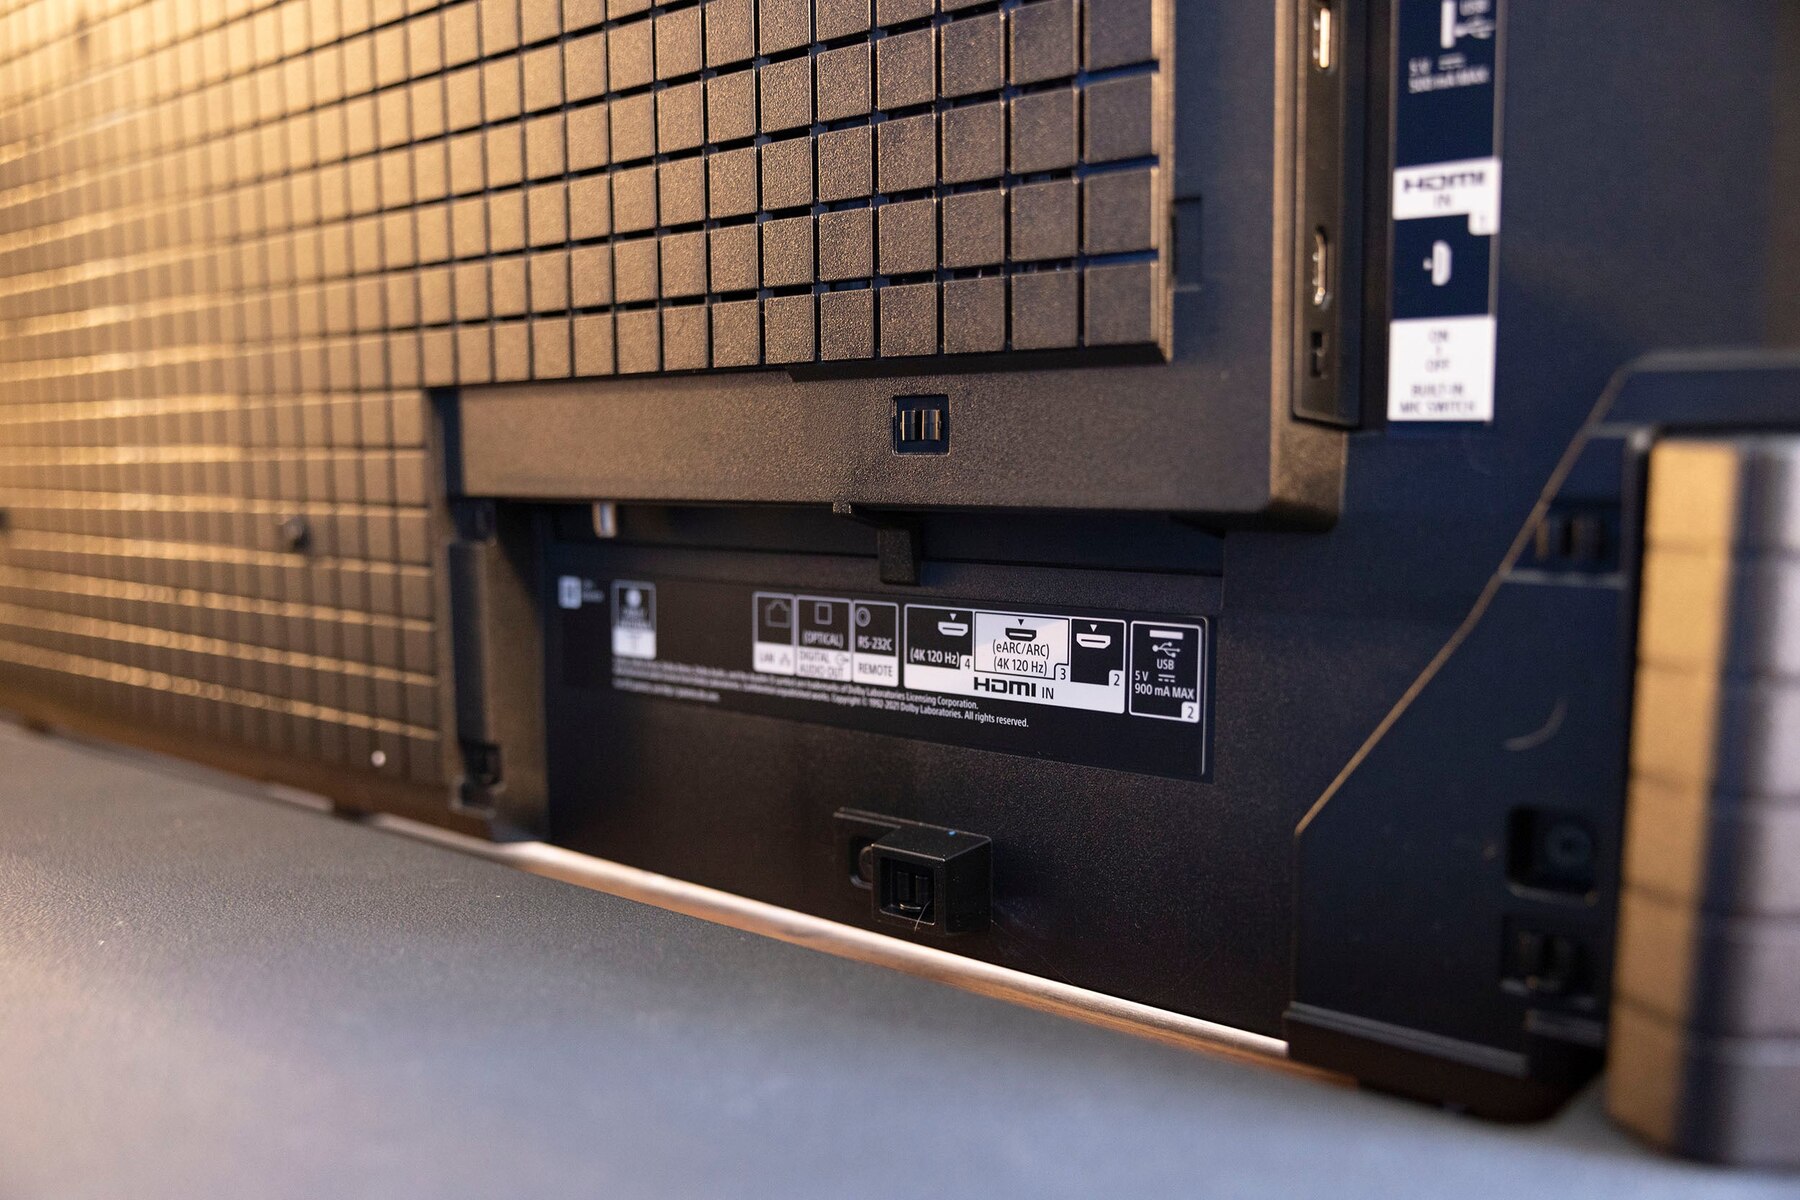
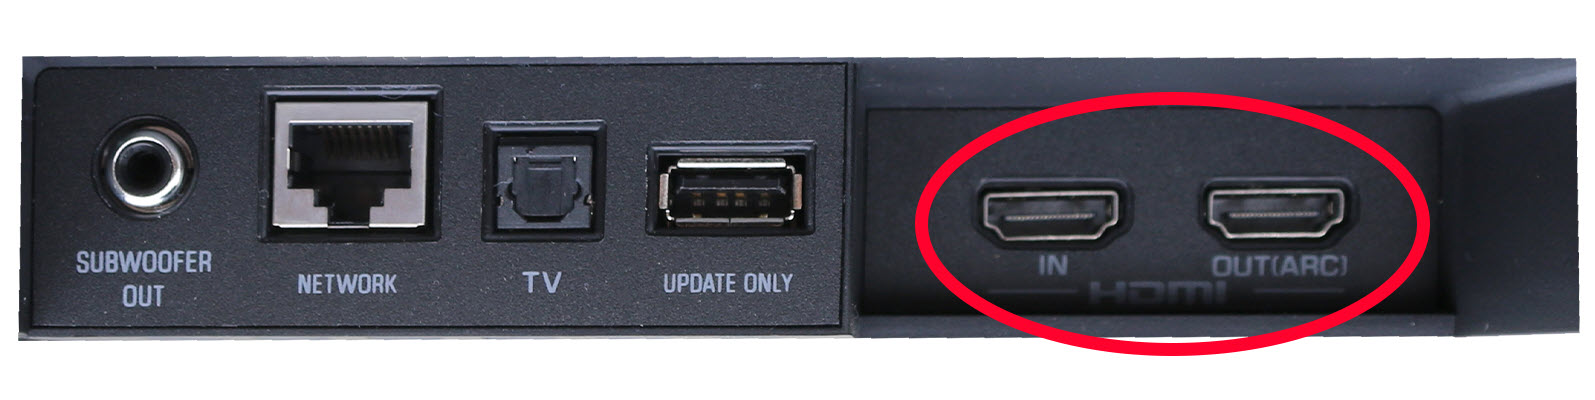
- Inspect the physical ports: Examine the ports on your TV and soundbar for any HDMI Arc labels or indicators. On the TV, the HDMI Arc port may be labeled as “ARC” or have a specific ARC symbol next to it. On the soundbar, the HDMI Arc port could also be identified as an “ARC” or “Audio Return” port.
- Confirm the HDMI version: Check the HDMI version supported by your TV and soundbar. HDMI Arc is typically supported by HDMI 1.4 and higher versions, but it’s recommended to have HDMI 2.0 or higher for enhanced audio and video capabilities.
- Update firmware: Ensure that your TV and soundbar have the latest firmware updates installed. Go to the respective manufacturer’s website and follow the instructions to update the firmware if needed. This step is important as it can address any known compatibility issues and improve overall performance.
- Consult the manufacturer: If you’re still unsure about compatibility or have specific questions about your TV or soundbar, reach out to the manufacturer’s customer support for assistance. They can provide you with detailed information or troubleshooting steps tailored to your specific devices.
By verifying the compatibility of your TV and soundbar, you can proceed with confidence knowing that HDMI Arc will work as intended. If it turns out that your devices are not compatible, you may need to consider alternative audio connection options or upgrade your equipment to enjoy the benefits of HDMI Arc.
Once you’re certain that your TV and soundbar are compatible with HDMI Arc, it’s time to move on to the next step of the setup process: connecting your HDMI Arc-enabled devices.
Step 2: Connect your HDMI Arc-enabled devices
After confirming the compatibility of your TV and soundbar, it’s time to physically connect the two devices using an HDMI cable. Follow these steps to establish the HDMI Arc connection:
- Locate the HDMI Arc ports: Identify the HDMI Arc ports on both your TV and soundbar. These ports are usually labeled as “ARC” or have a specific ARC symbol.
- Connect the HDMI cable: Take one end of the HDMI cable and insert it into the HDMI Arc port on the TV. Ensure that it is firmly connected. Then, plug the other end of the cable into the HDMI Arc port on your soundbar.
- Power on your devices: Turn on both your TV and soundbar. Make sure they are properly powered and ready for the setup process.
- Select the HDMI Arc input: On your TV, navigate to the input/source selection menu using your TV remote. Look for the HDMI Arc input or the HDMI port number that you connected your soundbar to. Select this input to route the audio from the TV to the soundbar.
Once you have completed these steps, the physical connection between your TV and soundbar using HDMI Arc is established. However, keep in mind that the HDMI Arc feature needs to be configured properly on both devices for it to work seamlessly.
In the next sections, we will guide you through the process of configuring HDMI Arc on your TV and soundbar. This will ensure that the audio is transmitted and received correctly, allowing you to enjoy enhanced sound quality and convenient control.
Now that the HDMI Arc connection is made, let’s move on to configuring HDMI Arc on your TV.
Step 3: Configure HDMI Arc on your TV
Configuring HDMI Arc on your TV is an essential step to ensure the proper transmission of audio to your soundbar. Follow these steps to configure HDMI Arc on your TV:
- Access the TV settings: Using your TV remote, navigate to the settings menu. Look for options like “Settings,” “Setup,” or “Preferences.” The exact location and terminology may vary depending on your TV model.
- Select the Audio settings: Once in the settings menu, locate the audio settings or audio output options. This is where you will find the settings relevant to HDMI Arc.
- Enable HDMI Arc: Look for an option to enable HDMI Arc or Audio Return Channel. This setting may be labeled as “HDMI ARC,” “ARC,” or “Audio Return.” Select this option to activate HDMI Arc on your TV.
- Check CEC settings: If your TV has CEC functionality, ensure that it is enabled. CEC allows for simplified control of multiple devices using a single remote. Look for options like “CEC,” “Device Control,” or “HDMI Control.” Enable this setting if it’s not already activated.
- Save and exit the settings: After making the necessary changes, save the settings and exit the menu. Your TV is now configured for HDMI Arc.
By enabling HDMI Arc on your TV, you allow the audio signal to be transmitted through the HDMI cable to your soundbar. This ensures that you can enjoy high-quality sound output from your TV through your soundbar’s speakers.
Next, we’ll move on to configuring HDMI Arc on your soundbar to complete the setup process and ensure both devices are communicating effectively.
Now that HDMI Arc is configured on your TV, let’s proceed to the next step, which is configuring HDMI Arc on your soundbar.
Step 4: Configure HDMI Arc on your Soundbar
To complete the HDMI Arc setup process, you need to configure HDMI Arc on your soundbar. Follow these steps to ensure proper communication between your TV and soundbar:
- Access the soundbar settings: Using your soundbar remote or control panel, navigate to the settings or setup menu. The location and terminology may vary depending on your soundbar model.
- Select the Input settings: Once in the settings menu, locate the input settings or audio input options. This is where you will configure the HDMI Arc settings on your soundbar.
- Choose the HDMI Arc input: Look for an option to select the HDMI Arc input or the specific HDMI port that is connected to your TV. This will ensure that the soundbar receives the audio signal from the TV.
- Enable HDMI Control: If your soundbar has HDMI Control or CEC functionality, enable this setting. It allows for seamless control between the TV and soundbar using a single remote.
- Save and exit the settings: After making the necessary changes, save the settings and exit the menu on your soundbar. The HDMI Arc configuration for your soundbar is now complete.
By configuring HDMI Arc on your soundbar, you establish a two-way communication channel between your TV and soundbar. This enables the smooth transmission of audio signals from the TV to the soundbar, ensuring that you can enjoy the enhanced sound quality offered by your soundbar’s speakers.
Now that both your TV and soundbar are configured for HDMI Arc, it’s time to test the connection and verify that everything is working correctly.
In the next section, we’ll guide you through testing the HDMI Arc connection and address common issues that may arise during the setup process.
With HDMI Arc configured on your soundbar, we’re nearing the end of the setup process. Let’s proceed to the next step, which involves testing your HDMI Arc connection.
Step 5: Test your HDMI Arc connection
After configuring HDMI Arc on both your TV and soundbar, it’s essential to test the connection to ensure proper functionality. Follow these steps to test your HDMI Arc connection:
- Play audio on your TV: Start playing audio content on your TV, such as a movie, show, or music. Make sure the volume is audible.
- Check sound output: Listen to the sound coming from your soundbar. If the HDMI Arc connection is working correctly, the audio should be playing through the soundbar’s speakers instead of the TV’s built-in speakers.
- Adjust volume: Use your TV remote to adjust the volume. The soundbar’s volume should respond accordingly. If it doesn’t, check that the HDMI Control or CEC settings are enabled on both your TV and soundbar.
- Test other functions: Test other functions, such as mute, power on/off, and input selection on your TV remote. These commands should be properly transmitted and executed on your soundbar.
- Ensure synchronization: Observe the synchronization between the audio and video. The sound should be in perfect sync with the images on the TV screen. If there’s a noticeable delay, you may need to fine-tune audio delay settings on your soundbar or consult the user manual for further guidance.
By testing your HDMI Arc connection, you can confirm that the audio is being transmitted correctly from your TV to the soundbar, and that all the control functions are functioning as expected.
If any issues arise during the testing process, refer to the troubleshooting section in the next part of this article for solutions to common HDMI Arc problems.
With your HDMI Arc connection successfully tested, you’ve completed the setup process. Now you can enjoy the enhanced audio experience provided by HDMI Arc.
In the next section, we’ll discuss some common issues that may occur with HDMI Arc and provide troubleshooting tips to help resolve them.
Troubleshooting common issues with HDMI Arc
While HDMI Arc provides a convenient and streamlined audio setup, it’s not uncommon to encounter some issues during the setup or usage. Here are some common problems that you may come across and troubleshooting steps to resolve them:
- No sound from the soundbar: If you’re not hearing any audio from your soundbar, ensure that the HDMI Arc connection is properly established. Check that both your TV and soundbar are powered on and that the HDMI Arc input is selected on your soundbar. Also, verify that the volume is not muted on the TV or soundbar.
- Audio is out of sync with video: If you notice a delay between the audio and video, it may be due to a synchronization issue. Some soundbars have audio delay settings that allow you to manually adjust the synchronization. Refer to your soundbar’s user manual for instructions on how to adjust these settings.
- Interference or static noise: If you’re experiencing interference or static noise, ensure that all cables are securely plugged in and not damaged. Try using a different HDMI cable or testing the connection with another device to rule out any cable or device issues.
- HDMI Control or CEC not working: If you’re unable to control your soundbar with your TV remote or vice versa, check that HDMI Control or CEC is enabled on both the TV and soundbar. Additionally, ensure that both devices are connected to HDMI ports that support these features.
- Audio cuts out or drops: If the audio intermittently cuts out or drops, it may be due to an incompatible HDMI cable or an outdated firmware. Try using a high-speed HDMI cable that supports Ethernet and ensure that both your TV and soundbar have the latest firmware updates installed.
- Device compatibility issues: In some cases, certain TV and soundbar models may have compatibility issues with HDMI Arc. Check for firmware updates for both your TV and soundbar, as manufacturers often release updates to address compatibility issues.
If you encounter any other issues that are not mentioned here, refer to the user manuals of your TV and soundbar or consult the manufacturer’s customer support for specific troubleshooting steps tailored to your devices.
By troubleshooting and resolving these common issues, you can ensure that your HDMI Arc setup functions smoothly, allowing you to enjoy the benefits of simplified audio connectivity and enhanced sound quality.
In the next section, we’ll provide a brief recap of the HDMI Arc setup process before concluding this article.
Conclusion
Setting up HDMI Arc can greatly enhance your home entertainment system by providing a simplified and streamlined audio setup. By using a single HDMI cable, you can transmit high-quality audio from your TV to your soundbar, eliminating the need for multiple cables and reducing clutter.
In this article, we covered the steps to set up HDMI Arc, including checking compatibility, connecting your devices, configuring HDMI Arc on your TV and soundbar, testing the connection, and troubleshooting common issues. By following these steps, you can achieve optimal audio performance and enjoy an immersive sound experience.
Remember to verify the compatibility of your TV and soundbar, connect the devices using an HDMI cable, enable HDMI Arc and CEC settings, and test the audio output and synchronization. If you encounter any issues, refer to the troubleshooting section or seek guidance from your device’s manufacturer.
Whether you’re watching movies, playing games, or streaming music, HDMI Arc provides a convenient and high-quality audio solution for your home entertainment needs. With its ability to transmit advanced audio formats and simplify control, HDMI Arc enhances your overall viewing and listening experience.
Now that you have successfully set up HDMI Arc and resolved any issues, sit back, relax, and enjoy immersive sound that brings your favorite movies, shows, and music to life.