Introduction
Welcome to this guide on how to set exclusions in Avast Antivirus. Avast is a popular antivirus software that provides comprehensive protection against various types of malware and threats. While its default settings are designed to provide maximum security, there may be instances where you want to exclude certain files, folders, websites, or applications from being scanned or blocked by Avast.
Setting exclusions can be particularly useful in cases where Avast identifies a legitimate file or program as potentially harmful, resulting in false positives. By setting exclusions, you can prevent Avast from flagging and interfering with these trusted files, folders, or applications, allowing them to function without disruption.
Additionally, setting exclusions can help improve the performance and speed of your system. By excluding non-threatening files or locations from Avast’s scans, you can reduce the scanning time and resource usage, resulting in a smoother and more efficient experience.
In this guide, we will walk you through the process of accessing the exclusions settings in Avast and provide step-by-step instructions on how to set exclusions for different scenarios. We will also discuss best practices for managing and editing exclusions to ensure optimal security and performance of your system.
Note that the specific steps and options may vary slightly depending on the version of Avast Antivirus you are using. However, the general concepts and principles remain the same, and this guide will provide you with a solid understanding of how to set exclusions in Avast.
How to Access the Exclusions Settings
To begin setting exclusions in Avast Antivirus, you first need to access the exclusions settings. Follow the steps below to locate the exclusions settings in Avast:
- Open the Avast Antivirus software on your computer. You can usually find the Avast icon in the system tray or by searching for “Avast” in the Start menu.
- Once Avast is open, locate the “Menu” tab at the top-right corner of the main interface. It is represented by three horizontal lines or dots.
- Click on the “Menu” tab to expand the drop-down menu and select “Settings” from the list of available options.
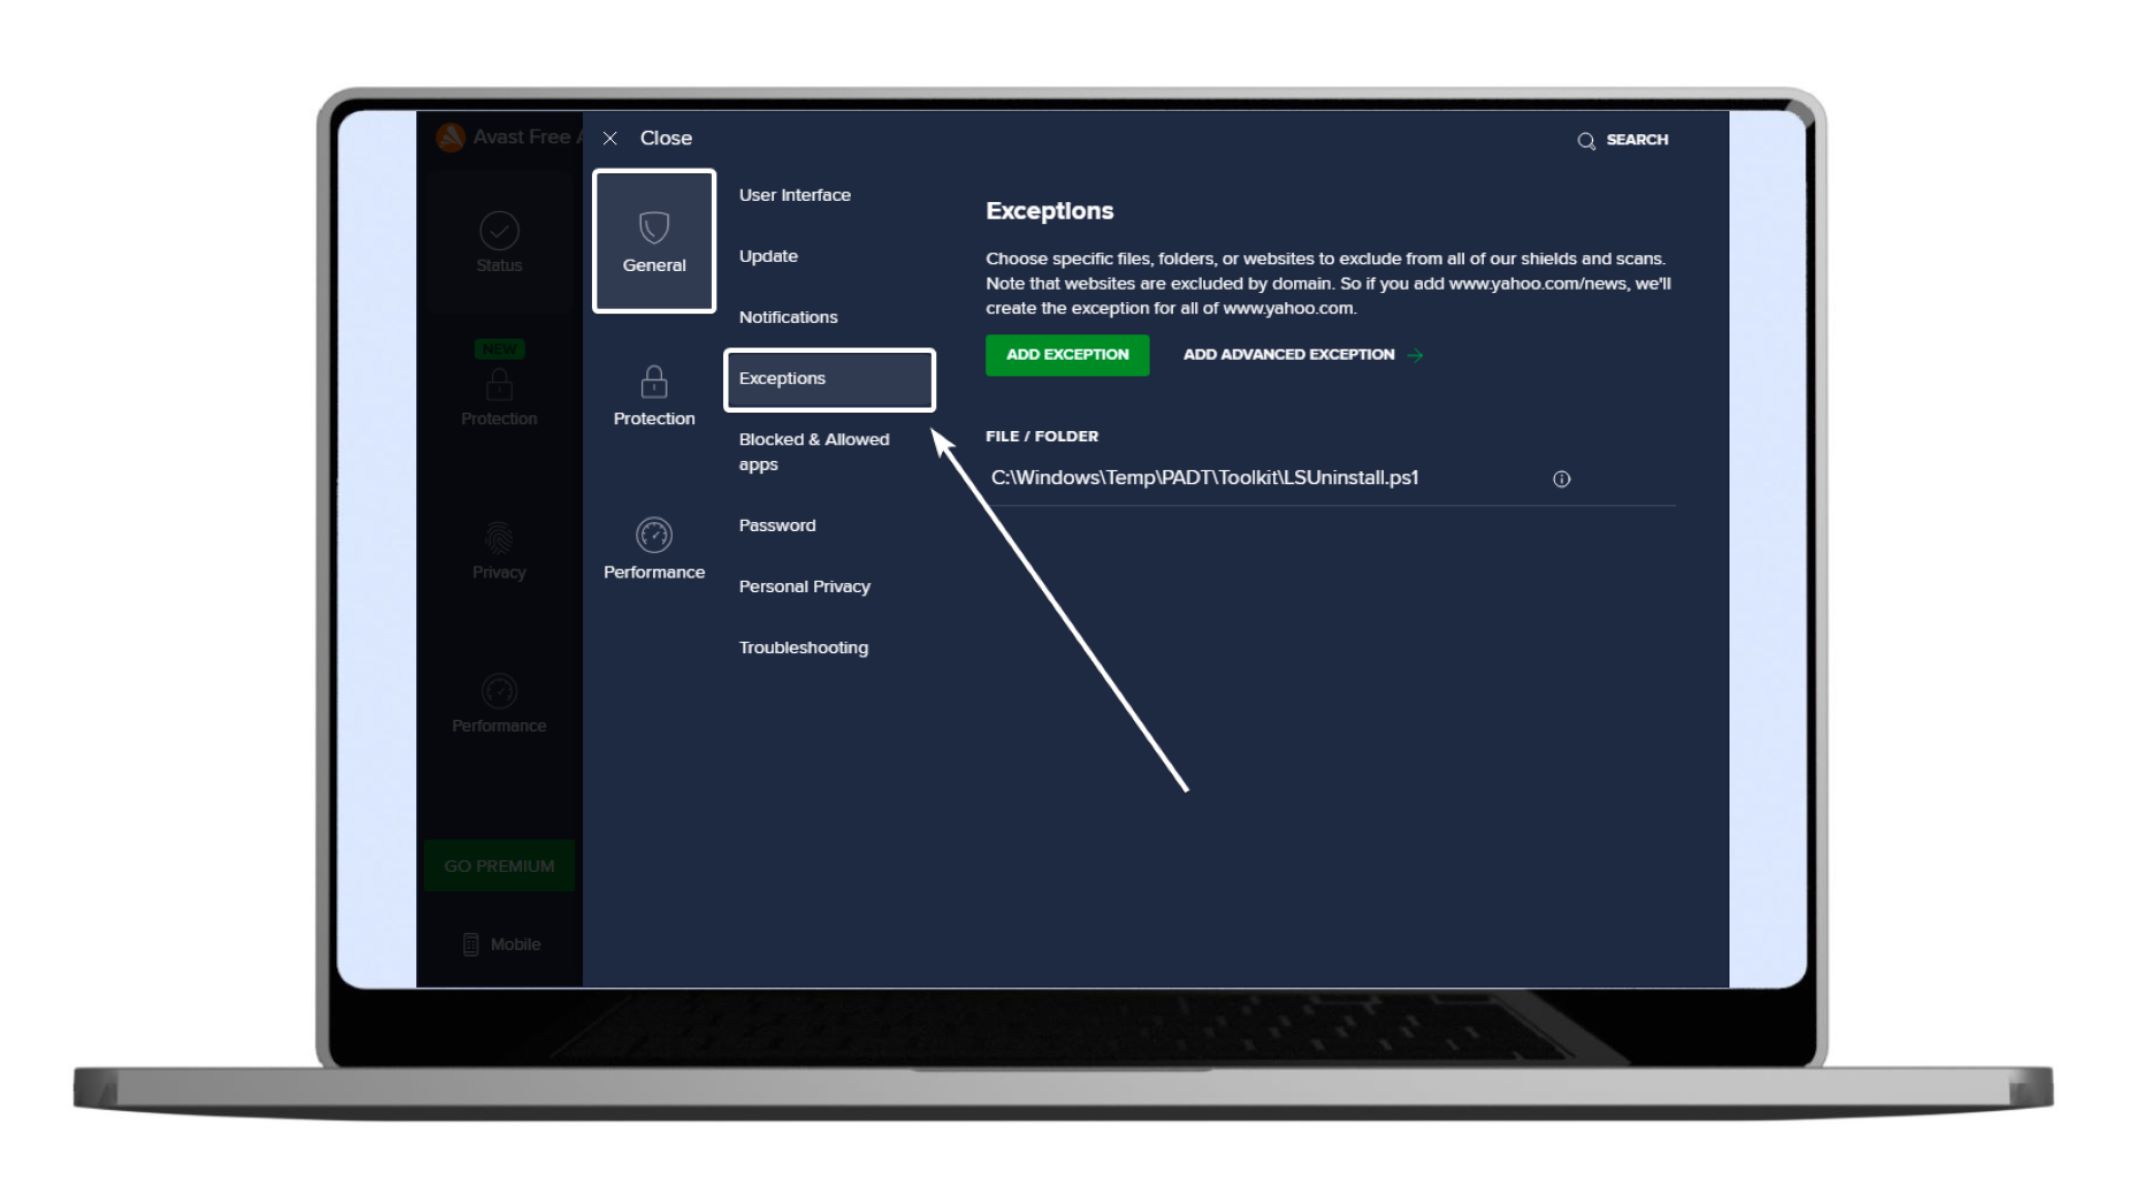
- In the Settings menu, navigate to the “General” section, usually located on the left-hand side.
- Within the General settings, scroll down until you find the “Exclusions” tab. Click on it to access the exclusions settings.
Once you have accessed the exclusions settings, you can proceed to set exclusions for specific files, folders, websites, applications, file types, or protection modules based on your requirements. The following sections will guide you through the process of setting exclusions for different scenarios.
It is important to note that the steps provided above are for illustrative purposes, and the options and layout may vary depending on the version of Avast you are using. However, the general concept of accessing the exclusions settings remains the same.
Setting Exclusions for a Specific File or Folder
If you want to exclude a specific file or folder from being scanned or blocked by Avast, you can easily do so by following these steps:
- Open Avast Antivirus and navigate to the Exclusions settings, as mentioned in the previous section.
- Within the Exclusions settings, click on the “File Paths” tab.
- Click on the “Add” button to specify the file or folder you want to exclude.
- In the dialog box that appears, you can either manually enter the file or folder path or use the file explorer to locate and select it. You can exclude a specific file by selecting the file itself, or exclude an entire folder by selecting the parent folder.
- Once you have selected the file or folder, click “OK” to add it to the exclusions.
After adding the file or folder to the exclusions, Avast will not scan or block it in future scans or real-time protection. This is useful for excluding trusted files or folders from being flagged as potential threats, ensuring they remain unaffected by Avast’s security measures.
Keep in mind that when setting exclusions for a file or folder, it is important to have a good understanding of the file’s or folder’s legitimacy. Only exclude files or folders that you are confident are safe and pose no threat to your system’s security.
Remember to regularly review and update your exclusions to adapt to any changes in your system or the files you work with. This will help ensure that your system remains protected while allowing the necessary files and folders to function without interference from Avast.
Setting Exclusions for a Specific Website or URL
If you encounter issues accessing a specific website or URL due to Avast’s security measures, you can set exclusions to allow uninterrupted access. Here’s how you can exclude a specific website or URL in Avast:
- Launch Avast Antivirus and access the Exclusions settings, as outlined in the previous section.
- Within the Exclusions settings, navigate to the “Websites” or “URLs” tab.
- Click on the “Add” button to input the website or URL you want to exclude.
- Enter the complete URL of the website you want to exclude, starting with https:// or http://. Make sure to include the necessary prefixes (e.g., www) and any subdomains if applicable.
- Click “OK” to add the website or URL to the exclusions list.
By setting exclusions for a specific website or URL, Avast will allow access to the site without scanning or blocking its content. This can be helpful when a trusted website or a particular URL within a website is being incorrectly flagged as suspicious or harmful.
It’s important to exercise caution when setting website or URL exclusions. Ensure that you are confident in the legitimacy and security of the website or URL you are excluding. Be mindful that excluding a website or URL can potentially expose your system to malicious content if it has been compromised.
Regularly review your exclusions for websites or URLs to ensure they are still valid and pose no threat to your system’s security. Remove any exclusions that may no longer be necessary or relevant.
Setting exclusions for websites or URLs can help prevent interruptions and false positives while browsing the internet, allowing you to access trusted web content without interference from Avast Antivirus.
Setting Exclusions for a Specific Application or Program
If you have a specific application or program that is being flagged or blocked by Avast Antivirus, you can set exclusions to allow it to run without interference. Here’s how you can exclude a specific application or program in Avast:
- Open Avast Antivirus on your computer and go to the Exclusions settings, as explained earlier.
- In the Exclusions settings, locate the “Executable Files” or “Applications” tab.
- Click on the “Add” button to specify the application or program you want to exclude.
- In the dialog box that appears, navigate to the location where the application is installed and select its executable file (.exe).
- Once you have selected the executable file, click “OK” to add it to the exclusions.
By setting exclusions for a specific application or program, Avast will stop flagging or blocking it, allowing it to execute without any interruptions. This is useful when Avast incorrectly identifies a trusted program as a potential threat or when a program requires specific access or permissions.
It is essential to exercise caution when excluding applications or programs from Avast’s scans and protection. Only exclude trusted and legitimate applications that you are confident will not pose any security risks to your system.
Regularly review the exclusions for applications or programs, especially after installing updates or new versions. This helps ensure that your exclusions remain relevant and aligned with the current state of your system.
By setting exclusions for specific applications or programs in Avast, you can ensure they run smoothly with minimal interference from the antivirus software, allowing you to utilize the software without any issues.
Setting Exclusions for a Specific File Type or Extension
If Avast Antivirus is flagging or blocking a specific file type or extension that you consider safe and trustworthy, you can set exclusions to prevent Avast from scanning or blocking files with that particular file type or extension. Here’s how you can set exclusions for a specific file type or extension in Avast:
- Launch Avast Antivirus on your computer and access the Exclusions settings, as mentioned earlier.
- Within the Exclusions settings, find the “File Types” or “File Extensions” tab.
- Click on the “Add” button to specify the file type or extension you want to exclude.
- In the dialog box that appears, enter the file extension without the dot (.) symbol. For example, if you want to exclude all files with the .txt extension, you would simply enter “txt” in the dialogue box.
- Click “OK” to add the file type or extension to the exclusions list.
By excluding a specific file type or extension, Avast will bypass scanning or blocking files with that file type or extension. This is helpful when you know that a particular file type is safe and you do not want Avast to unnecessarily flag or block files with that extension.
Exercise caution when excluding file types or extensions from Avast’s scans and protection. Make sure that the file types you exclude are genuinely safe and do not pose any security risks to your system.
Periodically review and update your exclusions for file types or extensions as needed. This will ensure that the exclusions remain relevant and aligned with your system’s security requirements.
Setting exclusions for specific file types or extensions in Avast can help prevent false positives and unnecessary interruptions while working with trusted file types, allowing you to work seamlessly without interference from the antivirus software.
Setting Exclusions for a Specific Shield or Protection Module
Avast Antivirus offers various shields and protection modules to safeguard your system from threats. However, there may be situations where you need to exclude a specific shield or protection module from scanning or blocking certain files or activities. Here’s how you can set exclusions for a specific shield or protection module in Avast:
- Open Avast Antivirus and go to the Exclusions settings, as mentioned earlier.
- Within the Exclusions settings, find the “Shields” or “Protection Modules” tab.
- Click on the “Add” button to specify the shield or protection module you want to exclude.
- In the dialog box that appears, choose the shield or protection module you want to exclude from the drop-down menu.
- Specify the file, folder, website, or application you want to exclude from that specific shield or protection module. Follow the appropriate steps mentioned in the previous sections based on the type of exclusion you want to set.
- Click “OK” to add the exclusion for the specific shield or protection module.
By setting exclusions for a specific shield or protection module, you can prevent Avast from scanning or blocking certain files or activities related to that shield. This can be useful in cases where a particular shield or protection module is causing false positives or interfering with legitimate files or activities.
Use caution when excluding shields or protection modules from Avast’s scans and protection. Ensure that the exclusion is necessary and does not compromise the security of your system.
Regularly review and update your exclusions for specific shields or protection modules to ensure they are still relevant and aligned with your system’s security needs. Remove any exclusions that are no longer necessary or may pose a security risk.
By setting exclusions for specific shields or protection modules in Avast, you can fine-tune the scanning and blocking behavior of the antivirus software, allowing you to customize the level of protection provided while minimizing unnecessary interruptions.
Setting Exclusions for a Specific Scan or Action
Avast Antivirus offers various scanning options and actions to keep your system secure. However, there may be instances where you want to exclude specific scans or actions from being performed by Avast. Here’s how you can set exclusions for a specific scan or action in Avast:
- Launch Avast Antivirus and access the Exclusions settings, as mentioned earlier.
- Within the Exclusions settings, locate the “Scans” or “Actions” tab.
- Click on the “Add” button to specify the scan or action you want to exclude.
- In the dialog box that appears, select the specific scan or action you want to exclude from the drop-down menu.
- Choose the file, folder, website, or application that you want to exclude from the selected scan or action. Follow the appropriate steps mentioned in the previous sections to specify the exclusion based on the type.
- Click “OK” to add the exclusion for the specific scan or action.
By setting exclusions for a specific scan or action, you can customize Avast’s behavior and prevent it from performing certain scans or actions on the excluded items. This can be useful when you have trusted files or activities that you do not want Avast to scan or perform specific actions on.
Exercise caution when excluding scans or actions. Ensure that the exclusion is necessary and does not compromise the overall security of your system.
Regularly review and update your exclusions for specific scans or actions to ensure their relevance and alignment with your system’s security needs. Remove any exclusions that are no longer necessary or may pose a security risk.
By setting exclusions for specific scans or actions in Avast, you can tailor the scanning and action behavior of the antivirus software, allowing you to strike a balance between security and system performance.
Managing and Editing Exclusions
As you continue to use Avast Antivirus and set exclusions for various files, folders, websites, applications, and more, you may need to manage and edit your exclusions over time. Here are some tips for effectively managing and editing your exclusions in Avast:
Review Exclusions Regularly: It’s important to review your exclusions periodically to ensure they are still necessary and relevant. This is especially crucial if you have made changes to your system, installed updates, or no longer use certain files or applications.
Edit Exclusions when Needed: If you need to make changes to an exclusion, such as updating a file path or removing an exclusion altogether, access the Exclusions settings following the steps mentioned earlier in this guide. Locate the specific exclusion you want to edit and make the necessary modifications.
Remove Unused Exclusions: Over time, you might find that some exclusions are no longer necessary or relevant. To keep your exclusions list tidy, remove any unused or unnecessary exclusions to maintain a lean and efficient setup.
Consider Security Implications: When managing or editing exclusions, always consider the potential security implications. Ensure that the exclusions you set are indeed safe and do not compromise the overall security of your system. Be vigilant and cautious when excluding files, folders, websites, or applications from Avast’s scans and protection.
Keep Track of Changes: It’s a good practice to keep a record of any changes you make to your exclusions. This can be in the form of a text document or a note, so you have a reference point in case you need to revisit or revert any exclusions in the future.
By effectively managing and editing your exclusions in Avast, you can optimize the performance of the antivirus software while maintaining the necessary levels of security for your system.
Best Practices for Setting Exclusions
When setting exclusions in Avast Antivirus, it’s important to follow best practices to ensure optimal security and performance. Here are some key best practices to consider:
1. Exercise Caution: Before setting exclusions, carefully evaluate the files, folders, websites, applications, or specific scans/actions you are excluding. Ensure they are legitimate and pose no threat to your system’s security. Avoid excluding anything that you’re unsure about.
2. Regularly Review and Update Exclusions: Periodically review your exclusions to ensure they are still necessary and relevant. Remove any exclusions that are no longer needed or pose a potential security risk. Update exclusions as your system or usage patterns change.
3. Be Mindful of False Positives: Keep an eye out for false positives, where Avast incorrectly identifies trusted files or activities as potential threats. If you encounter false positives, consider excluding the affected files, folders, websites, or applications from Avast’s scans or protection to prevent unnecessary interruptions.
4. Maintain an Organized Exclusions List: Keep your exclusions list organized and well-documented. Make notes or keep a reference of the exclusions you set, including the reasons behind them. This will help you manage and understand your exclusions in the future and avoid confusion.
5. Continuously Monitor for Changes: Stay vigilant and monitor changes to your system. New files, applications, or websites may require exclusions, while existing exclusions may no longer be necessary. Stay proactive in adapting your exclusions to ensure they reflect the current state of your system.
6. Consult Official Documentation: Avast provides official documentation that offers specific guidance on exclusions for different scenarios. Refer to Avast’s official documentation or support resources for further information and recommended exclusions for specific applications or situations.
7. Balance Security and Performance: While exclusions can help improve performance, it’s important to strike a balance between security and performance. Avoid excluding too many files or locations if they may pose a potential security risk. Regularly evaluate the impact of your exclusions on system performance and security.
By adhering to these best practices, you can effectively set exclusions in Avast Antivirus, ensuring a secure and optimized experience while minimizing false positives and unnecessary interruptions.
Conclusion
Setting exclusions in Avast Antivirus allows you to customize the scanning and blocking behavior of the software, ensuring a balance between security and performance. Whether you need to exclude specific files, folders, websites, applications, file types, protection modules, or scans/actions, Avast provides a user-friendly interface to help you manage and edit your exclusions effectively.
Throughout this guide, we discussed how to access the exclusions settings in Avast and provided step-by-step instructions on setting exclusions for various scenarios. We also outlined best practices for managing and editing exclusions, emphasizing the importance of caution, regular review, and the consideration of security implications.
Remember, exclusions should be set wisely, taking into account the legitimacy of files, folders, websites, applications, and the potential impact on system security. Regularly review and update your exclusions to reflect changes in your system and usage patterns.
Avast Antivirus continues to evolve, and the interface and options may vary slightly depending on the version you are using. We recommend referring to official Avast documentation or seeking support resources if you require additional guidance for specific scenarios or applications.
By following the best practices outlined in this guide, you can effectively set exclusions in Avast Antivirus, contributing to a secure and efficient computing experience.