Introduction
Welcome to our guide on how to screenshot on a Samsung Galaxy A53. Taking screenshots can be incredibly useful for capturing important information, sharing funny moments, or documenting errors for technical support. The Samsung Galaxy A53 offers several methods to capture screenshots, making it easy and convenient for users.
Whether you’re a new Samsung Galaxy A53 owner or someone who’s just looking to refresh their memory on the screenshotting process, you’ve come to the right place. In this guide, we will walk you through step-by-step instructions on how to take screenshots on your Samsung Galaxy A53 smartphone.
Before we dive into the details, it’s worth mentioning that the Samsung Galaxy A53 comes equipped with a powerful combination of hardware and software to make the screenshotting process seamless and efficient. It boasts a vibrant display, a reliable processor, and a user-friendly interface that enhances your overall smartphone experience.
With that said, let’s explore the different methods you can use to capture screenshots on your Samsung Galaxy A53.
Step 1: Pressing the Power and Volume Down buttons
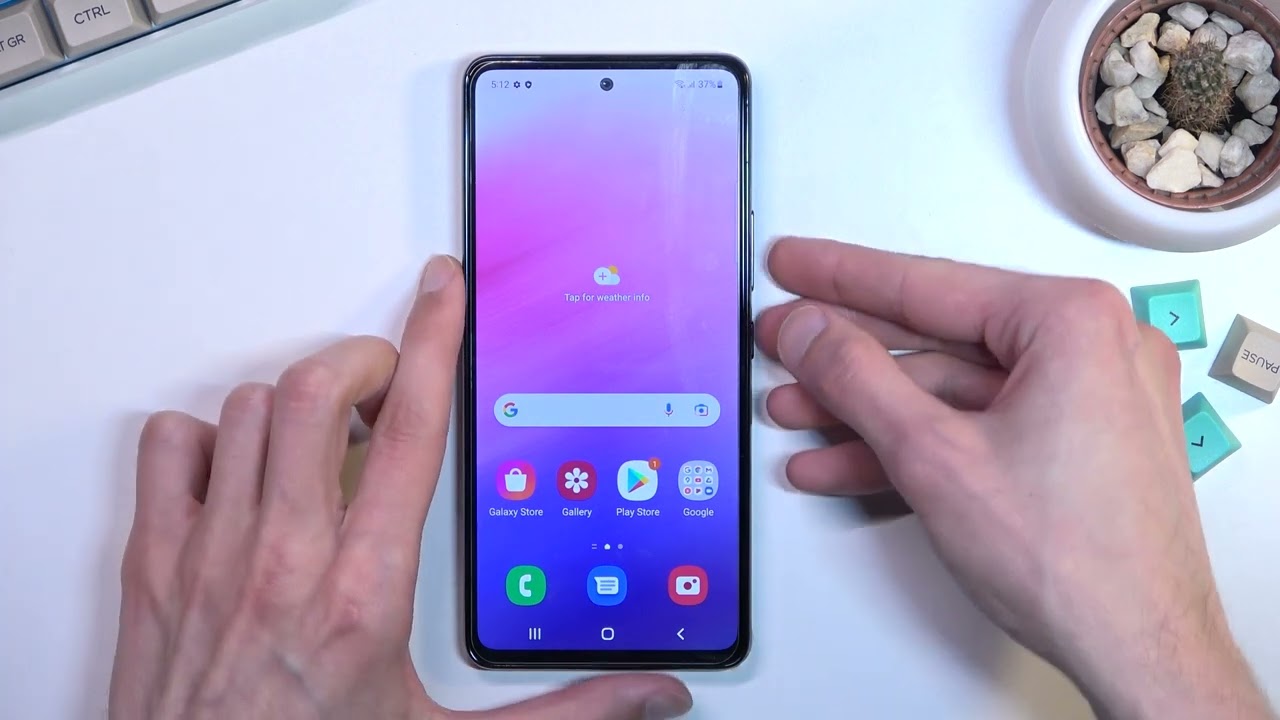
One of the easiest and most common methods to capture a screenshot on your Samsung Galaxy A53 is by using the combination of the Power button and the Volume Down button. This method works on almost all Samsung devices, including the Galaxy A53.
To take a screenshot using this method, follow these simple steps:
- Locate the Power button, which is usually positioned on the right side of the device.
- Identify the Volume Down button, which is typically located on the left side of the device.
- Navigate to the screen or app that you want to capture.
- Simultaneously press and hold the Power button and the Volume Down button for a brief moment.
- You will hear a shutter sound or see a brief animation to indicate that the screenshot has been successfully taken.
It’s important to ensure that you press both buttons at the same time and hold them for a moment until the screenshot is captured. If you release the buttons too quickly, the screenshot may not be captured successfully.
Once you’ve taken the screenshot, it will be automatically saved in the “Screenshots” folder in your phone’s Gallery or Photos app. From there, you can easily access, view, edit, or share the captured screenshot as needed.
With the Power and Volume Down button method, you can quickly capture screenshots of anything on your Samsung Galaxy A53, including images, web pages, messages, social media posts, or any other content you find interesting or important.
Step 2: Using the palm swipe feature
In addition to using the Power and Volume Down buttons, the Samsung Galaxy A53 offers a convenient palm swipe gesture feature to capture screenshots. This method allows you to take a screenshot by simply swiping your hand across the screen.
To utilize the palm swipe feature for screenshotting on your Samsung Galaxy A53, follow these steps:
- Ensure that the palm swipe feature is enabled on your device. To do this, go to the “Settings” menu, scroll down to “Advanced features,” and tap on “Motions and gestures.”
- Locate the “Palm swipe to capture” option and toggle it on.
- Navigate to the screen or app that you want to capture.
- Place the side of your hand vertically on one edge of the screen, ensuring that your hand makes contact with the display.
- Swipe your hand across the screen horizontally, from one edge to the other, while maintaining contact with the display.
- You will hear a shutter sound or see a brief animation to indicate that the screenshot has been successfully taken.
The palm swipe feature makes screenshotting on the Samsung Galaxy A53 even more effortless and intuitive. It provides a hands-free option that is especially useful for moments when you may have limited access to physical buttons or prefer a touchless interaction.
Once the screenshot is captured, it will be saved in the “Screenshots” folder in your phone’s Gallery or Photos app, just like screenshots taken with the Power and Volume Down buttons method. From there, you can easily view, edit, share, or delete the captured screenshot based on your preferences.
Now you can effortlessly capture screenshots with a simple swipe of your hand, thanks to the palm swipe feature on the Samsung Galaxy A53.
Step 3: Accessing the screenshot from the notification panel
Once you have taken a screenshot on your Samsung Galaxy A53, accessing it is a breeze thanks to the notification panel. The notification panel allows you to conveniently view and interact with your most recent screenshots without having to navigate through your phone’s gallery.
To access your screenshots from the notification panel, follow these steps:
- Immediately after taking a screenshot, you will receive a notification at the top of your screen indicating that a screenshot has been captured.
- Swipe down from the top of the screen to open the notification panel.
- Look for the screenshot notification. It may be labelled as “Screenshot captured” or something similar.
- Tap on the screenshot notification to open it.
Once you tap on the screenshot notification, it will open in a preview window, allowing you to review the captured screenshot. From there, you can perform various actions such as editing, sharing, or deleting the screenshot, depending on your needs.
If you have multiple screenshots, you can scroll through the list of screenshot notifications in the notification panel to access and view each one individually.
It’s worth noting that the screenshot notifications in the notification panel may only be available for a limited period of time. If you miss the notification or the screenshot notification disappears, don’t worry. You can still access your screenshots through the “Screenshots” folder in your phone’s Gallery or Photos app.
By utilizing the notification panel, you can quickly access and manage your recent screenshots, eliminating the need to search for them in your phone’s storage. This feature enhances the efficiency and convenience of screenshotting on your Samsung Galaxy A53.
Step 4: Using the S Pen (if available)
If you are fortunate enough to have the S Pen stylus that comes with some models of the Samsung Galaxy A53, you can take advantage of its unique capabilities to capture and annotate screenshots with precision and ease. The S Pen provides a seamless and intuitive way to interact with your device and enhance your screenshotting experience.
To use the S Pen for screenshotting on your Samsung Galaxy A53, follow these steps:
- Remove the S Pen from its slot, located either at the bottom or side of your device, depending on the model.
- Navigate to the screen or app that you want to capture.
- Once you’ve positioned the screen to your liking, simply press and hold the button on the S Pen to activate its features.
- With the S Pen activated, tap and hold the S Pen on the screen and drag it to select the area you want to capture. You can adjust the size and dimensions of the selection as needed.
- Release the S Pen, and a menu will appear with various options, including “Capture,” “Crop,” and “Share.”
- Select the desired action from the menu, such as “Capture” to capture the selected area.
The S Pen offers a range of additional features for screenshotting, allowing you to crop, annotate, and share your captured screenshots easily. You can use the S Pen to draw, write notes, highlight important elements, or add customizations to the screenshot before saving or sharing it.
Once you have made your desired modifications, the annotated screenshot will be automatically saved in the “Screenshots” folder within your phone’s Gallery or Photos app, ready for you to access, view, and share at your convenience.
The S Pen provides a powerful tool for capturing and editing screenshots with precision and creativity. If you have the S Pen with your Samsung Galaxy A53, make sure to explore its capabilities and unleash your creativity when screenshotting.
Conclusion
Capturing screenshots on your Samsung Galaxy A53 is a simple and convenient process. In this guide, we have explored four different methods: using the Power and Volume Down buttons, utilizing the palm swipe feature, accessing screenshots from the notification panel, and using the S Pen (if available).
By familiarizing yourself with these methods, you have gained the knowledge to capture screenshots of important information, funny moments, or technical errors on your Samsung Galaxy A53. Whether you prefer using physical buttons, gestures, or the S Pen stylus, there is a method that suits your preference and makes the screenshotting process effortless.
Remember that once you have taken a screenshot, you can access, view, and manage it in the “Screenshots” folder within your phone’s Gallery or Photos app. From there, you can edit, share, or delete your screenshots as needed.
Now that you know how to screenshot on your Samsung Galaxy A53, you can effortlessly capture and preserve valuable moments, document errors, or save important information for future reference. Whether you’re a casual user or a power user, taking screenshots can be a valuable tool in various scenarios.
So, go ahead and start capturing those screenshots on your Samsung Galaxy A53. Explore the different methods and find the one that works best for you. Happy screenshotting!