Why Screen Recording on Windows is Important
Screen recording has become an essential tool for individuals and businesses alike, offering a range of benefits and applications. Whether you are a content creator, educator, gamer, or business professional, screen recording on Windows can greatly enhance your productivity and communication. In this section, we will explore the key reasons why screen recording is important and how it can positively impact your work or personal endeavors.
1. Visual Communication: Screen recording allows you to visually communicate complex ideas, instructions, or concepts in a clear and concise manner. Instead of relying on lengthy written explanations, you can demonstrate processes and actions directly on your computer screen, making it easier for your audience to understand.
2. Remote Collaboration: In today’s digital age, where working and learning remotely has become the norm, screen recording is an indispensable tool for efficient collaboration. You can record your screen, along with audio narration, and share it with your team or colleagues. This enables seamless communication, eliminates the need for multiple meetings, and ensures everyone is on the same page.
3. Training and Tutorials: Screen recording is widely used in the field of education and online learning. Educators and trainers can create engaging video tutorials, walkthroughs, or demonstrations, providing a more interactive and immersive learning experience for their students. With screen recording, you can capture every step, highlight important details, and illustrate complex processes, enhancing the effectiveness of your training materials.
4. Demonstrating Software or Products: If you are a software developer, app creator, or product reviewer, screen recording is essential for showcasing your work. You can record the screen while demonstrating the features and functionalities of your software or product, giving your audience a firsthand experience. This not only builds trust but also increases the chances of engagement and potential sales.
5. Troubleshooting and Support: Screen recording is a valuable asset for troubleshooting technical issues or providing customer support. Instead of relying on verbal explanations or written instructions, you can record your screen while addressing the problem, visually guiding the user through the steps to resolve the issue. This saves time, reduces misunderstandings, and improves the overall customer experience.
Overall, screen recording on Windows offers a wide range of applications and benefits for individuals and businesses. It streamlines communication, enhances productivity, and simplifies complex processes. Whether you are a content creator, educator, or business professional, incorporating screen recording into your workflow can greatly improve your efficiency and effectiveness. So, start exploring the different screen recording software options available, and unlock the full potential of visual communication on your Windows device.
Choosing the Right Screen Recording Software
When it comes to screen recording on Windows, choosing the right software is crucial to ensure a seamless and efficient recording experience. With a plethora of options available, it’s important to consider your specific needs and requirements before making a decision. In this section, we will discuss some key factors to consider when selecting screen recording software for your Windows device.
1. Recording Features: One of the first things to consider is the set of features offered by the screen recording software. Look for software that allows you to capture both the screen and audio, offers options for webcam recording, and provides customizable recording settings such as frame rate and resolution. Additional features like mouse highlighting, cursor effects, and annotations can also enhance the overall recording quality.
2. Ease of Use: A user-friendly interface and intuitive controls are essential for a smooth recording experience. Look for software that is easy to navigate and provides simple, yet comprehensive options for recording. The ability to start, pause, and stop recordings with a single click, as well as easy access to editing and sharing features, can greatly enhance your productivity and save time.
3. Editing Capabilities: While basic screen recording software may only offer minimal editing options like trimming and cropping, more advanced software provides a range of editing capabilities. Look for features like adding annotations, text overlays, and callouts, as well as the ability to merge multiple recordings, add transitions, and adjust audio levels. These editing tools allow you to refine your recordings and create professional-looking videos.
4. Output Formats and Quality: Ensure that the screen recording software supports a variety of output formats and allows you to choose the desired video quality. This is important if you plan to share your recordings on different platforms or if you have specific requirements for video resolution and encoding. Look for software that offers options for popular video formats such as MP4, AVI, or WMV, and allows you to adjust the quality settings according to your needs.
5. Compatibility and Support: Before selecting screen recording software, check its compatibility with your Windows operating system version. Ensure that the software is regularly updated and supported by the developer to avoid any compatibility issues or security vulnerabilities. Additionally, consider software that offers adequate customer support, including tutorials, forums, or direct assistance, to help you resolve any technical difficulties that may arise.
6. Pricing: Consider your budgetary constraints and compare the pricing options of different screen recording software. While some software may offer free versions with limited features, others may require a one-time purchase or a subscription-based model. Evaluate the features and benefits offered by each option and choose one that aligns with your requirements and financial considerations.
7. User Reviews and Ratings: Lastly, take the time to read user reviews and ratings of the screen recording software you are considering. This will provide you with valuable insights into the user experience, performance, and reliability of the software. Look for software that has positive reviews, high ratings, and a good reputation in the market.
By carefully considering these factors, you can select the right screen recording software that meets your specific needs and ensures a seamless recording experience on your Windows device. Remember to download and test a few options before making a final decision, as this will help you determine which software best suits your requirements. So, take the time to research and choose wisely!
Step-by-Step Guide to Screen Recording on Windows
Screen recording on Windows can be a powerful tool for capturing your computer screen and creating engaging videos. Whether you want to record a tutorial, gameplay, or a presentation, the process can be simple and straightforward. In this section, we will provide you with a step-by-step guide on how to screen record on Windows.
Step 1: Choose the Right Screen Recording Software: Start by selecting a reliable screen recording software that suits your needs. There are various options available, both free and paid, that offer different features and capabilities. Some popular choices include OBS Studio, Camtasia, and Bandicam. Download and install the software on your Windows device.
Step 2: Launch the Screen Recording Software: After installing the software, launch it on your Windows device. Familiarize yourself with the interface and explore the available options and settings.
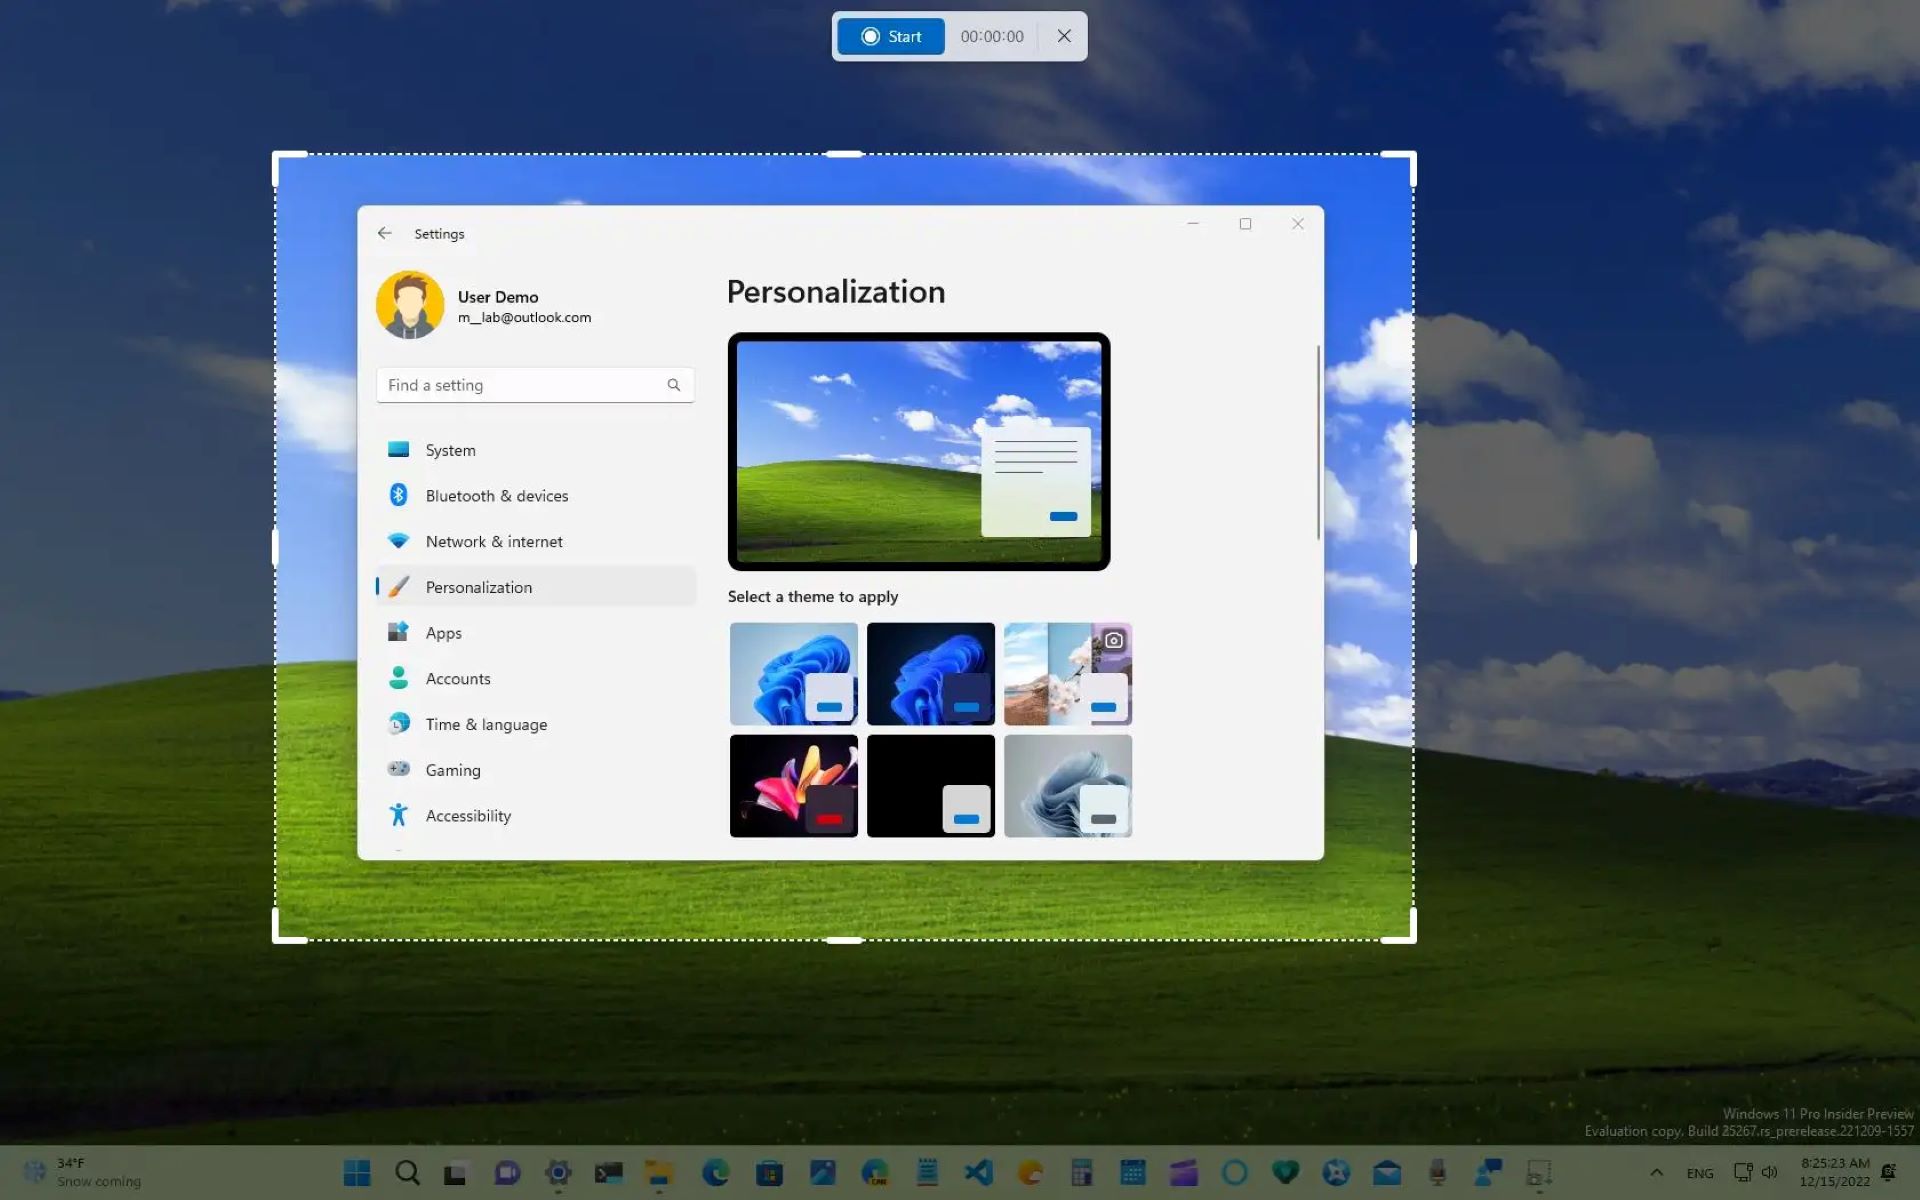
Step 3: Configure the Recording Area: Before you begin recording, decide on the area of your screen that you want to capture. Most screen recording software allows you to choose between recording the full screen or a specific region. Adjust the recording area accordingly.
Step 4: Adjust Audio Settings: If you want to include audio in your screen recording, make sure to configure the audio settings. You can choose to record system audio, microphone input, or both. Adjust the audio levels to ensure clear and balanced sound during the recording.
Step 5: Select Video Quality and Format: Determine the desired video quality and format for your screen recording. Most software allows you to choose different resolutions and formats such as MP4, AVI, or WMV. Consider the intended use of the recording and select the appropriate settings.
Step 6: Preview and Configure Additional Settings: Some screen recording software offers additional settings and options such as cursor effects, annotations, or webcam overlay. Preview these features and configure them based on your preferences. These enhancements can make your screen recording more engaging and professional.
Step 7: Start the Screen Recording: Once you have configured all the necessary settings, click on the “Start” or “Record” button to begin the screen recording. Make sure to indicate any on-screen actions or steps you’ll be performing during the recording to ensure clarity.
Step 8: Perform the Desired Actions: Start performing the actions or demonstrating the content you want to capture on your screen. Speak clearly if you are providing audio narration. Keep in mind that screen recording software allows you to pause and resume the recording, so use these features if needed.
Step 9: End and Save the Recording: Once you have finished your recording, click on the “Stop” or “Finish” button to end the screen recording session. The software will typically prompt you to save the recording in the desired location on your Windows device. Choose a suitable name and location for easy access later on.
Step 10: Edit and Share the Recording (Optional): If your screen recording software offers editing features, you can use them to trim, enhance, or add annotations to your recording. Once you’re satisfied with the edits, save the final version and share it with others. You can upload it to a video sharing platform, send it via email, or embed it on your website or blog.
By following these step-by-step instructions, you can easily screen record on Windows and create professional-looking videos for various purposes. Experiment with different software options and settings to find the workflow that works best for you. Happy recording!
Setting Up your Recording Area
Before diving into screen recording on Windows, it’s important to set up your recording area to ensure that you capture the intended content accurately. Whether you want to record the entire screen or a specific region, this section will guide you through the process of configuring your recording area effectively.
1. Determine the Scope: Before you start recording, think about the scope of your content. Do you want to capture the entire screen or just a specific portion? Consider the purpose of your recording and the level of detail you want to include.
2. Full Screen Recording: If you want to capture the entire screen, most screen recording software provides an option to select the full screen as the recording area. This is ideal for gaming, presentations, or tutorials that require capturing the entire desktop.
3. Custom Region Recording: If you prefer to record a specific region of your screen, you can define a custom recording area. This allows you to capture only the necessary content, eliminating any distractions that may be present on the rest of the screen.
4. Adjusting the Recording Area: Once you have determined the scope of your recording, it’s time to adjust the recording area. In most screen recording software, you can either drag and resize a selection box to define the area manually or use predefined aspect ratios and sizes for precise positioning.
5. Focus on the Essential Content: When setting up your recording area, focus on the essential content you want to capture. Ensure that important windows, applications, or elements are clearly visible within the recording area. Avoid including unnecessary parts of the screen that may clutter the recording.
6. Consider Aspect Ratios: If you’re recording for a specific platform or device, consider the aspect ratios that are commonly used. For example, if you plan to upload your recording to YouTube, a 16:9 aspect ratio is recommended for optimal viewing on different devices.
7. Test the Recording Area: Before you start your actual recording, it’s a good practice to test the recording area to ensure everything is set up as desired. Check for any areas that may be cut off or hidden within the recording area. Make adjustments if necessary.
8. Record a Sample: To be absolutely certain that your recording area is configured correctly, record a short sample video and review it. Ensure that the content you intended to capture is clearly visible and not cropped or distorted in any way. Make any necessary adjustments based on your review.
9. Save the Recording Area Settings: Once you are satisfied with your recording area setup, save the settings in your screen recording software if applicable. This way, you can easily access and use the same configuration for future recordings without having to set it up each time.
By following these steps, you can effectively set up your recording area for screen recording on Windows. By taking the time to properly configure your recording area, you will ensure that your recordings are focused, visually pleasing, and aligned with your intended purpose. So, spend a few moments adjusting and testing your recording area before hitting that record button!
Adjusting Audio Settings
When it comes to screen recording on Windows, capturing high-quality audio is just as important as capturing the visual content. Properly adjusting your audio settings ensures that your recordings have clear and balanced sound, making them more engaging and professional. In this section, we will guide you through the process of adjusting the audio settings for your screen recordings.
1. Choose the Audio Source: Before you start recording, decide on the audio source you want to capture. Most screen recording software allows you to choose between recording system audio, microphone input, or a combination of both. Consider the type of content you are recording and the audio elements that need to be captured.
2. Recording System Audio: If you want to record the audio produced by your computer system, enable the system audio option in your screen recording software. This is useful if you are recording gameplay, online videos, or any other content that relies on audio output from your computer.
3. Capturing Microphone Input: If you want to include your voice narration or any external audio, make sure your microphone is properly connected and recognized by your Windows device. Select the microphone input as the audio source in your screen recording software. Adjust the microphone volume to ensure clear and distortion-free sound.
4. Balance Audio Levels: It’s essential to balance the audio levels between the system audio and microphone input to avoid background noise or one audio source overpowering the other. Most screen recording software provides settings to adjust the volume levels of both the system audio and microphone input.
5. Conduct Audio Tests: Before you start your actual screen recording, conduct audio tests to ensure that both the system audio and microphone input are functioning properly. Play an audio file or speak into your microphone to check for any issues such as distortion, echo, or low volume levels. Make adjustments as needed.
6. Use Headphones: If you are recording with a microphone, consider using headphones during the recording process. This helps prevent audio feedback or echo caused by the microphone picking up sound from the computer speakers. Using headphones ensures a cleaner and more professional recording.
7. Monitor Audio During Recording: While recording, it’s crucial to monitor the audio levels to ensure optimal sound quality. Many screen recording software provides real-time audio monitoring, allowing you to observe the levels and make adjustments if required. Keep an eye on the audio levels throughout the recording process to maintain consistent and clear audio.
8. Edit and Enhance the Audio (Optional): After the recording is complete, you may want to edit and enhance the audio to further improve its quality. Some screen recording software offers basic audio editing features such as noise reduction, equalizer adjustments, or audio normalization. Utilize these tools to enhance the clarity and overall sound of your recording.
9. Perform Audio Checks Before Finalizing: Before finalizing your recording, review the audio quality by playing it back. Verify that the audio is clear, audible, and synchronized with the visual content. Make any necessary adjustments if you discover any issues during the review process.
By following these steps, you can effectively adjust the audio settings for your screen recordings on Windows. Clear and well-balanced audio enhances the overall quality of your recordings and improves the viewing experience for your audience. Don’t overlook the importance of audio in your screen recording process, and take the time to configure and fine-tune your audio settings for optimal results.
Choosing Video Quality and Format
When it comes to screen recording on Windows, choosing the appropriate video quality and format is crucial to ensure optimal playback and compatibility. Selecting the right settings will determine the clarity, file size, and compatibility of your recordings. In this section, we will guide you through the process of choosing the video quality and format for your screen recordings.
1. Consider the Intended Use: Before deciding on the video quality and format, consider the purpose and intended use of your screen recordings. Will you be uploading them to a video sharing platform, embedding them in a presentation, or sharing them with colleagues? Understanding the use case will help you determine the appropriate settings.
2. Video Quality: The video quality determines the level of detail and clarity in your recordings. Most screen recording software allows you to choose from different quality settings, ranging from low to high. Higher quality settings result in sharper images, but they also create larger file sizes. Balance the desired quality with the practicality of file size for efficient storage and sharing.
3. Resolution: Consider the resolution of your recordings, which refers to the number of pixels displayed on the screen. Higher resolutions provide more detail, but they also result in larger file sizes. If your screen recording software allows you to adjust the resolution, choose a setting that aligns with your intended use and takes into account the device and screen size it will be viewed on.
4. Frame Rate: The frame rate determines the smoothness of motion in your recordings. Common frame rates are 30 frames per second (fps) and 60 fps. Higher frame rates provide smoother motion but result in larger file sizes. Consider the content you are capturing and the level of motion. For standard screen recordings, a frame rate of 30 fps is typically sufficient, whereas higher frame rates may be necessary for capturing fast-paced gameplay or video demonstrations.
5. Bitrate: The bitrate refers to the amount of data used to encode each second of video. Higher bitrates result in better image quality but also increase file size. Consider the intended platform and audience for your recordings. For online sharing or streaming, balancing a decent bitrate for quality with a reasonable file size is important to ensure smooth playback and fast loading times.
6. Video Format: Choosing the appropriate video format for your screen recordings is essential for compatibility and ease of use. Common video formats include MP4, AVI, and WMV. MP4 is widely supported across platforms and is suitable for online sharing. AVI offers uncompressed quality but creates larger file sizes, while WMV is compatible with Windows devices and provides a good balance between quality and file size.
7. Compatibility: When selecting the video format, ensure compatibility with the desired playback devices or platforms. If your recordings will primarily be viewed on Windows devices, formats such as WMV or AVI are recommended. However, if you plan to share your recordings with a wider audience or upload them online, formats like MP4 offer better compatibility across different platforms and devices.
8. Test and Review: After adjusting the video quality and format settings, test and review your recordings. Pay attention to the image clarity, file size, and playback compatibility. Verify that your recordings meet your expectations in terms of quality, file size, and compatibility with the intended platform or audience.
By considering the intended use, resolution, frame rate, bitrate, and video format, you can choose the appropriate video quality and format for your screen recordings on Windows. Striking a balance between quality, file size, and compatibility will ensure that your recordings are visually appealing, manageable, and accessible across various platforms and devices. Take the time to experiment with different settings and formats to find the best configuration for your specific needs.
Adding Cursor Effects and Annotations
When it comes to screen recording on Windows, adding cursor effects and annotations can significantly enhance the visual clarity and engagement of your recordings. Cursor effects allow you to highlight actions or movements on the screen, while annotations provide additional context or explanations. In this section, we will explore how you can effectively incorporate cursor effects and annotations into your screen recordings.
1. Highlighting Cursor Movements: Cursor effects are particularly useful when demonstrating actions or navigating through menus or interfaces. Most screen recording software provides options to highlight cursor movements, such as enlarging the cursor, adding colored circles or trails, or emphasizing mouse clicks. These effects draw attention to the cursor and make it easier for viewers to follow your actions.
2. Emphasizing Clicks and Interactions: When recording tutorials or walkthroughs, it’s essential to emphasize mouse clicks and other interactions with the screen. Cursor effects like click animations or sound effects can help to clearly indicate when and where you are clicking, making it easier for viewers to understand the steps involved.
3. Adding Text and Callouts: Annotations play a crucial role in providing additional context or explanations within your screen recordings. Screen recording software often offers text and callout features, allowing you to add text boxes, arrows, or shapes to highlight specific areas of the screen or provide textual information. Use these annotations to clarify instructions, label elements, or emphasize important details.
4. Drawing and Drawing Tools: Some screen recording software includes drawing tools, which allow you to sketch or draw directly on the screen while recording. This can be useful for creating diagrams, flowcharts, or illustrations, adding a visual element to your explanations. Utilize the available drawing tools to illustrate concepts or emphasize key points effectively.
5. Webcam Overlay: Depending on your screen recording software, you may have the option to include a webcam overlay in your recordings. This allows viewers to see your face or reactions while you demonstrate actions on the screen. A webcam overlay can add a personal touch to your recordings, enhancing the connection with your audience.
6. Balancing Effects and Simplicity: While cursor effects and annotations can be beneficial in guiding viewers and providing additional insights, it’s essential to strike a balance and avoid overwhelming the screen with excessive effects. Keep the visual clarity and simplicity of your recordings in mind. Use these features strategically and sparingly to avoid distracting viewers from the main content.
7. Preview and Fine-tune: Before finalizing your screen recording, take the time to preview the cursor effects and annotations you have added. Make sure they are clearly visible, accurately aligned, and do not obstruct any important on-screen elements. Fine-tune the effects as needed to ensure they enhance the overall understanding and engagement of your recordings.
8. Consistency and Branding: If you are creating screen recordings for a brand or organization, consider incorporating consistent cursor effects, color schemes, or branded annotations. This helps to maintain a cohesive visual identity and reinforce brand recognition across your recordings.
By incorporating cursor effects and annotations into your screen recordings on Windows, you can provide a more engaging and informative experience for your viewers. Use these features strategically and thoughtfully to highlight important actions, provide contextual information, and enhance the overall clarity of your recordings. Experiment with different effects and annotations to find the perfect balance that suits your content and audience.
Editing Options for your Screen Recording
Editing your screen recording can take it from a raw capture to a polished and professional video. With a wide range of editing options available, you can enhance the visual and audio aspects of your recording, remove any mistakes or unwanted content, and add a personal touch to your final video. In this section, we will explore the various editing options for your screen recording on Windows.
1. Trimming and Cutting: One of the most basic yet essential editing options is trimming and cutting. This allows you to remove any unnecessary portions from the beginning, middle, or end of your recording. By eliminating mistakes, pauses, or irrelevant content, you create a more concise and focused video for your viewers.
2. Adding Transitions: Transitions help to smoothly connect different segments of your screen recording. They can be used to fade in or out, dissolve from one scene to another, or create other visual effects that enhance the flow between clips. Transitions add polish and professionalism to your video, making it visually appealing and engaging for the viewers.
3. Overlaying Text and Graphics: Adding text and graphics to your screen recording allows you to provide further context, titles, subtitles, or annotations. You can overlay text boxes, diagrams, arrows, or other visual elements to highlight key points, clarify instructions, or emphasize important details within your video.
4. Enhancing Audio: Audio is a crucial aspect of any screen recording. Audio editing options include adjusting the volume levels, removing background noise, adding background music, or using audio effects to enhance the overall sound quality and clarity. Well-balanced and high-quality audio significantly improves the viewing experience for your audience.
5. Applying Filters and Effects: Filters and effects can enhance the visual appeal of your screen recording by applying color corrections, adjusting brightness and contrast, or adding artistic effects. These options can help create a consistent visual style, add a touch of creativity, or create a specific mood for your video.
6. Adding Annotations and Callouts: Annotations and callouts are a powerful tool for providing additional context or information. You can add text, shapes, pointers, arrows, or highlighting effects to draw attention to specific areas, explain complex concepts, or emphasize important elements within your recording. Annotations serve as visual aids, making your video more engaging and informative.
7. Overlaying Webcam or Picture-in-Picture (PiP): If you recorded your screen along with your webcam, you can overlay the webcam footage on top of your screen recording or use a Picture-in-Picture (PiP) effect. This allows viewers to see your face or reactions while you demonstrate actions on the screen, adding a personal touch and connection with your audience.
8. Exporting and Sharing: Once you have finished editing your screen recording, you can export it into a suitable video format. Make sure to choose a format that is compatible with various platforms and devices. Once exported, you can share your edited video on video-sharing platforms, social media, websites, or directly with your audience.
By utilizing the editing options available for your screen recording on Windows, you can transform a raw capture into a polished and professional video. Use trimming, transitions, text, and graphics to enhance the flow and clarity of your content. Apply audio adjustments and effects to ensure excellent sound quality. Experiment with filters, annotations, and overlays to add a personalized touch to your recordings. Editing options allow you to create a final video that is engaging, visually appealing, and effectively communicates your message to your viewers.
Saving and Sharing your Screen Recording
Once you have finished creating and editing your screen recording on Windows, saving and sharing it effectively is crucial to ensure that your content reaches your intended audience. In this section, we will explore the steps involved in saving and sharing your screen recording in various formats and through different channels.
1. Save your Screen Recording: After completing the editing process, save your screen recording in a suitable format. Most screen recording software allows you to choose from popular formats such as MP4, AVI, or WMV. Select a format that meets your specific requirements for quality, file size, and compatibility with your target platforms or devices.
2. Name your File: Give your screen recording a descriptive and meaningful name that accurately reflects the content or purpose of the video. This will make it easier to identify and locate later on.
3. Choose a Storage Location: Select a storage location on your Windows device where you want to save your screen recording. Consider choosing a location that is easily accessible and organized for future reference.
4. Consider Compressing the File: Depending on the duration and quality settings of your screen recording, the file size might be substantial. Consider compressing the video file using video compression software or online tools to reduce file size while maintaining acceptable quality. This will make it more manageable for sharing and uploading.
5. Choose a Sharing Platform or Method: Determine the best platform or method for sharing your screen recording with your intended audience. This may include using websites or platforms specifically designed for video sharing, such as YouTube or Vimeo. Alternatively, you can utilize cloud storage services like Google Drive or Dropbox to share the file directly.
6. Upload to Video Sharing Platforms: If you plan to share your screen recording on video sharing platforms, create an account, and follow their specific upload instructions. Pay attention to any recommended video settings or guidelines provided by the platform to ensure optimal playback quality.
7. Share on Social Media: Leverage social media platforms such as Facebook, Twitter, LinkedIn, or Instagram to easily share your screen recording. Upload the video directly or post a link to the recording hosted on a video sharing platform or cloud storage service.
8. Embed in Websites or Blogs: If you have a website or blog, consider embedding your screen recording directly into a webpage. Most video platforms provide embed codes that you can copy and paste into your website’s HTML editor, allowing visitors to watch the video without leaving your site.
9. Share via Email: If you prefer to share your screen recording directly with specific individuals or groups, you can attach the video file to an email. Compress the video, if needed, to ensure it fits within email attachment limits.
10. Password Protection (if necessary): If your screen recording contains sensitive or confidential information, consider password protecting the file or using secure file sharing methods to ensure only authorized individuals can access it.
By following these steps, you can effectively save and share your screen recording on Windows. Consider the best approach for your specific needs, whether it involves using video sharing platforms, social media, embedding on websites, or sharing via email. Remember to respect any copyright restrictions, privacy considerations, and platform guidelines as you distribute your screen recording to ensure a positive and professional sharing experience.
Tips and Tricks for Effective Screen Recording on Windows
Screen recording on Windows can be a powerful tool for capturing and sharing your computer screen. To ensure a smooth and effective recording experience, it’s essential to adopt some tips and tricks. In this section, we will share some valuable advice to help you create professional and engaging screen recordings on Windows.
1. Plan Your Recording: Before you start recording, plan the content, structure, and key points you want to cover. This will help you stay organized, deliver a cohesive presentation, and minimize the need for editing later.
2. Clear Your Desktop: Remove any clutter from your desktop that is not relevant to your recording. Close unnecessary applications, clean up icons, and hide personal or sensitive information to create a clean and professional-looking screen.
3. Use Keyboard Shortcuts: Familiarize yourself with keyboard shortcuts for your screen recording software. This will allow you to start, pause, stop, and perform other essential functions without interrupting your flow or making unwanted mouse clicks during the recording.
4. Optimize System Performance: Ensure that your Windows device is running smoothly during the recording. Close any resource-intensive applications, disable notifications, and consider using game mode or performance settings to maximize your computer’s processing power.
5. Check Audio Levels: Before you start recording, test the audio levels to ensure clear and balanced sound. Adjust the microphone volume and system audio levels to ensure both are audible and not overpowering or distorted.
6. Make Use of Visual Cues: Incorporate visual cues, such as highlighting mouse clicks, using animated cursor effects, or adding arrows or circles to draw attention to important areas on the screen. These visual elements help viewers follow along and understand the actions being performed.
7. Consider Narration Script: If you plan to provide voice narration, consider preparing a script or outline to guide your speech. This will help you deliver a clear and concise explanation, ensuring that your viewers understand the content more effectively.
8. Be Mindful of Recording Duration: Keep your recordings concise and focused to maintain viewer engagement. Avoid unnecessary repetition or digressions that may cause viewers to lose interest. Aim for a recording length that adequately covers the content while respecting your audience’s time.
9. Utilize Video Editing Software: Take advantage of video editing software to enhance your recordings further. This allows you to trim unnecessary portions, add visual effects, create a professional-looking intro and outro, and apply transitions to smooth out the flow of your video.
10. Practice and Review: Practice your screen recording techniques to improve your delivery and flow. Review your recordings to identify areas for improvement, such as pacing, clarity, or audio quality. Continuously seek feedback and learn from each recording to refine your skills.
By implementing these tips and tricks, you can enhance the quality, clarity, and overall effectiveness of your screen recordings on Windows. Remember to plan your recording, optimize your system, utilize visual cues, and practice consistently. With each recording, you will improve your skills, resulting in more engaging and professional screen recordings.


