Introduction
Are you eager to showcase your 3D printing projects in an engaging and visually captivating way? One popular method is to create a time-lapse video of the entire printing process, from start to finish. A time-lapse provides a condensed view of the printing project, capturing every intricate detail in a short clip. Whether you want to share your creation on social media or document your progress for personal reference, recording a 3D printer time-lapse can be a rewarding and fun endeavor.
While many 3D printers come with built-in time-lapse functionality, the quality and flexibility of these recordings may be limited. Thankfully, you can create your own high-quality time-lapse videos with the help of a camera and a few simple techniques. In this article, we will guide you through the process of recording a 3D printer time-lapse, providing tips and instructions on camera setup, angle selection, monitoring your print, recording techniques, and post-production editing. By following these steps, you’ll be able to produce professional-looking time-lapse videos that showcase your creativity and skills.
Before we dive into the technical aspects of recording a 3D printer time-lapse, let’s briefly discuss the equipment you’ll need for this project. Firstly, you’ll need a camera capable of shooting time-lapse videos. While a dedicated digital camera or a DSLR can deliver excellent results, even a smartphone with a good camera can be used. Additionally, you’ll need a tripod or a stable mount to ensure the camera remains steady throughout the recording process. A remote trigger or intervalometer can also be useful for automating the shooting process. Finally, make sure you have sufficient storage space and a fully-charged battery for uninterrupted recording.
Equipment Needed
To record a 3D printer time-lapse, you’ll need a few essential pieces of equipment. While some items might be optional or can be substituted with alternatives, having the right tools will significantly enhance the quality of your recordings. Here’s a list of the equipment you’ll need:
- A Camera: Choose a camera that has the capability to shoot time-lapse videos. This can be a dedicated digital camera, a DSLR, or even a smartphone with a good camera. Ensure that your camera can be set up on a tripod or mounted securely near your 3D printer.
- A Tripod or Mount: Stability is crucial when capturing a time-lapse, so invest in a sturdy tripod or mount to keep your camera in place. This will prevent any unwanted movement or shaking during the recording process.
- A Remote Trigger or Intervalometer: While not mandatory, a remote trigger or intervalometer can be beneficial for automating the shooting process. It allows you to set intervals between each frame, ensuring smooth and consistent capture of the printing process.
- Sufficient Storage Space: Make sure you have enough storage space available on your camera’s memory card or smartphone. Depending on the duration of your print, time-lapses can use a significant amount of storage, so consider using a high-capacity memory card or transferring files to a computer or external hard drive during longer prints.
- A Fully-Charged Battery: It’s essential to have a fully-charged camera or smartphone battery to avoid interruption during the recording process. If you’re recording an extended time-lapse, it’s a good practice to have a spare battery on hand.
Having the right equipment will ensure that you’re well-prepared to capture high-quality time-lapse videos of your 3D printing projects. Now that you have the necessary tools, let’s move on to the next step: setting up the camera for optimal recording.
Setting Up the Camera
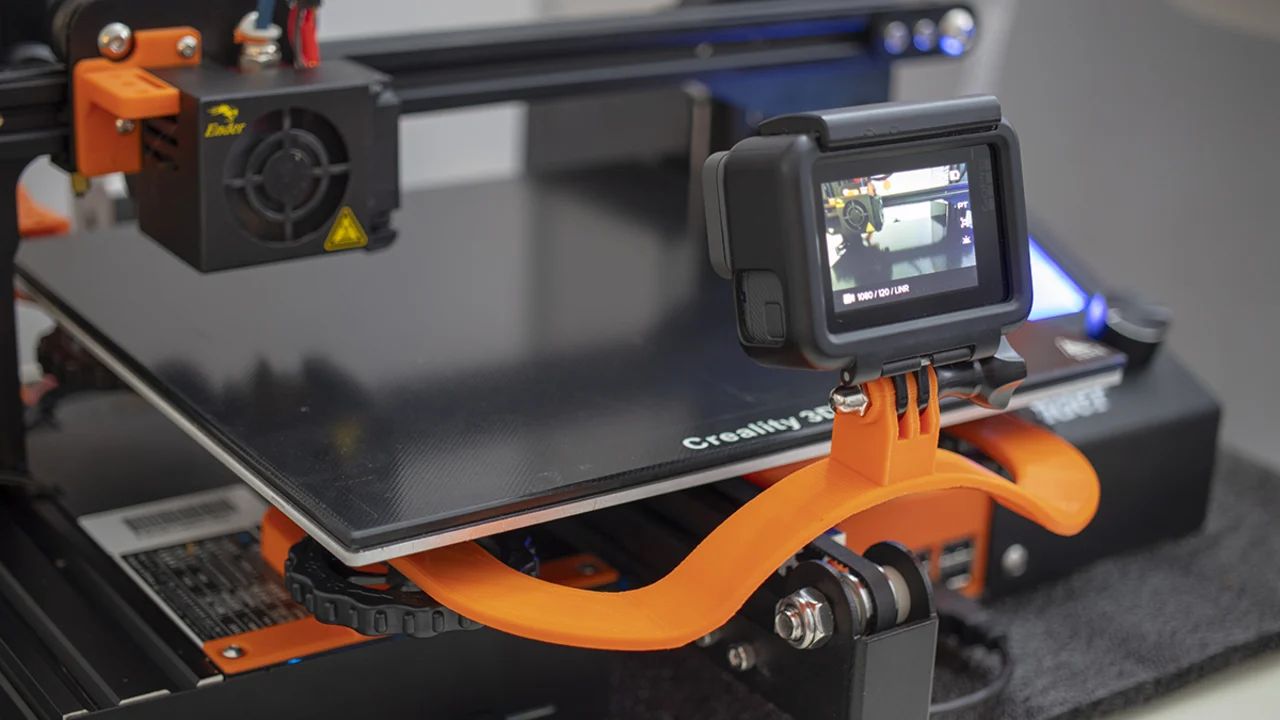
Before you begin recording your 3D printer time-lapse, it’s important to set up your camera in the right position to capture the best angles and perspectives. Here are some steps to help you set up your camera effectively:
- Positioning the Camera: Place your camera on a tripod or mount it securely near your 3D printer. Position it in a location that provides a clear view of the print bed and the printer’s movements. Consider the size and shape of your print to determine the best position for the camera.
- Camera Stability: Ensure the camera is stable and won’t move or vibrate during the print process. This is important to prevent blurriness in your time-lapse footage. Use a sturdy tripod or mount and tighten all screws and knobs to keep the camera in place.
- Focus and Depth of Field: Adjust the camera’s focus to ensure that the print and surrounding area are clear and in focus. A shallow depth of field can create a more visually appealing effect, but make sure the print itself remains sharp.
- Perspective and Framing: Experiment with different perspectives and framing options to find the most visually interesting composition. Consider capturing the print from different angles, such as a top-down view or a side view, to highlight different aspects of the printing process.
- Noise and Distractions: Pay attention to potential distractions in the frame, such as cluttered backgrounds or reflective surfaces that can cause unwanted reflections. Minimize background noise or create a clean backdrop to ensure the focus remains on the 3D printing process.
Taking the time to set up your camera properly will ensure that you capture the best angles and perspectives of your 3D printer and the printing process. The next step is to adjust the camera settings to optimize the recording.
Adjusting Camera Settings
Once you have set up your camera in the desired position, it’s important to adjust the camera settings to optimize the recording of your 3D printer time-lapse. Here are some camera settings to consider:
- Resolution and Frame Rate: Select a suitable resolution and frame rate for your time-lapse. Higher resolutions and frame rates can provide more detailed and smoother footage, but they may also require more storage space. Consider your camera’s capabilities and the desired output when making this decision.
- Exposure and White Balance: Adjust the exposure settings to ensure that the print and the surrounding area are properly lit. Avoid overexposed or underexposed areas that can negatively impact the overall quality of the time-lapse. Additionally, set the white balance appropriately to maintain accurate colors throughout the recording.
- Shutter Speed: Experiment with different shutter speeds to capture the movement of the print head and extruder accurately. Slower shutter speeds can create motion blur, while faster shutter speeds freeze the movement. Find the right balance to showcase the printing process clearly.
- Interval and Duration: Set the interval between each frame to determine the speed of your time-lapse. Consider the length of your print and the desired duration of the final video. Faster intervals will result in faster playback, while slower intervals create a slower time-lapse effect. Experiment with different interval settings to find the desired effect.
- Auto vs. Manual Mode: Determine whether to use automatic or manual mode for your camera settings. Manual mode provides greater control over individual settings, allowing you to fine-tune the recording. Automatic mode can be more convenient but may not always produce optimal results. Choose the mode that suits your preferences and the available lighting conditions.
Take the time to test different camera settings and make adjustments as needed. It’s a good idea to conduct some test shots before starting the actual time-lapse recording to ensure the settings are dialed in correctly. Once you are satisfied with the camera settings, it’s time to move on to finding the right angle to capture the 3D printing process.
Finding the Right Angle
Choosing the right angle to capture your 3D printing process is crucial for creating an engaging and visually appealing time-lapse video. The angle you choose can highlight the details of the print, showcase the movement of the printer, and provide an overall interesting perspective. Here are some tips to help you find the right angle:
- Top-Down View: Positioning the camera directly above the print bed can provide a unique and comprehensive view of the entire printing process. This angle is particularly effective for showcasing intricate designs and patterns.
- Side View: Capturing the print from a side angle allows you to emphasize the movement of the print head and extruder. This can add a dynamic element to the time-lapse, especially if your print has complex geometries or requires extensive support structures.
- Close-Up Shots: Zooming in or getting close to the print can capture the finer details and textures of the object being printed. This angle works well when you want to showcase the quality and precision of your 3D prints.
- Multi-Angle Shots: Consider capturing the print from multiple angles to provide a more comprehensive view of the printing process. This can add variety and visual interest to your time-lapse video.
- Perspective Experimentation: Don’t be afraid to experiment with different angles and perspectives. Try low-angle shots, high-angle shots, or even incorporating elements of your workspace or surroundings. This can create a more unique and visually captivating time-lapse.
- Consider the Print Size: The size and scale of your print can also influence the choice of the angle. Larger prints may require a wider angle to capture the entire object, while smaller prints can benefit from close-up shots to highlight the details.
Take the time to explore different angles and perspectives before starting the time-lapse recording. Remember, the goal is to capture the 3D printing process in a visually compelling way that showcases the intricacies of your project. Once you’ve found the perfect angle, it’s time to move on to the next step: monitoring the print progress during recording.
Monitoring the Print
While your camera captures the 3D printer time-lapse, it’s important to keep a close eye on the printing progress to ensure everything is running smoothly. Monitoring the print allows you to identify any issues, make adjustments if necessary, and ensure the final time-lapse reflects the desired outcome. Here are some tips for effectively monitoring the print:
- Visual Inspection: Regularly inspect the print’s layers and overall quality to ensure there are no visible defects or printing errors. This can include checking for warping, stringing, or uneven layers.
- Check Printer Status: Monitor the printer’s display or software for any error messages or issues that might affect the print quality. Address any problems promptly to avoid negative impacts on the final time-lapse footage.
- Temperature and Print Bed Stability: Pay attention to the temperature settings of the printer and the stability of the print bed. Ensure that the printer maintains the necessary temperature for optimal printing conditions and that the print bed remains level and secure.
- Adjustments and Maintenance: If you notice any issues with the print, such as poor adhesion or extrusion problems, consider making necessary adjustments or performing maintenance tasks to improve the print quality. This could involve cleaning the print bed, adjusting nozzle height, or troubleshooting filament issues.
- Monitor Filament Usage: Keep track of the filament usage throughout the print to ensure you have enough material for the entire duration. Running out of filament can disrupt the printing process and result in an incomplete time-lapse.
- Document Print Settings: Make note of the printer settings, such as print speed, layer height, and filament type, as this information can be helpful for future reference or troubleshooting any issues that may arise.
By monitoring the print closely, you can intervene if necessary and ensure that the final time-lapse video reflects the best possible outcome. Remember to strike a balance between monitoring the print and allowing the camera to capture the process without interference. Once the print is complete, it’s time to move on to recording the time-lapse.
Recording the Time-Lapse
Now that you’ve set up your camera, adjusted the settings, and monitored the print, it’s time to start recording the 3D printer time-lapse. Follow these steps to ensure a smooth and successful recording:
- Double-Check Camera Position: Before starting the recording, make sure the camera is still securely positioned and framed correctly. Ensure that the camera’s view is unobstructed and that it won’t be accidentally bumped or moved during the print.
- Start the Recording: Begin the time-lapse recording either by pressing the camera’s record button or by activating the intervalometer/remote trigger. Double-check that the camera is indeed recording and that the time-lapse sequence has initiated.
- Monitor the Recording: Keep a watchful eye on the recording throughout the print process. Ensure that the camera is capturing the print correctly, without any technical issues or interruptions. If you encounter any problems, address them promptly to avoid compromising the final time-lapse.
- Interval Time and Duration: The length of your time-lapse will depend on the duration of the print and the interval time between each frame. Ensure that the interval time is set appropriately to capture the desired speed and smoothness of the printing process. Consider testing different interval times during the recording to find the best result.
- Allow for Sufficient Recording Time: Estimate the duration of your print and ensure that your camera has sufficient storage space and battery life to record the entire process. It’s always a good idea to have extra memory cards and charged batteries on hand, especially for longer prints.
- Avoid Disturbances: While the time-lapse is recording, minimize any movements or disturbances in the vicinity of the camera or printer. This includes avoiding accidental bumps or vibrations that can affect the quality of the footage.
- Review and Make Adjustments: Periodically review the recorded footage during the print to ensure that everything is being captured correctly and meets your expectations. If necessary, make adjustments to the camera position, framing, or settings to optimize the time-lapse recording.
By following these steps, you’ll be able to record a high-quality and visually captivating time-lapse of your 3D printing process. Once the print is complete and the time-lapse recording is successfully finished, it’s time to move on to the next step: editing the time-lapse video to polish the final result.
Editing the Time-Lapse
After recording the 3D printer time-lapse, the next step is to edit the footage to create a polished and visually engaging final video. Editing allows you to enhance the time-lapse, add music or commentary, and make any necessary adjustments. Follow these steps to edit your time-lapse effectively:
- Select a Video Editing Software: Choose a video editing software that suits your needs and comfort level. There are both free and paid software options available, each with its own set of features and capabilities.
- Import the Time-Lapse Footage: Import the recorded time-lapse footage into the editing software. Ensure that the footage is in the correct format and that all the clips are organized in the desired order.
- Trim and Arrange Clips: Trim any unnecessary sections of the time-lapse footage and arrange the clips in the desired sequence. This will help create a smooth and cohesive story of the printing process.
- Adjust Speed and Duration: Fine-tune the speed and duration of the time-lapse to achieve the desired effect. You can speed up the footage for a quicker playback or slow it down to highlight specific moments or details.
- Add Transitions and Effects: Enhance the visual appeal of the time-lapse by incorporating transitions between clips and applying effects like fade-ins, fade-outs, or color grading. Use these creative elements to add interest and smooth transitions between different stages of the printing process.
- Include Music or Commentary: Consider adding background music or a voice-over commentary to complement and enhance the visual experience of the time-lapse. Choose music that is appropriate for the mood and style of your project, ensuring that it doesn’t overshadow the main focus of the video.
- Apply Color Correction and Enhancements: Adjust the color balance, contrast, saturation, or other image parameters to improve the overall look and feel of the time-lapse. This step can help ensure that the colors are accurate and vibrant.
- Export and Save the Final Video: Once you are satisfied with the edited time-lapse, export the final video in the desired format and resolution. Save a copy of the video to your preferred storage location.
Editing your time-lapse allows you to refine the footage, add creative touches, and create a visually captivating final video. Experiment with different techniques and explore the features of your chosen editing software to personalize and enhance your time-lapse. Once the editing is complete, you’ll have a polished and impactful video ready to share with others.
Conclusion
Recording a 3D printer time-lapse is a fantastic way to showcase your projects and share the creative process with others. By following the steps outlined in this guide, you can create captivating and visually appealing time-lapse videos that capture every detail of your 3D printing journey.
First, ensure that you have the necessary equipment, including a camera capable of shooting time-lapse videos, a tripod or mount for stability, and a remote trigger or intervalometer for automation. Once your equipment is set up, adjust the camera settings to optimize the recording, including resolution, exposure, interval time, and duration.
Finding the right angle is key to capturing the printing process effectively. Explore different perspectives such as top-down views, side views, and close-up shots to highlight the details and movements of your print. Alongside this, make sure to monitor the print’s progress, ensuring the quality and troubleshooting any issues that arise.
When it comes time to record the time-lapse, double-check the camera position, start the recording, and keep an eye on the footage to capture the entire printing process accurately. After recording, edit your time-lapse to enhance its visual appeal, adjust speed and duration, add transitions and effects, and incorporate music or commentary to complement the footage.
Remember to experiment with different techniques and be creative throughout the process. By following these steps and infusing your own style, you can produce stunning time-lapse videos that showcase your 3D printing projects in an engaging and captivating way.
So, go ahead and start recording your own 3D printer time-lapse videos, share your creations with the world, and inspire others to dive into the exciting world of 3D printing!