Introduction
Are you running out of storage on your Moto G4? Running low on internal storage space can be frustrating, especially when you want to download new apps or take more photos. Fortunately, there’s a solution – you can move your apps to an SD card on your Moto G4!
The Moto G4 offers expandable storage via an SD card slot, allowing you to move apps from the internal storage to the SD card. This not only frees up precious space but also allows you to conveniently manage your apps and data. In this article, we will explore three methods that will guide you through the process of moving apps to the SD card on your Moto G4.
Before we dive into the methods, it’s important to note that not all apps can be moved to the SD card. Certain system apps and apps that have specific dependencies on the internal storage cannot be moved. However, the majority of downloaded apps can be moved, which can still significantly free up space on your device.
Now that we have the basics covered, let’s get started exploring the different methods you can use to move apps to the SD card on your Moto G4.
Method 1: Using the Settings Menu
The first method to move apps to the SD card on your Moto G4 is by using the built-in Settings menu. Follow these steps:
- Open the ‘Settings’ app from the app drawer or by swiping down on the notification panel and tapping the gear icon.
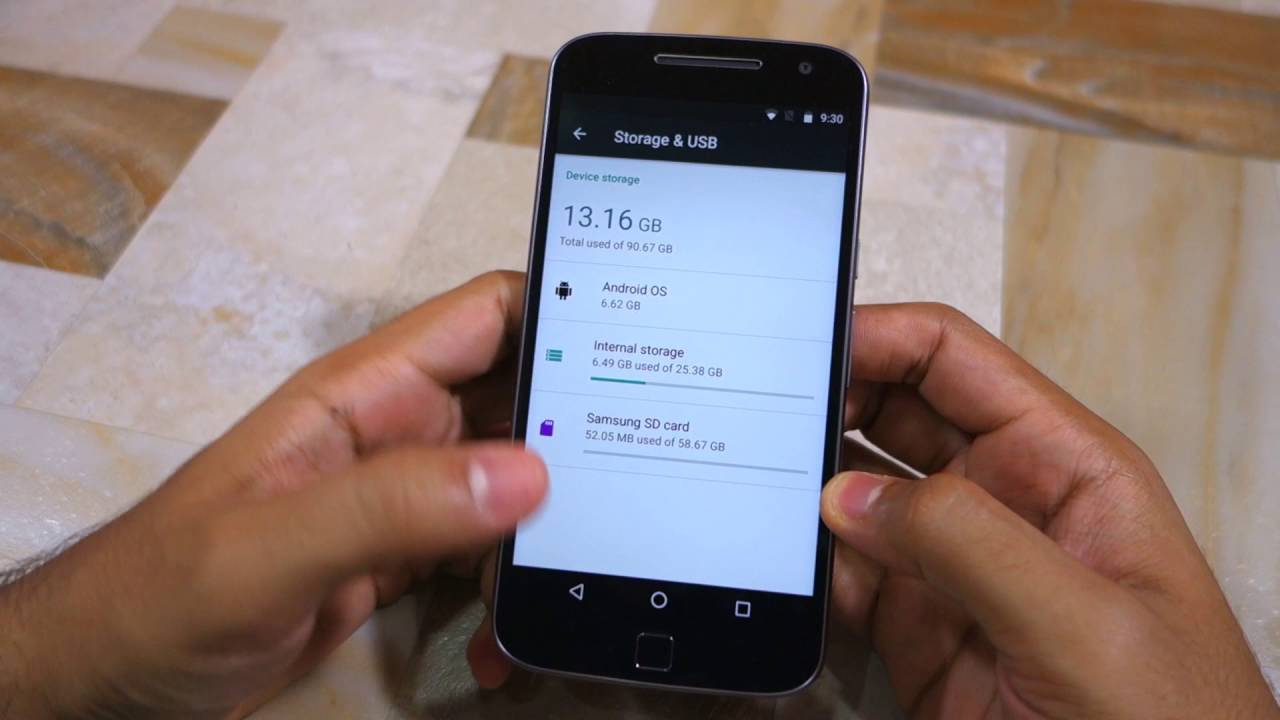
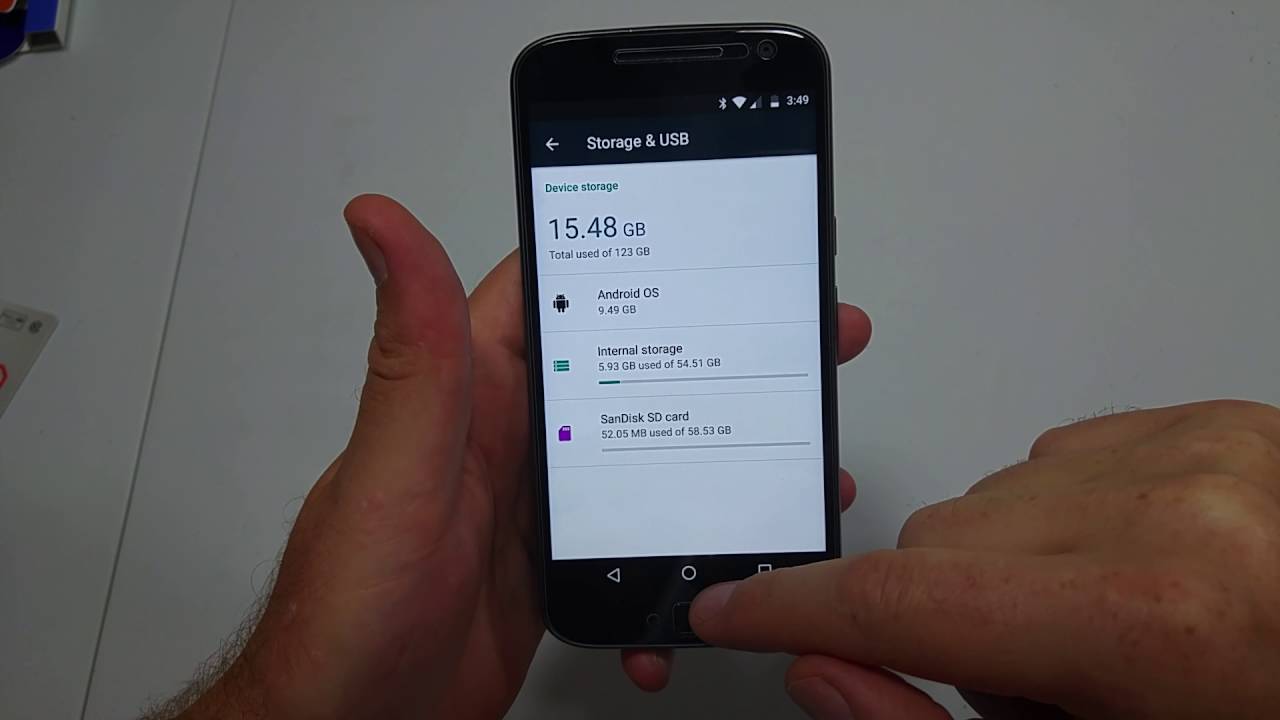
- Scroll down and tap on ‘Storage’ or ‘Storage & USB’.
- Under the ‘Internal storage’ section, you will see a list of apps using the internal storage.
- Select the app you want to move to the SD card. The app’s details will open.
- Tap on the ‘Change’ or ‘Move’ button, depending on your device’s software version.
- A pop-up message will appear asking for confirmation. Tap ‘Move’ to proceed with moving the app to the SD card.
- Wait for the process to complete. The time taken will depend on the app’s size and your device’s speed.
- Once the process is finished, the app will be moved to the SD card, freeing up space on your internal storage.
Note that some apps may not have the option to be moved to the SD card. In such cases, the ‘Change’ or ‘Move’ button will be grayed out.
Moving apps to the SD card can have some limitations. Some apps may not function perfectly when moved to external storage, especially if they have specific dependencies on the internal storage. Additionally, moving apps to the SD card may cause a slight decrease in performance due to the difference in read and write speeds between the internal storage and the SD card.
It’s important to remember that if you remove the SD card from your Moto G4, any apps stored on the card will no longer be accessible until the SD card is reinserted. Therefore, it’s advisable to keep the SD card inserted at all times if you want to use the apps stored on it.
Now that you’re familiar with the first method, let’s move on to the next one for moving apps to the SD card on your Moto G4.
Method 2: Using the App Info Settings
Another method you can use to move apps to the SD card on your Moto G4 is through the App Info settings. Follow these steps:
- Open the app drawer and find the app you want to move to the SD card.
- Long-press on the app icon until a menu appears.
- Select ‘App Info’ from the menu. This will open the App Info settings for the selected app.
- Tap on the ‘Storage’ option in the App Info settings.
- You will see two options: ‘Internal’ and ‘SD card’.
- Tap on ‘Change’ or ‘Move to SD card’, depending on the options available.
- A pop-up message will appear asking for confirmation. Tap ‘Move’ to proceed with moving the app to the SD card.
- Wait for the process to complete.
- Once the process is finished, the app will be moved to the SD card, freeing up space on your internal storage.
Similar to the previous method, not all apps are eligible to be moved to the SD card. If the ‘Change’ or ‘Move to SD card’ option is grayed out, it means the app cannot be moved.
It’s worth noting that when you move an app to the SD card, only a portion of the app’s data is transferred. The app’s main components will remain on the internal storage, while certain data will be moved to the SD card. This is done to ensure the app can still function properly.
Keep in mind that if you remove the SD card from your Moto G4 or if the SD card becomes corrupted, the apps stored on the card may not work until the SD card is reinserted or replaced. Therefore, it’s wise to periodically backup your important data and regularly check the functionality of the apps stored on the SD card.
We have now covered two methods for moving apps to the SD card on your Moto G4. Let’s proceed to the next method.
Method 3: Using a Third-Party App
If the previous methods didn’t work for moving your desired app to the SD card on your Moto G4, you can try using a third-party app. There are various apps available on the Google Play Store that specialize in managing app storage and allowing you to move apps to the SD card.
Here are the steps to move apps to the SD card using a third-party app:
- Open the Google Play Store on your Moto G4.
- Search for a third-party app that supports app-to-SD functionality. Some popular options include ‘AppMgr III’ and ‘Link2SD’.
- Install and open the app of your choice.
- Grant the necessary permissions to the app.
- Select the app you want to move to the SD card.
- Follow the app’s instructions to move the selected app to the SD card.
- Wait for the process to complete.
- Once the process is finished, the app will be successfully moved to the SD card.
Third-party apps can offer more advanced features and flexibility when it comes to managing app storage. They may provide additional options for moving apps, clearing app caches, and even creating app backups.
However, it’s important to exercise caution when using third-party apps. Make sure to read user reviews, check the app’s ratings, and do some research to ensure you’re downloading a reputable app. Also, be aware that some third-party apps may come with ads or in-app purchases.
Now that you have learned about three different methods to move apps to the SD card on your Moto G4, you can choose the approach that works best for you and your device.
Conclusion
Managing your app storage space on your Moto G4 is essential to ensure smooth performance and make the most out of your device. By moving apps to the SD card, you can free up valuable internal storage and create more space for new apps, photos, and other data.
In this article, we explored three methods to move apps to the SD card on your Moto G4:
- Using the Settings Menu: This built-in method allows you to move apps directly from the device’s settings. However, not all apps can be moved.
- Using the App Info Settings: This method involves accessing the App Info settings for each individual app and selecting the option to move it to the SD card.
- Using a Third-Party App: If the previous methods didn’t work, you can try using a third-party app from the Google Play Store that specializes in app management and offers app-to-SD functionality.
Each method has its own advantages and limitations, so choose the one that suits your needs and preferences the best. Keep in mind that not all apps can be moved to the SD card, as certain system apps and apps with internal dependencies cannot be relocated.
Before proceeding with any method, it’s always a good idea to back up your important data to prevent any loss or damage during the app moving process.
Lastly, remember to regularly check the functionality of the apps stored on the SD card and periodically backup your data to ensure a seamless experience.
By utilizing these methods, you can effectively manage your app storage and optimize your Moto G4’s internal space, allowing you to enjoy a smoother and more efficient device performance.