Introduction
An email signature is an essential component of professional communication. It acts as a virtual business card, providing recipients with important contact information and creating a professional image. In today’s digital age, an email signature serves as an opportunity to make a lasting impression on clients, colleagues, and potential business partners.
Creating an effective email signature involves careful consideration of various factors, such as platform compatibility, design elements, and the content you want to include. By optimizing your email signature, you can enhance your brand image, drive traffic to your website or social media profiles, and improve the overall professionalism of your email communication.
In this article, we will guide you through the process of creating an impressive email signature. From choosing the right email platform to testing and optimizing your signature, we will cover all the essential steps to help you make a lasting impact with every email you send.
Whether you are a professional looking to enhance your personal brand or a business seeking to leave a memorable impression on clients, this comprehensive guide will equip you with the knowledge and tools needed to create an appealing and effective email signature.
Choose the Right Email Platform
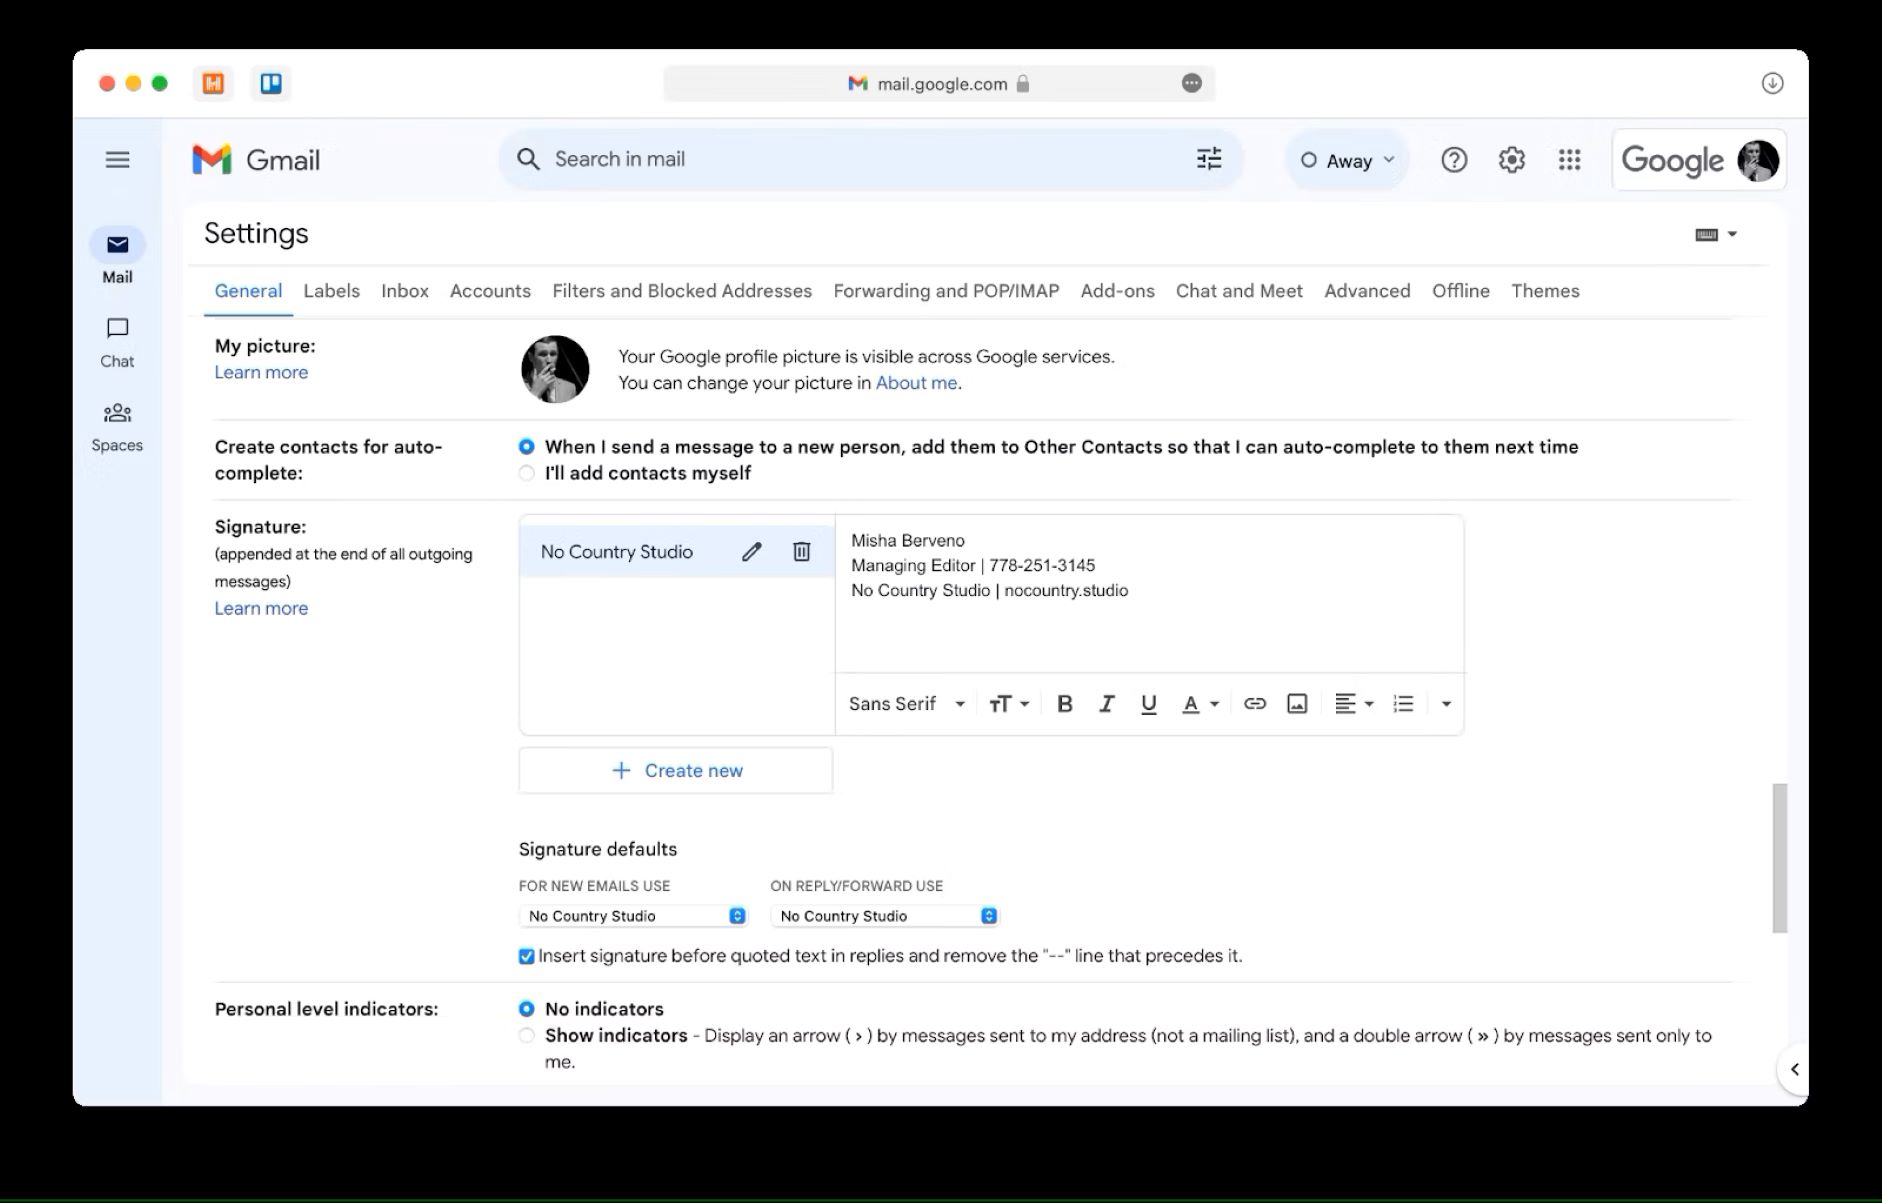
Before you start creating your email signature, it’s important to ensure that the platform you are using supports custom signatures. Most popular email providers, such as Gmail, Outlook, and Apple Mail, allow users to customize their signatures. However, it’s always a good idea to double-check the capabilities of your specific email platform.
Consider the features and limitations of each platform to determine which one best suits your needs. Look for options that allow you to add images, hyperlinks, and formatting to your email signature. The ability to use HTML coding is also beneficial if you want to create a more visually appealing and interactive signature.
Additionally, keep in mind that different platforms might have specific guidelines or restrictions when it comes to email signatures. Familiarize yourself with these guidelines to ensure that your signature aligns with platform requirements and can be displayed correctly across different devices and email clients.
If you’re using a company email address, consult with your IT department or email administrator to see if there are any specific guidelines or templates you need to follow. Maintaining a consistent and professional look across all employees’ signatures can help reinforce brand identity and ensure a cohesive visual representation of your organization.
Once you’ve identified the right email platform for your needs and understand its signature capabilities, you’re ready to move on to the next step: determining the content of your email signature.
Determine the Content of Your Email Signature
The content of your email signature should strike a balance between providing essential contact information and maintaining a clean and concise design. It’s crucial to include the necessary details without overwhelming your recipients with excessive text or cluttered visuals.
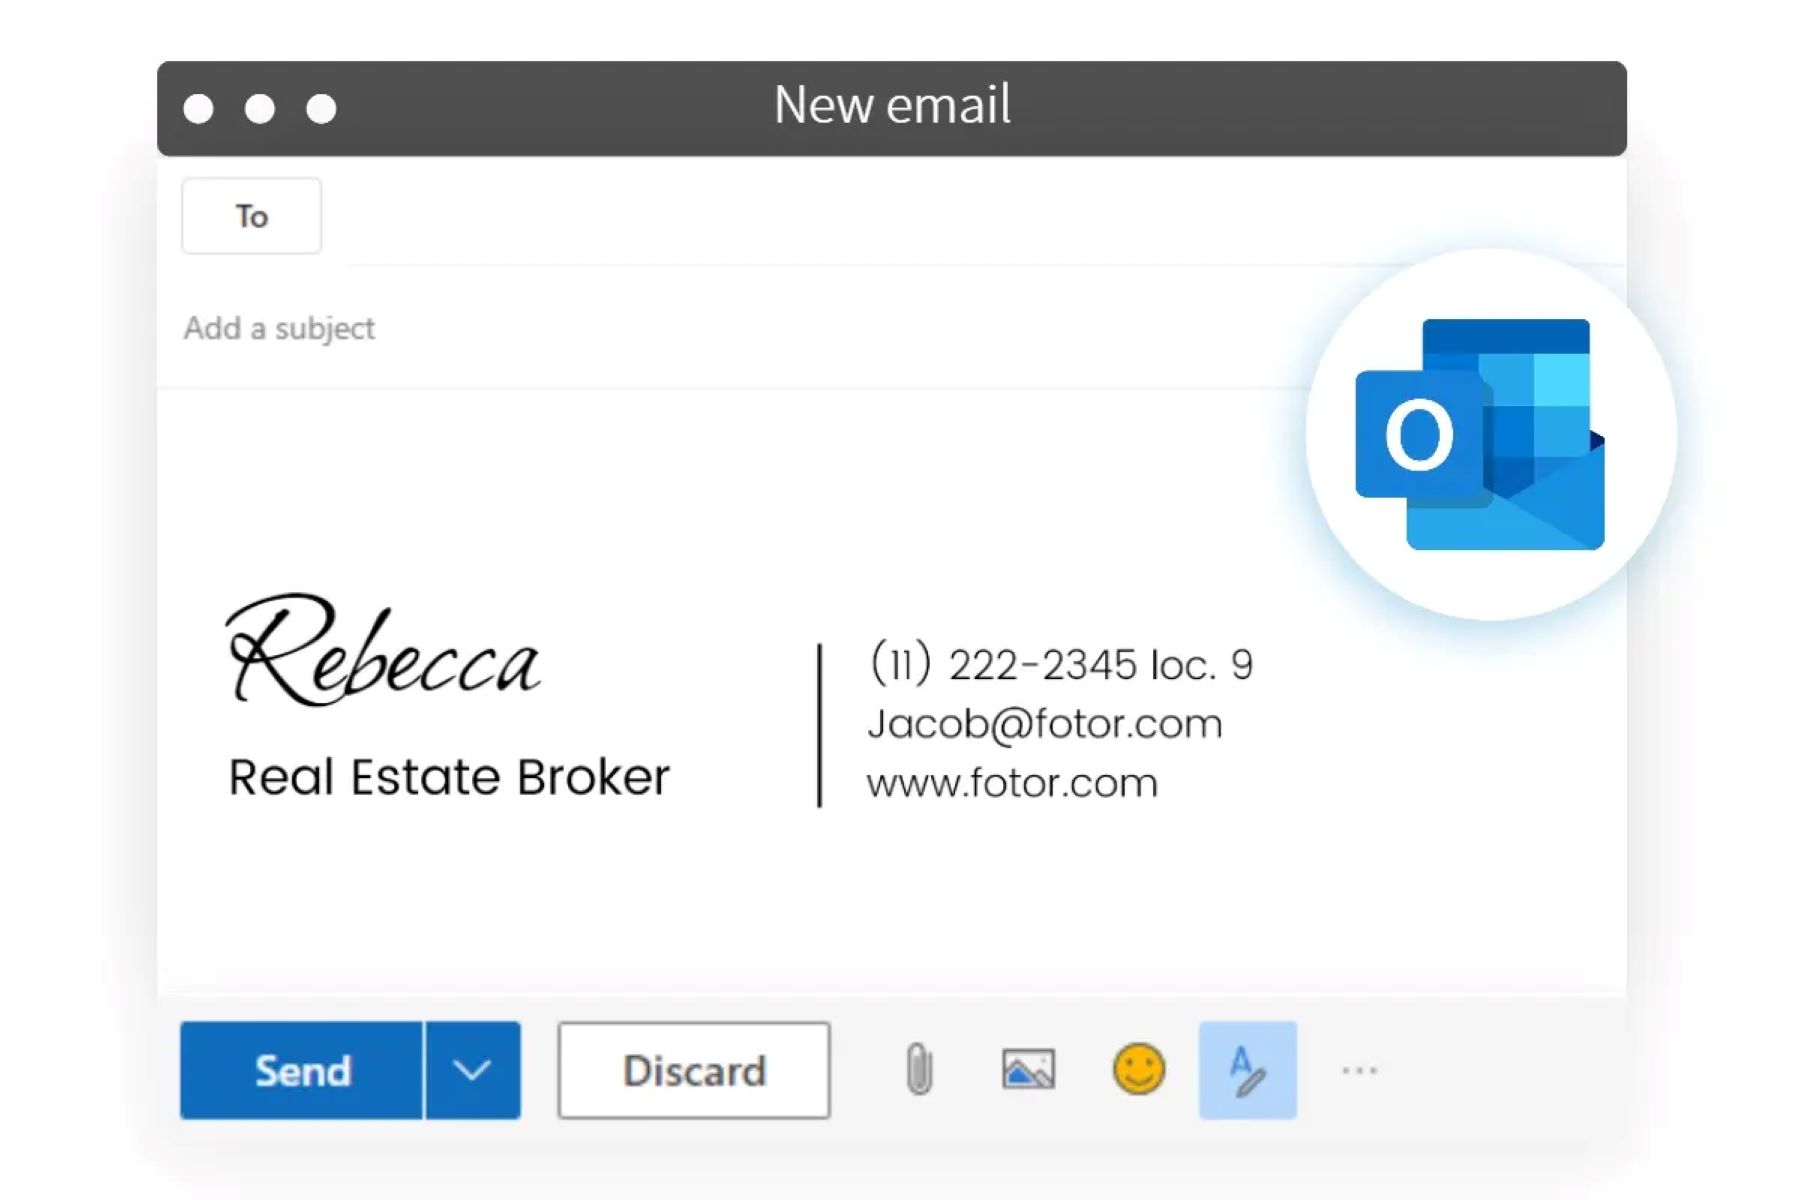
Start by including your full name and job title. This establishes your identity and professional credibility. If applicable, you can also include additional credentials or certifications that showcase your expertise.
Next, include contact information that allows recipients to easily reach you. This should typically include your phone number and professional email address. If applicable, include your physical address to make it convenient for clients or business partners to locate your office.
Consider including relevant links to your website, portfolio, or blog. This can drive traffic to your online presence and provide recipients with the opportunity to learn more about your work or services. Make sure the links are clickable by using HTML markup.
Adding social media icons and links to your signature can also enhance your online presence. Include icons for platforms such as LinkedIn, Twitter, Facebook, or Instagram, depending on which platforms are relevant to your professional endeavors. This allows recipients to connect with you on social media and stay updated on your latest projects or industry insights.
Keep in mind the size and positioning of the content. Generally, a font size of 10-12 points works well for email signatures, ensuring readability without overpowering the email’s main content. Choose a font that is professional and legible, such as Arial, Helvetica, or Calibri.
Remember, simplicity is key. Avoid overcrowding your email signature with unnecessary images or excessive text. A cluttered signature can detract from its effectiveness and make it look unprofessional. Focus on including the most relevant and important details that will make it easy for recipients to contact and connect with you.
Now that you have determined the content of your email signature, the next step is to design it in a visually appealing and professional manner.
Design Your Email Signature
The design of your email signature is crucial for creating a professional and visually appealing impression. A well-designed signature reflects your brand identity and enhances the overall look and feel of your email communications.
Start by choosing a suitable color palette that aligns with your personal brand or company branding. Consider using colors that are consistent with your logo or website to maintain brand consistency.
When it comes to font selection, opt for clean and easy-to-read fonts. Stick to a maximum of two different fonts to maintain a professional and cohesive look. Choose a font for your name and job title that is slightly larger and bolder, and use a slightly smaller and lighter font for the rest of the content.
Consider adding a separator line or whitespace to visually separate your contact details, social media icons, and any additional elements you include in your signature. This helps organize the information and makes it easier for recipients to navigate.
Another important aspect of design is the use of images in your email signature. Including a professional headshot can add a personal touch and help recipients put a face to your name. Make sure the image is high-quality, well-lit, and accurately represents your professional image.
If you decide to add a logo or other supporting imagery, ensure that the file size is optimized for email. Large image files can slow down email loading times, so it’s best to keep them small and compressed without compromising image quality.
Keep your email signature visually balanced by using appropriate spacing and alignment. Avoid overcrowding the signature with too many elements or cramming information in a small space. By keeping it clean and well-organized, you create a more visually pleasing and professional signature.
Lastly, don’t forget to consider the responsiveness of your email signature design. With many emails being read on mobile devices, it’s essential to ensure that your signature looks good on both desktop and mobile screens. Test your signature on different devices and email clients to ensure it maintains its visual integrity.
With the design of your email signature complete, the next step is to add your contact information and other relevant details.
Include Contact Information
One of the primary purposes of an email signature is to provide recipients with your contact information. Including the right contact details ensures that your recipients can easily reach out to you for further communication or inquiries.
Start by including your phone number in your email signature. Make sure to use a professional phone number that is dedicated to business purposes. Including your phone number allows recipients to reach you directly and facilitates quicker communication.
Your professional email address should also be prominently displayed in your signature. This ensures that recipients can easily recognize and use your official email address when responding to your emails. Avoid using personal email addresses or generic email accounts to maintain a professional image.
If your business has a physical address, consider including it in your email signature. This is especially useful if you have a physical storefront or office location that clients or business partners might need to visit. Including your address helps establish credibility and provides a convenient reference for those seeking your physical location.
In addition to basic contact information, you may also include other relevant details that are specific to your professional activities. This could include your website URL, blog link, or online portfolio. These additional links can drive traffic to your online platforms and showcase your work or services to recipients.
Remember to use hyperlinks for any web addresses you include in your signature. This makes it easy for recipients to click on the links and access the respective pages directly from the email.
By including relevant and up-to-date contact information in your email signature, you facilitate seamless communication with your recipients and increase the likelihood of getting responses and inquiries regarding your professional activities.
In the next step, we will explore the importance of adding social media icons to your email signature.
Add Social Media Icons
In today’s digital landscape, social media has become an integral part of personal and professional branding. Including social media icons in your email signature allows recipients to easily connect with you and stay updated on your latest updates, projects, and industry insights.
Consider which social media platforms are most relevant to your professional activities. Popular options include LinkedIn, Twitter, Facebook, Instagram, and YouTube. Choose the platforms that align with your industry, target audience, and personal branding goals.
Once you have identified the social media platforms you want to include, find the official icons or use custom-designed icons that match your branding. There are various online resources that provide free or premium social media icons in different styles and formats.
Place the social media icons in your email signature, ideally in a separate section or line below your contact information. Use HTML code to add hyperlinks to each respective social media platform. This ensures that recipients can click on the icons and be redirected directly to your profiles.
It’s important to regularly update and maintain your social media profiles. Make sure your profiles are up-to-date with accurate information, engaging content, and professional branding. This will help you make a strong impression when recipients check out your social media profiles after seeing the icons in your email signature.
However, it’s essential to strike the right balance. Including too many social media icons may clutter your email signature and distract recipients from the main content of your email. Stick to the most relevant platforms and limit the number of icons to maintain visual harmony in your signature.
Adding social media icons to your email signature allows recipients to connect with you beyond email and provides another avenue for them to engage with your personal or professional brand. It also demonstrates that you are digitally savvy and stay connected with current communication trends.
Next, we will explore the benefits of including a professional headshot in your email signature.
Consider Including a Professional Headshot
Adding a professional headshot to your email signature can have a powerful impact on how recipients perceive you. It adds a personal touch, builds trust, and helps humanize your digital interactions.
A high-quality and professional headshot provides a visual representation of yourself, allowing recipients to put a face to your name. It creates a sense of familiarity, making it easier for them to remember you and your interactions.
When choosing a headshot, opt for a professional-looking image that reflects the image you want to portray. Dress appropriately for your industry and maintain a friendly and approachable expression. Consider the background and lighting to ensure a well-composed photo.
Make sure the headshot is clear, properly cropped, and of high resolution. Blurry or pixelated images can undermine the professionalism of your signature. It’s worth investing in professional photography or using high-quality images taken with a good camera or smartphone.
Place the headshot near the contact information in your signature, ideally on the left side. This ensures that the image doesn’t overpower the other elements of your signature and maintains a visual balance.
Remember, the purpose of including a headshot is to create a positive and professional impression. Avoid using casual or poorly edited images that might detract from your credibility. Aim for a headshot that exudes confidence, approachability, and professionalism.
Including a headshot in your email signature not only helps create a personal connection but also makes your email communication more memorable. It adds a human touch to an otherwise digital interaction, making you more relatable and building rapport with recipients.
In our next section, we will discuss the importance of adding a call-to-action to your email signature.
Add a Call-to-Action
A call-to-action (CTA) in your email signature is a powerful tool that encourages recipients to take a specific action, such as visiting your website, scheduling a meeting, or downloading a resource. Including a CTA in your signature adds a sense of purpose to your email communication and can drive valuable engagement.
Start by determining the desired action you want recipients to take. Do you want them to visit your website, read your latest blog post, connect with you on LinkedIn, or explore your portfolio? Identify the action that aligns with your goals and include a CTA accordingly.
Once you have identified your desired action, use clear and concise language to convey your message. For example, you can use phrases like “Visit My Website,” “Connect with Me,” or “Schedule a Consultation.” Keep the CTA short and impactful, making it easy for recipients to understand and act upon.
Adding a button or hyperlink to your CTA is an effective way to make it stand out. Use HTML code to create a clickable element that directs recipients to the desired landing page or action. Ensure that the CTA is visually distinct by using contrasting colors or a different font style.
Consider the placement of your CTA within your email signature. Ideally, position it where it is easily noticeable and doesn’t distract from other important elements. Placing the CTA immediately after your contact information or social media icons can be effective.
Remember to regularly update your CTA to align with your current goals or campaigns. A relevant and timely CTA can significantly increase the chances of recipients taking the desired action.
By including a CTA in your email signature, you encourage recipients to engage further with your brand or take specific actions that can lead to valuable outcomes. It adds a sense of direction and purpose to your email communication, making it more than just an exchange of messages.
In the next section, we’ll explore the importance of adding legal disclaimers, especially in certain professional contexts.
Add Legal Disclaimers (If Applicable)
Depending on your professional context, it might be necessary to include legal disclaimers in your email signature. Legal disclaimers are statements that clarify the legal and confidential nature of your email communication, protecting both you and the recipient.
Legal disclaimers are particularly relevant in fields such as law, finance, or healthcare, where confidentiality and legal compliance are critical. These disclaimers often inform recipients that the email is intended solely for the named recipient and may contain confidential information. They also typically state that if the recipient is not the intended recipient, they should inform the sender and delete the email.
If adding a legal disclaimer is required in your professional context, consult with your legal or compliance team to determine the appropriate wording. Legal disclaimers should meet the specific requirements and guidelines set by your industry, region, or organization.
When including a legal disclaimer in your email signature, ensure that it is clearly visible and easily legible. Consider using a slightly smaller font size, italicizing the text, or surrounding it with brackets or a highlighted box to make it stand out.
It’s important to note that legal disclaimers should not be used as a substitute for legal advice. If you have any concerns or doubts about what disclaimers to include or their legal implications, consult with a legal professional.
Keep in mind that not all professions or industries require legal disclaimers in their email signatures. If you’re uncertain whether a legal disclaimer is necessary, it’s best to seek guidance from industry-specific regulations or professional associations.
By adding legal disclaimers to your email signature when appropriate, you demonstrate your commitment to legal and ethical compliance, protecting both yourself and your recipients.
Now that you’ve considered legal disclaimers, it’s time to move on to the important step of testing and optimizing your email signature.
Test and Optimize Your Email Signature
Once you have created your email signature, it’s crucial to test and optimize it to ensure that it appears correctly and effectively communicates your intended message across different devices, email clients, and screen sizes.
Start by testing your email signature on various popular email platforms, such as Gmail, Outlook, and Apple Mail. Send test emails to different accounts, including those on desktop and mobile devices, to see how your signature appears to recipients. Check for any formatting issues, image distortions, or inconsistencies in the design.
Pay attention to the responsiveness of your email signature. Ensure that it scales properly on different screen sizes, from desktops to mobile devices. Elements should not be too large or disproportionately small, maintaining a visually pleasing and professional appearance regardless of the device used to view the email.
Check the functionality of any hyperlinks or buttons in your email signature. Make sure they direct recipients to the intended web pages or actions. Click on each link or button to verify that they are working correctly and consistently across different email clients and devices.
Consider seeking feedback from colleagues, friends, or clients to gather their impressions and suggestions. They may provide valuable insights and identify areas for improvement that you may have overlooked.
Periodically review and update your email signature to keep it fresh and aligned with any changes in your contact information, branding, or professional activities. Regular updates help ensure that your signature remains relevant and accurate over time.
Optimizing your email signature also involves tracking its performance. Use analytics tools or URL shorteners to monitor the click-through rates of any links in your signature. This can provide valuable insights into the effectiveness of your signature in driving engagement and traffic to your website or social media profiles.
By thoroughly testing and continuously optimizing your email signature, you can ensure that it consistently represents your professional image, effectively communicates your message, and supports your overall branding efforts.
With the optimization of your email signature complete, you are now ready to make a lasting impact with every email you send.
Conclusion
Creating a well-designed and informative email signature is a crucial step in establishing a professional image and leaving a lasting impression on recipients. By following the steps outlined in this guide, you can craft an effective email signature that reflects your personal or business brand, while providing recipients with key contact information and additional opportunities for engagement.
Starting with choosing the right email platform, you ensure compatibility and maximize the customization options available. Determining the content of your signature allows you to include essential contact details, such as your name, job title, phone number, email address, and physical address.
By adding social media icons, you make it easy for recipients to connect with you on different platforms and stay updated on your professional activities. Consider including a professional headshot, as it brings a personal touch to your signature and helps recipients put a face to your name.
Don’t forget to include a call-to-action to prompt recipients to take specific actions, such as visiting your website or scheduling a consultation. Depending on your industry, including legal disclaimers may be necessary to ensure legal compliance and protect both you and your recipients.
Before finalizing your email signature, testing and optimization are crucial. Ensure that your signature displays correctly across various devices, email clients, and screen sizes. Continuously monitor and update your signature to keep it relevant and effective.
By following these steps, you will have a well-crafted email signature that enhances your professional image, promotes engagement, and helps you leave a memorable impact with every email you send. So go ahead, create your signature, customize it to your liking, and confidently hit send on your emails.