Introduction
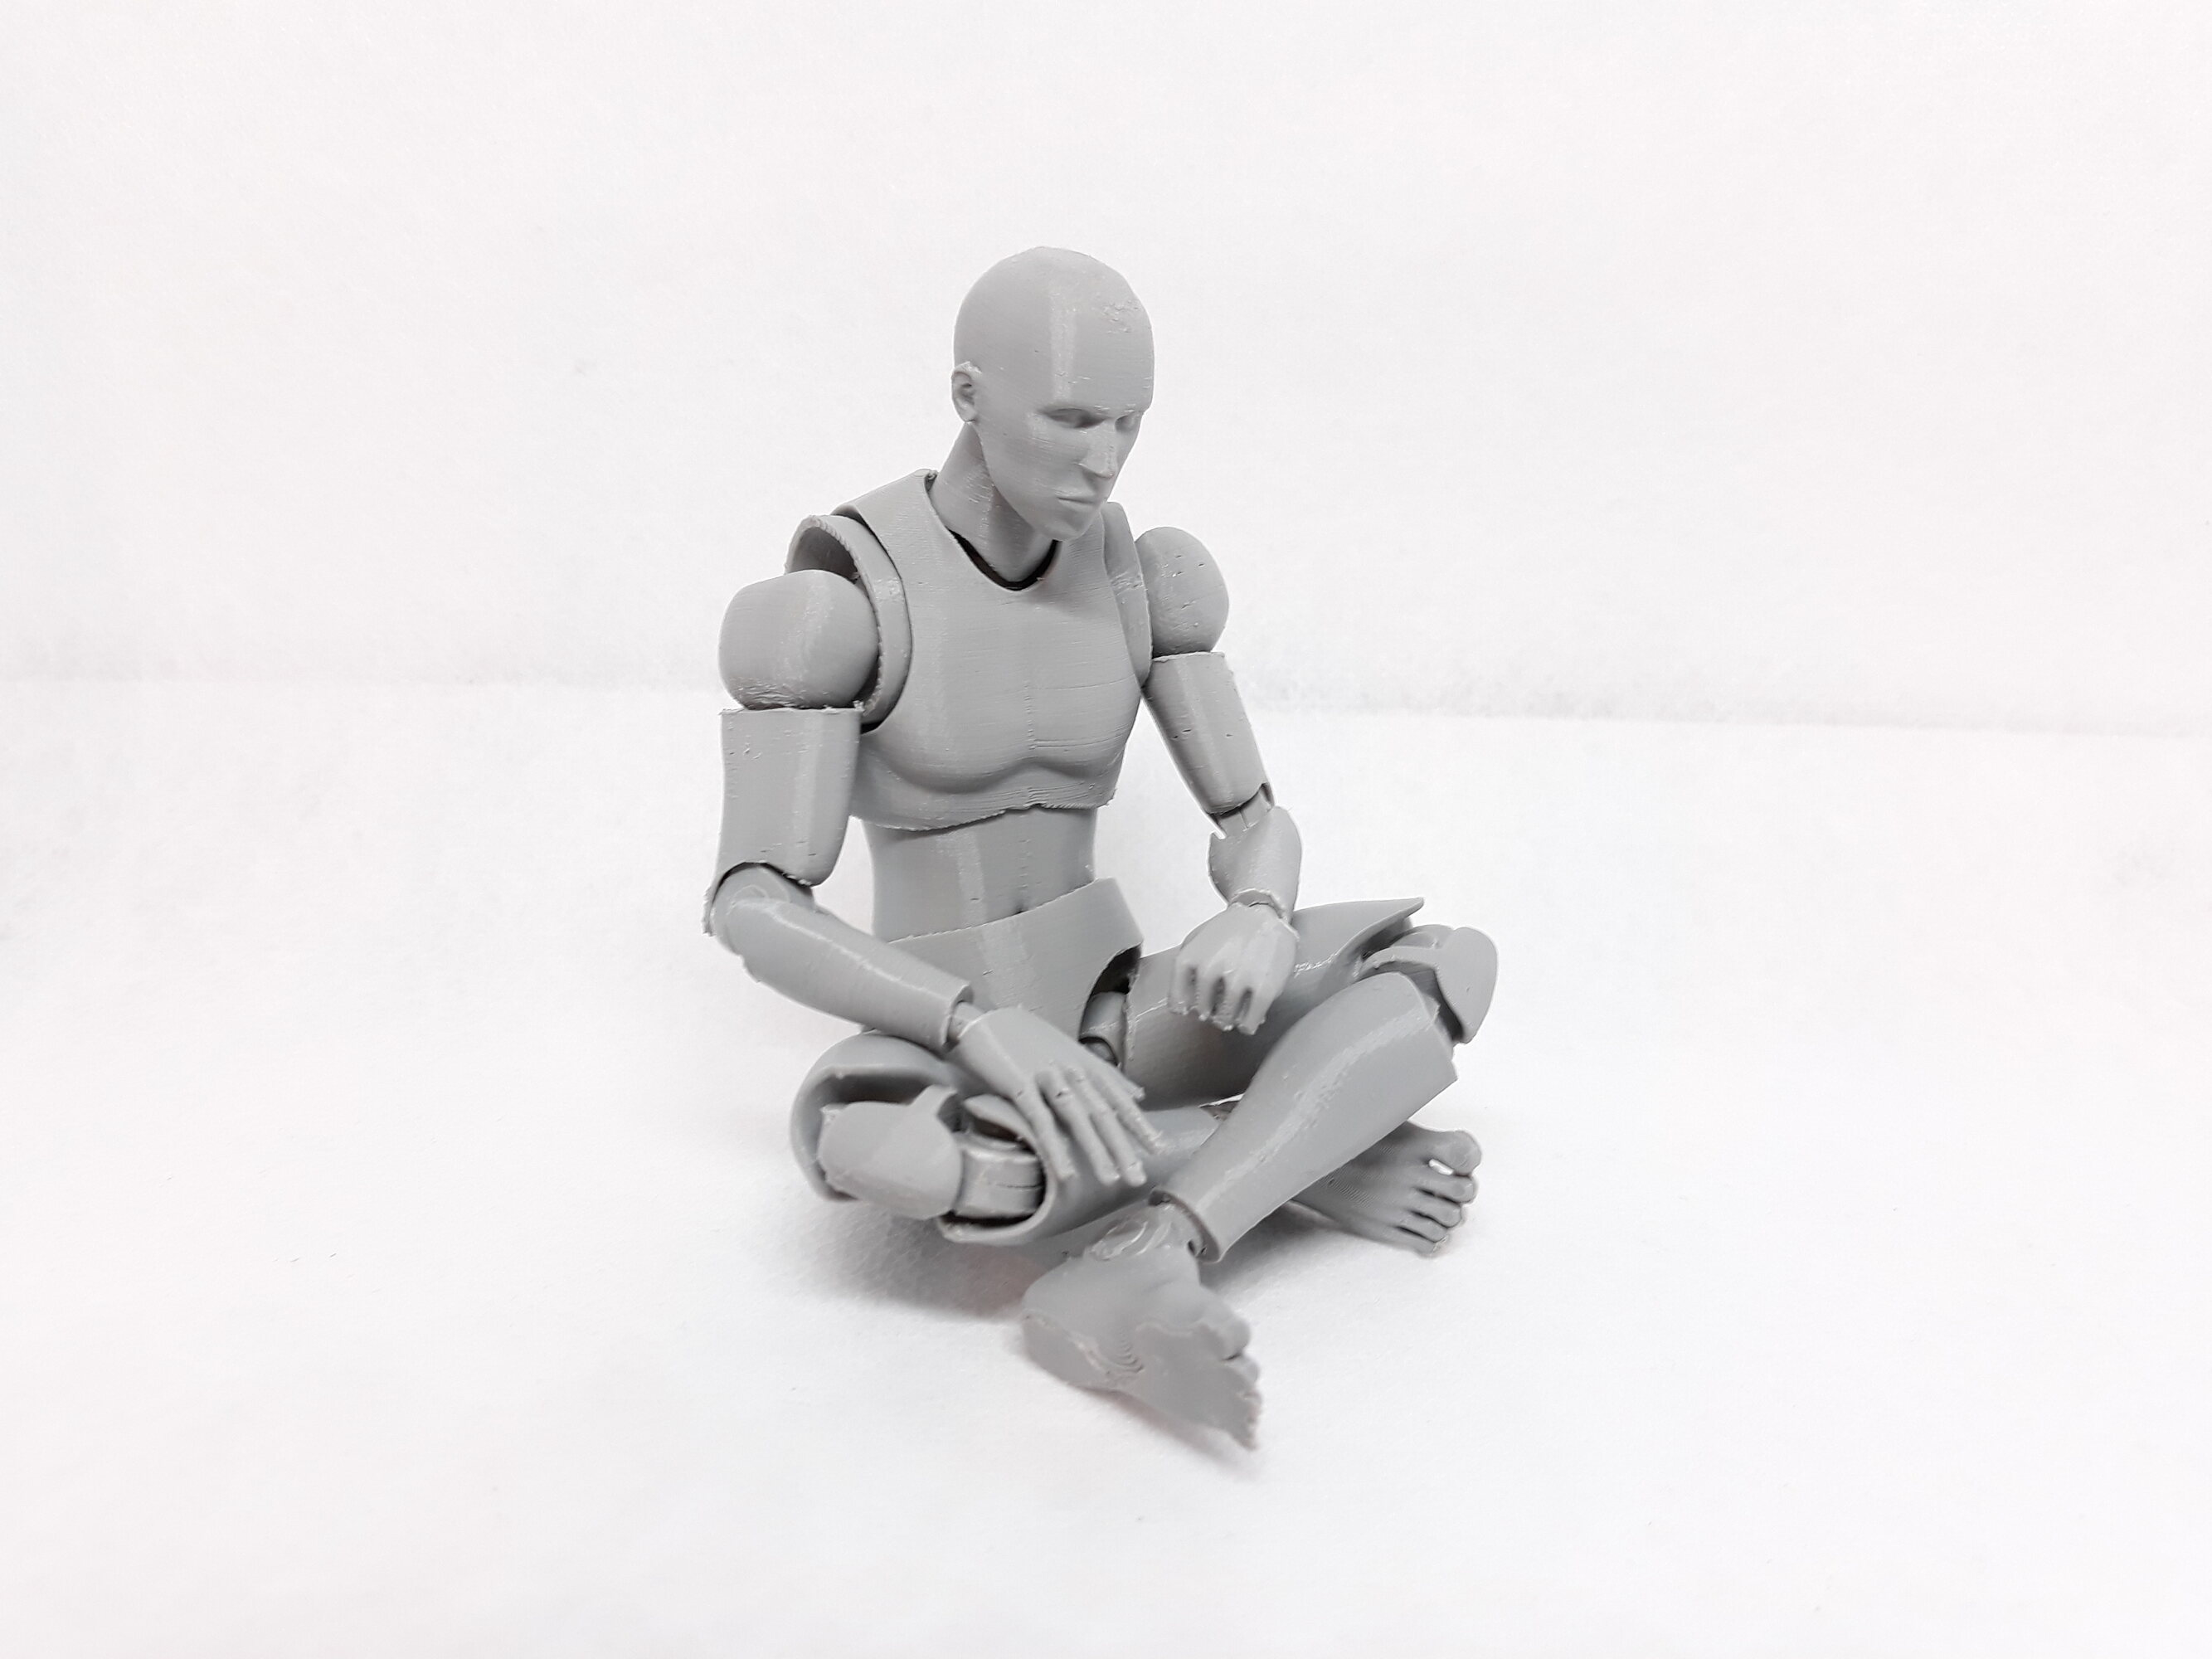
Welcome to the exciting world of action figure creation with the help of 3D printing technology. With a 3D printer at your disposal, you have the power to bring your imagination to life and create unique, customized action figures that reflect your personal style and interests. Whether you’re a collector, a hobbyist, or someone who simply loves action figures, this guide will walk you through the process of making your own action figures using a 3D printer.
By harnessing the power of 3D printing, you can go beyond what is available in stores and bring your dream action figures into reality. This technology allows you to design and create intricate, detailed figures with ease, giving you the freedom to unleash your creativity and add your personal touch to each and every piece.
In this comprehensive guide, we will explore the step-by-step process of creating action figures using a 3D printer. From choosing the right 3D printer to understanding design software, finding or creating 3D models, and adjusting print settings for the best results, we will cover all the essential aspects of the journey. We will also delve into post-processing techniques, painting and customizing options, and even tips for displaying and storing your finished action figures.
Whether you’re a seasoned 3D printing enthusiast or a beginner looking to take the plunge, this guide will provide you with the knowledge and resources to successfully create your own action figures. It’s time to unleash your creativity, dive into the world of 3D printing, and bring your favorite characters to life!
Choosing the Right 3D Printer
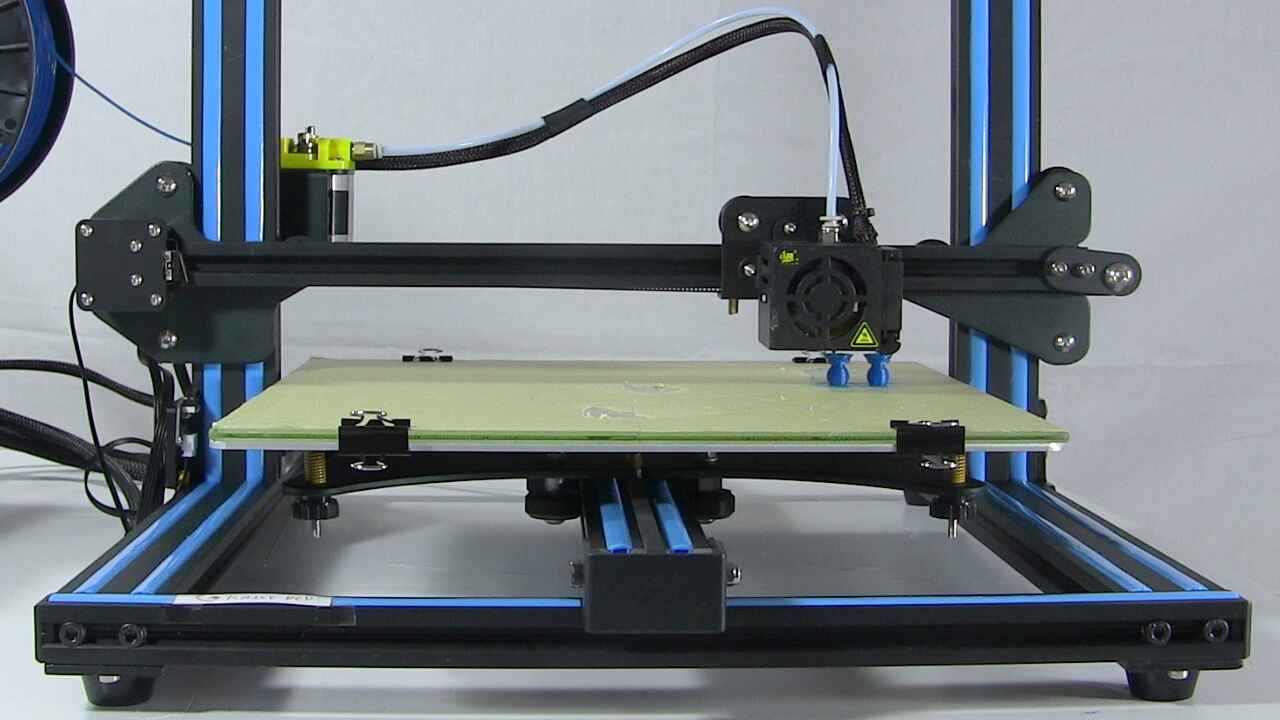
When it comes to bringing your action figure designs to life, choosing the right 3D printer is crucial. There are many options available on the market, each with its own set of features and capabilities. Here are some factors to consider when selecting a 3D printer for creating action figures:
- Print quality: Look for a printer that can deliver high-resolution prints with fine details. Action figures often have intricate designs and small parts, so having a printer capable of producing smooth surfaces and sharp edges is essential.
- Build size: Consider the size of the action figures you plan to create. Make sure the printer’s build volume is large enough to accommodate your desired figure size. You don’t want to be limited by the printer’s size constraints when it comes to bringing your vision to life.
- Material compatibility: Check if the printer supports the materials you intend to use. Different materials have different properties, such as flexibility, strength, and color options. Make sure the printer can handle the specific materials you need for your action figures.
- Ease of use: For beginners, a user-friendly 3D printer with intuitive software and setup is highly recommended. This will make the learning curve less steep and allow you to focus on the creative aspect of designing your action figures.
- Price range: Consider your budget when choosing a 3D printer. Entry-level printers can offer good value for money and are suitable for beginners. However, if you’re looking for advanced features and capabilities, be prepared to invest in a higher-end printer.
It’s also worth reading user reviews and checking for online communities and forums dedicated to 3D printing. This can provide valuable insights and firsthand experiences from other users, helping you make an informed decision.
Remember, choosing the right 3D printer is a personal decision based on your specific needs and requirements. Take the time to research and compare different models, and consider seeking advice from experts in the field. With the right printer by your side, you’ll be well-equipped to embark on your action figure creation journey.
Understanding Design Software for Action Figures
Design software plays a crucial role in the process of creating action figures using a 3D printer. It allows you to bring your ideas to life, transform them into digital models, and prepare them for printing. Understanding the different types of design software available is essential for successfully creating your action figures. Here are a few key things to consider:
- 3D Modeling Software: This type of software is used to create 3D models from scratch. It offers a wide range of tools and features to manipulate shapes, textures, and colors. Popular 3D modeling software options include Blender, Autodesk Fusion 360, and ZBrush. These powerful tools may have a steeper learning curve, but they provide extensive creative freedom.
- Parametric Modeling Software: Parametric modeling software, such as Autodesk Inventor or SolidWorks, allows for more precise and controlled design. It uses mathematical equations and parameters to create models that can be easily modified and adjusted. This type of software is often used in professional settings or when precise measurements and engineering considerations are required.
- Sculpting Software: Sculpting software, like Sculptris or Autodesk Mudbox, allows you to shape your models in a more organic and artistic way. It mimics traditional sculpting techniques, enabling you to add intricate details and sculpt complex shapes. This type of software is ideal for creating highly detailed and realistic action figures.
- File Conversion Software: Sometimes, you may need to convert the file format of your 3D model to ensure compatibility with your chosen 3D printer. File conversion software, such as MeshLab or Netfabb, can help with this process. These tools allow you to adjust file formats, repair any potential issues, and optimize the model for printing.
It’s important to familiarize yourself with the chosen software’s interface and capabilities. Many design software options offer extensive tutorials and resources to help you get started. Additionally, online communities and forums can be invaluable for sharing tips and tricks with other users.
Remember that learning 3D design software takes time and practice. Don’t be discouraged if it feels overwhelming at first. Start with simple shapes and gradually work your way up to more complex designs. As you gain experience, you’ll become more proficient in using the software and create stunning action figures.
By mastering design software, you’ll have the ability to bring your action figure ideas to life and unleash your creativity in the digital realm.
Finding or Creating 3D Models for Action Figures
When it comes to creating action figures using a 3D printer, you have two primary options for obtaining 3D models: finding pre-existing models or creating your own from scratch. Let’s explore both options:
Finding 3D Models:
There are numerous online platforms and repositories where you can find a wide range of 3D models that can be used for action figures. Websites like Thingiverse, Cults3D, and MyMiniFactory offer extensive libraries of free and paid models designed by creators from around the world. These models cover various themes, characters, and styles, giving you plenty of options to choose from and customize to your liking.
When searching for 3D models, pay attention to the licensing terms. Some models may be freely available for personal use, while others might have specific restrictions or require attribution to the original creator. Always respect the copyright and licensing terms associated with the models you find.
Creating Your Own 3D Models:
If you have a specific vision in mind or want to add a personal touch to your action figures, creating your own 3D models can be a rewarding experience. To do this, you’ll need 3D modeling software, as mentioned in the previous section. This allows you to design and sculpt your action figures from scratch, giving you complete control over the details and aesthetics.
If you’re new to 3D modeling, there are many online tutorials and courses available that can help you get started. These resources will guide you through the basics of modeling, understanding polygonal geometry, and manipulating shapes and textures. With practice and dedication, you’ll soon be able to create unique, customized 3D models for your action figures.
It’s important to note that creating your own 3D models from scratch can be time-consuming and may require some trial and error. However, the satisfaction of seeing your own designs come to life is unmatched.
Whether you choose to find pre-existing 3D models or create your own, the availability of online communities and forums can be a great resource for sharing and discovering action figure designs. Engaging with these communities allows you to connect with other enthusiasts, learn new techniques, and even collaborate on projects.
Remember, finding or creating 3D models is a crucial step in bringing your action figures to life. Whether you choose to customize existing designs or embark on the journey of creating your own, the possibilities are endless.
Preparing the 3D Model for Printing
Before you can begin the process of 3D printing your action figures, it’s important to properly prepare the 3D model for printing. This step ensures that your design is optimized for a successful print and minimizes the chances of any printing issues. Here are the key steps involved in preparing the 3D model:
1. Scaling and Resizing:
Take measurements and determine the desired size of your action figure. Use the scaling tools in your 3D modeling software to adjust the size of the model accordingly. Keep in mind the limitations of your 3D printer’s build volume to ensure that the final printed figure fits within its printing area.
2. Mesh Analysis and Repair:
Perform a mesh analysis to identify any potential issues with the geometry of the 3D model. Look for non-manifold edges, inverted faces, or any other defects that could affect the printing process. Repair these issues using software tools like MeshLab, Netfabb, or the repair features available in your modeling software.
3. Support Structures:
If your action figure design includes overhangs or complex shapes, you may need to add support structures. These temporary structures provide stability during the printing process and are typically removed after printing. Some 3D modeling software packages have built-in support generation tools, or you can manually add them to the model as needed.
4. Orientation:
Consider the orientation of the action figure model on the print bed. The orientation can impact the print quality and the need for support structures. Experiment with different orientations to find the best balance between print quality and minimal use of support structures.
5. Slicing and Generating G-code:
Prepare the 3D model for printing by slicing it into thin layers using slicing software, such as Cura, Simplify3D, or PrusaSlicer. Set the desired layer height, printing speed, infill density, and other parameters based on your preferences. The slicing software will generate a G-code file that contains the instructions for the 3D printer to create your action figure layer by layer.
6. Check and Validate G-code:
Before sending the G-code file to the 3D printer, validate it using G-code validation tools or simulators. This step helps identify any potential errors, such as collisions or excessive extrusion, which could cause issues during the printing process. Make any necessary adjustments to the G-code before proceeding.
By following these steps to prepare the 3D model for printing, you can ensure that your action figures are ready to be transformed from a digital design to a physical object. Taking the time to properly optimize the model for printing increases the likelihood of a successful print with accurate details and a high-quality outcome.
Selecting the Right Material for Action Figures
Choosing the right material for your action figures is crucial as it determines their appearance, durability, and overall quality. There are several materials commonly used in 3D printing, each with its own unique properties. Here are some factors to consider when selecting the material for your action figures:
1. PLA (Polylactic Acid):
PLA is a popular choice for many 3D printing projects, including action figures. It is a biodegradable and eco-friendly material made from renewable resources, such as cornstarch or sugarcane. PLA is easy to print with, has high dimensional accuracy, and boasts a wide range of color options. However, it may not be as durable as some other materials.
2. ABS (Acrylonitrile Butadiene Styrene):
ABS is known for its strength and durability, making it a suitable choice for action figures that may undergo rough handling. It has good temperature resistance and can withstand impact better than PLA. However, it requires a heated print bed and may produce fumes during printing, requiring proper ventilation.
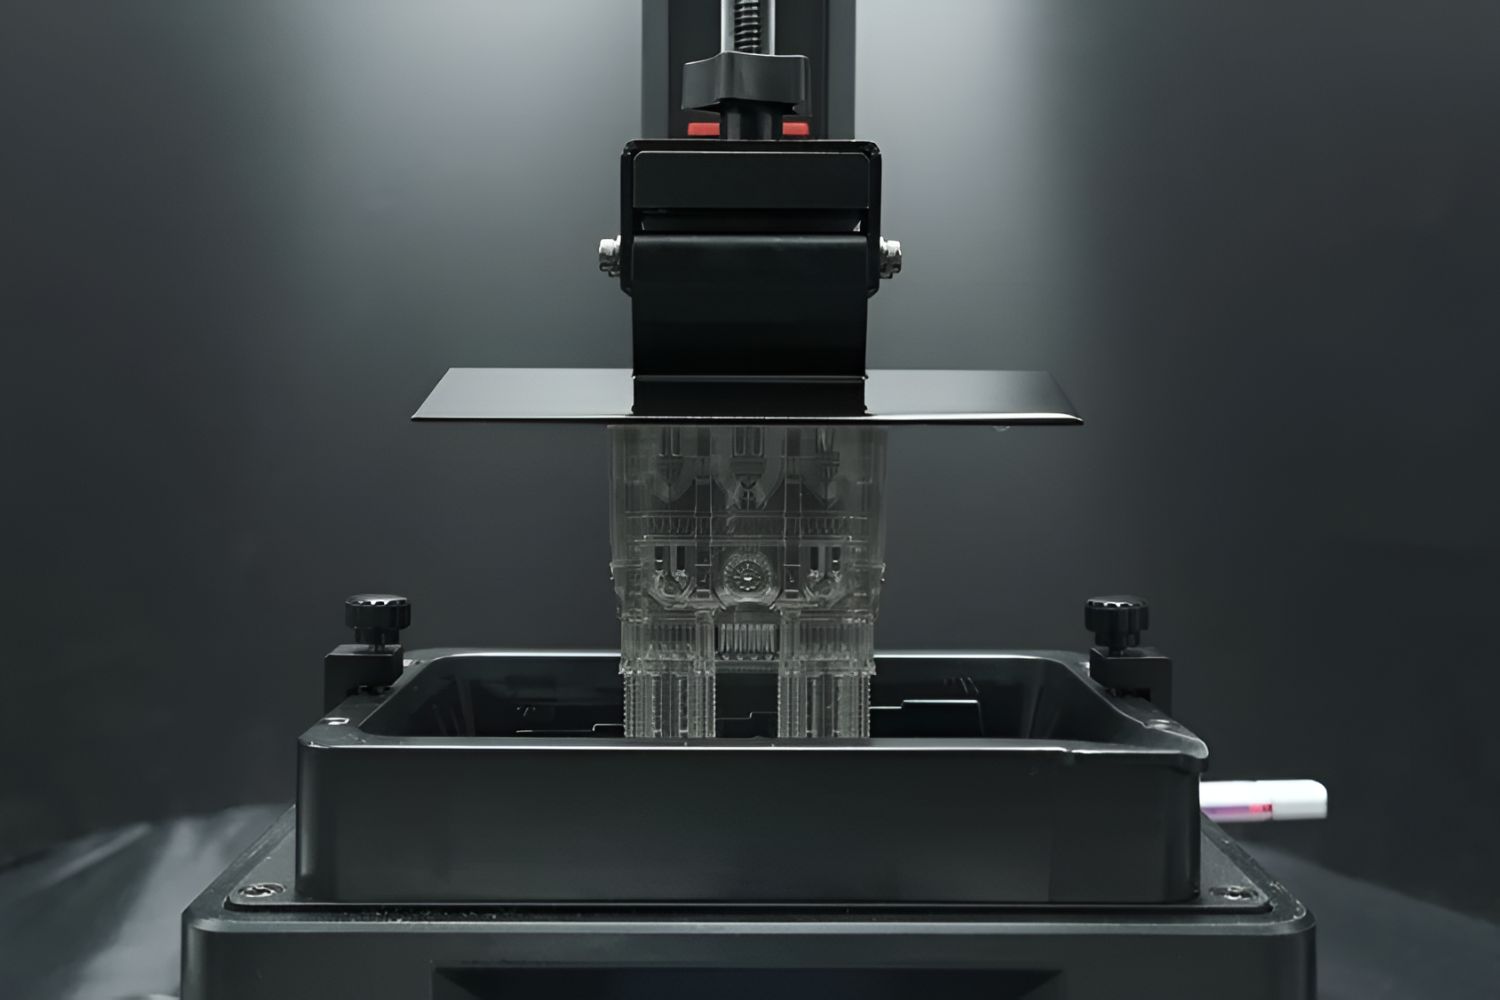
3. Resin:
Resin-based 3D printing, such as SLA (Stereolithography) or DLP (Digital Light Processing) technology, offers incredibly detailed prints with smooth surfaces. Resin is often preferred for action figures that require intricate details and a high level of accuracy. However, resin printing typically requires more advanced equipment and post-processing steps.
4. PETG (Polyethylene Terephthalate Glycol):
PETG is a strong and impact-resistant material that combines the benefits of PLA and ABS. It has high transparency, good layer adhesion, and is less prone to warping during printing. PETG is a good choice for action figures that require both strength and appearance.
5. Nylon:
Nylon is a durable and flexible material that offers great impact resistance and elasticity. It is often used for functional parts that require strength and flexibility. Action figures printed with nylon can withstand deformation and rough handling, making them ideal for dynamic poses.
Considerations:
When selecting a material for your action figures, consider their intended use, desired appearance, and your personal preferences. Additionally, take into account the 3D printer requirements and compatibility with the chosen material. Some materials may require specific nozzle sizes, print bed temperatures, or other printing parameters.
Experimentation and testing with different materials can help you find the perfect fit for your action figures. Don’t be afraid to try new materials and techniques to achieve the desired look and functionality for your creations.
Remember, selecting the right material is crucial in ensuring that your action figures not only look impressive but also withstand the test of time and play.
Adjusting Print Settings for the Best Results
To achieve the best results when 3D printing your action figures, it is essential to fine-tune and adjust the print settings. These settings can significantly impact the quality, accuracy, and overall outcome of your prints. Here are some key factors to consider when adjusting the print settings:
1. Layer Height:
The layer height refers to the thickness of each layer deposited by the 3D printer. Smaller layer heights, such as 0.1mm or 0.2mm, result in higher resolution and finer details, but may increase print time. Choosing the right layer height depends on the level of detail desired for your action figures.
2. Printing Speed:
The printing speed determines how fast the 3D printer moves while printing. Higher speeds can reduce print time, but may compromise print quality. Adjust the printing speed based on the complexity and intricacy of your action figure design. Balancing speed with quality is crucial to achieve the desired results.
3. Infill Density:
Infill density refers to the amount of material filled inside the action figure structure. Higher infill percentages result in stronger and more solid prints, but also increase print time and material usage. For decorative action figures, lower infill densities can be sufficient, while functional parts may require higher densities for added strength.
4. Support Structures:
If your action figure design requires overhangs or complex geometries, enabling support structures can prevent sagging or collapsing during printing. Adjust the support structure settings based on the specific needs of your design. Be mindful of their placement and ease of removal after printing.
5. Print Bed Adhesion:
Ensuring proper print bed adhesion is crucial to prevent warping or lifting of your action figures during printing. Use techniques like a heated bed, using adhesives like glue or tape, or utilizing a bed leveling system to optimize adhesion. Experimentation and adjustment may be required to find the best approach for your specific printer and material.
6. Post-Processing:
Consider any post-processing steps you may need to take after the print is complete. This may include sanding, filling gaps, or using post-curing methods for resin prints. Plan for any additional steps required to achieve the desired finish, texture, and appearance of your action figures.
It’s important to note that every 3D printer and material combination may have specific settings and considerations. Experimentation and iterative adjustments are often necessary to achieve optimal results. Keep track of the changes you make, and document the settings that yield the best outcome for future reference.
By fine-tuning the print settings based on the specific requirements of your action figure designs, you can ensure high-quality prints with accurate details, smooth surfaces, and improved overall aesthetics.
Printing and Post-Processing Action Figures
Once you have prepared your 3D model and adjusted the print settings, it’s time to start printing your action figures. Here is a step-by-step guide to the printing and post-processing process:
1. Prepare the Printer:
Ensure that your 3D printer is properly set up and calibrated. Check that the build plate is level, and if necessary, apply any bed adhesion materials, such as glue or tape, to promote adhesion during printing.
2. Start Printing:
Load the prepared G-code file onto your 3D printer using the printer’s software or interface. Initiate the print and monitor the progress to ensure that the layers are being deposited correctly and that there are no issues or errors.
3. Post-Processing:
Once the printing is complete, it’s time to post-process your action figures to achieve the desired finish. Here are some common post-processing steps:
Sanding: Use sandpaper or sanding tools to smooth the surfaces of the printed action figures. This helps remove any layer lines or imperfections and creates a more polished appearance.
Filling and Bonding: If there are gaps or imperfections in the print, you can use fillers or adhesives to fill them and create a seamless finish. This step may be necessary, especially for action figures with intricate details or complex geometries.
Painting and Coloring: Apply paint or other coloring methods to bring your action figures to life. Use acrylic paints, spray paints, or other coloring techniques to add detail, shading, and customization to your figures. This step allows you to make your action figures truly unique and personalized.
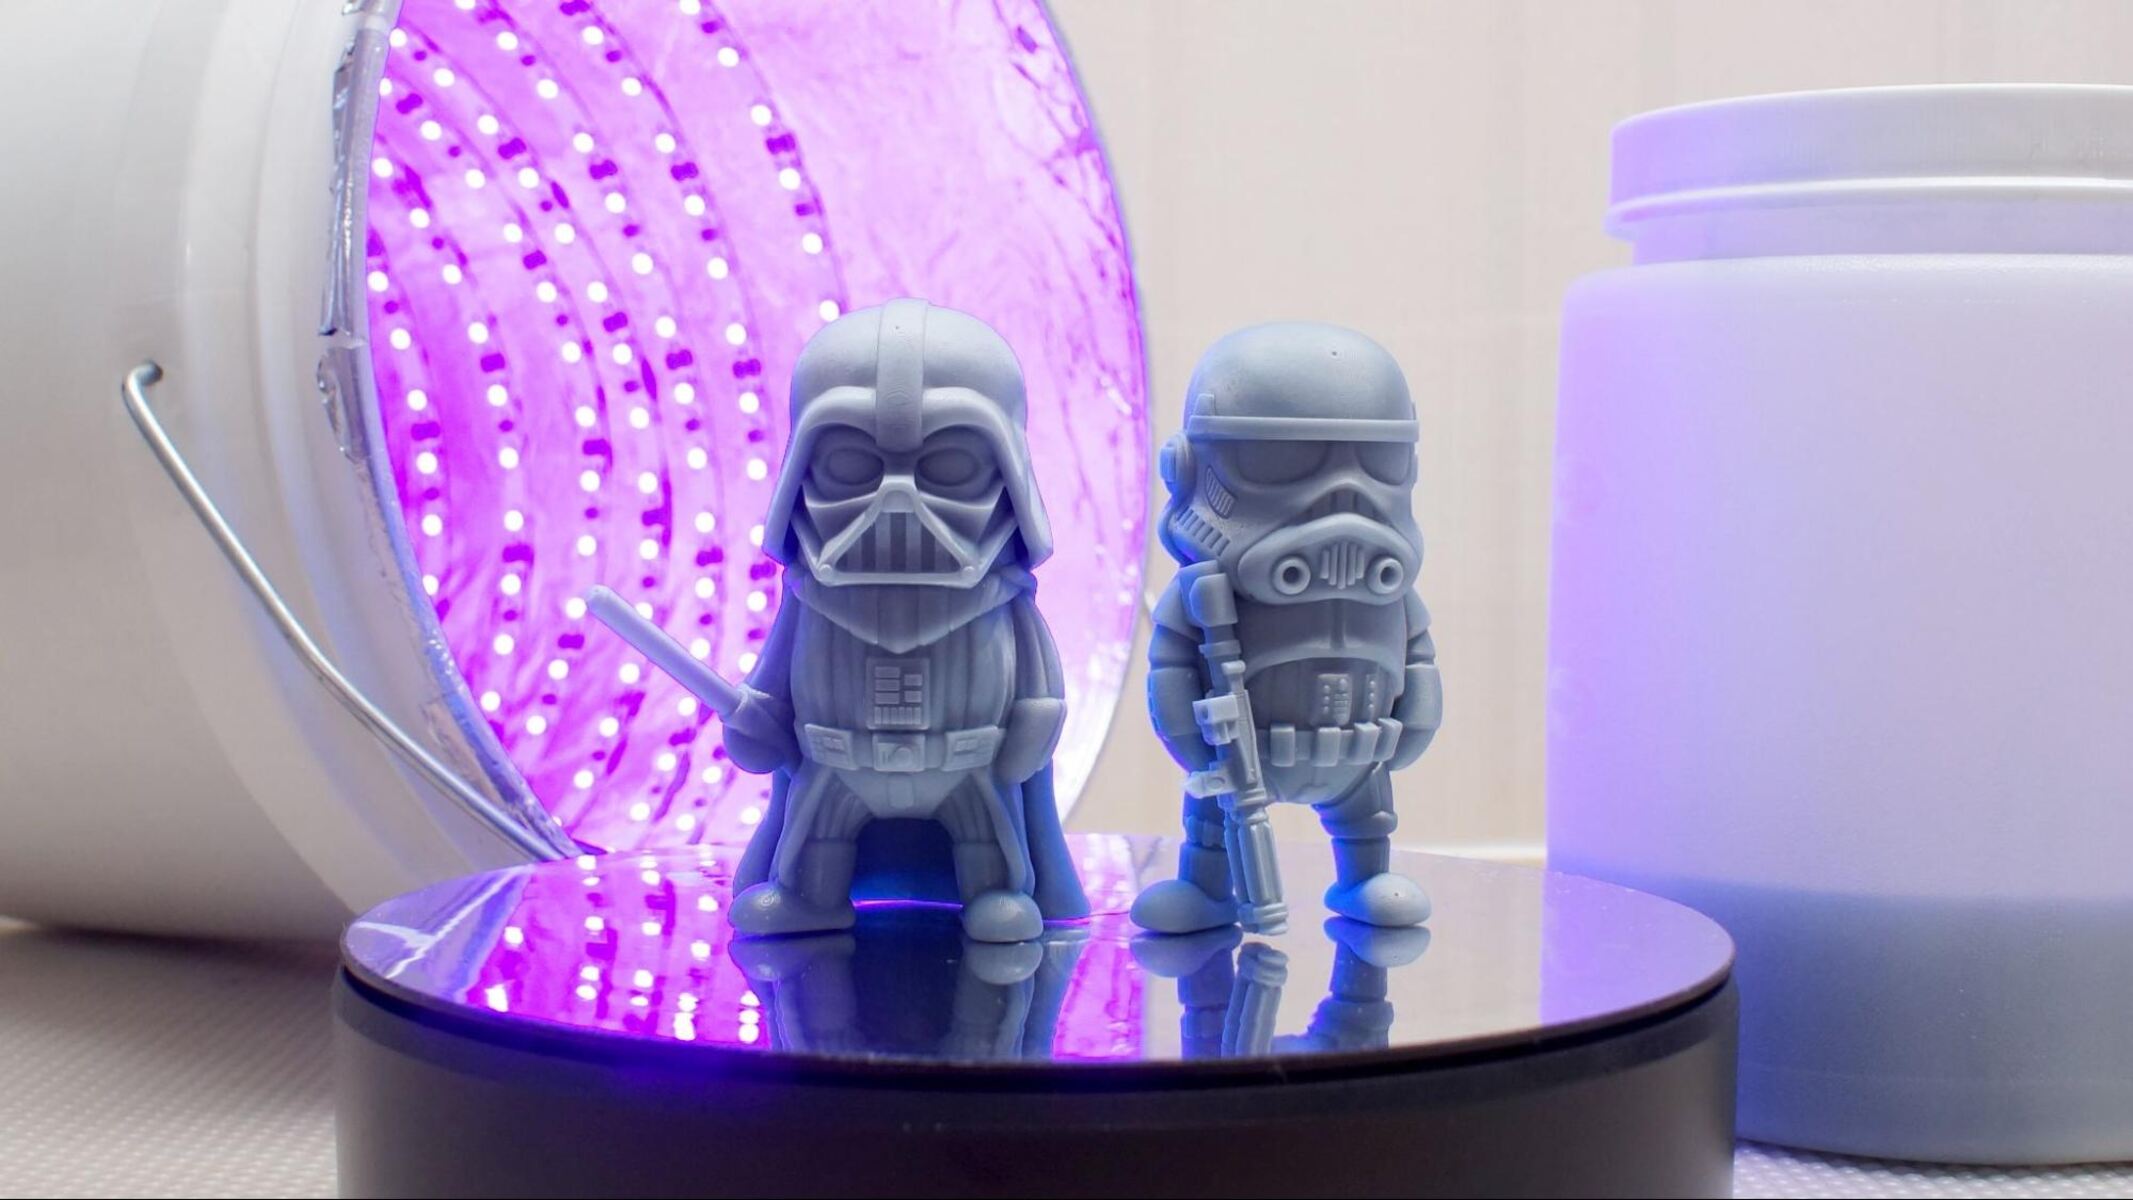
Curing (for Resin Prints): If you’re working with resin-based 3D prints, post-curing is an important step. Follow the manufacturer’s instructions to properly cure the resin and achieve maximum strength and durability. This step typically involves exposing the printed parts to UV light for a specified time.
Final Touches: As a finishing touch, you can add decals, accessories, or other embellishments to enhance the appearance and character of your action figures. These additional details help bring your figures to life and make them stand out.
Remember to take your time during the post-processing stage. Pay attention to detail and ensure that each action figure receives the necessary attention to achieve the desired result.
Throughout the process, don’t hesitate to experiment and try new techniques. The post-processing stage allows you to add your personal touch and creativity, transforming your 3D prints into stunning action figures that reflect your style and vision.
Painting and Customizing Action Figures
Painting and customizing your 3D printed action figures is an exciting and creative process that allows you to bring them to life with color, detail, and personality. Here are some essential tips and steps to consider when painting and customizing your action figures:
1. Prepare the Surface:
Before painting, make sure the surface of your action figure is clean and smooth. Sand down any rough areas or imperfections, and ensure that there is no dust or residue on the surface. A smooth surface will provide better adhesion for the paint and allow for more detailed paintwork.
2. Primer Coat:
Applying a primer coat to your action figure is important as it creates a base layer that helps paint adhere better to the surface. Choose a primer suitable for the material of your action figure, such as a plastic primer for PLA prints. Apply a thin and even coat of primer, following the manufacturer’s instructions.
3. Base Coat:
Once the primer coat is dry, apply a base coat of paint to your action figure. This base coat serves as the foundation color for your figure. Use thin and even layers of paint, allowing each layer to dry before applying the next. Acrylic paints are commonly used for action figure customization as they offer good coverage and versatility.
4. Layering and Detailing:
Add depth and detail by layering different colors of paint onto your action figure. Use smaller brushes and precise techniques to paint intricate designs, patterns, or small details such as facial features, clothing, armor, or weapons. Take your time and build up the details gradually, allowing each layer to dry before moving on to the next.
5. Weathering and Aging:
To give your action figures a more realistic and weathered look, consider applying weathering techniques. Dry brushing, washes, and stippling can create effects such as wear and tear, dirt, rust, or battle damage. Experiment with different weathering techniques to achieve the desired level of realism and character for your action figures.
6. Sealing:
Once you are satisfied with the paintwork, seal your action figures with a protective clear coat. This will help protect the paint job, prevent chipping or fading, and provide a glossy or matte finish depending on your preference. Follow the instructions on the clear coat product for proper application.
Customizing:
Customization goes beyond just painting. You can also customize your action figures by adding additional elements such as decals, accessories, or fabric clothing. Consider sculpting or 3D printing accessories like weapons, capes, or accessories that can be attached to your action figures, making them even more unique and personalized.
Remember, painting and customizing your 3D printed action figures requires patience, practice, and creativity. Don’t be afraid to experiment and try new techniques to achieve the desired look and feel of your action figures. Enjoy the process and have fun bringing your creations to life with color and customization!
Displaying and Storing Action Figures
Once you’ve created your beautiful and customized action figures, it’s important to think about how to display and store them properly. Here are some tips and ideas for showcasing and preserving your 3D printed creations:
1. Display Cases:
Invest in display cases or cabinets specifically designed for action figures. These cases protect your figures from dust, sunlight, and other potential damage while allowing them to be prominently showcased. Display cases come in various sizes and styles, including those with built-in lighting or mirrored backdrops for added visual impact.
2. Dioramas:
Create dioramas or miniature scenes to complement your action figures. These custom-made backgrounds or settings enhance the overall display and add a sense of storytelling. It can be as simple as a themed shelf or a complex setup with props, backdrops, and custom scenery.
3. Shelves and Racks:
Utilize wall-mounted shelves or display racks to create a visually appealing arrangement for your action figures. Group them by theme, series, or character, and consider adding small decorative elements to further enhance the display. This not only showcases your collection but also makes it easily accessible for admiration.
4. Lighting:
Consider incorporating proper lighting to highlight the details of your action figures. Use LED lights or spotlighting to illuminate specific areas, bringing out the vibrant colors and intricate features of your prints. Balancing ambient and focused lighting can create a visually striking display.
5. Protective Covers:
If you prefer to keep your action figures accessible without a display case, consider using individual protective covers or clear plastic cases. These covers shield your figures from dust and potential damage while still allowing them to be showcased on open shelves or desks.
6. Storage Boxes:
If you need to store your action figures temporarily or during transportation, use dedicated storage boxes. These boxes are designed to protect your figures from scratches, dust, and moisture. Look for boxes that have compartments or are customizable to keep each figure securely in place.
Regular Maintenance:
To keep your action figures in top condition, dust them regularly with a soft-bristled brush or compressed air. Avoid placing them in direct sunlight or in areas with high humidity to prevent discoloration or damage to the materials.
Remember to take pride in displaying your collection and make adjustments or additions to your display setup as needed. The goal is to show off your 3D printed action figures in a way that highlights their unique qualities and allows you to fully enjoy and appreciate your creations!
Troubleshooting Common Issues with 3D Printing Action Figures
3D printing action figures can sometimes come with challenges and issues that may affect the quality and outcome of your prints. Here are some common issues you might encounter when printing action figures and troubleshooting tips to help you overcome them:
1. Warping and Adhesion Problems:
Excessive warping and poor adhesion to the print bed can result in distorted or detached prints. Ensure that the print bed is clean and level. Adjust the bed temperature, use adhesive materials like glue or tape, or consider using a heated enclosure to minimize warping and improve adhesion.
2. Layer Lines or Surface Imperfections:
Layer lines or rough surfaces on your action figures can be a common issue. Adjust the print settings, such as layer height or print speed, to improve the surface finish. Consider post-processing techniques like sanding, filling, or applying smoothing techniques to achieve a smoother and more refined appearance.
3. Stringing or Oozing:
Extraneous strands or blobs of filament between different parts of your action figure can be caused by improper retraction settings or excessive temperature. Adjust the retraction settings in your slicing software and consider lowering the printing temperature to minimize stringing and oozing. Additional cooling fans or adjusting fan speed can also help reduce these issues.
4. Inadequate Support Structures:
When printing action figures with overhangs or complex shapes, inadequate support structures can lead to sagging or collapsing during printing. Adjust the support settings in your slicing software, making sure to generate sufficient support structures where needed. Position the model for optimal support placement and ensure easy removal of supports without damaging the printed parts.
5. Printing Artifacts:
Artifacts like ghosting, ringing, or z-wobble can appear as unwanted patterns or distortions on your action figure prints. These artifacts can be caused by issues with the printer’s mechanical components or vibrations during printing. Address these issues by tightening belts, lubricating moving parts, or reducing printing speeds to minimize vibrations.
6. Insufficient Filament Flow:
If you notice under-extrusion, where the flow of filament is not consistent, it can result in weak or incomplete layers in your action figures. Ensure that the nozzle is clean and free from clogs. Adjust the printer’s extrusion settings, including temperature or retraction, to ensure proper filament flow throughout the print.
It’s important to keep in mind that troubleshooting 3D printing issues often requires patience, experimentation, and adjustments specific to your printer and filament combination. Take notes of the changes you make and keep track of the outcomes to determine the most effective solutions for your setup.
Remember, learning from each print and understanding the underlying causes of issues will help you improve your printing skills and produce high-quality action figures that meet your expectations.
Conclusion
Creating your own action figures with a 3D printer opens up a world of creativity and customization. From choosing the right printer and software to finding or designing 3D models, adjusting print settings, painting, and displaying your creations, this guide has provided valuable insights into the process. With patience, practice, and a creative mindset, you can bring your favorite characters to life in a tangible and personalized way.
Throughout this journey, remember to experiment and iterate. Each print and customization presents an opportunity to learn and refine your techniques. Embrace the challenges that may arise and use them as stepping stones to improve your skills.
Furthermore, engage with the 3D printing community. Online forums and communities are filled with experienced makers who can offer advice, share tips, and provide inspiration. Connecting with others will not only enhance your knowledge but also foster a sense of camaraderie among fellow enthusiasts.
Lastly, enjoy the process. The world of 3D printing offers endless possibilities and allows you to dive into your imagination. Whether you’re a collector, a hobbyist, or simply a lover of action figures, creating your own with a 3D printer is an exciting and fulfilling endeavor. So, unleash your creativity, master the techniques, and have fun bringing your unique action figures to life!