Introduction
Are you an electronics enthusiast or a hobbyist looking for a reliable power supply for your bench setup? Look no further! In this guide, we will show you how to create a bench power supply using an old computer Power Supply Unit (PSU). Converting a PSU into a bench power supply has a multitude of benefits, including cost-effectiveness and flexibility.
A bench power supply allows you to have a regulated and adjustable DC power source, perfect for powering and testing electronic circuits, Arduino projects, or any other low voltage applications. By repurposing an old PSU, not only are you reducing waste, but you are also saving money by repurposing something you may already have lying around.
Throughout this article, we will guide you through the step-by-step process of creating your own bench power supply from a PSU. From properly disassembling the PSU to wiring it for bench use and building an enclosure, we’ve got you covered.
Before we dive into the detailed steps, it’s essential to emphasize the importance of safety. Working with electronics and power supplies can be hazardous if not handled properly. Always ensure that the PSU is disconnected from power, and take necessary precautions such as wearing proper protective equipment and working in a well-ventilated area.
So, whether you are a beginner with minimal electronics knowledge or an experienced DIY enthusiast, let’s get started on creating your very own bench power supply from an old PSU!
Choosing the Right Power Supply Unit (PSU)
When it comes to repurposing a Power Supply Unit (PSU) for a bench power supply, not all PSUs are created equal. It’s crucial to choose the right PSU to ensure optimal performance and compatibility with your bench setup. Here are a few key factors to consider while selecting a PSU:
Power Rating: The power rating of the PSU determines how much electrical power it can provide. Consider the maximum power requirement of your projects to choose a PSU with an adequate power rating. Look for PSUs with a power rating of at least 300 watts or higher to have sufficient power for most bench applications.
Modularity: Modular PSUs have detachable cables, allowing for better cable management and customization. This feature ensures a clean and organized bench setup, minimizing cable clutter. While not necessary, modularity can greatly simplify the wiring process and improve the overall aesthetic.
Output Voltage and Current: Confirm that the PSU you choose provides the required output voltages and currents for your projects. Most PSUs offer multiple outputs, including +12V, +5V, and +3.3V, which are commonly used in electronic circuits. Additionally, check the maximum current output of each voltage rail to ensure it meets your needs.
Efficiency and Reliability: Consider the efficiency and reliability of the PSU. Look for PSUs with high efficiency ratings, such as 80 Plus Bronze, Silver, Gold, or Platinum certifications. These certifications indicate that the PSU operates efficiently and wastes less power as heat. Additionally, read reviews and choose a reputable brand to ensure a reliable and long-lasting bench power supply.
Quiet Operation: Noise can be a significant concern for a bench setup, especially if you plan to spend long hours working on your projects. Look for PSUs with quiet operation and good cooling features to minimize fan noise and prevent overheating.
By considering these factors, you can select a PSU that meets your power requirements, is compatible with your bench setup, and offers the necessary features for a reliable and efficient bench power supply. Once you have chosen the right PSU, proceed to the next section to begin the process of converting it into a bench power supply.
Tools and Materials You Will Need
Before you start converting your Power Supply Unit (PSU) into a bench power supply, gather the following tools and materials to ensure a smooth and efficient process:
Tools:
- Screwdriver set (Phillips and flathead)
- Wire strippers
- Wire cutters
- Multimeter (for voltage and continuity testing)
- Heat shrink tubing and heat gun (for insulation)
- Soldering iron and solder (if necessary)
- Drill (for building the enclosure)
Materials:
- Power Supply Unit (PSU)
- Electrical wires (various colors and gauges)
- Terminal blocks or binding posts (for power outputs)
- Voltage regulator module (if not already present in the PSU)
- Digital voltmeter or voltage display module
- Enclosure or box for housing the bench power supply
- Power switch and indicator LED (optional but recommended)
- Screws, nuts, and standoffs (for securing and mounting components)
It’s important to have the right tools and materials to ensure a successful conversion without any unnecessary setbacks. Consider gathering all the required items before you start the project to make the process more efficient and enjoyable.
Once you have all the necessary tools and materials ready, you are well-equipped to proceed with the step-by-step conversion process. In the next section, we will begin by taking the necessary safety precautions and disassembling the PSU.
Step 1: Safety Precautions and Disassembly
Before starting the disassembly process, it’s essential to prioritize safety and take the necessary precautions. Dealing with electronics and power supplies can be hazardous if not handled properly. Follow these safety guidelines:
- Disconnect the Power: Ensure that the PSU is completely disconnected from the power source. Unplug it from the wall outlet and detach any other power sources, such as batteries or UPS connections.
- Allow for Discharge: Even after disconnecting the power, capacitors inside the PSU may still hold residual charge. To discharge them, simply press and hold the power button for a few seconds. This will help prevent any accidental shocks while working.
- Work in a Well-Ventilated Area: Electronic devices can emit fumes and odors, especially when heated or soldered. Always work in a well-ventilated area or use a fume extractor to minimize exposure to potentially harmful substances.
- Wear Personal Protective Equipment (PPE): To protect yourself from accidental injuries, wear suitable PPE, including safety goggles, gloves, and an anti-static wristband (if available).
Once you have taken the necessary safety precautions, it’s time to disassemble the PSU according to its specific design. Most PSUs have a metal casing that can be opened by removing screws or sliding off a cover. Carefully remove the casing, exposing the internal components.
As you disassemble the PSU, take note of how the wires are connected and grouped together. This will help you in later steps when identifying and removing unnecessary wires. A multimeter can be handy for identifying the voltages and testing the continuity of wires.
Remember to handle the components inside the PSU with care. Avoid touching any exposed circuitry or delicate electronic parts. Take your time to understand the internal layout and components of the PSU before proceeding to the next step.
Now that you have taken the necessary safety precautions and successfully disassembled the PSU, it’s time to move on to the next step: identifying the PSU wires and connectors. Continue reading to learn how to navigate the internal components of the PSU.
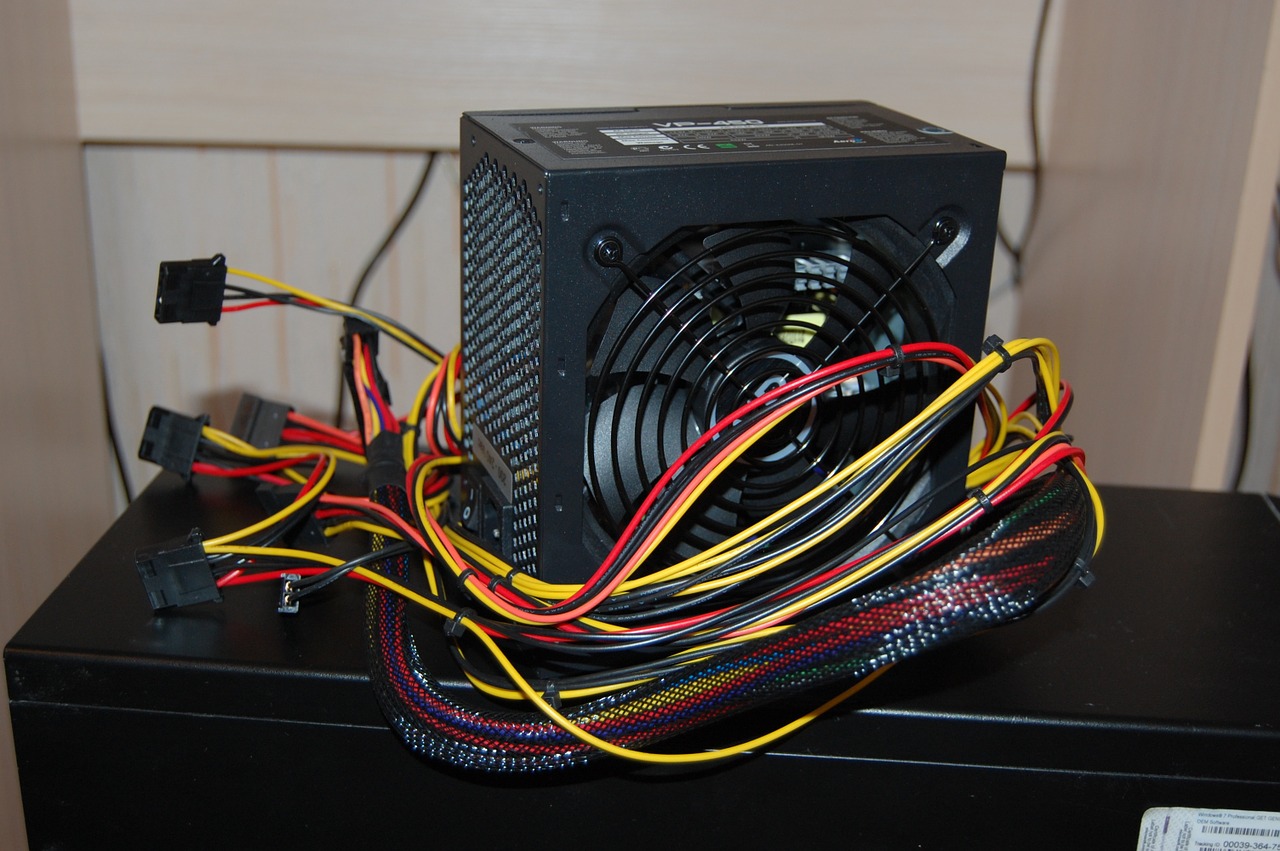
Step 2: Identifying the PSU Wires and Connectors
After safely disassembling the Power Supply Unit (PSU), the next step is to identify the various wires and connectors inside. Understanding the wiring configuration is crucial for repurposing the PSU into a bench power supply. Here’s a helpful guide to help you identify the key components:
- Main Power Connectors: The PSU will likely have a set of main power connectors that provide power to the motherboard and other components in a computer. These connectors usually include a 24-pin or a 20+4-pin connector for the motherboard and a 4 or 8-pin connector for the CPU power.
- Molex Connectors: Molex connectors are widely used in computer PSUs. These are typically 4-pin connectors used to power devices such as hard drives, optical drives, and fans. They can be identified by their plastic housing and four thick wires (usually yellow, black, red, and black) inside.
- SATA Connectors: SATA connectors are used for connecting SATA drives, such as HDDs or SSDs. They have a slim, L-shaped design and usually come in different colors, such as red or black.
- PCIe Connectors: PCIe connectors are used to provide power to high-performance graphics cards. These connectors have different configurations, such as 6-pin or 8-pin. They often have a unique shape and can be found near the edge of the PSU.
- Extra Connectors: Depending on the make and model of the PSU, there may be additional connectors, such as floppy power connectors or specialized connectors for specific peripherals.
Take your time to carefully examine the PSU and identify the different wires and connectors. Pay attention to the labels or markings on the connectors or the color-coding of the wires. Refer to any documentation or online resources related to your specific PSU model for more detailed information.
Using a multimeter, you can also test the voltage output of each wire to confirm its function. Be cautious while performing these tests and avoid shorting any wires or components.
Once you have successfully identified the various wires and connectors, proceed to the next step: removing unnecessary wires and connectors. This will help simplify the wiring and ensure a cleaner setup for your bench power supply.
Step 3: Removing Unnecessary Wires and Connectors
With a clear understanding of the wires and connectors inside your Power Supply Unit (PSU), the next step is to remove any unnecessary wires and connectors. Streamlining the wiring configuration will help simplify the bench power supply setup and reduce clutter. Here’s how to proceed:
- Identify Unused Connectors: Determine which connectors are not needed for your bench power supply setup. These may include connectors for peripherals you won’t be using or extra PCIe connectors if you don’t have a graphics card.
- Trace and Label Wires: Follow the path of the wires from the unnecessary connectors to their destination. Make note of which devices or components they are connected to. This will help you identify and trace the wires that can be safely removed.
- Cut or Desolder Unnecessary Wires: Once you have identified the wires that can be removed, use wire cutters or desoldering tools (if necessary) to detach them from the connectors or circuit boards. Take care not to damage any other wires or components in the process.
- Secure Loose Ends: After removing wires, it’s important to secure the loose ends to prevent them from touching other components or causing short circuits. You can insulate the ends with heat shrink tubing or use electrical tape to cover them.
- Keep Safety in Mind: While removing wires, remember to maintain safety precautions. Ensure that the PSU is disconnected from power, and take measures to prevent accidental shocks or damage to the components.
By removing unnecessary wires and connectors, you are simplifying the wiring layout and ensuring a clean setup for your bench power supply. This not only improves the overall aesthetics but also makes it easier to identify and work with the essential wires during the subsequent steps of the conversion process.
Once you have successfully removed the unnecessary wires and connectors, you are ready to proceed to the next step: wiring the PSU for bench power supply use. Get your tools and wires ready as we dive into the process of transforming the PSU into a functional bench power supply!
Step 4: Wiring the PSU for Bench Power Supply Use
With the unnecessary wires and connectors removed, it’s time to wire the Power Supply Unit (PSU) for bench power supply use. This step involves connecting the essential wires and configuring the outputs for your desired voltage ranges. Follow these guidelines to proceed:
- Identify the Output Wires: Determine which wires you will be using as your power outputs. These are typically the +12V, +5V, and +3.3V wires. Refer to the documentation or markings on the PSU connectors to identify the wire colors associated with each voltage.
- Strip and Tin the Wires: Use wire strippers to remove a small section of insulation from the ends of the wires. Then, carefully apply solder to create a tinned surface. This will make it easier to connect the wires to the desired output terminals without causing any loose connections.
- Connect the Wires to Terminal Blocks: Use terminal blocks or binding posts to create secure connections for your power outputs. Connect the tinned ends of the corresponding wires to the appropriate terminals. Ensure that all connections are tight and secure.
- Use Color Coding: To keep the wiring organized and easily identifiable, you can use color-coded wires for different voltage outputs. For instance, use red wires for +5V, yellow wires for +12V, and orange wires for +3.3V. This will help prevent any confusion when connecting your circuits or devices.
- Provide Ground Connections: It’s important to establish a proper ground connection for your bench power supply. Connect the black wires (usually the ground) from the PSU to a common ground terminal or binding post. This will ensure a stable and reliable power supply.
- Insulate and Secure the Connections: Once all the connections are made, insulate them with heat shrink tubing or electrical tape to prevent any short circuits or accidental contact. Additionally, use zip ties or cable management solutions to secure the wires and prevent them from interfering with other components.
When wiring the PSU, ensure that the connections are secure and well-insulated to avoid any electrical hazards. Double-check your wiring against the PSU documentation or consult online resources if you are unsure about specific wire colors or configurations.
Now that you have successfully wired the PSU for bench power supply use, it’s time to move on to the next step: building the enclosure to house your bench power supply. Gather the necessary materials and prepare to create a sturdy and functional enclosure for your project.
Step 5: Building the Bench Power Supply Box
Now that you have wired the Power Supply Unit (PSU) for bench power supply use, the next step is to build an enclosure or box to house your bench power supply. This will not only protect the components but also provide a neat and organized setup. Here’s how you can proceed:
- Choose an Enclosure: Select a suitable enclosure or box that can accommodate the size of your PSU and other components. Consider using a metal or plastic enclosure that is sturdy and provides proper ventilation to prevent overheating.
- Measure and Mark: Measure the dimensions of the PSU and other components to determine the necessary space inside the enclosure. Mark the areas where you will be mounting the PSU, voltage regulator, and other components. Consider leaving extra space for cable management.
- Prepare Mounting Holes: Use a drill to create mounting holes in the enclosure according to your markings. Ensure that the holes are precisely aligned with the screw holes of the PSU and other components. Use appropriate screws, nuts, and standoffs to secure the components in place.
- Cut Openings for Connectors: Depending on the location and orientation of the connectors on the PSU, you may need to cut or drill openings in the enclosure to allow easy access to the power outputs and other connectors. Use appropriate tools to create clean and precise openings.
- Consider Ventilation: To prevent overheating, ensure that the enclosure has proper ventilation. You can achieve this by drilling additional ventilation holes or incorporating mesh panels in the design. Also, consider adding a cooling fan if necessary.
- Label and Mark: Use labels or markings to indicate the different power outputs, such as +12V, +5V, and +3.3V. This will help you easily identify and connect your circuits or devices to the appropriate voltage outputs.
Building the enclosure for your bench power supply provides a professional and organized appearance. It also protects the components from dust and accidental contact, ensuring a safe working environment. Take your time to measure and plan before executing the build to ensure a precise and functional enclosure.
With the enclosure built, you are one step closer to completing your bench power supply. The next step is to install power output terminals, allowing easy access to the different voltage outputs. Continue reading to learn more about this crucial step.
Step 6: Installing Power Output Terminals
With the enclosure built for your bench power supply, it’s time to install power output terminals to provide easy access to the different voltage outputs. This step allows you to conveniently connect your circuits or devices to the desired voltage levels. Here’s how you can proceed:
- Select Suitable Terminals: Choose appropriate power output terminals, such as banana jacks, binding posts, or terminal blocks. Consider the number of terminals you will need based on the number of voltage outputs available on your bench power supply.
- Mark Terminal Positions: Determine the positions where you will be installing the power output terminals on the enclosure. Mark the locations using a pencil or marker. Ensure that the positions are convenient and easily accessible.
- Drill Mounting Holes: Use a drill to create small pilot holes at the marked positions on the enclosure. Then, use a suitable drill bit to enlarge the holes to accommodate the mounting hardware of the power output terminals.
- Mount the Terminals: Insert the mounting hardware (screws, nuts, or clips) provided with the power output terminals through the holes in the enclosure. From the inside of the enclosure, attach the terminals and secure them in place using the corresponding hardware.
- Connect Wires to Terminals: Take the wires that you previously identified as the power outputs (+12V, +5V, and +3.3V) and connect them to the appropriate terminals. Ensure that the connections are secure and properly tightened to prevent any loose connections.
- Ensure Insulation: After connecting the wires to the power output terminals, insulate the connections using heat shrink tubing or electrical tape. This step is essential to prevent any accidental short circuits or contact with live wires.
- Label the Terminals: To avoid confusion or mistakes during connections, use labels or markings to identify each power output terminal. Clearly indicate the corresponding voltage level (such as +12V, +5V, and +3.3V) to make it easy to connect your circuits or devices.
By installing power output terminals, you are creating convenient access points for connecting your circuits or devices to the desired voltage levels. This ensures a streamlined and organized bench power supply setup. Take your time to properly secure and label the terminals, as this will make your future projects and experiments hassle-free.
With the power output terminals installed, we move on to the next crucial step: installing the voltage regulator and display. Continue reading to learn how to incorporate these components into your bench power supply.
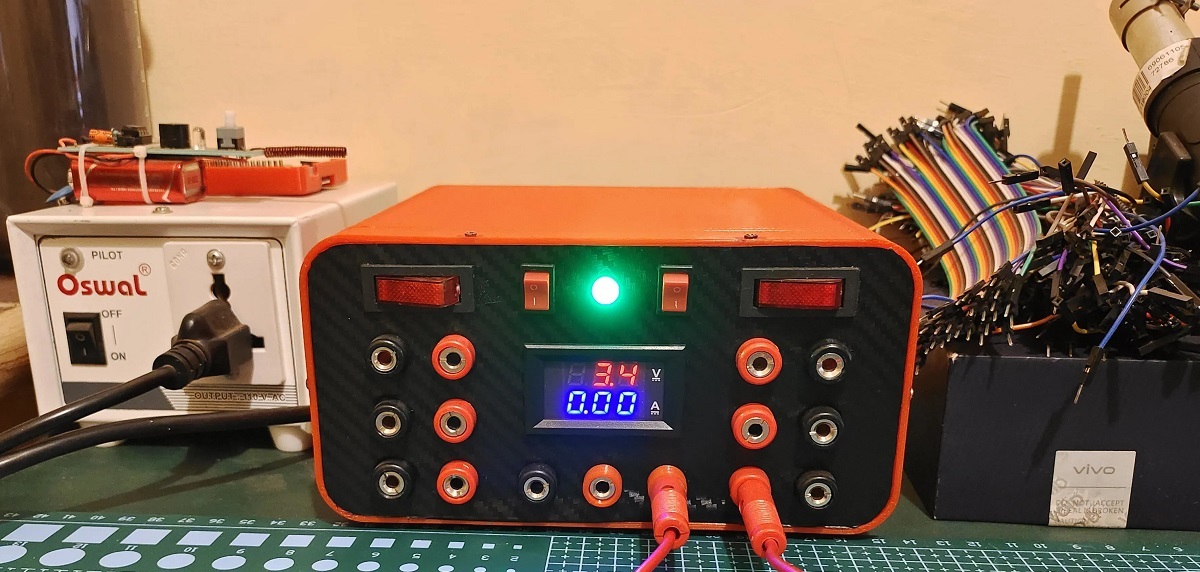
Step 7: Installing Voltage Regulator and Display
After installing the power output terminals for your bench power supply, the next step is to incorporate a voltage regulator and display. This will allow you to regulate and monitor the voltage output of your bench power supply. Here’s how you can proceed:
- Choose a Voltage Regulator: Select a suitable voltage regulator module that can handle the desired voltage adjustments and provide stable output. Popular options include LM317 or LM338 regulators, which can be readily available and easy to use.
- Identify Connection Points: Identify the input, output, and adjustment pins of the voltage regulator module. The input pin will receive the high voltage input from the PSU, the output pin will provide the regulated voltage, and the adjustment pin will allow you to fine-tune the output voltage.
- Mount the Voltage Regulator: Determine a suitable location inside the enclosure to mount the voltage regulator module. Use screws, nuts, or adhesive to secure the module in place. Ensure that the module is positioned in a way that allows easy access to the input and output terminals.
- Connect Input and Output Wires: Take a wire from the PSU’s +12V output and connect it to the input terminal of the voltage regulator. Similarly, connect a wire from the output terminal of the voltage regulator to one of the power output terminals on the enclosure.
- Wire the Adjustment Pin: The adjustment pin of the voltage regulator module allows you to fine-tune the output voltage. Connect a potentiometer or a fixed resistor between the adjustment pin and the ground to set the desired output voltage. Refer to the datasheet or documentation of the voltage regulator for the recommended resistor value or potentiometer configuration.
- Install the Voltage Display: Mount a digital voltmeter or a voltage display module inside the enclosure. Connect the appropriate wires from the voltage display to the voltage output terminals on the enclosure. Ensure correct polarity and connections as per the instructions provided with the display.
- Test the Regulator and Display: Before finalizing the installation, test the voltage regulator and display to ensure they are functioning correctly. Use a multimeter to measure the output voltage and compare it to the value displayed on the voltage display. Make any necessary adjustments to the voltage regulator until the desired output voltage is achieved.
By installing a voltage regulator and display, you gain the ability to control and monitor the output voltage of your bench power supply. This allows for precise voltage adjustments and ensures that your circuits or devices receive the desired voltage levels. Take your time to properly mount and connect the components, ensuring accurate readings and stable output.
With the voltage regulator and display installed, you are approaching the final steps of creating your bench power supply. In the next step, we will finalize the bench power supply setup, ensuring everything is secured and ready for use. Let’s move on to the last step!
Step 8: Finalizing the Bench Power Supply
Congratulations! You’ve reached the final step of creating your bench power supply. Now it’s time to finalize the setup, ensuring that everything is securely in place and ready for use. Here’s how you can complete the process:
- Secure and Organize the Wiring: Take a close look at the wiring inside the enclosure. Ensure that all connections are secure, properly insulated, and organized. Use zip ties, cable management solutions, or adhesive clips to tidy up the wires and prevent them from interfering with other components.
- Check for Clearance and Interference: Double-check that there is sufficient clearance between components to avoid any interference or contact. Make sure no wires or components are obstructing the cooling vents or fans. This will help maintain proper airflow and prevent overheating.
- Install a Power Switch and Indicator LED: Consider installing a power switch and indicator LED on the enclosure. The switch will allow you to turn the bench power supply on and off conveniently. The LED will indicate the status of power supply, showing when it is active or in standby mode.
- Seal and Insulate Any Openings: Inspect the enclosure for any openings or gaps that may pose a risk of electrical shock or dust accumulation. Seal these openings using silicone sealant or rubber grommets to ensure a safe and clean setup.
- Test the Bench Power Supply: Before connecting any circuits or devices, perform a thorough test of the bench power supply. Use a multimeter to measure the output voltage across the different voltage terminals. Verify that the voltage regulator and display are functioning correctly and providing accurate readings.
- Document and Label: It’s always a good practice to document the specifications and wiring configuration of your bench power supply. Create a labeling system on the enclosure to indicate the different voltage outputs, the maximum current capacity, and any other relevant information. This will make future projects and troubleshooting more efficient.
By finalizing the bench power supply, you are ensuring a safe and well-organized setup that is ready to power your electronic projects. Take the time to thoroughly inspect and test everything before connecting any circuits or devices to ensure a reliable and stable power supply.
With your bench power supply complete, you now have a valuable tool for your electronics experiments and projects. Enjoy the benefits of having a regulated and adjustable power source at your disposal. Happy tinkering!
Conclusion
Congratulations on successfully creating your own bench power supply! By repurposing an old Power Supply Unit (PSU), you have transformed it into a versatile tool that provides regulated and adjustable DC power for your electronics projects. Throughout the process, you have learned how to choose the right PSU, disassemble it safely, identify and remove unnecessary wires, wire it for bench power supply use, build an enclosure, install power output terminals, incorporate a voltage regulator and display, and finalize the setup.
With your bench power supply ready, you now have a reliable and cost-effective solution for powering and testing electronic circuits, Arduino projects, or any other low voltage applications. The flexibility to adjust and regulate the voltage outputs ensures compatibility with a wide range of projects, making it a valuable asset in your workshop.
Remember to always prioritize safety when working with electronics and power supplies. Follow the necessary safety procedures, such as disconnecting the power, discharging capacitors, and wearing suitable protective equipment. Regularly inspect and maintain your bench power supply to ensure its optimal performance and longevity.
Now that you have completed your bench power supply, let your creativity and curiosity guide you as you explore the vast world of electronics. Utilize your power supply to power your projects, experiment with various circuits, and expand your skills and knowledge. Enjoy the freedom and control that your bench power supply provides in bringing your electronic creations to life.
Happy experimenting and may your bench power supply fuel many successful projects in the future!