Introduction
Welcome to our guide on how to install an operating system (OS) on your Ultrabook. If you have recently purchased an Ultrabook or are looking to upgrade to a new OS, this step-by-step tutorial will walk you through the installation process.
Ultrabooks are known for their sleek design, lightweight build, and impressive performance. Whether you’re a student, a professional, or a casual user, having the latest operating system on your Ultrabook can enhance your productivity and provide access to new features and improvements.
Before we proceed, it’s important to note that installing an operating system should be done with caution. While it’s a relatively straightforward process, it involves making changes to your computer’s settings and potentially erasing existing data. Therefore, it is highly recommended to back up all your important files and documents before proceeding with the installation.
This guide will cover the installation process for Windows, macOS, and Linux operating systems. However, please note that the specific steps and requirements may vary depending on the operating system and model of your Ultrabook. It’s always a good idea to consult the manufacturer’s documentation or support resources for any specific instructions or recommendations.
Ready to dive into the world of operating systems? Let’s get started with the compatibility and requirements you need to consider before installing an OS on your Ultrabook.
Compatibility and Requirements
Before you begin the installation process, it’s essential to ensure that your Ultrabook is compatible with the operating system you want to install. Different OS versions have specific hardware and software requirements, so it’s important to check the compatibility list provided by the OS developer.
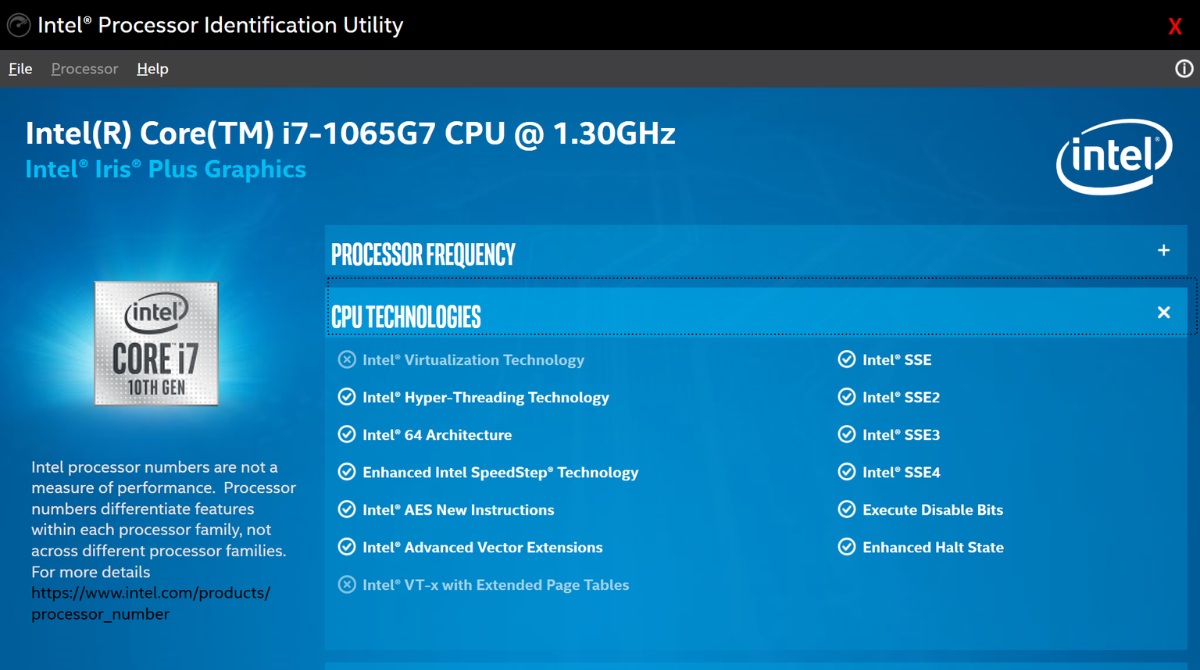
First, consider the processor requirements. Most modern Ultrabooks come with Intel processors, but some models may have AMD processors. Check the minimum and recommended processor specifications for the operating system you plan to install. Generally, newer and more powerful processors will provide a smoother experience.
Next, check the RAM requirements. Operating systems usually list the minimum and recommended RAM specifications. It’s recommended to have at least the minimum requirement, but for better performance, it’s advisable to have more RAM.
Storage capacity is another crucial factor to consider. Ensure that your Ultrabook has enough free storage space for the operating system installation. Some OS versions require a specific amount of storage, so it’s important to check the requirements beforehand.
Graphics capability is also important, especially if you plan to use your Ultrabook for tasks such as gaming or graphic design. Check the required graphics specifications for the operating system and make sure your Ultrabook meets or exceeds them. Integrated graphics may be sufficient for most tasks, but for more demanding applications, a dedicated graphics card may be necessary.
Additionally, consider the network requirements. Some operating systems may require an active internet connection for certain features or updates. Ensure that your Ultrabook has a reliable internet connection during the installation process.
Lastly, check for any additional software requirements or dependencies. Some operating systems may require specific software packages or drivers to be installed before or during the installation process. It’s crucial to review the documentation provided by the OS developer to avoid any potential issues.
By ensuring that your Ultrabook meets or exceeds the compatibility and requirements of the operating system you plan to install, you can ensure a smoother installation process and optimal performance.
Step 1: Back Up Your Data
Before proceeding with any operating system installation, it’s crucial to back up all your important data. This step is essential to prevent data loss in case anything goes wrong during the installation process.
Creating a backup of your data ensures that you have a copy of all your important files, documents, photos, and other valuable data. This includes documents, music, videos, bookmarks, emails, and any other files that you can’t afford to lose.
There are several ways you can back up your data. One option is to use an external hard drive or a USB flash drive to manually copy and paste your files onto the external storage device. This method is straightforward but may require some time, depending on the amount of data you have.
Alternatively, you can make use of cloud storage services, such as Google Drive, Dropbox, or OneDrive. These services allow you to upload your files to the cloud, keeping them safely stored online. This way, even if something happens to your Ultrabook, your data will still be accessible from any device with an internet connection.
If you already have a backup system in place, make sure to update it before starting the installation process. It’s always better to be safe than sorry, and having a recent backup will give you peace of mind.
Remember to double-check that you have backed up all your important files and folders. Take the time to organize your data and make sure nothing is left behind. You don’t want to realize later that you forgot an important document or cherished photo.
Once you have completed the backup process, verify that all your files have been successfully copied and stored. If possible, try accessing a few files from the backup storage device or cloud service to ensure they are intact.
By taking the time to back up your data, you can proceed with the operating system installation confidently, knowing that your important files are safely backed up. In the next step, we will guide you on how to obtain the operating system image for your Ultrabook.
Step 2: Obtain the Operating System Image
Once you have backed up your data, the next step is to obtain the operating system image that you want to install on your Ultrabook. The operating system image is a file that contains all the necessary installation files and tools to install the OS onto your device.
The method for obtaining the operating system image will depend on the specific operating system you plan to install. Here are a few common ways to obtain the OS image:
- Official Website: Many operating systems, such as Windows, macOS, and various Linux distributions, provide official download links on their respective websites. Visit the official website of the OS you want to install and look for a download section or page. Make sure to download the correct version and edition of the operating system that matches your Ultrabook’s specifications.
- Distribution Websites: For Linux-based operating systems, you can often find different distributions available for download from their respective websites. These distributions may come with different pre-installed software packages and customized user interfaces. Choose the one that suits your preferences and download the corresponding ISO image file.
- Third-Party Sources: In some cases, you may find the OS image from third-party sources. However, it is recommended to obtain the operating system image from official or trusted sources to ensure authenticity and security. Be cautious when downloading from unofficial or unknown websites to avoid malware or modified versions of the OS.
Once you have downloaded the operating system image, ensure that the file is in a compatible format, such as ISO or DMG. These formats can be easily used to create a bootable USB drive for the installation process.
It’s important to note that obtaining the operating system image itself is legal, but using it without a valid license may be against the terms and conditions set by the OS developer. Make sure to obtain the necessary licenses or follow open-source guidelines if applicable.
With the operating system image at hand, proceed to the next step, where we will guide you on how to create a bootable USB drive to install the OS on your Ultrabook.
Step 3: Create a Bootable USB Drive
Creating a bootable USB drive is a crucial step in installing an operating system on your Ultrabook. A bootable USB drive allows you to boot your computer from the USB device and initiate the installation process. Here’s how you can create a bootable USB drive:
- Format the USB Drive: Before you can make it bootable, you need to format the USB drive to ensure it’s empty and ready for the OS installation files. You can format the USB drive using the built-in formatting tools on your operating system (e.g., Windows Disk Management or Disk Utility on macOS).
- Use Third-Party Software: There are several third-party software tools available that can help you create a bootable USB drive. Some popular options include Rufus, Etcher, and UNetbootin. Download and install one of these tools, then follow the instructions provided by the software to create a bootable USB drive using the operating system image file you obtained in the previous step.
- Command Line Method (Advanced): If you are comfortable using the command line, you can create a bootable USB drive using command-line tools such as “dd” on macOS and Linux or “diskpart” on Windows. This method requires precise commands and can be more complex, so it’s recommended for experienced users only.
When creating the bootable USB drive, make sure to select the correct USB drive from the software interface to avoid accidentally formatting or overwriting important data on other storage devices. Double-check the selected USB drive before proceeding with the creation process.
Once the bootable USB drive is created successfully, you’re ready to move on to the next step, where we will guide you on how to access the BIOS settings of your Ultrabook.
Step 4: Access the BIOS Settings
In order to install the operating system from the bootable USB drive, you need to access the BIOS (Basic Input/Output System) settings of your Ultrabook. The BIOS settings allow you to configure various hardware and system settings, including the boot order. Follow these steps to access the BIOS settings:
- Restart Your Ultrabook: If your Ultrabook is on, save your work and completely shut it down. Then, press the power button to turn it back on. Alternatively, if your Ultrabook is already off, you can turn it on normally.
- Press the BIOS Key: As the Ultrabook starts up, you will see a logo or a message on the screen. At this point, you need to press the appropriate key to enter the BIOS settings. The key may vary depending on your Ultrabook’s manufacturer and model. Common BIOS keys include F2, F10, Del, Esc, or the combination of Fn+F2. If you’re not sure which key to press, consult the user manual or do a quick search online for your specific Ultrabook model.
- Navigate the BIOS: Once you enter the BIOS settings, you’ll be presented with a user interface that may vary depending on the manufacturer. Use the arrow keys on your keyboard to navigate through the different menus and options. Look for a section related to boot options or boot order.
- Modify the Boot Order: Within the boot options or boot order section, you need to configure the settings to prioritize booting from the USB drive. Move the USB drive to the top of the boot order list, usually by selecting it and using the appropriate key (often F5 or F6) to move it up. This ensures that your Ultrabook will boot from the USB drive first when you start the computer.
- Save and Exit: After modifying the boot order, save your changes and exit the BIOS settings. Look for an option to save and exit, usually by pressing F10 or selecting an exit option and confirming your selection. Your Ultrabook will then restart according to the new boot order settings.
Once you have successfully accessed and modified the BIOS settings to prioritize booting from the USB drive, you’re now ready to proceed with the operating system installation. In the next step, we will guide you through the actual installation process of the operating system on your Ultrabook.
Step 5: Change Boot Order
Changing the boot order is a crucial step to ensure that your Ultrabook boots from the bootable USB drive and initiates the operating system installation. Follow these steps to change the boot order:
- Restart Your Ultrabook: If your Ultrabook is on, save your work and completely shut it down. Then, press the power button to turn it back on. Alternatively, if your Ultrabook is already off, you can turn it on normally.
- Access the BIOS Settings: As your Ultrabook starts up, there is usually a splash screen or a logo displayed. Look for a message that indicates the key you need to press to access the BIOS settings. The key may vary depending on your Ultrabook’s manufacturer and model, but common keys include F2, F12, Del, Esc, or the combination of Fn+F2. Press the designated key to enter the BIOS settings.
- Navigate to the Boot Order: Once inside the BIOS settings, use the arrow keys on your keyboard to navigate through the different menus. You need to find the section that controls the boot order of your Ultrabook. This section may be labeled as “Boot,” “Boot Options,” or something similar.
- Set the USB Drive as the First Boot Device: Inside the boot order section, you will see a list of devices that you can boot from. Locate the entry that corresponds to your bootable USB drive and move it to the top of the boot order list. This ensures that your Ultrabook will attempt to boot from the USB drive first.
- Save and Exit: After setting the USB drive as the first boot device, save your changes and exit the BIOS settings. Look for an option to save and exit, usually by pressing F10 or selecting the appropriate option from the menu. Your Ultrabook will then restart with the new boot order configuration.
By changing the boot order and setting the USB drive as the first boot device, you ensure that your Ultrabook will prioritize booting from the USB drive, where the operating system installation files are located. This allows you to proceed with the installation process without any issues.
In the next step, we will guide you through the actual process of installing the operating system on your Ultrabook.
Step 6: Install the Operating System
Now that you have successfully changed the boot order, you are ready to install the operating system on your Ultrabook. Follow these steps to install the operating system:
- Insert the Bootable USB Drive: Make sure your Ultrabook is powered on and insert the bootable USB drive into a USB port. The installation process will begin automatically, or you may need to press a key (such as F12 or Esc) to bring up a boot menu and select the USB drive as the boot device.
- Follow the On-screen Prompts: Once the bootable USB drive is detected, you will be presented with the installation wizard or prompts. Follow the on-screen instructions to proceed with the installation. You may need to select the language, region, and other preferences during this initial setup.
- Agree to the License Agreement: Read and accept the license agreement or terms of service for the operating system. Be sure to review any additional options or customizations that may be presented during the installation process.
- Select the Installation Drive: Choose the appropriate drive or partition where you want to install the operating system. This will typically be the main internal storage drive of your Ultrabook. Make sure to select the correct drive and be aware that the installation process may delete any existing data on that drive.
- Wait for the Installation to Complete: The installation process will now begin, and you will see a progress bar or other indicators showing the installation progress. Depending on the operating system and the speed of your Ultrabook, the installation process may take some time. Be patient and avoid interrupting the process.
- Set Up User Account and Preferences: Once the installation is complete, you may be prompted to set up a user account and other preferences. Follow the on-screen instructions to create a username and password, customize your settings, and set up any additional features or options offered by the operating system.
- Restart Your Ultrabook: After completing the setup process, the operating system will require a restart. Remove the bootable USB drive from your Ultrabook and restart the system. It will now boot from the installed operating system on your internal storage drive.
Congratulations! You have successfully installed the operating system on your Ultrabook. The initial setup and installation process may vary depending on the specific operating system you have chosen. Refer to the documentation or user guides provided by the OS developer for any detailed instructions or specific features unique to that OS.
In the next step, we will guide you on how to configure the settings and install necessary drivers to ensure optimal performance on your Ultrabook.
Step 7: Configure Settings and Drivers
After successfully installing the operating system on your Ultrabook, you’ll need to configure various settings and install necessary drivers to ensure optimal performance and functionality. Follow these steps to configure settings and install drivers:
- System Settings: Access the system settings menu to customize various aspects of your Ultrabook. This includes personalization options such as changing the desktop background, theme, and screen resolution. Additionally, you can configure system preferences like power settings, privacy settings, language preferences, and more.
- Connect to the Internet: If your Ultrabook is not already connected to the internet, establish an internet connection to download and install available updates and drivers. This will help ensure your Ultrabook has the latest bug fixes, security patches, and enhancements.
- Install Device Drivers: Identify any hardware components that require specific device drivers for optimal functionality. Most operating systems come with a built-in driver repository that automatically detects and installs basic drivers for common hardware. However, you may need to manually install drivers for certain devices like the graphics card, sound card, wireless network adapter, and other peripherals. Visit the manufacturer’s website or use a driver update tool to acquire the latest drivers for your specific Ultrabook model.
- Configure Security Settings: Enhance the security of your Ultrabook by configuring security settings. This includes setting up user accounts and passwords, enabling firewall protection, installing antivirus software, and configuring automatic software updates. Taking these precautions helps protect your Ultrabook from potential security threats.
- Install Necessary Software: Install any additional software applications that are essential for your needs. This may include productivity tools, media players, web browsers, office suites, or any software necessary for your work or leisure activities. Make sure to download and install software from trusted sources to avoid potential malware or security risks.
- Backup Your System: Set up a regular backup system to avoid potential data loss. Utilize cloud storage solutions or external hard drives to create periodic backups of your important files and documents. Having a backup system in place ensures that your data is safe in case of hardware failure or other unforeseen circumstances.
By configuring the settings and installing necessary drivers, you ensure that your Ultrabook is fully optimized for performance, security, and usability. Take the time to customize your preferences and explore the features offered by the operating system. With your Ultrabook fully set up, you can now enjoy a smooth and efficient computing experience.
In the next step, we will guide you on how to restore your data from the backup you created earlier.
Step 8: Restore Your Data
Now that you have configured the settings and installed necessary drivers on your Ultrabook, it’s time to restore your data from the backup you created earlier. Follow these steps to restore your data:
- Connect Your Backup Storage Device: If you backed up your data to an external hard drive or a USB flash drive, connect the storage device to your Ultrabook.
- Access Your Backup Files: Navigate to your backup storage device and locate the backed-up files and folders that you want to restore. If you used cloud storage, sign in to your account and access your previously uploaded files.
- Select and Copy Files: Select the files and folders that you want to restore and copy them to the appropriate locations on your Ultrabook. This could be your user folder, documents folder, or other personalized directories. Be cautious not to overwrite any important existing files.
- Verify Data Integrity: Once the copying process is complete, take some time to verify the integrity of your restored data. Open a few files and ensure they are intact and accessible. Verify that the restored files are in their correct format and retain their original content.
- Organize Restored Data: Organize your restored data by creating relevant folders and subfolders. This will help you maintain a well-structured and easily navigable file system. Consider grouping files by category, project, or any other logical organization method that suits your needs.
- Update Files Linked to Applications: If you have files linked to specific applications, such as media files in a media player or documents in an office suite, make sure to update the file paths in those applications to reflect the new location of the restored files. This will ensure that the applications can access and open the restored files seamlessly.
By following these steps to restore your data, you can regain access to your important files, documents, media, and other data that you have backed up. Having your data restored ensures that you can continue your work, access your favorite media, and resume your digital lifestyle without any interruption.
With Step 8 completed, you have successfully restored your data. Congratulations! Your Ultrabook is now ready for you to enjoy your favorite applications, media, and productivity tools.
Please note that regular backups are crucial to ensure the safety and availability of your data. It’s recommended to set up an automated backup system and periodically create backups to protect against potential data loss.
Conclusion
Congratulations on successfully installing an operating system on your Ultrabook! Through this guide, you have learned the step-by-step process of backing up your data, obtaining the operating system image, creating a bootable USB drive, accessing the BIOS settings, changing the boot order, installing the operating system, configuring settings and drivers, and restoring your data. By following these steps, you have transformed your Ultrabook into a fully functional and personalized device.
Remember, before starting the installation process, it is crucial to back up your data to ensure its safety. In the event of any unforeseen issues during installation, you can recover your important files without any loss. Additionally, make sure to review the compatibility and system requirements of the operating system you intend to install. This ensures a smooth installation process and optimal performance on your Ultrabook.
After completing the installation, take the time to configure the system settings, install necessary drivers, and customize your preferences. This will ensure that your Ultrabook is set up according to your specific needs and preferences.
Lastly, don’t forget to maintain regular backups of your data and keep your operating system and drivers up to date. Regular backups will protect your important files and minimize the risk of data loss. Keeping your operating system and drivers updated will ensure compatibility with new software, enhance the overall performance of your Ultrabook, and improve system security.
We hope this guide has been helpful in assisting you through the installation process and setting up your Ultrabook with a new operating system. Enjoy exploring the features and possibilities that your Ultrabook now offers, and make the most out of your improved computing experience.