Introduction
Welcome to our step-by-step guide on how to install memory in your ASUS Ultrabook B56Ca. If you’re experiencing slow performance or constantly running out of memory, upgrading your Ultrabook’s memory can significantly improve its speed and overall performance. By increasing the amount of memory, you’ll be able to run more programs simultaneously, browse the web effortlessly, and enjoy a smoother user experience.
Before we dive into the installation process, it’s important to note that upgrading the memory in your Ultrabook requires some technical knowledge and caution. If you’re not comfortable working with computer hardware, we recommend seeking assistance from a professional or referring to your Ultrabook’s user manual for specific instructions. However, if you’re up for the challenge, let’s get started!
In this guide, we’ll walk you through each step, providing detailed instructions and helpful tips along the way. We’ll begin by gathering the necessary tools and then proceed to turn off the Ultrabook. Next, we’ll locate the memory slots and remove the bottom panel to access them. We’ll guide you through inserting the new memory module and securing it properly. Finally, we’ll replace the bottom panel and power on the Ultrabook to ensure everything is functioning as expected.
Upgrading the memory in your Ultrabook can be a cost-effective way to improve its performance without having to invest in a new device. So, let’s roll up our sleeves and embark on this memory installation journey together!
Step 1: Gather the necessary tools
Before you can begin the memory installation process, it’s important to gather all the necessary tools. Here’s a list of what you’ll need:
- Anti-static wrist strap: This strap helps protect the sensitive components of your Ultrabook from electrostatic discharge.
- Small screwdriver set: You’ll need a Phillips screwdriver to remove the screws securing the bottom panel.
- New memory module: Make sure to purchase a compatible and high-quality memory module that meets the specifications of your ASUS Ultrabook B56Ca.
- Clean, lint-free cloth: This will come in handy for cleaning any fingerprints or dirt from the memory module and other components.
It’s crucial to have the anti-static wrist strap to avoid damaging the delicate internal components of your Ultrabook. Electrostatic discharge can cause irreparable harm to the memory module or other critical parts, so remember to wear the wrist strap throughout the installation process.
Additionally, having a small screwdriver set will allow you to remove the screws securing the bottom panel of your Ultrabook. These screws may be tiny, so using the appropriate-sized screwdriver is essential to prevent any damage. Be sure to handle the screws with care to avoid losing them.
Finally, investing in a high-quality memory module that’s compatible with your Ultrabook is crucial. Consult your Ultrabook’s user manual or visit the manufacturer’s website to determine the specific memory specifications required. Choosing a reputable brand will ensure optimal performance and compatibility with your Ultrabook.
Once you have gathered all the necessary tools, you’re ready to proceed to the next step: turning off the Ultrabook.
Step 2: Turn off the Ultrabook
Before you begin working on your ASUS Ultrabook B56Ca, it’s essential to turn it off and disconnect the power source. Here’s a step-by-step guide on how to do it:
- Save your work and close all open programs.
- Disconnect the Ultrabook from any external power source, such as the AC adapter.
- Shut down the operating system by clicking on the “Start” button, selecting “Power,” and then choosing “Shut down.”
- Wait until the Ultrabook completes the shut down process, and the screen is completely dark.
Turning off the Ultrabook properly ensures that all processes are safely terminated, and the internal components are not at risk of being damaged during the installation process. It’s important to wait until the screen is completely dark before proceeding to the next steps.
Remember to disconnect the Ultrabook from any power source to eliminate the risk of electric shock during the installation process. This step is crucial for both your safety and the integrity of the hardware components.
Now that your ASUS Ultrabook B56Ca is powered off and disconnected from the power source, you’re ready to move on to the next step: locating the memory slot.
Step 3: Locate the memory slot
Locating the memory slot in your ASUS Ultrabook B56Ca is crucial for successful memory installation. Follow these steps to find the memory slot:
- Flip your Ultrabook upside down to access the bottom panel.
- Carefully examine the bottom panel for any screws or latches that secure it in place.
- Use a small screwdriver to remove the screws, if any, and set them aside in a safe place.
- Gently lift off the bottom panel, revealing the internal components of your Ultrabook.
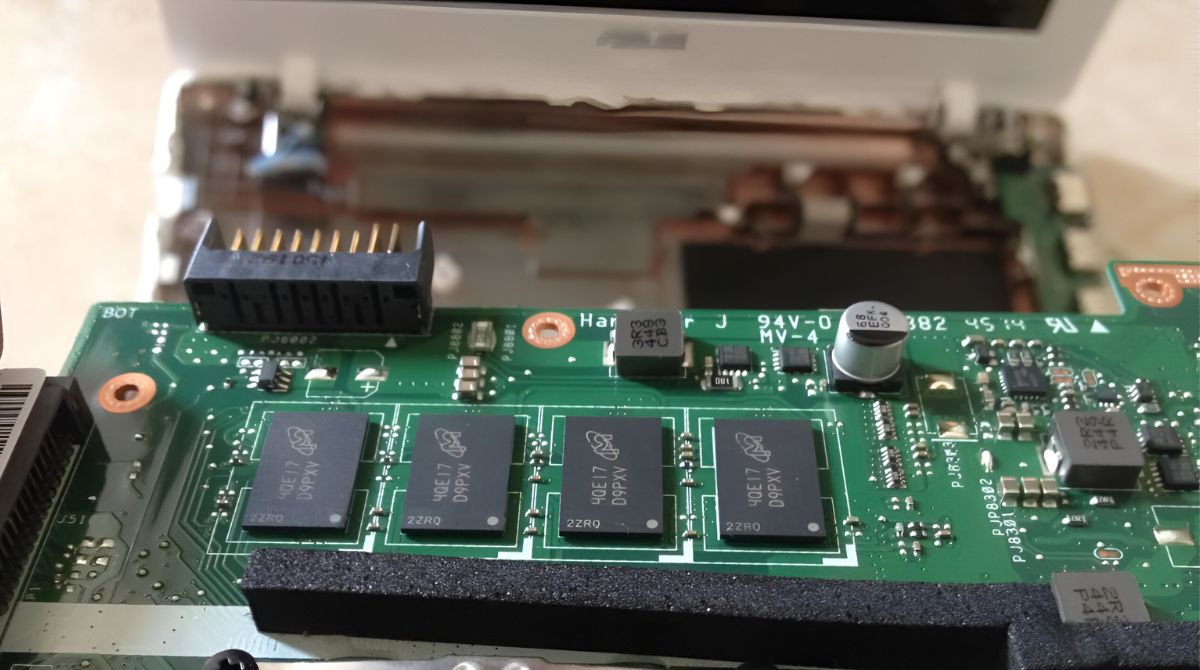
- Locate the memory slot, which will be a small rectangular slot on the motherboard.
Once you have located the memory slot, visually inspect it to ensure there are no obstructions or debris. Clear away any dust or dirt using a clean, lint-free cloth if necessary.
It’s important to handle the bottom panel with care to avoid damaging any internal components. Take note of the placement of any screws removed so that you can easily reattach the bottom panel later.
Keep in mind that the location and design of the memory slot may vary depending on the specific model of your ASUS Ultrabook B56Ca. Consult your Ultrabook’s user manual or the manufacturer’s website for detailed information on locating the memory slot specific to your device.
Now that you have successfully located the memory slot, you’re ready to move on to the next step: removing the bottom panel to access the memory slot.
Step 4: Remove the bottom panel
In order to access the memory slot in your ASUS Ultrabook B56Ca, you’ll need to remove the bottom panel. Follow these steps to safely remove the panel:
- Ensure that your Ultrabook is still powered off and disconnected from any power source.
- Identify the screws that secure the bottom panel in place. They are typically located around the edges of the panel.
- Using a small screwdriver, carefully unscrew and remove all the screws. Keep them in a secure place to avoid misplacing or losing them.
- Gently lift off the bottom panel, being mindful of any clips or connectors that may be attaching it to the body of the Ultrabook.
- If you encounter any resistance while lifting off the panel, double-check for any remaining screws or clips that may still be securing it.
When removing the screws, it’s important to use the appropriate-sized screwdriver and exert gentle pressure to avoid damaging the screws or the Ultrabook’s body. Take note of the order in which you remove the screws, as they may vary in size or have different threading.
As you lift off the bottom panel, be cautious of any clips or connectors that may be holding it in place. Applying gentle, even pressure and angling the panel slightly can help loosen any attached components without causing harm.
Remember to keep the removed screws in a safe place, as you’ll need them when reattaching the bottom panel later. Misplacing or losing screws can make it difficult to properly secure the panel, leading to potential issues with your Ultrabook’s stability.
With the bottom panel successfully removed, you’re now ready to proceed to the next step: inserting the new memory module.
Step 5: Insert the new memory module
Now that you have accessed the memory slot in your ASUS Ultrabook B56Ca, it’s time to insert the new memory module. Follow these steps carefully:
- Ensure that your Ultrabook is still powered off and disconnected from any power source.
- Take out the new memory module from its packaging, handling it carefully by the edges to avoid any damage from static electricity or fingerprints.
- Identify the notch or notches on the memory module and compare them to the slot in your Ultrabook. These notches ensure that the module is inserted in the correct orientation.
- Align the notch(es) on the memory module with the corresponding slot in the memory slot.
- Once aligned correctly, gently and firmly press down on the memory module until it clicks into place. This ensures a secure connection.
When handling the memory module, it’s crucial to avoid touching the gold-coloured contacts on the bottom. Oils and residues from your fingers can interfere with the module’s performance. If you accidentally touch the contacts, use a clean, lint-free cloth to wipe them gently before proceeding.
Pay close attention to the orientation of the memory module and the slot. The notch(es) on the module should match the slot precisely. Attempting to force the module in if it doesn’t align properly can cause damage to both the module and the slot.
Ensure that the memory module is fully inserted by applying firm, even pressure. You should feel a slight resistance before it clicks into place. This confirms that the module is securely attached and making proper contact with the slot.
With the new memory module successfully inserted, you’re ready to move on to the next step: securing the memory module.
Step 6: Secure the memory module
After inserting the new memory module into your ASUS Ultrabook B56Ca, it’s crucial to properly secure it in place. Follow these steps to ensure a secure connection:
- Inspect the memory module to confirm that it is seated correctly in the memory slot. The notches on the module should align precisely with the slot.
- If necessary, gently push down on the edges of the memory module to ensure that it is fully inserted and making proper contact with the slot.
- Once you have confirmed the proper placement of the memory module, carefully lower the bottom panel back onto the Ultrabook’s body.
- Align the screw holes on the bottom panel with the corresponding holes on the Ultrabook’s body.
- Using the small screwdriver, reattach and tighten the screws that secure the bottom panel.
Take the time to visually inspect the memory module and ensure that it is seated correctly. It should be snugly fitted into the memory slot with no gaps or unevenness. If you notice any irregularities, gently push down on the edges of the module to secure it firmly in place.
Be careful when placing the bottom panel back onto the Ultrabook’s body to avoid any unnecessary pressure on the memory module or other internal components. Align the screw holes on the panel with the corresponding holes on the Ultrabook, ensuring a proper fit.
When reattaching the screws, make sure to apply the appropriate amount of torque to hold the bottom panel securely in place. Over-tightening the screws can damage the threads or strip them, while under-tightening can result in a loose bottom panel. Maintain a balanced and consistent grip on the screwdriver as you tighten the screws evenly.
With the memory module properly secured and the bottom panel reattached, you can now move on to the next step: replacing the bottom panel.
Step 7: Replace the bottom panel
After securing the memory module in your ASUS Ultrabook B56Ca, it’s time to put the bottom panel back in place. Follow these steps to complete the process:
- Ensure that your Ultrabook is still powered off and disconnected from any power source.
- Hold the bottom panel with both hands and align it carefully with the Ultrabook’s body.
- Lower the panel onto the Ultrabook, taking care to align any clips or connectors with their corresponding slots or ports.
- Gently press down on the panel to ensure a snug fit and proper alignment with the Ultrabook’s body.
- If your Ultrabook’s bottom panel is secured with screws, use a small screwdriver to reinsert and tighten them.
While replacing the bottom panel, it’s important to handle it with care and ensure a proper alignment with the Ultrabook’s body. Misaligning the panel may cause it to be uneven or not sit flush, potentially interfering with the functionality and stability of the Ultrabook.
As you lower the panel onto the Ultrabook, take note of any clips or connectors on the panel that need to align with their corresponding slots or ports on the Ultrabook. Applying slight pressure and gentle maneuvering can help guide these components into place without causing any damage.
If your Ultrabook’s bottom panel is secured with screws, reinsert and tighten them using a small screwdriver. Be cautious not to overtighten, as this can damage the screws or the threading on the Ultrabook.
With the bottom panel securely in place, your ASUS Ultrabook B56Ca is almost ready for use. The final step is to power on the Ultrabook, which we’ll cover in the next step.
Step 8: Turn on the Ultrabook
After successfully installing the new memory module in your ASUS Ultrabook B56Ca, it’s time to turn it on and ensure everything is functioning properly. Follow these steps to power on your Ultrabook:
- Make sure that your Ultrabook is still connected to a power source if needed.
- Press the power button located on your Ultrabook’s keyboard or chassis.
- Wait for the operating system to boot up and the Ultrabook to complete the startup process.
- Once the Ultrabook is fully powered on, log in to your user account as usual.
- Verify that the Ultrabook recognizes the new memory module by checking the system’s memory or by navigating to the system information.
Before powering on your Ultrabook, make sure it is connected to a power source if required. This will ensure that the battery is charged, allowing for uninterrupted operation during the startup process.
Press the power button on your Ultrabook to initiate the bootup sequence. The screen will display the manufacturer’s logo, followed by the operating system’s loading screen. The time it takes for the Ultrabook to fully boot up may vary depending on your specific model and system configuration.
After the operating system has finished loading, you’ll be prompted to log in to your user account. Enter your credentials as usual and proceed to the desktop or home screen.
To confirm that the new memory module has been successfully recognized by the system, navigate to the system information or check the memory settings within the operating system. It should display the updated amount of installed memory, reflecting the upgrade.
If everything appears as expected and your Ultrabook performs smoothly, congratulations! You have successfully installed new memory in your ASUS Ultrabook B56Ca.
Remember to keep your Ultrabook’s software and firmware updated to ensure optimal performance with the new memory module. Enjoy the improved speed and multitasking capabilities that the memory upgrade brings!
Conclusion
Congratulations on successfully installing new memory in your ASUS Ultrabook B56Ca! Upgrading the memory can significantly improve your Ultrabook’s performance, allowing you to run more programs simultaneously and enjoy a smoother user experience.
We started by gathering the necessary tools, including an anti-static wrist strap, small screwdriver set, and a compatible memory module. Then, we carefully turned off the Ultrabook and located the memory slot by removing the bottom panel.
Afterward, we inserted the new memory module, ensuring it was seated properly and securely. We then reattached and tightened the bottom panel, taking care to align any clips or connectors. Finally, we powered on the Ultrabook and verified that the new memory module was recognized by the system.
Remember, if at any point during the installation process you felt unsure or uncomfortable, it’s always a good idea to seek assistance from a professional or consult your Ultrabook’s user manual for specific instructions.
With the memory upgrade complete, you can now enjoy improved performance, faster multitasking, and a more efficient computing experience with your ASUS Ultrabook B56Ca. Don’t forget to keep your Ultrabook’s software and firmware up to date for optimal performance with the new memory.
Thank you for following this step-by-step guide. We hope it has been informative and helpful. If you have any further questions or concerns, feel free to reach out. Happy computing!