Introduction
Welcome to our guide on how to install a M.2 Solid State Drive (SSD). As technology advances, SSDs have become increasingly popular due to their lightning-fast speed and reliability. Upgrading your computer with an M.2 SSD can greatly enhance its performance, allowing for faster boot times, seamless multitasking, and quicker access to your files and applications.
But if you’re new to the world of M.2 SSDs, you might be wondering what exactly they are and why installing one is beneficial. In this guide, we will not only walk you through the installation process step-by-step but also provide you with a clear understanding of M.2 SSDs and the advantages they offer.
Before we dive into the details, it’s important to note that while M.2 SSDs are becoming increasingly common, not all computers are equipped with M.2 slots. Therefore, it’s crucial to check whether your motherboard has an available M.2 slot before proceeding with the installation.
In this guide, we’ll cover everything you need to know to successfully install an M.2 SSD in your computer. From checking compatibility to preparing for installation and securely installing the drive, we’ll guide you through each step of the process. So let’s get started and unleash the full potential of your computer with an M.2 SSD!
What is an M.2 Solid State Drive?
An M.2 Solid State Drive, commonly referred to as an M.2 SSD, is a small, rectangular storage device that connects directly to the motherboard of your computer. Unlike traditional hard disk drives (HDDs), which utilize mechanical components to read and write data, M.2 SSDs use flash memory technology to store and retrieve data quickly and efficiently.
M.2 SSDs come in various lengths and widths, with the most common sizes being 22mm wide and either 30mm, 42mm, 60mm, 80mm, or 110mm long. The size of the M.2 SSD is determined by the number of NAND chips it contains and its form factor, which includes factors such as the number of physical layers and the keying notch position.
One of the key advantages of an M.2 SSD is its compact and lightweight design. These drives are incredibly thin, typically less than 2mm thick, making them ideal for slim laptops and other devices with limited space for storage. Additionally, M.2 SSDs use the PCI Express (PCIe) or Serial ATA (SATA) interface to connect to the motherboard, allowing for high-speed data transfer rates.
Another notable feature of M.2 SSDs is their compatibility with the NVMe (Non-Volatile Memory Express) protocol. NVMe is a communication protocol specifically designed for solid-state drives, enabling them to take full advantage of the PCIe interface’s capabilities. This results in significantly faster data transfer speeds and reduced latency, ultimately improving overall system performance.
Furthermore, M.2 SSDs are known for their durability and reliability. Since they don’t contain any moving parts, such as spinning disks or read/write heads, they are less prone to mechanical failures. This makes them more resistant to shocks, vibrations, and temperature fluctuations, making them a reliable choice for storing important data.
In summary, an M.2 Solid State Drive is a compact and high-performance storage device that connects directly to the motherboard of your computer. It offers faster data transfer speeds, improved system performance, and enhanced reliability compared to traditional hard disk drives. Now that you have a clear understanding of what an M.2 SSD is, let’s explore the benefits of installing one in your computer.
Why Install an M.2 Solid State Drive?
There are several compelling reasons to install an M.2 Solid State Drive (SSD) in your computer. Upgrading from a traditional hard disk drive (HDD) to an M.2 SSD can bring about significant improvements in performance, speed, and efficiency. Let’s explore the key benefits of installing an M.2 SSD.
1. Incredible Speed: M.2 SSDs are known for their lightning-fast read and write speeds. With sequential read and write speeds reaching up to 3,500 MB/s and 2,500 MB/s, respectively, M.2 SSDs can drastically reduce load times for applications and games. This means you can boot up your computer in seconds, launch programs quicker, and experience smoother overall performance.
2. Improved System Responsiveness: The fast access times of M.2 SSDs result in enhanced system responsiveness. Tasks like file transfers, loading large multimedia files, and running multiple applications simultaneously become seamless and lag-free. You’ll notice a significant improvement in your computer’s ability to handle intensive tasks, resulting in a more fluid user experience.
3. Efficient Multitasking: M.2 SSDs excel at multitasking due to their high random read and write speeds. This allows you to work on multiple applications simultaneously without experiencing performance bottlenecks. You can easily switch between tasks, open and close programs quickly, and multitask efficiently without any slowdowns.
4. Increased Productivity: The improved speed and responsiveness of an M.2 SSD can boost your productivity. Whether you’re a professional working with large files or a gamer who demands seamless gameplay, M.2 SSDs provide the performance needed to accomplish tasks faster and more efficiently.
5. Energy Efficiency: M.2 SSDs consume less power compared to traditional HDDs, which translates to lower energy consumption and improved battery life for laptops and portable devices. This makes M.2 SSDs an excellent choice for users who prioritize energy efficiency and want to extend the battery life of their devices.
6. Reliability and Durability: M.2 SSDs are more durable than HDDs as they lack moving mechanical parts. This makes them more resistant to shock, vibration, and accidental drops. Additionally, M.2 SSDs have a longer lifespan and greater endurance, ensuring that your data remains secure and accessible for years to come.
7. Space-saving Design: M.2 SSDs have a compact form factor, allowing for easy installation in laptops and devices with limited space. Their slim profile and small footprint make them ideal for slim and lightweight devices without compromising on storage capacity or performance.
In summary, installing an M.2 Solid State Drive brings numerous benefits, including lightning-fast speed, improved system responsiveness, efficient multitasking, increased productivity, energy efficiency, reliability, durability, and a space-saving design. Now that you understand the advantages of M.2 SSDs, let’s move on to the next section and check the compatibility of your system for installation.
Compatibility Check
Before proceeding with the installation of an M.2 Solid State Drive (SSD), it’s essential to check whether your system is compatible with this type of storage device. Here are a few key factors to consider when performing a compatibility check:
1. Motherboard Compatibility: The first and most crucial aspect to examine is whether your motherboard has an available M.2 slot. Look for the M.2 slot on the motherboard itself or consult the motherboard’s documentation to determine if it supports M.2 SSDs. Additionally, check if the M.2 slot supports the NVMe protocol, as this will ensure optimal performance.
2. M.2 Form Factor: M.2 SSDs come in various sizes, denoted by their length and width measurements. Common form factors include 22mm wide with lengths of 30mm, 42mm, 60mm, 80mm, or 110mm. Ensure that your M.2 SSD size matches the available slot size on your motherboard to guarantee a proper fit.
3. Supported Interface: M.2 SSDs can use either the PCIe (PCI Express) or SATA (Serial ATA) interface. Check the specifications of your motherboard to determine which interface is supported by the M.2 slot. If the slot supports both PCIe and SATA, consider opting for a PCIe-based M.2 SSD for faster data transfer speeds.
4. BIOS and Firmware Update: In some cases, older motherboards may require a BIOS update to support M.2 SSDs. Check the manufacturer’s website for any available BIOS updates specific to your motherboard model. Additionally, make sure that your SSD’s firmware is up to date for optimal performance and compatibility.
5. Storage Capacity: Consider the storage capacity of the M.2 SSD you intend to install. Verify that the drive’s capacity meets your requirements and is supported by your motherboard. Keep in mind that some older motherboards may have limitations on the maximum storage capacity supported.
6. Additional Considerations: While not directly related to compatibility, it’s worth mentioning a few additional factors to consider. Ensure that you have enough space inside your computer case to accommodate the M.2 SSD. Check if your power supply unit (PSU) has sufficient power connectors or adapters for the SSD as well.
Performing a compatibility check ensures a smooth installation process and prevents any compatibility issues that may arise. It’s important to thoroughly research and understand your computer’s specifications and limitations before purchasing an M.2 SSD.
By verifying motherboard compatibility, checking the M.2 form factor, confirming the supported interface, updating the BIOS and firmware if necessary, considering the storage capacity, and addressing any additional considerations, you can confidently move forward with the installation process. Now that you have ensured compatibility, let’s move on to the next section and prepare for the installation of the M.2 SSD.
Preparing for Installation
Before you begin the installation process of your M.2 Solid State Drive (SSD), it’s crucial to make the necessary preparations to ensure a smooth and successful installation. Here are some essential steps to follow:
1. Gather the Tools: Make sure you have all the necessary tools and equipment on hand. This may include a screwdriver, an antistatic wristband (optional but recommended), and any cables or adapters required for connecting the SSD to your motherboard.
2. Read the Documentation: Carefully read the documentation and user manual provided by the SSD manufacturer. Familiarize yourself with any specific installation instructions, precautions, or recommendations mentioned in the documentation.
3. Backup Your Data: It’s always a good practice to back up your data before making any hardware changes or installations. Create a backup of your important files, documents, and applications to an external storage device or cloud service to prevent data loss during the installation process.
4. Shut Down Your Computer: Before working on your computer, ensure that it is powered off completely. Shut down the system properly and disconnect the power cord from the electrical outlet to avoid any risk of electric shock.
5. Ground Yourself: To protect the SSD and other components from electronic discharge, consider wearing an antistatic wristband or periodically touch a grounded metal object to discharge any static electricity buildup in your body. This ensures that you won’t accidentally damage any sensitive electronics during the installation process.
6. Locate the M.2 Slot: Open the computer case and locate the M.2 slot on your motherboard. Refer to the motherboard’s documentation to find the exact location and any specific instructions for accessing the M.2 slot.
7. Remove the Cover or Heatsink: If your motherboard has a protective cover or heatsink over the M.2 slot, carefully remove it to access the slot. Some covers may be secured with screws, while others may have clips or levers that need to be released.
8. Check for Standoffs: Take a close look at the M.2 slot area to ensure that there are no misplaced standoffs or other obstructions that may interfere with the installation process. If you notice any, gently remove or adjust them to create a clear path for the SSD.
9. Locate the Mounting Screw: Depending on your motherboard, there may be a mounting screw included, specifically for securing the M.2 SSD. Consult the motherboard’s documentation to locate the appropriate mounting screw and keep it ready for the installation.
10. Review the Installation Steps: Take a moment to review the installation steps provided by the SSD manufacturer. Make sure you understand the sequence of actions required for a proper installation, including how to insert and secure the M.2 SSD in the slot and any additional steps that may be necessary.
By gathering the necessary tools, reading the documentation, backing up your data, shutting down your computer, grounding yourself, locating the M.2 slot, removing any cover or heatsink, checking for standoffs, locating the mounting screw, and reviewing the installation steps, you will be well-prepared for the next phase: installing the M.2 SSD. Now let’s move on to the detailed steps of the installation process in the next section.
Step 1: Shutting Down and Opening the Computer Case
Before you can begin installing your M.2 Solid State Drive (SSD), it’s essential to shut down your computer properly and open the computer case to access the internal components. Follow these steps to ensure a safe and smooth process:
1. Save and Close Programs: Save any open documents or projects and close all running programs. This will prevent any data loss or interruptions during the shutdown process.
2. Shut Down the Computer: Click on the Start menu and select “Shut down” or “Turn off” to power off your computer. Wait for the system to completely shut down before proceeding to the next step.
3. Unplug the Power Cord: Disconnect the power cord from the wall outlet or power strip to ensure that there is no active electrical connection. This is an important safety step to avoid any electrical shock or damage to your computer components.
4. Ground Yourself: To prevent static electricity from damaging any sensitive components, it’s important to ground yourself. You can do this by wearing an antistatic wristband or by frequently touching a grounded metal object to discharge any static buildup in your body.
5. Locate the Screws or Latches: Inspect the computer case and identify the screws or latches that hold the side panel in place. Depending on the case design, there may be thumb screws, Phillips screws, or quick-release latches that need to be loosened or removed.
6. Remove the Side Panel: Once you’ve identified the screws or latches, carefully remove the side panel of the computer case. Place it aside in a safe location, as you may need to reattach it later after completing the installation.
7. Ground Yourself Again: Before touching any internal components, ground yourself once more to discharge any potential static electricity that may have accumulated during the case removal process.
8. Inspect the Internal Components: With the computer case open, take a moment to inspect the internal components, including the motherboard, PCIe slots, SATA ports, and other existing drives. This will help you identify the location of the M.2 slot for the SSD installation.
9. Note Cable Connections: As you inspect the internal components, it’s a good idea to make a mental note of the cable connections. This will be helpful when reconnecting the cables later, ensuring that everything is properly reconnected for the system to function correctly.
10. Handle Components with Care: During the entire process of shutting down and opening the computer case, exercise caution when handling the internal components. Avoid unnecessary jostling or applying excessive force to prevent any damage to the delicate parts of your computer.
By following these steps, you have successfully shut down your computer and opened the computer case, preparing it for the installation of the M.2 SSD. In the next section, we will locate the M.2 slot on the motherboard and continue with the installation process.
Step 2: Finding the M.2 Slot
After opening the computer case, the next step in installing your M.2 Solid State Drive (SSD) is to locate the M.2 slot on your motherboard. The M.2 slot is where the SSD will be inserted and connected to the motherboard. Follow these steps to find the M.2 slot:
1. Identify the Motherboard: Take a careful look at the motherboard inside your computer case. The motherboard is the large circuit board that connects and powers all the components of your computer.
2. Consult the Motherboard Manual: If you have access to your motherboard manual, refer to it to find the exact location of the M.2 slot. The manual should provide detailed diagrams and instructions specific to your motherboard model.
3. Look for the M.2 Label: In the absence of a manual, visually scan the motherboard for any labels or markings that indicate the presence of an M.2 slot. Look for the term “M.2” or variations such as “M-Key” or “M.2 socket”. These labels may be printed near the PCIe slots or around the storage connectors.
4. Examine the Motherboard Layout: Some motherboards have conveniently placed a dedicated slot for the M.2 SSD. Look for a longer, slender slot with a keying notch that matches the size and shape of your M.2 SSD. It typically looks like a horizontal slot with contact pins in it.
5. Check the Manual of Other Installed Drives: If you have other storage drives already installed, such as traditional HDDs or SATA SSDs, their manual or spec sheet may mention the location of the M.2 slot. Look for any references to M.2 slots or additional storage expansion options.
6. Research Online: If you’re still unsure about the location of the M.2 slot, you can search online for the specifications or reviews of your motherboard model. Many websites, forums, and manufacturer support pages provide detailed information about the layout and features of specific motherboard models.
7. Take Precautions: While searching for the M.2 slot, be mindful of the other components and connectors on the motherboard. Take note of any PCIe slots, RAM slots, or other delicate components that may be adjacent to the M.2 slot to avoid accidentally damaging or interfering with them during the installation.
Locating the M.2 slot is an important step before proceeding with the installation of your M.2 SSD. By following these steps and referring to your motherboard manual or online resources, you will successfully identify the M.2 slot on your motherboard. In the next section, we will move on to the actual installation of the M.2 SSD into the slot.
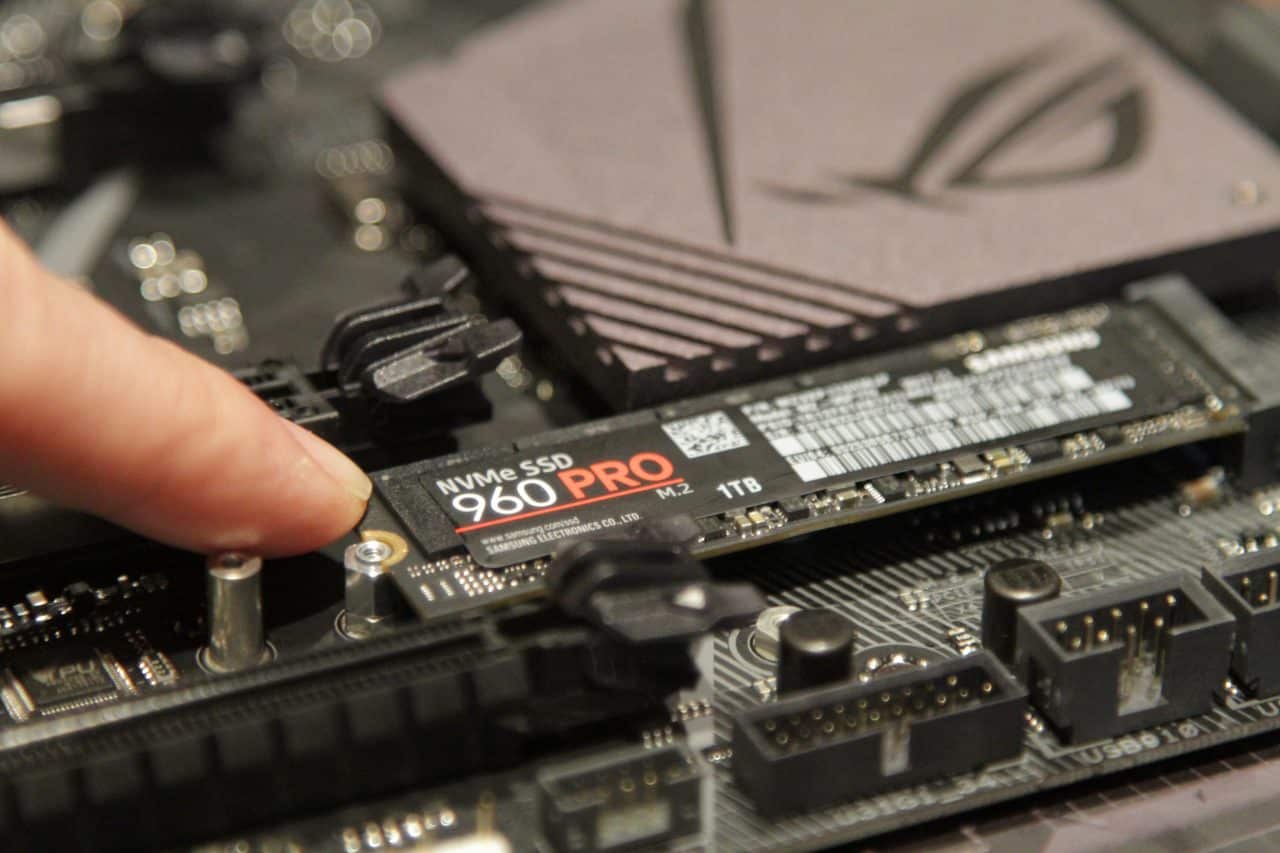
Step 3: Installing the M.2 Solid State Drive
Now that you have located the M.2 slot on your motherboard, it’s time to proceed with installing the M.2 Solid State Drive (SSD). Follow these steps carefully to ensure a successful installation:
1. Handle the M.2 SSD with Care: Before touching the SSD, make sure your hands are clean and dry to prevent any damage from static electricity or dirt. Handle the SSD by its edges, avoiding contact with the gold connectors or circuitry.
2. Align the Notch: Examine the M.2 SSD and locate the notch on its connector edge. This notch corresponds to the keying notch on the M.2 slot. Align the notches to ensure that the SSD is inserted in the correct orientation.
3. Insert the M.2 SSD: Gently insert the M.2 SSD into the M.2 slot on the motherboard at an angle, aligning the gold pins with the corresponding slots in the M.2 socket. Apply even pressure to the top of the SSD and push it down until it is fully seated in the M.2 slot.
4. Secure the M.2 SSD: Depending on your motherboard and SSD model, you may need to secure the M.2 SSD with a mounting screw. Refer to your motherboard’s manual to locate the appropriate screw hole near the M.2 slot. Insert the screw and tighten it to secure the SSD in place.
5. Note the Screw Tightness: It’s important not to overtighten the mounting screw as this could damage the SSD or the motherboard. Simply tighten it until it is snug to keep the SSD securely in place without applying excessive force.
6. Replace the Cover or Heatsink: If your motherboard had a protective cover or heatsink over the M.2 slot, carefully reattach it over the installed M.2 SSD. Ensure that it is properly aligned and secured according to the manufacturer’s instructions.
7. Double-Check the Connection: Before closing the computer case, double-check that the M.2 SSD is firmly inserted into the M.2 slot and securely fastened with the mounting screw. Verify that the connection is stable and that the SSD is not loose or wobbly in the slot.
8. Verify Compatibility and Features: If desired, consult your motherboard’s manual or manufacturer’s website to confirm that the installed M.2 SSD is compatible and operating at its full potential. Some motherboards may require additional configuration or settings adjustments to fully utilize the features of the M.2 SSD.
Congratulations! You have successfully installed the M.2 Solid State Drive into the M.2 slot on your motherboard. The SSD is securely connected and ready to unlock faster performance and improved storage capabilities. In the next section, we will cover the necessary steps for securing the M.2 SSD in place to ensure stability during operation.
Step 4: Securing the M.2 Solid State Drive in Place
After installing the M.2 Solid State Drive (SSD) into the M.2 slot, it’s important to secure it properly to ensure stability and reliable performance. Follow these steps to securely fasten the M.2 SSD in place:
1. Locate the Mounting Screw Hole: Check your motherboard’s manual or the markings near the M.2 slot to identify the specific mounting screw hole designated for securing the M.2 SSD. It is usually a small hole located near the end of the SSD slot or labeled “M.2 Screw”.
2. Choose the Correct Mounting Screw: Most motherboards provide a mounting screw for securing the M.2 SSD. If your motherboard did not come with one, you can typically find compatible mounting screws at computer hardware stores. Ensure that the screw matches the specifications outlined in your motherboard’s manual.
3. Carefully Insert the Mounting Screw: Take the mounting screw and insert it into the designated screw hole near the M.2 SSD. Gently rotate the screw clockwise until it is tightened securely, but be cautious not to overtighten it, as this can damage the SSD or motherboard.
4. Check Firmness: After tightening the mounting screw, gently shake the computer case or apply light pressure to the M.2 SSD. Ensure that the SSD is secured firmly in the slot and that there is no noticeable movement or looseness. This step confirms that the SSD is properly fastened in place.
5. Reattach the Cover or Heatsink: If you had to remove a protective cover or heatsink to access the M.2 slot, carefully reattach it. Align the cover or heatsink properly and secure it according to the manufacturer’s instructions. This step adds an extra layer of protection and stability to the M.2 SSD.
6. Inspect Surrounding Components: Take a moment to inspect the area surrounding the M.2 SSD. Ensure that no cables, connectors, or other components are interfering with the SSD or exerting pressure on it. Adjust any cables or components if needed to avoid any potential damage or loosening of the SSD connection.
7. Verify a Tight Connection: Before closing the computer case, verify that the M.2 SSD is securely fastened in place. Ensure that all screws are tightened properly, and the SSD is snug within the M.2 slot. A tight and stable connection ensures reliable performance and prevents any accidental disconnections.
8. Double-Check Compatibility Settings: Depending on your motherboard, there may be specific BIOS or UEFI settings related to M.2 SSDs. Double-check the motherboard manual or manufacturer’s website for any recommended settings or updates that optimize the performance and compatibility of the installed M.2 SSD.
By effectively securing the M.2 Solid State Drive in place, you ensure that it remains stable during operation and can function optimally. Now that the SSD is securely fastened, we can proceed to the next step and close the computer case before powering up the system.
Step 5: Closing the Computer Case and Powering On
With the M.2 Solid State Drive (SSD) securely installed and fastened inside the M.2 slot, it’s time to close the computer case and power on your system. Follow these steps to complete the installation process:
1. Position the Side Panel: Ensure that any cables or connectors are neatly arranged inside the computer case. Carefully position the side panel back onto the case, aligning it with the screw holes on the case frame.
2. Secure the Side Panel: Using the appropriate screws or latches, tighten the side panel onto the case. Start with one corner and gradually secure the remaining screws or latches, ensuring that the side panel is securely attached to the case.
3. Reconnect Power and Peripherals: Reconnect the power cord to the wall outlet or power strip. If there are any peripherals, such as monitors, keyboards, or mice, that were disconnected during the installation process, reconnect them to the appropriate ports.
4. Double-Check Connections: Verify that all cables, including power and data cables, are securely connected to their respective ports. Check the connections of any other drives or peripherals you may have, ensuring that nothing has become loose or disconnected during the installation.
5. Power On the System: Press the power button of your computer to switch it on. You should see the system booting up, and you may hear the familiar startup sounds or see the motherboard manufacturer’s logo on your screen.
6. Check for SSD Recognition: As the system boots up, pay attention to any messages or prompts on the screen. Some systems may display a message indicating the presence of a new drive, such as “New Hardware Detected” or “Installing Device Drivers”.
7. Access the BIOS or UEFI Settings (Optional): If necessary, enter the BIOS or UEFI settings of your motherboard by pressing the specified key during the startup process. Verify that the M.2 SSD is recognized in the system configuration and adjust any necessary settings for optimal performance.
8. Verify SSD Functionality: Once you have accessed the operating system, check that the M.2 SSD is functioning correctly. Open your file explorer or disk management utility and verify that the SSD is listed as a storage device with the correct capacity.
By securely closing the computer case and powering on the system, you have completed the installation of the M.2 SSD. Ensure that the system recognizes the SSD correctly and that it is functioning as expected. Congratulations! You can now enjoy the benefits of faster data access and improved performance provided by the M.2 Solid State Drive.
Step 6: Verifying the Installation
After successfully installing your M.2 Solid State Drive (SSD), it’s crucial to verify that the installation has been completed accurately and that the SSD is functioning correctly. Follow these steps to ensure a successful installation:
1. Check Drive Recognition: Open your computer’s file explorer or disk management utility and verify that the M.2 SSD is listed as a recognized storage device. It should display the correct storage capacity and be labeled accordingly.
2. Verify Drive Capacity: Compare the storage capacity listed for the M.2 SSD with the specifications provided by the manufacturer. Ensure that the drive capacity matches the expected size and that no significant discrepancies are present.
3. Check Drive Health: Install a reputable drive health monitoring tool, such as CrystalDiskInfo or Samsung Magician, to check the health and performance of your M.2 SSD. Monitor the SSD’s temperature, firmware version, and any signs of potential issues that may arise.
4. Run Benchmark Tests: Use benchmarking software, like CrystalDiskMark or AS SSD Benchmark, to evaluate the performance of your M.2 SSD. Run tests to measure the sequential and random read/write speeds, ensuring that they align with the specifications provided by the manufacturer.
5. Verify Boot Time: Restart your computer and time the boot process. With the M.2 SSD installed, you should notice a significant improvement in boot time compared to traditional hard disk drives. If the system boots quickly and smoothly, it indicates successful installation.
6. Test File Transfers: Copy a large file or folder from one location to another within your computer to verify that the M.2 SSD performs efficiently in terms of read and write speeds. If the file transfer completes quickly and without any issues, it indicates the SSD is functioning properly.
7. Monitor System Performance: Keep an eye on your system’s overall performance after installing the M.2 SSD. Notice improvements in application loading times, responsiveness, and multitasking capabilities. If you experience smoother operations and a noticeable boost in performance, the installation was successful.
8. Check for Firmware Updates: Regularly visit the manufacturer’s website or use their software tools to check for any firmware updates for your M.2 SSD. Keeping your SSD firmware up to date ensures optimal performance, reliability, and compatibility with the latest technologies.
By thoroughly verifying the installation of your M.2 SSD and assessing its recognition, capacity, health, performance through benchmark tests, boot time, file transfers, system performance, and firmware updates, you can confirm that the installation was successful and that the M.2 SSD is functioning as intended. Enjoy the enhanced speed and performance that the SSD brings to your computer!
Conclusion
Congratulations on successfully installing your M.2 Solid State Drive (SSD)! By following the step-by-step instructions in this guide, you have unlocked the potential for faster performance, improved system responsiveness, and efficient multitasking.
We began by introducing M.2 SSDs and highlighting their compact design and use of flash memory technology, which offers fast data transfer speeds and enhanced durability. Next, we explored the benefits of installing an M.2 SSD, including incredible speed, improved system responsiveness, efficient multitasking, increased productivity, energy efficiency, reliability, durability, and a space-saving design.
We then moved on to the important step of checking compatibility to ensure that your motherboard supports an M.2 slot and that the SSD matches the size and interface required. Following that, we prepared for the installation by gathering the necessary tools, reading the documentation, backing up data, shutting down the computer, grounding ourselves, locating the M.2 slot, and removing any covers or heatsinks.
In the subsequent steps, we covered the process of installing the M.2 SSD into the slot, securing it in place with a mounting screw, closing the computer case, and reconnecting the power and peripherals. Once the installation was complete, we emphasized the significance of verifying the installation by checking drive recognition, capacity, health, and performance through benchmark tests, as well as monitoring the system’s overall performance.
By completing these steps, you have successfully integrated the M.2 SSD into your computer system, unlocking its full potential and reaping the benefits of faster data access, improved performance, and increased productivity.
Remember to regularly check for firmware updates provided by the manufacturer to ensure your M.2 SSD remains up to date with the latest improvements and features. Continuously monitoring the health and performance of your SSD will help maintain its reliability and longevity.
With your newly installed M.2 Solid State Drive, you can enjoy a faster, more responsive computing experience, whether you’re gaming, handling large files, or simply navigating through everyday tasks. Take advantage of the increased speed and efficiency that the M.2 SSD brings to your system.
Thank you for following this installation guide, and we hope it has helped you successfully install and optimize your M.2 Solid State Drive.