Introduction
Welcome to the world of ultrabooks, sleek and powerful devices designed for ultimate productivity and portability. These slim and lightweight laptops offer a wide range of features, including advanced touchpad functionality that can greatly enhance your user experience. However, there may be instances when the touchpad on your ultrabook is not enabled or working properly, leaving you in need of a solution. Don’t worry, we’ve got you covered!
In this article, we will explore various methods to enable the touchpad on your ultrabook. Whether you’re using a Windows or MacOS system, we’ll provide step-by-step instructions to help you get your touchpad up and running in no time. So, let’s dive in and discover how to unleash the full potential of your ultrabook’s touchpad!
Note: The methods mentioned in this article are general troubleshooting steps and may vary slightly depending on the make and model of your ultrabook. Be sure to consult your device’s user manual or manufacturer’s website for specific instructions related to your device.
Method 1: Checking the hardware key or function key
Before diving into software settings and driver updates, let’s start with a simple step – checking the hardware key or function key on your ultrabook that controls the touchpad. Many ultrabooks have a dedicated key or a function key combination to enable or disable the touchpad.
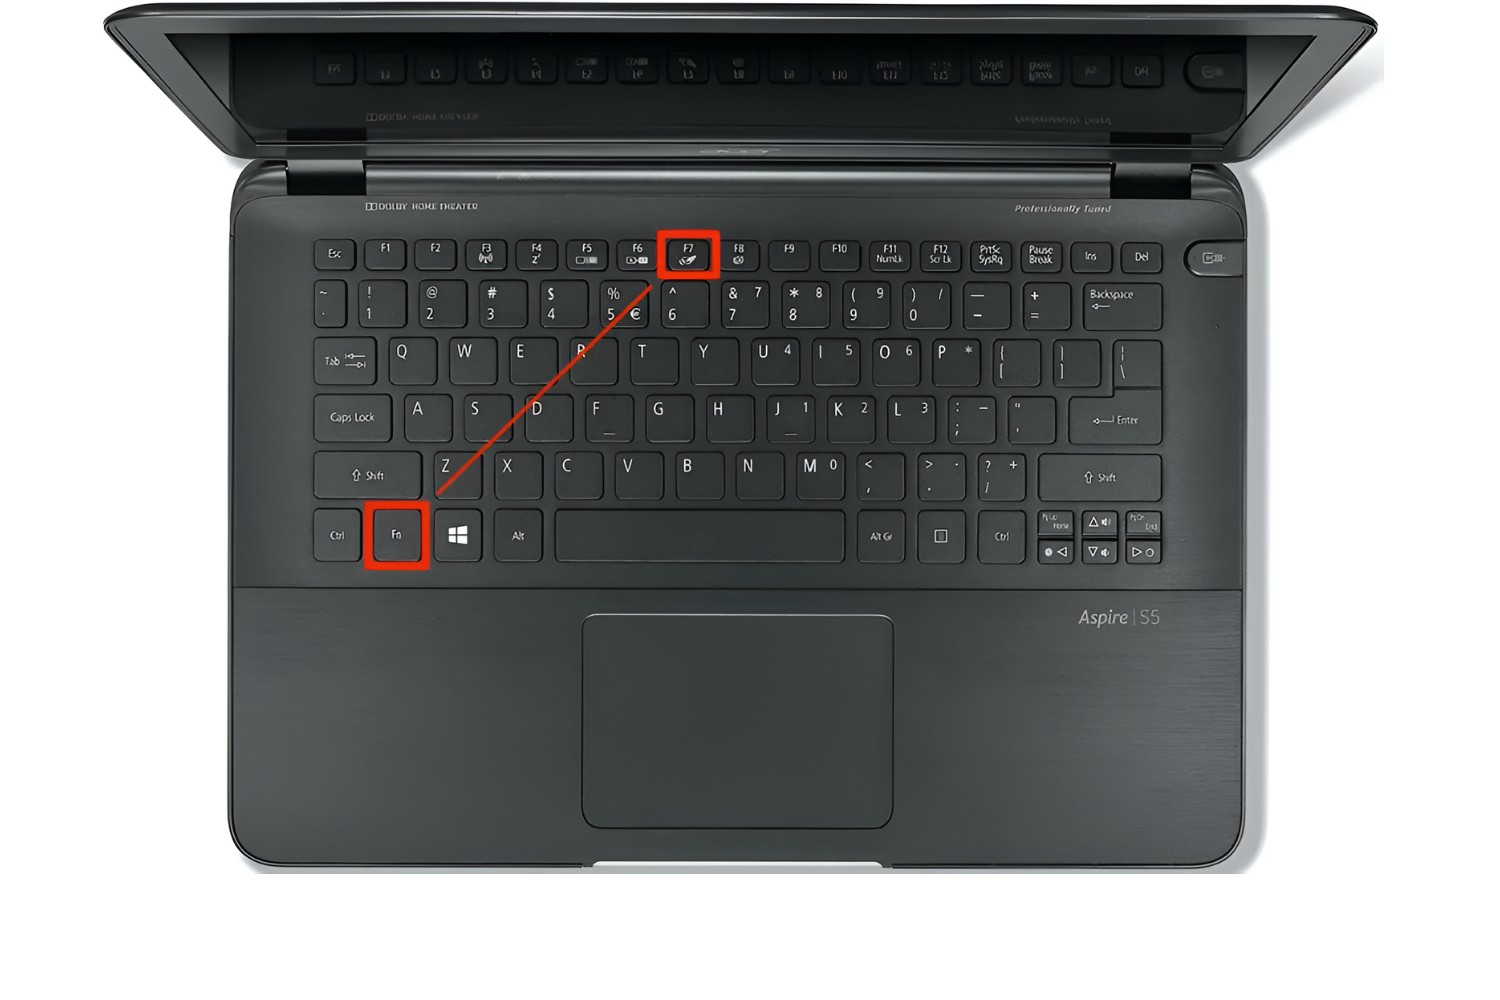
1. Take a closer look at your ultrabook’s keyboard and locate the touchpad control key. It is often represented by an icon that looks like a touchpad or has finger-like symbols.
2. If you have located the touchpad control key, press it once and check if the touchpad starts working. Some keys have LED indicators that light up when the touchpad is enabled or disabled.
3. Alternatively, your ultrabook might have a function key combination to control the touchpad. Look for a key that has an icon resembling a touchpad (often the F5, F6, F7, or F8 key) and an “Fn” key. Press and hold the “Fn” key and then press the corresponding touchpad function key to toggle the touchpad on or off.
4. After pressing the touchpad control key or the function key combination, give it a few moments to take effect. Your touchpad should now be enabled, and you can test it by moving your finger on the touch-sensitive surface.
If this method resolved your touchpad issue, you can now enjoy smooth navigation and multitasking on your ultrabook. However, if the touchpad is still not responding, don’t worry. We have more methods to explore!
Method 2: Enabling the touchpad via settings in the Control Panel
If the hardware key or function key method didn’t work for you, don’t worry. We can try enabling the touchpad through the settings in the Control Panel. Here’s how:
1. Click on the Start menu and type “Control Panel” in the search bar. Select Control Panel from the search results.
2. In the Control Panel window, navigate to the “Hardware and Sound” section and click on “Mouse” or “Mouse and Touchpad” (the exact name may vary depending on your system).
3. In the Mouse or Mouse and Touchpad settings, go to the Touchpad tab. If you don’t see a dedicated Touchpad tab, look for an “Advanced” or “Device Settings” tab.
4. Within the Touchpad or Advanced/Device Settings tab, look for a checkbox or switch that says “Enable Touchpad” or “Touchpad Enabled.” Make sure the box is checked or the switch is in the On position.
5. Apply the changes by clicking the “Apply” or “OK” button, and then close the Control Panel window.
6. Test the touchpad by moving your finger across the touch-sensitive surface. It should now be enabled and responsive.
If the touchpad was previously disabled through the Control Panel settings, following these steps should re-enable it. However, if the touchpad is still not working, proceed to the next method to further troubleshoot the issue.
Method 3: Enabling the touchpad through the device driver settings
If the previous methods didn’t work, there may be an issue with the touchpad driver settings. Follow the steps below to enable the touchpad through the device driver settings:
1. Press the Windows key + X on your keyboard and select “Device Manager” from the menu that appears.
2. In the Device Manager window, expand the “Mice and other pointing devices” category by clicking on the arrow next to it.
3. Look for your touchpad device in the list. It is usually labeled as “Synaptics Touchpad,” “Elan Touchpad,” or something similar.
4. Right-click on the touchpad device and select “Enable” from the context menu. If the option is grayed out or not available, try selecting “Update driver” or “Properties” instead.
5. If you selected “Update driver,” follow the on-screen instructions to update the touchpad driver. If you chose “Properties,” go to the “Driver” tab and click on the “Enable” button if available.
6. Once the touchpad driver has been enabled or updated, close the Device Manager window.
7. Test the touchpad to see if it is now responsive. Move your finger across the touch-sensitive surface, and it should register your input.
If the touchpad driver was disabled or outdated, enabling it or updating it should resolve the issue. However, if the touchpad is still not functioning, continue to the next method to further troubleshoot the problem.
Method 4: Updating or reinstalling device driver
If the touchpad is still not working, it’s possible that the device driver needs to be updated or reinstalled. Follow these steps to update or reinstall the touchpad driver:
1. Press the Windows key + X on your keyboard and select “Device Manager” from the menu.
2. In the Device Manager window, locate the “Mice and other pointing devices” category and expand it.
3. Right-click on the touchpad device (e.g., “Synaptics Touchpad” or “Elan Touchpad”) and select “Update driver” from the context menu. You may also have the option to select “Uninstall device” or “Properties.”
4. If you choose “Update driver,” you will be prompted to select how you want to search for updated drivers: automatically or manually. It is recommended to choose the automatic option to let Windows search for the latest driver software.
5. If Windows detects a newer driver version, it will download and install it automatically. Follow the on-screen instructions to complete the update process.
6. If the automatic update option didn’t find a newer driver or didn’t resolve the issue, you can try the manual update. Visit the manufacturer’s website for your ultrabook’s model and search for the latest touchpad driver specifically designed for your operating system. Download the driver and follow the installation instructions provided by the manufacturer.
7. If you selected “Uninstall device,” confirm the action and then proceed to reinstall the touchpad driver. To do this, go to the manufacturer’s website, download the appropriate driver for your ultrabook, and follow the installation instructions.
8. After updating or reinstalling the touchpad driver, restart your ultrabook if prompted. Once the system reboots, check if the touchpad is functioning correctly.
If updating or reinstalling the touchpad driver didn’t solve the problem, move on to the next method to further troubleshoot and identify the issue.
Method 5: Checking for physical damage or loose connections
If the touchpad on your ultrabook is still not working after trying the previous methods, it’s time to investigate if there is any physical damage or loose connections contributing to the issue. Follow these steps to check for potential hardware-related problems:
1. Power off your ultrabook and disconnect any external peripherals connected to it.
2. Inspect the touchpad surface for any visible signs of damage, such as cracks, scratches, or liquid residue. If you notice any physical damage, it may require professional repair or replacement.
3. Gently press around the edges of the touchpad, checking for any loose connections. If the touchpad feels loose or wobbly, it could indicate a loose cable connection or a faulty touchpad module.
4. If your ultrabook has removable panels, consider removing the panel covering the touchpad area (if possible) to inspect the internal connections. Make sure the touchpad cable is securely attached to the motherboard. If it appears loose, carefully reconnect it and ensure it is properly seated.
5. In some cases, dust or debris may accumulate beneath the touchpad, affecting its functionality. Use a can of compressed air to blow away any dirt or particles that may be interfering with the touchpad’s operation.
6. After performing the necessary checks and adjustments, reassemble your ultrabook and power it back on.
7. Test the touchpad to see if it is now functioning correctly. Move your finger across the touch-sensitive surface, and it should respond to your gestures.
If the touchpad still does not work after checking for physical damage and loose connections, there may be a more complex issue at hand. In such cases, it is advisable to seek professional assistance from a qualified technician or reach out to the manufacturer’s support team for further guidance.
Method 6: Enabling the touchpad through BIOS settings
If none of the previous methods have resolved the touchpad issue on your ultrabook, it is worth exploring the BIOS settings. In some cases, the touchpad may be disabled at the BIOS level. Follow these steps to enable the touchpad through the BIOS settings:
1. Restart your ultrabook and repeatedly press the designated key to enter the BIOS or UEFI settings during the boot process. The key varies depending on your ultrabook’s manufacturer but commonly includes the F2, F10, or Del key.
2. Once you enter the BIOS or UEFI settings, use the arrow keys to navigate to the “Advanced” or “Hardware” section.
3. Look for a menu or option related to the touchpad settings. It may be labeled as “Internal Pointing Device,” “Touchpad,” or something similar.
4. Verify that the touchpad is enabled in the BIOS settings. If it is currently disabled, use the arrow keys to select the option and press Enter to enable it.
5. Save the changes and exit the BIOS or UEFI settings. The key combination to save and exit might vary, but it is usually listed at the bottom of the screen.
6. Allow your ultrabook to boot up normally, and test the touchpad by moving your finger across the touch-sensitive surface. It should now respond and function as expected.
If enabling the touchpad through the BIOS settings resolved the issue, you can now enjoy the full functionality of your touchpad. However, if the touchpad is still unresponsive, it is recommended to seek professional assistance or contact the manufacturer’s support team for further troubleshooting.
Conclusion
Having the touchpad on your ultrabook enabled is essential for smooth and efficient navigation. If you encounter issues with your touchpad, the methods outlined in this article provide a comprehensive troubleshooting guide to help you address the problem.
Starting with the hardware key or function key method, you can quickly determine if the touchpad is disabled at a basic level. If that doesn’t work, you can proceed to the Control Panel settings to enable the touchpad or adjust its configurations.
If the touchpad remains unresponsive, further troubleshooting can be done through the device driver settings. Updating or reinstalling the touchpad driver can often resolve conflicts or compatibility issues that may be causing the problem.
Checking for physical damage or loose connections is another crucial step, as visible damage or faulty connections can affect the touchpad’s functionality. If necessary, consulting a professional or the manufacturer’s support team may be required for repair or replacement.
In rare cases, the touchpad may be disabled at the BIOS or UEFI settings. By accessing the system’s BIOS or UEFI, you can enable the touchpad to regain its full functionality.
Remember to consult your ultrabook’s user manual or the manufacturer’s website for specific instructions tailored to your device. These methods are general troubleshooting steps that can be applied to most ultrabooks, but it’s always best to refer to the appropriate resources for accurate information.
We hope that this article has been helpful in enabling the touchpad on your ultrabook. With your touchpad working properly, you can navigate with ease and enjoy the enhanced productivity and convenience it offers.