Introduction
Welcome to our guide on how to disable antivirus and firewall. In today’s digital world, antivirus software and firewalls play a crucial role in protecting our computers and networks from various cyber threats. They act as a defense mechanism, scanning and monitoring incoming and outgoing data to detect and block malicious activities. However, there may be instances where you need to temporarily disable these security measures, such as when troubleshooting network connectivity issues or installing certain software.
While disabling antivirus and firewall temporarily can be useful in specific scenarios, it’s important to understand the risks associated with doing so. By disabling these security features, you essentially expose your system and network to potential threats, leaving them vulnerable to malware infections, unauthorized access, and data breaches. Therefore, it’s crucial to exercise caution and only disable antivirus and firewall as a last resort or under the guidance of a trusted IT professional.
In this guide, we will provide step-by-step instructions on how to disable antivirus and firewall on both Windows and Mac operating systems. Additionally, we will cover how to re-enable these security measures once you no longer need them to ensure the continued protection of your computer and network.
It’s important to note that the instructions provided in this guide will vary depending on the antivirus software and firewall you’re using. We recommend referring to the documentation or support resources provided by the specific software or contacting their customer support for more accurate and detailed instructions tailored to your setup.
Now, let’s dive into the details and learn how to disable antivirus and firewall on your Windows or Mac computer.
Why would someone want to disable antivirus and firewall?
Antivirus software and firewalls are essential components of computer security. They provide protection against viruses, malware, and unauthorized access. However, there are situations where you may need to temporarily disable these security measures for legitimate reasons. Let’s explore some common scenarios where disabling antivirus and firewall can be necessary:
- Troubleshooting connectivity issues: Sometimes, antivirus software or firewalls can interfere with network connectivity and cause problems accessing certain websites, online services, or local network resources. In such cases, disabling these security measures can help identify if they are the root cause of the connectivity issue.
- Installing certain software: Some software installations require temporarily disabling antivirus and firewall to avoid conflicts. This is particularly common with applications that involve network communications or modify system settings.
- Running specific applications: Certain applications, such as virtual private network (VPN) clients or network monitoring tools, may require temporarily disabling antivirus and firewall to function properly. These applications often require low-level access to network resources, which can be blocked by security software.
- System performance: In rare instances, antivirus software or firewalls can consume a significant amount of system resources, causing slowdowns or performance issues. Disabling them temporarily can help troubleshoot or mitigate such performance-related problems, although this should be done with caution.
- Unnecessary blocking: In some cases, antivirus software or firewalls may flag legitimate applications or websites as malicious, resulting in false positives. Disabling these security measures can enable access to these trusted resources until the issue is resolved or the software is updated.
Before disabling antivirus and firewall for any reason, it’s crucial to assess the potential risks and weigh them against the benefits. Remember, by disabling these security measures, you expose your computer and network to potential threats. Therefore, it’s essential to have a clear understanding of the specific situation and consult with an IT professional if needed.
Now that we have explored the reasons why someone may need to disable antivirus and firewall, let’s move on to the next section and discuss the risks associated with disabling these security measures.
Risks of disabling antivirus and firewall
While there may be legitimate reasons for temporarily disabling antivirus and firewall, it’s essential to understand the risks involved in doing so. Antivirus software and firewalls are crucial for protecting your computer and network from various cyber threats. Here are some of the risks you should be aware of:
- Malware infections: One of the primary functions of antivirus software is to detect and block malware. By disabling your antivirus, you remove this layer of protection, making your system vulnerable to malware infections. Malicious software can cause severe damage, including stealing sensitive information, corrupting files, or rendering your computer inoperable.
- Unauthorized access: Firewalls act as a barrier between your computer and the outside world, blocking unauthorized access attempts. Disabling your firewall removes this protection, allowing hackers to exploit vulnerabilities in your system and gain unauthorized access to your computer or network. This can lead to data breaches, identity theft, or even the compromise of your entire network.
- Increased vulnerability to network attacks: Without a firewall, your computer becomes an easy target for network-based attacks, such as port scanning, denial-of-service (DoS) attacks, or intrusions. These attacks can disrupt your network, compromise your system’s stability, or result in the theft of sensitive information.
- Data loss or corruption: Antivirus software often includes features that help protect your data from accidental loss or corruption. Disabling antivirus removes these safeguards, increasing the risk of data loss through accidental deletion, hardware failure, or other unforeseen circumstances.
- Negative impact on system performance: While antivirus software and firewalls can sometimes impact system performance, disabling them without valid reason may expose your system to increased resource consumption from malicious processes or network attacks, resulting in degraded performance or instability.
It’s important to note that the risks associated with disabling antivirus and firewall can vary depending on various factors, including your computer’s configuration, the specific threats present in your environment, and the duration of the disablement. Therefore, it’s crucial to weigh the potential risks against the benefits before making the decision to disable these security measures.
Now that you understand the risks involved, let’s move on to the next sections where we will provide step-by-step instructions on how to disable antivirus and firewall on both Windows and Mac systems.
How to disable antivirus on Windows
Disabling antivirus software on Windows may vary depending on the specific antivirus program you are using. The general steps outlined below should apply to most antivirus software. However, we recommend referring to the documentation or support resources provided by your antivirus vendor for accurate and detailed instructions tailored to your specific software version.
- Step 1: Find the antivirus software icon: Look for the antivirus software icon in the system tray, which is typically located in the bottom-right corner of your screen. Right-click on the icon to open the context menu.
- Step 2: Temporarily disable the antivirus: In the context menu, look for options like “Disable,” “Turn off,” or “Pause protection.” Select the appropriate option to disable the antivirus software temporarily. Some antivirus programs may require you to specify the duration for which you want to disable the protection.
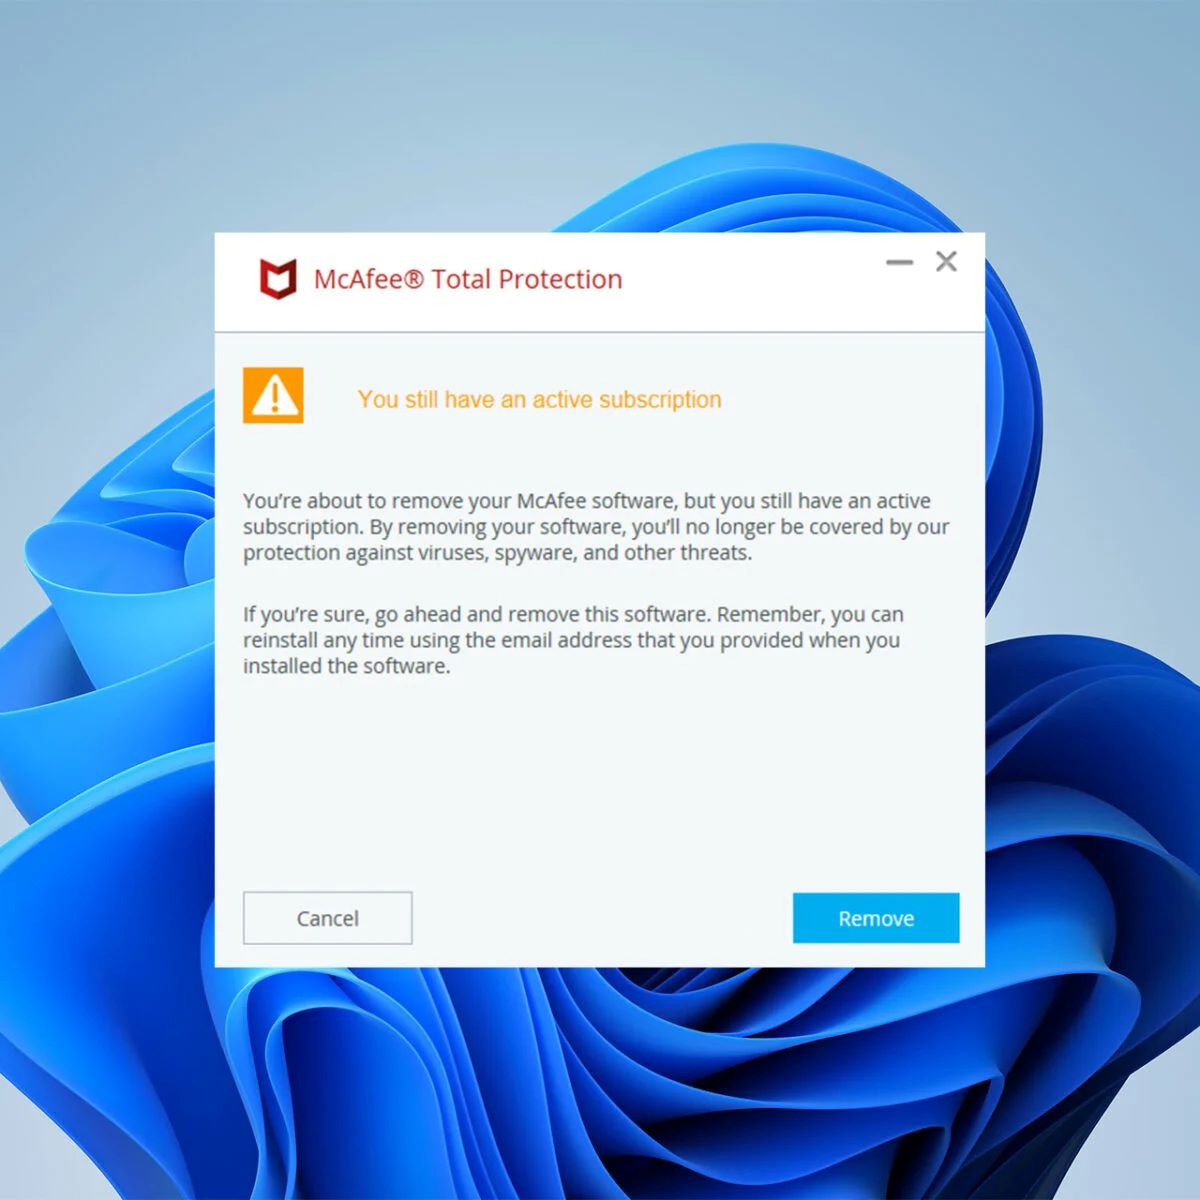
- Step 3: Confirm the disablement: Depending on the antivirus program, you may be prompted to confirm your action. Read the dialog box carefully and ensure you understand the consequences of disabling the antivirus. If you are confident in your decision, proceed with confirming the disablement.
It’s important to remember that when you disable the antivirus, your computer becomes vulnerable to malware infections. Therefore, it’s advisable to only disable the antivirus for the duration necessary and re-enable it once your specific task is complete.
After following these steps, your antivirus software should be temporarily disabled on your Windows system. Make sure to monitor your system closely and re-enable the antivirus as soon as you are done with the specific task you disabled it for.
Next, let’s move on to the next section where we will discuss how to disable antivirus on Mac systems.
How to disable antivirus on Mac
Disabling antivirus software on a Mac may vary depending on the specific antivirus program you are using. The steps outlined below should provide a general guide, but we recommend referring to the documentation or support resources provided by your antivirus vendor for accurate and detailed instructions tailored to your specific software version.
- Step 1: Locate the antivirus software: Look for the antivirus software icon in the menu bar at the top of your screen. Click on the icon to access the application’s menu.
- Step 2: Access the settings or preferences: In the application’s menu, look for options like “Preferences” or “Settings” and click on it to open the settings window.
- Step 3: Disable the antivirus: Within the settings or preferences window, look for options related to real-time protection, scanning, or overall system protection. Toggle the switch or uncheck the box next to the relevant option to disable the antivirus software temporarily. Some antivirus programs may require you to input your password to confirm the disablement.
- Step 4: Confirm the disablement: Depending on the antivirus program, a confirmation dialog may appear asking for your consent to disable the antivirus. Review the information presented to you and proceed with confirming the disablement if you are certain about your decision.
Keep in mind that disabling the antivirus leaves your Mac vulnerable to malware threats. It is important to only disable the antivirus for the necessary duration and re-enable it as soon as your specific task is completed.
After following these steps, your antivirus software should be temporarily disabled on your Mac system. However, remember to closely monitor your computer’s security status and re-enable the antivirus once the specific task is accomplished.
Now that you have learned how to disable antivirus on both Windows and Mac systems, let’s move on to the next section where we will discuss how to disable the firewall on Windows.
How to disable firewall on Windows
Disabling the firewall on a Windows computer can be done using the following steps. However, it’s important to note that disabling the firewall removes a crucial layer of defense against unauthorized access and network-based attacks. Only disable the firewall if absolutely necessary and remember to re-enable it as soon as you have completed the required task.
- Step 1: Open the Control Panel: Click on the “Start” button, located in the bottom-left corner of your screen, and search for “Control Panel”. Click on it to open the Control Panel window.
- Step 2: Access the Windows Firewall settings: In the Control Panel, search for “Windows Firewall” using the search bar at the top-right corner of the window. Click on the “Windows Defender Firewall” or “Windows Firewall” option to open the Firewall settings.
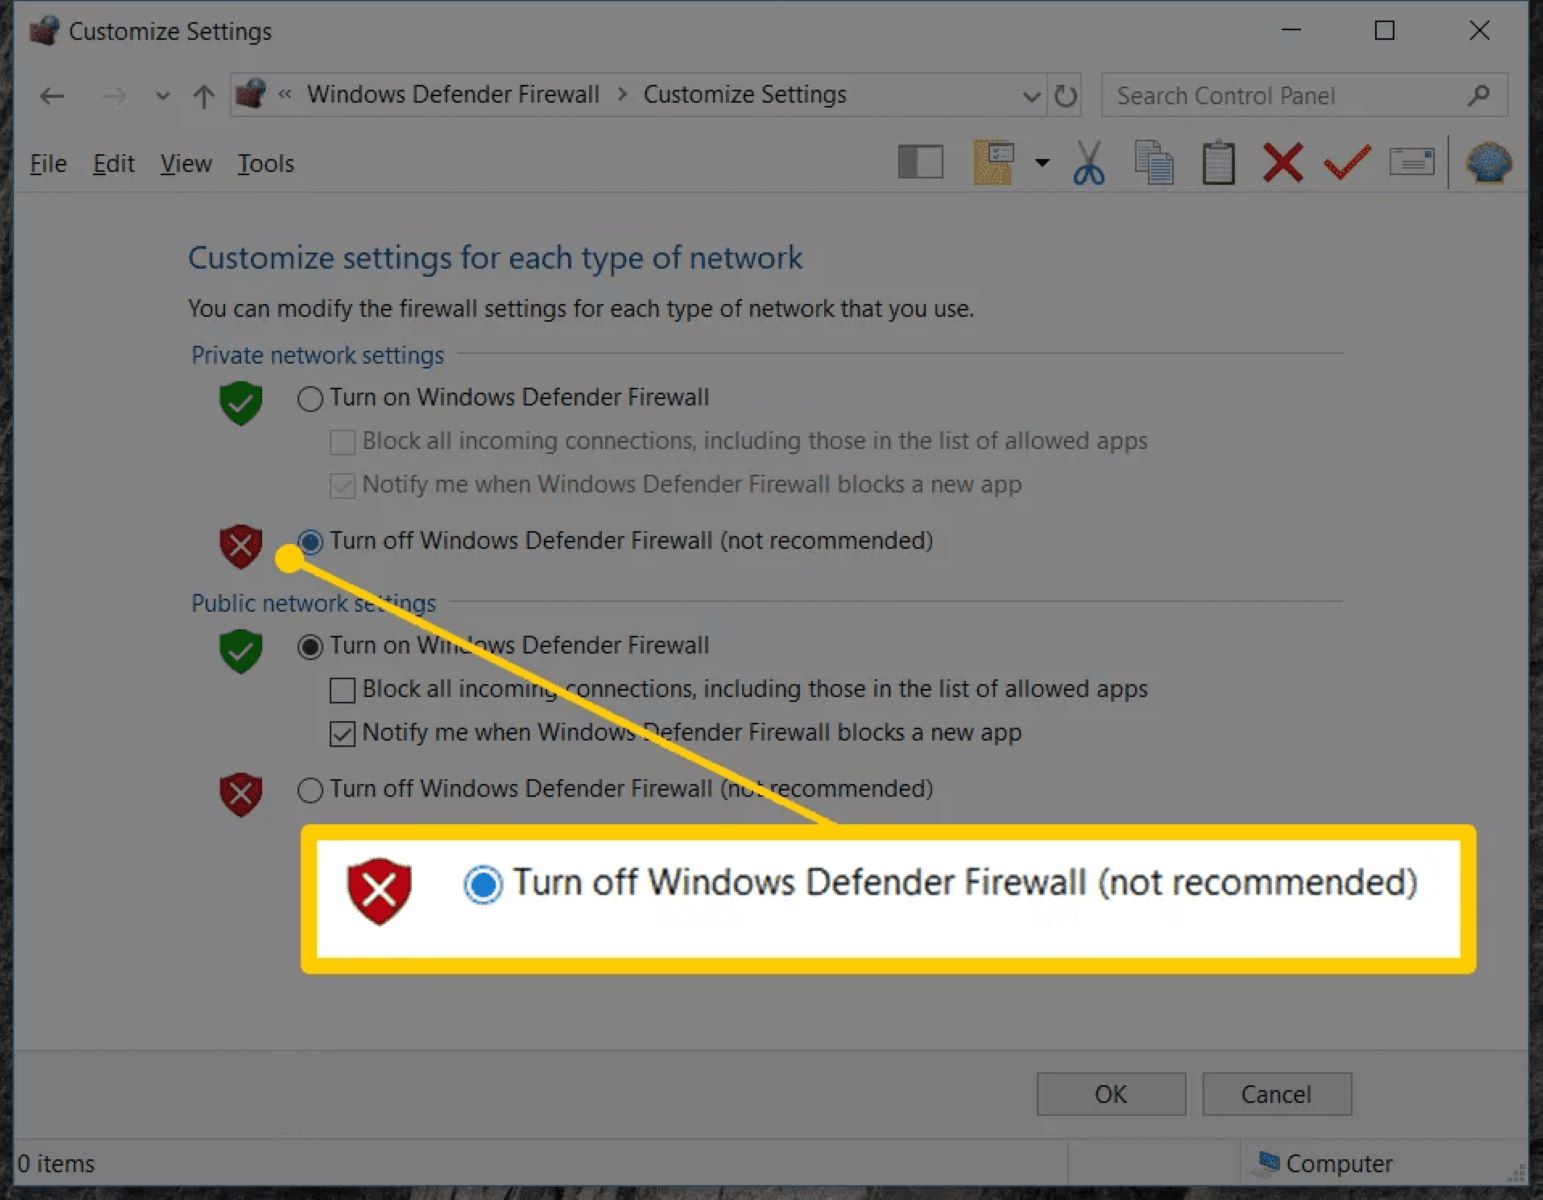
- Step 3: Turn off the firewall: In the Firewall settings window, you will see options to enable or disable the firewall for different networks (such as private and public networks). Select the network profile for which you want to disable the firewall, and click on the “Turn Windows Defender Firewall on or off” link in the left sidebar.
- Step 4: Disable the firewall: In the Windows Defender Firewall settings, select the option that says “Turn off Windows Defender Firewall” for the selected network profile. Click on the “OK” or “Apply” button to save the changes.
It’s important to remember that disabling the firewall exposes your computer to potential security risks. Only disable the firewall for the necessary duration and re-enable it as soon as your task is completed.
Following these steps should disable the firewall on your Windows computer. Remember to exercise caution and regularly update your system to stay protected from potential threats.
Next, let’s move on to the next section where we will discuss how to disable the firewall on Mac systems.
How to disable firewall on Mac
Disabling the firewall on a Mac computer can be done using the following steps. However, it’s important to note that disabling the firewall removes a crucial layer of defense against unauthorized access and network-based attacks. Only disable the firewall if absolutely necessary and remember to re-enable it as soon as you have completed the required task.
- Step 1: Open System Preferences: Click on the Apple menu at the top-left corner of your screen and select “System Preferences” from the dropdown menu.
- Step 2: Access the Security & Privacy settings: In the System Preferences window, locate and click on the “Security & Privacy” icon.
- Step 3: Unlock the settings: In the Security & Privacy settings, you may need to click on the lock icon at the bottom-left corner of the window to make changes. Enter your administrator password when prompted.
- Step 4: Disable the firewall: In the Security & Privacy settings, select the “Firewall” tab. Click on the “Turn Off Firewall” or “Stop” button to temporarily disable the firewall on your Mac.
It’s important to remember that disabling the firewall exposes your computer to potential security risks. Only disable the firewall for the necessary duration and re-enable it as soon as your task is completed.
Please note that the steps provided here may vary slightly depending on the version of macOS you are using. Refer to the official Apple documentation or consult the support resources provided by your firewall software vendor for more specific instructions tailored to your setup.
Now that you’ve learned how to disable the firewall on both Windows and Mac systems, we can move on to the next section where we will discuss how to re-enable antivirus and firewall after they have been temporarily disabled.
How to re-enable antivirus and firewall
After temporarily disabling antivirus and firewall on your computer, it is crucial to re-enable them to restore the protection and security they provide. Here’s how you can re-enable antivirus and firewall on both Windows and Mac systems:
Re-enabling antivirus on Windows:
- Step 1: Open the antivirus software: Find the antivirus software icon in the system tray on your Windows taskbar, typically located in the bottom-right corner of the screen. Right-click on the icon to open the context menu.
- Step 2: Enable the antivirus: In the context menu, look for options like “Enable,” “Turn on,” or “Resume protection.” Select the appropriate option to enable the antivirus software. Some antivirus programs may automatically enable themselves after a certain period of inactivity.
Re-enabling antivirus on Mac:
- Step 1: Open the antivirus software: Locate the antivirus software in the Applications folder on your Mac. Double-click on the application icon to launch it.
- Step 2: Access the settings or preferences: In the application’s menu, look for options like “Preferences” or “Settings” and click on it to open the settings window.
- Step 3: Enable the antivirus: Within the settings or preferences window, look for options related to real-time protection, scanning, or system protection. Toggle the switch or check the box next to the relevant option to enable the antivirus. Some antivirus programs may require you to input your password to confirm the enablement.
For both Windows and Mac systems, it is recommended to periodically check for updates to your antivirus software and keep it up to date to ensure the best protection against the latest threats.
Re-enabling firewall on Windows:
- Step 1: Open the Control Panel: Click on the “Start” button, search for “Control Panel”, and open it.
- Step 2: Access the Windows Firewall settings: In the Control Panel, search for “Windows Firewall” using the search bar at the top-right corner of the window. Click on the “Windows Defender Firewall” or “Windows Firewall” option to open the Firewall settings.
- Step 3: Enable the firewall: In the Windows Defender Firewall settings, select the network profile you want to enable the firewall for (private, public, or both). Then, select the option that says “Turn on Windows Defender Firewall” for the selected network profile and click on the “OK” or “Apply” button to save the changes.
Re-enabling firewall on Mac:
- Step 1: Open System Preferences: Click on the Apple menu at the top-left corner of your screen and select “System Preferences” from the dropdown menu.
- Step 2: Access the Security & Privacy settings: In the System Preferences window, click on the “Security & Privacy” icon.
- Step 3: Enable the firewall: In the Security & Privacy settings, select the “Firewall” tab. Click on the lock icon and enter your administrator password if needed. Then, click on the “Turn On Firewall” button to enable the firewall.
Remember, re-enabling antivirus and firewall restores the protection and security features of your computer. It is essential to keep them enabled at all times to safeguard your system and data from potential threats.
Now that you know how to re-enable antivirus and firewall, let’s move on to the final section of this guide, where we will provide some additional tips and considerations.
Additional tips and considerations
As you navigate the process of disabling and re-enabling antivirus and firewall on your computer, keep the following additional tips and considerations in mind:
- Use discretion when disabling: Only disable antivirus and firewall when absolutely necessary, and for the shortest possible duration. Leaving your computer unprotected for an extended period significantly increases the risk of malware infections and unauthorized access.
- Follow vendor instructions: It’s important to refer to the documentation or support resources provided by your antivirus and firewall vendors for accurate instructions. The steps provided in this guide are general and may vary depending on the specific software you have installed.
- Regularly update software: Keeping your antivirus and firewall software up to date ensures that you have the latest security patches and protection against emerging threats. Enable automatic updates whenever possible.
- Enable Windows/Mac built-in security features: In addition to third-party antivirus and firewall software, ensure that you have enabled the built-in security features offered by your operating system, such as Windows Defender on Windows or XProtect on Mac.
- Be cautious of suspicious emails and websites: Antivirus and firewall software offer a layer of protection, but it’s essential to exercise caution when interacting with emails or websites that may contain malicious content. Be wary of clicking on suspicious links or downloading files from untrusted sources.
- Consider a comprehensive security solution: Antivirus and firewall are vital components of computer security, but they are not the only measures you should rely on. Consider using a comprehensive security solution that includes features such as real-time scanning, web protection, and vulnerability detection.
- Consult with IT professionals: If you are uncertain or uncomfortable with disabling antivirus and firewall on your own, seek guidance from IT professionals. They can provide expert advice and ensure the necessary precautions are taken.
By following these tips and considering the implications of disabling and re-enabling antivirus and firewall, you can navigate these processes safely and effectively. Remember, the primary goal is to balance the need for troubleshooting or specific software requirements with maintaining the security and protection of your computer and network.
With these additional tips and considerations in mind, you are now equipped to manage antivirus and firewall settings on your computer. Ensure that you always prioritize the security of your system and stay vigilant against potential threats.
Conclusion
In today’s digital landscape, antivirus and firewall software play a crucial role in protecting our computers and networks from cyber threats. While there may be occasions where you need to temporarily disable antivirus and firewall for troubleshooting or specific software requirements, it’s important to understand the risks involved and exercise caution.
In this guide, we have provided step-by-step instructions on how to disable and re-enable antivirus and firewall on both Windows and Mac systems. Additionally, we discussed the potential risks of disabling these security measures and shared some additional tips and considerations to help you navigate the process safely.
Remember, disabling antivirus and firewall exposes your computer to malware infections, unauthorized access, and other potential threats. It is crucial to only disable these security measures when absolutely necessary and for the shortest possible duration. Regularly update your antivirus and firewall software, enable built-in security features offered by your operating system, and exercise caution when interacting with suspicious emails and websites.
By following the instructions provided, consulting vendor documentation or support resources, and seeking guidance from IT professionals if needed, you can effectively manage antivirus and firewall settings to ensure the ongoing protection and security of your computer and network.
Thank you for reading this guide, and we hope it has been helpful in your journey to navigate antivirus and firewall settings. Stay vigilant, stay protected!