Introduction
Welcome to the world of data storage! External hard drives have become an indispensable tool for storing and accessing large amounts of data. Whether you use it for work, personal use, or as a backup drive, external hard drives provide convenience and reliability. However, dealing with corrupted files on your external hard drive can be frustrating and worrisome.
Corrupted files can occur due to various reasons, such as system crashes, power failures, hardware errors, or even virus infections. When a file becomes corrupted, it can disrupt your workflow and potentially lead to data loss. That’s why it’s crucial to learn how to identify and delete these corrupted files to ensure the smooth operation of your external hard drive.
In this guide, we will explore the various causes of corrupted files on external hard drives and provide step-by-step instructions on how to identify and delete them. We will also discuss the importance of backing up your data and provide alternative solutions to deal with corrupted files.
Whether you’re a novice or an experienced user, this guide will equip you with the knowledge and tools necessary to tackle corrupted files on your external hard drive. So let’s dive in and learn how to reclaim the health of your storage device!
Understanding Corrupted Files
Corrupted files, as the name suggests, are files that have become damaged or unusable. When a file becomes corrupted, it may not open properly or display errors when you try to access it. Understanding the nature of corrupted files can help you grasp the severity of the issue and determine the best course of action for deletion.
Corruption can occur in various file types, including documents, images, videos, audio files, and more. The corruption can manifest in different ways, such as missing data, garbled text, distorted images, or playback errors. In some cases, corrupted files may be completely unresponsive, making it impossible to access or retrieve any information from them.
Corrupted files are often the result of data errors or inconsistencies within the file’s structure. This can happen due to multiple factors, including:
- Hardware Issues: Faulty hardware components, such as a malfunctioning hard drive or a damaged USB cable, can lead to data corruption.
- Power Outages: Sudden power failures or improper shutdowns can interrupt the writing process and cause file corruption.
- Software Errors: Bugs or glitches in software applications can inadvertently manipulate file data, resulting in corruption.
- Virus Infections: Malicious software, such as viruses or malware, can infect files and disrupt their integrity.
- File System Errors: Errors in the file system, such as file allocation table (FAT) or master file table (MFT) corruption, can render files inaccessible.
It is essential to note that not all corrupted files are irreparable. Sometimes, the corruption is limited to a small part of the file, and it may be possible to salvage the rest of the data. However, in other cases, the corruption can be widespread or affect critical sections of the file, making recovery impossible.
By understanding the causes and consequences of corrupted files, you can effectively address the issue and take the necessary steps to delete them from your external hard drive. In the following sections, we will explore methods and techniques to identify and remove these corrupted files, minimizing potential data loss and restoring the functionality of your storage device.
Causes of Corrupted Files on External Hard Drives
Corrupted files on external hard drives can be attributed to several factors. It’s important to understand these causes to prevent further file corruption and effectively address the issue.
1. Power Issues: Power fluctuations or sudden power outages can disrupt the writing process and lead to data corruption on your external hard drive. It’s crucial to use a reliable power source or invest in a UPS (uninterruptible power supply) to protect your device from such incidents.
2. Physical Damage: External hard drives are portable, making them susceptible to physical damage. Drops, impacts, or exposure to extreme temperatures can harm the internal components, resulting in corrupted files. Proper handling and storage of your external hard drive can minimize the risk of physical damage.
3. Virus or Malware Infections: Viruses or malware can infect your external hard drive when connected to an infected computer. These malicious programs can alter or delete your files, causing corruption. Regularly updating your antivirus software and scanning your external hard drive can help detect and remove any infections.
4. File System Errors: File system errors occur when the structure of the file system becomes corrupted or damaged. This can lead to inconsistencies in file management, resulting in file corruption. Conducting regular file system checks and repairing any detected errors can help prevent further file corruption.
5. Improper Ejection: Removing your external hard drive without properly ejecting it from the computer can result in file corruption. It’s important to safely remove the device to ensure all data is written and transferred correctly.
6. Software or Firmware Issues: Outdated or malfunctioning software or firmware on your external hard drive can cause file corruption. Keeping your device’s software up to date and regularly checking for firmware updates can minimize the risk of corruption caused by software bugs or glitches.
By being aware of these causes, you can take proactive measures to avoid file corruption on your external hard drive. However, if you already have corrupted files on your device, don’t worry; in the next sections, we will provide you with techniques and methods to identify and delete these files effectively.
How to Identify Corrupted Files
Identifying corrupted files on your external hard drive is crucial for taking appropriate actions to resolve the issue. Here are some methods to help you identify whether a file is corrupted:
1. File Errors or Unusual Behavior: Pay attention to any error messages or unusual behavior when trying to open a file. If you encounter error messages indicating file corruption, such as “file is damaged” or “unable to read file,” it’s likely that the file is corrupted.
2. Inability to Open or Access the File: If you are unable to open or access a file, it may be a sign of corruption. Try different applications to open the file and check if the issue persists.
3. File Size Discrepancies: Compare the file sizes of similar files. If you notice a significant difference in file sizes for files that should be similar, it may indicate corruption. However, keep in mind that file size discrepancies can also be due to different encoding or compression methods.
4. File Extension Changes: Sometimes, the file extension of a corrupted file may change or become unreadable. For example, a corrupted image file may have an unusual extension like “.dat” instead of “.jpg”.
5. Checksum or Hash Value Verification: Some file formats, such as MD5 or SHA-1 checksums, have a unique value associated with them. You can verify this value to ensure the integrity of the file. If the checksum or hash value doesn’t match the expected value, it could indicate file corruption.
6. Third-Party File Integrity Tools: There are various third-party tools available that can scan your external hard drive and identify corrupted files. These tools analyze file integrity and identify any signs of corruption.
It’s important to note that the above methods can provide indications of file corruption, but they are not foolproof. Some files may appear to be fine but still contain internal corruption that only becomes apparent when you try to access or use the file.
By using these methods, you can identify potential corrupted files on your external hard drive. In the upcoming sections, we will explore different methods to delete these corrupted files effectively, allowing you to maintain the health and functionality of your storage device.
Backing Up Important Data
Before attempting to delete corrupted files from your external hard drive, it is essential to emphasize the importance of backing up your important data. Data loss can occur during the file deletion process or due to unforeseen circumstances, such as hardware failure or accidental deletion. Having a backup ensures that you have a copy of your valuable data in case of any mishaps.
Here are some reasons why backing up your important data is crucial:
1. Protection against Data Loss: Accidents happen, and there is always a risk of data loss. By regularly backing up your important data, you have a safety net in case files become corrupted or are accidentally deleted.
2. Peace of Mind: Knowing that your important files are securely backed up provides peace of mind. You can work with confidence, knowing that your data is protected and can be easily restored if needed.
3. Seamless Recovery: In the unfortunate event of a computer crash, virus infection, or hardware failure, having a backup allows for a smooth recovery process. You can quickly restore your backed-up data and get back to work without significant disruptions.
4. Versioning and Historical Data: Backing up your data allows you to maintain multiple versions of files. This is especially useful if you need to access an older version of a document or retrieve a deleted file.
There are several methods for backing up your data, including:
1. External Hard Drive or SSD: An external storage device, such as another external hard drive or solid-state drive (SSD), provides a convenient way to create backups. You can manually copy important files or use backup software to automate the process.
2. Cloud Storage Services: Cloud storage services, such as Google Drive, Dropbox, or OneDrive, offer secure and accessible storage options. You can upload your important files to the cloud and access them from various devices.
3. Network Attached Storage (NAS): A NAS device is connected to your home or office network and provides centralized storage. You can use it to back up multiple devices and access your data from anywhere on the network.
4. Online Backup Services: Online backup services, such as Backblaze or Carbonite, offer automatic and continuous backup solutions. Your files are securely stored in the cloud, and you can restore them with ease.
Remember, regular backups are essential to ensure you have the most up-to-date copies of your files. It’s recommended to establish a backup routine that suits your needs, whether it’s daily, weekly, or monthly.
Now that you understand the significance of backing up your important data, it’s time to explore the various methods of deleting corrupted files from your external hard drive. We will provide step-by-step instructions for different operating systems and scenarios in the upcoming sections.
Troubleshooting Steps to Delete Corrupted Files
Dealing with corrupted files on your external hard drive can be frustrating, but there are several troubleshooting steps you can take to delete them effectively. Follow these methods to regain control of your storage device:
Method 1: Using Command Prompt (Windows)
If you are using a Windows operating system, you can use the Command Prompt to delete corrupted files. Here’s how:
- Open the Command Prompt by pressing
Win + R, typing incmd, and hitting Enter. - Navigate to the location of the corrupted file using the
cdcommand. - Type
del filename.extensionand press Enter to delete the corrupted file.
Method 2: Using Terminal (Mac)
Mac users can utilize the Terminal to remove corrupted files. Here’s what you need to do:
- Open the Terminal by going to Applications > Utilities > Terminal.
- Navigate to the location of the corrupted file using the
cdcommand. - Type
rm filenameand press Enter to delete the corrupted file.
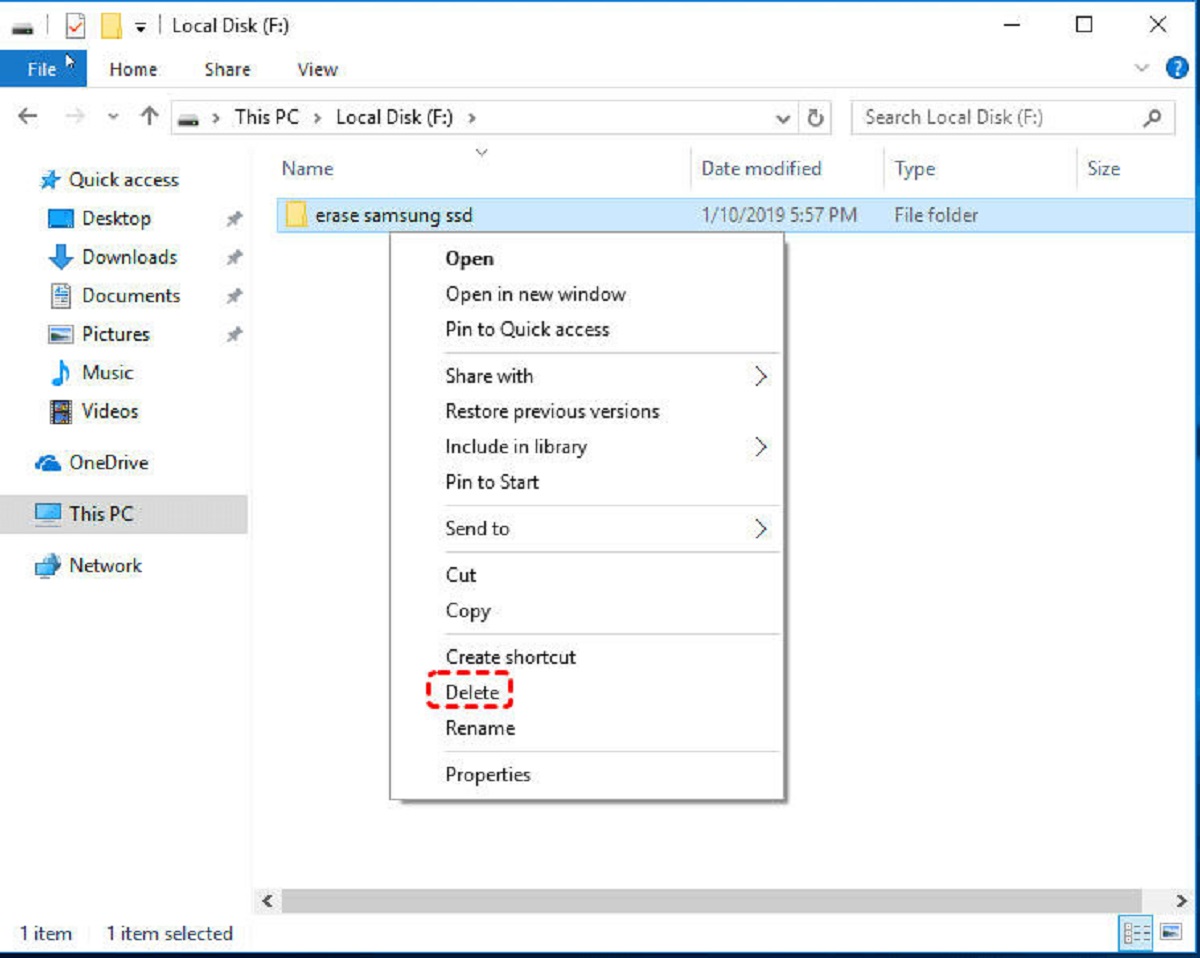
Method 3: Using File Explorer (Windows)
If you prefer a graphical interface, you can use File Explorer on Windows to delete corrupted files:
- Open File Explorer and navigate to the location of the corrupted file.
- Right-click on the file and select “Delete” from the context menu.
Method 4: Using Finder (Mac)
Mac users can use the Finder application to delete corrupted files:
- Open Finder and navigate to the location of the corrupted file.
- Right-click on the file and select “Move to Trash” from the context menu.
Note: Before deleting any file, always double-check and ensure it is indeed a corrupted file. Deleting the wrong file can result in permanent data loss.
If the above methods do not work or you encounter any difficulties, consider reaching out to a professional data recovery service for assistance. They have the expertise and tools to handle complex cases of file corruption and data retrieval.
Next, we will discuss some alternative solutions that you can try if the methods listed above are unsuccessful in deleting the corrupted files from your external hard drive.
Method 1: Using Command Prompt (Windows)
If you’re using a Windows operating system, you can utilize the Command Prompt to delete corrupted files from your external hard drive. Follow the steps below to use this method:
- Open the Command Prompt by pressing the
Win + Rkey combination, typing in “cmd”, and hitting Enter. The Command Prompt window will appear. - Navigate to the location of the corrupted file. You can use the
cdcommand followed by the filepath to move to the appropriate directory. For example, if your file is located in “D:\corrupted_files”, you would entercd D:\corrupted_filesand hit Enter. - Once you’re in the correct directory, type
del filename.extensionand press Enter. Replace “filename” with the name of the corrupted file and “extension” with the file’s extension (e.g., .docx, .jpeg). - If the file is successfully deleted, you will see a confirmation message in the Command Prompt.
By using the Command Prompt, you can bypass any potential restrictions or errors that may occur when trying to delete corrupted files through other methods. It provides a direct and efficient way to remove these problematic files from your external hard drive.
Remember to exercise caution when using the Command Prompt, as you are directly interacting with your computer’s system. Make sure to double-check the file names and extensions before executing the delete command to avoid unintentionally deleting the wrong files.
If you encounter any errors or difficulties during this process, you may need to run Command Prompt as an administrator. To do this, right-click on the Command Prompt icon and select “Run as administrator” from the context menu. This will give you elevated privileges and may resolve issues related to file permissions.
Once you have successfully deleted the corrupted files using Command Prompt, you can proceed to the next section to explore alternative solutions for dealing with file corruption on your external hard drive.
Method 2: Using Terminal (Mac)
If you’re using a Mac, you can use the Terminal application to delete corrupted files from your external hard drive. Follow the steps below to utilize this method:
- Open the Terminal application on your Mac. You can find it by navigating to “Applications” > “Utilities” > “Terminal”.
- Using the
cdcommand, navigate to the directory where the corrupted file is located. For example, if your file is in the “Documents” folder, you can typecd Documentsand press Enter. - Once you’re in the correct directory, use the
rmcommand followed by the filename to delete the corrupted file. For instance, if the file you want to delete is named “example.docx”, you would enterrm example.docxand hit Enter. - If the file is successfully deleted, the Terminal will not display any notifications or messages. However, if an error occurs, you may see an error message indicating the reason for the failure.
By using the Terminal application, you have direct access to the Mac’s command-line interface and can execute commands to delete corrupted files from your external hard drive. It bypasses any limitations or restrictions that may occur when using graphical file managers.
When using the Terminal, exercise caution to ensure you are deleting the correct files. Double-check the file names and extensions to avoid accidentally removing important data. Additionally, make sure you have the necessary permissions to delete the file from the specified location.
If you encounter any errors during the deletion process, you might need to run the Terminal application with administrative privileges. You can do this by right-clicking on the Terminal icon, selecting “Run as administrator,” and providing your administrator password.
Once you have successfully deleted the corrupted files using Terminal, you can proceed to the next section to explore additional alternative solutions for dealing with file corruption on your external hard drive.
Method 3: Using File Explorer (Windows)
If you’re using a Windows operating system, you can use File Explorer to easily delete corrupted files from your external hard drive. Follow the steps below to utilize this method:
- Open File Explorer by pressing the
Win + Ekey combination or by clicking on the File Explorer icon in the taskbar. - Navigate to the location where the corrupted file is stored on your external hard drive. You can do this by selecting the appropriate drive letter and then browsing through the folders.
- Once you have located the corrupted file, right-click on it. A context menu will appear.
- Select “Delete” from the context menu. Alternatively, you can press the
Deletekey on your keyboard. - A confirmation dialog will appear, asking if you want to permanently delete the file. Review the file name and make sure it is the correct file. Then, click “Yes” to proceed with the deletion.
- If the file is successfully deleted, it will no longer appear in the File Explorer window or its respective folder.
Using File Explorer provides a graphical and user-friendly method to delete corrupted files. This method is particularly useful if you prefer a more visual approach and want to easily navigate through your external hard drive’s file structure.
However, exercise caution to ensure you are deleting the correct file. Take a moment to double-check the file name, location, and content before confirming the deletion. Accidentally deleting important files can lead to permanent data loss.
If you encounter any errors or issues when attempting to delete the corrupted files through File Explorer, you can try using alternative methods like the Command Prompt or a dedicated file deletion utility to overcome any limitations or restrictions that may exist.
After successfully deleting the corrupted files using File Explorer, you can proceed to the next section to explore additional alternative solutions for dealing with file corruption on your external hard drive.
Method 4: Using Finder (Mac)
If you’re using a Mac, you can use Finder to easily delete corrupted files from your external hard drive. Follow the steps below to utilize this method:
- Open the Finder application on your Mac. You can do this by clicking on the Finder icon in the Dock or by selecting “Finder” from the menu bar.
- Navigate to the location where the corrupted file is stored on your external hard drive. You can do this by selecting the appropriate drive and then browsing through the folders.
- Once you have located the corrupted file, right-click (or Ctrl-click) on it. A context menu will appear.
- Select “Move to Trash” from the context menu. Alternatively, you can press the
Command + Deletekeys on your keyboard. - A confirmation dialog will appear, asking if you want to move the item to the trash. Make sure you have selected the correct file, then click “Move to Trash” to proceed with the deletion.
- The corrupted file will be moved to the Trash. To permanently delete it, empty the Trash by right-clicking (or Ctrl-clicking) on the Trash icon in the Dock and selecting “Empty Trash”.
Using Finder provides a visual and user-friendly method to delete corrupted files from your external hard drive on a Mac. It allows you to navigate through the file system, easily select the files you want to delete, and move them to the Trash.
However, exercise caution when deleting files to ensure you are selecting the correct file. Take a moment to double-check the file name, location, and content before confirming the deletion. Accidentally deleting important files can lead to data loss.
If you encounter any errors or issues when attempting to delete the corrupted files through Finder, you can try using alternative methods like the Terminal or specialized file deletion tools to overcome any limitations or restrictions that may exist.
After successfully deleting the corrupted files using Finder, you can proceed to the next section to explore additional alternative solutions for dealing with file corruption on your external hard drive.
Alternative Solutions
If the previously mentioned methods do not successfully delete the corrupted files from your external hard drive, there are several alternative solutions you can try:
1. Third-Party File Deletion Tools: Consider using specialized third-party software designed to handle file deletion, especially for stubborn or hard-to-delete corrupted files. These tools often provide advanced features and options to ensure successful file removal.
2. Formatting the External Hard Drive: If the corrupted files persist even after attempting various deletion methods, you may consider formatting the external hard drive. Formatting erases all data on the drive, including the corrupted files, so make sure to back up any important data before proceeding.
3. Data Recovery Services: If the corrupted files contain valuable data that you need to recover, it might be worth considering professional data recovery services. These services have specialized tools and expertise to recover data from damaged or corrupted storage devices.
4. Performing Disk Checks or Repair: Use built-in disk checking and repair utilities provided by your operating system. These tools can scan and repair errors on your external hard drive, potentially resolving issues related to file corruption.
5. Updating Firmware or Drivers: Outdated firmware or incompatible drivers can contribute to file corruption. Ensure that your external hard drive has the latest firmware installed and check for driver updates from the manufacturer’s website.
6. Verifying Hardware Integrity: Check the physical connections of your external hard drive and ensure that it is functioning properly. Faulty cables or connectors can lead to data corruption and file issues.
It’s important to note that some of these alternative solutions, such as formatting the external hard drive or using data recovery services, may result in permanent data loss. Therefore, exercise caution and carefully evaluate the potential risks before proceeding with these methods.
By exploring these alternative solutions, you can increase your chances of successfully deleting corrupted files from your external hard drive. However, it’s crucial to prioritize data backup and take preventive measures to avoid file corruption in the future.
Conclusion
Dealing with corrupted files on your external hard drive can be a frustrating experience. However, by understanding the causes of file corruption and utilizing the methods outlined in this guide, you can effectively identify and delete these problematic files.
Whether you choose to use the Command Prompt or Terminal for a more technical approach, or prefer the graphical interfaces of File Explorer or Finder, there are various options available to suit your preferences and operating system.
It’s important to exercise caution when deleting files, ensuring that you are targeting the correct files and verifying their contents before proceeding. Regularly backing up your important data is crucial to safeguard against data loss and provide a safety net in case of file corruption or accidental deletion.
If the methods covered in this guide are unsuccessful in deleting the corrupted files, alternative solutions like third-party file deletion tools, formatting the external hard drive, or seeking professional data recovery services may be considered. However, it’s essential to weigh the potential risks, such as data loss, associated with these solutions.
Remember to take preventive measures to protect your external hard drive from file corruption by addressing power issues, ensuring proper handling, regularly updating software and firmware, and maintaining a healthy file system.
By following the troubleshooting steps and alternative solutions provided in this guide, you can effectively manage and resolve file corruption issues on your external hard drive, restoring its functionality and preserving the integrity of your data.
Now, armed with the knowledge and techniques outlined in this guide, you are ready to take control of your external hard drive and tackle any corrupted files that come your way.


