Introduction
Welcome to our comprehensive guide on how to connect your Apple Watch to Wi-Fi. Wi-Fi connectivity on your Apple Watch allows you to access various features and functionalities, such as receiving notifications, using apps, and enjoying the convenience of a connected device on your wrist.
Connecting your Apple Watch to Wi-Fi is a straightforward process, but it requires a few simple steps to ensure a successful connection. In this guide, we’ll walk you through the process, from checking compatibility to connecting and troubleshooting common issues.
Before we dive into the steps, it’s important to note that not all models of Apple Watch have the ability to connect to Wi-Fi. The capability to connect to Wi-Fi is available on Apple Watch Series 3 and later models, including the Apple Watch SE and Apple Watch Series 6. If you have an older model, unfortunately, it does not support Wi-Fi connectivity.
If you have a compatible Apple Watch and want to enjoy the benefits of connecting it to Wi-Fi, continue reading to learn the necessary steps to set it up.
Step 1: Ensure your Apple Watch is compatible with Wi-Fi connections
Before attempting to connect your Apple Watch to Wi-Fi, it’s crucial to ensure that your device is compatible with Wi-Fi connectivity. Only certain models of Apple Watch support Wi-Fi connections, so it’s essential to verify the compatibility of your device.
Wi-Fi connectivity is available on Apple Watch Series 3 and later models, including the Apple Watch SE and Apple Watch Series 6. These models are equipped with the necessary hardware to connect to Wi-Fi networks.
To check the model of your Apple Watch, you can follow these steps:
- Swipe down on the watch face to access the Control Center.
- Tap on the Settings icon, which resembles a gear.
- Scroll down and tap on “General”.
- Tap on “About”.
- Look for the “Model” number, and compare it with the list of compatible models provided by Apple. You can find this list on the Apple Support website.
If your Apple Watch model is compatible with Wi-Fi connections, you’re ready to proceed to the next step. However, if you have an older model, you’ll need to consider upgrading if you wish to enjoy the benefits of Wi-Fi connectivity on your Apple Watch.
Step 2: Check if your Apple Watch is connected to Wi-Fi
Before connecting your Apple Watch to a Wi-Fi network, it’s important to determine whether your device is already connected to Wi-Fi. Checking the Wi-Fi connection status on your Apple Watch is a straightforward process.
Here’s how you can check if your Apple Watch is connected to Wi-Fi:
- On your Apple Watch, swipe up from the watch face to access the Control Center.
- Look for the Wi-Fi symbol, which resembles a series of concentric arcs. If the Wi-Fi symbol is highlighted or displayed with a checkmark, it indicates that your Apple Watch is already connected to a Wi-Fi network.
If you see the Wi-Fi symbol with a checkmark, it means that your Apple Watch is connected to Wi-Fi, and you can skip to the next step to connect to a different Wi-Fi network if desired.
However, if the Wi-Fi symbol is not highlighted or does not display a checkmark, it means that your Apple Watch is not currently connected to Wi-Fi. In this case, you’ll need to connect your Apple Watch to a Wi-Fi network.
It’s worth noting that your Apple Watch can only connect to Wi-Fi networks that you have previously connected to on your paired iPhone. Therefore, if your iPhone is connected to a Wi-Fi network, your Apple Watch will automatically attempt to connect to the same network if it is in range.
Now that you’ve checked if your Apple Watch is connected to Wi-Fi, let’s move on to the next step to connect it to a Wi-Fi network.
Step 3: Connect your Apple Watch to Wi-Fi
Now that you’ve confirmed that your Apple Watch is not connected to Wi-Fi, it’s time to connect it to a Wi-Fi network. The process involves a few simple steps and can be done directly from your Apple Watch.
Here’s how you can connect your Apple Watch to Wi-Fi:
- On your Apple Watch, open the Settings app. You can do this by pressing the digital crown to access the app grid, then finding and tapping the “Settings” app.
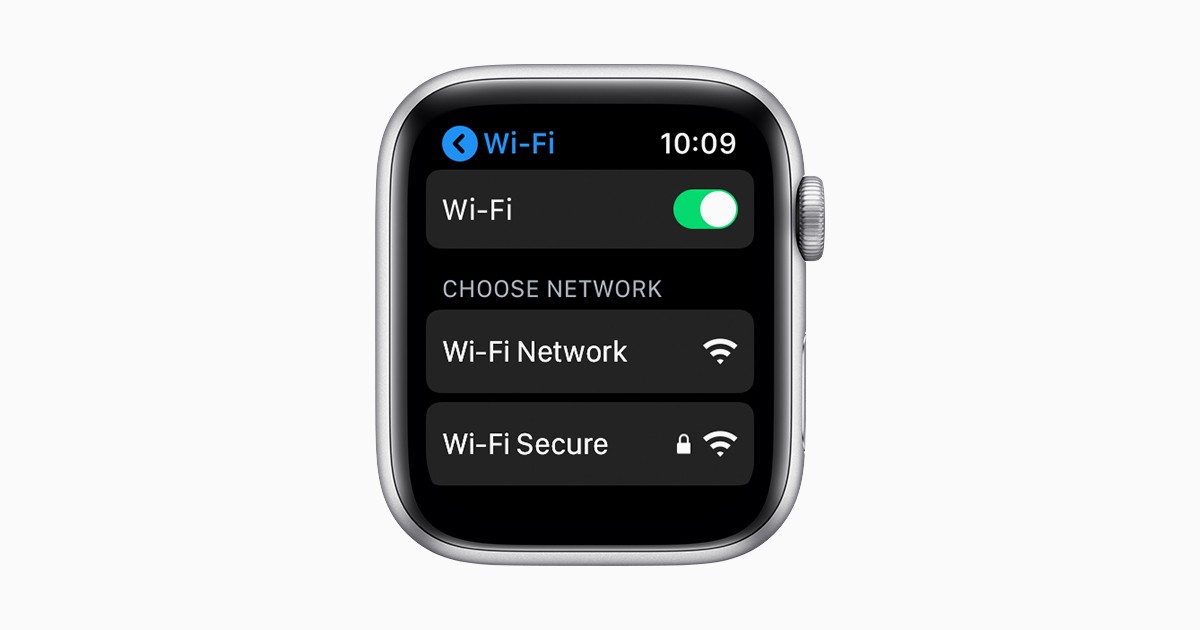
- Scroll down and tap on “Wi-Fi”.
- Your Apple Watch will start searching for available Wi-Fi networks. Wait for the list of networks to appear.
- Tap on the Wi-Fi network you want to connect to. If the network is password-protected, you will be prompted to enter the password. Use the keyboard on your Apple Watch to enter the password, and then tap “Join” or “Connect” to proceed.
- Your Apple Watch will attempt to connect to the selected Wi-Fi network. Once connected, the Wi-Fi symbol in the Control Center will be highlighted, indicating a successful connection.
That’s it! You have successfully connected your Apple Watch to a Wi-Fi network. Now you can enjoy the benefits of a connected Apple Watch, such as receiving notifications and using apps that require internet access.
Remember that your Apple Watch will automatically connect to known Wi-Fi networks when they are in range. If you previously connected to a Wi-Fi network on your iPhone, your Apple Watch will try to connect to the same network if it is available.
If you need to connect to a different Wi-Fi network or encounter any issues during the connection process, read on to the next step, where we’ll cover some troubleshooting tips.
Step 4: Troubleshooting common issues
While connecting your Apple Watch to a Wi-Fi network is usually a smooth process, there may be instances where you encounter some common issues. Here are some troubleshooting tips to help you resolve these issues:
1. Ensure your iPhone is connected to Wi-Fi: Since your Apple Watch relies on your iPhone for network connectivity, make sure that your iPhone is connected to Wi-Fi. If your iPhone is not connected, your Apple Watch won’t be able to connect as well. Verify the Wi-Fi connection on your iPhone before attempting to connect your Apple Watch.
2. Restart your Apple Watch and iPhone: Sometimes, a simple restart can resolve connectivity issues. Start by restarting your Apple Watch and iPhone simultaneously. This can help clear any temporary glitches or connectivity problems.
3. Reset network settings on your Apple Watch: If your Apple Watch is still having trouble connecting to Wi-Fi, you can try resetting the network settings. On your Apple Watch, go to Settings > General > Reset > Reset Network Settings. Keep in mind that this will remove any saved Wi-Fi networks, so you will need to reconnect to them afterward.
4. Move closer to the Wi-Fi router: If you’re experiencing weak or intermittent Wi-Fi signals, try moving closer to the Wi-Fi router. Obstacles or the distance between your Apple Watch and the router can affect the signal strength, causing connection issues.
5. Forget and reconnect to the Wi-Fi network: If you’re still facing issues, you can try forgetting the Wi-Fi network and reconnecting to it. On your Apple Watch, go to Settings > Wi-Fi, and tap on the “i” icon next to the connected network. Then, tap “Forget This Network” and confirm the action. Afterward, select the Wi-Fi network again and enter the password if required.
6. Update your software: Make sure that both your Apple Watch and iPhone are running the latest software versions. Software updates often address known bugs and issues, which can help improve connectivity and resolve any existing problems.
If you’ve tried these troubleshooting steps and are still unable to connect your Apple Watch to Wi-Fi, it’s recommended to reach out to Apple support or visit an authorized service center for further assistance.
By following these troubleshooting tips, you can increase the chances of resolving common Wi-Fi connectivity issues and enjoy a seamless experience with your Apple Watch.
Conclusion
Congratulations! You have successfully learned how to connect your Apple Watch to Wi-Fi. By following the steps outlined in this guide, you can enjoy the benefits of a connected device on your wrist, including receiving notifications, using apps, and staying connected even when your iPhone is out of range.
Throughout this guide, we covered the essential steps to ensure compatibility with Wi-Fi connections, checking if your Apple Watch is already connected to Wi-Fi, connecting your Apple Watch to a Wi-Fi network, and troubleshooting common issues that may arise during the process.
Remember, not all models of Apple Watch can connect to Wi-Fi, so it’s important to ensure compatibility before attempting to make a connection. Additionally, checking your Apple Watch’s Wi-Fi connection status and following the steps to connect to a Wi-Fi network will help you enjoy a seamless experience.
If you encounter any issues during the process, don’t worry. We provided troubleshooting tips to help you resolve common Wi-Fi connectivity issues. These tips include ensuring your iPhone is connected to Wi-Fi, restarting your devices, resetting network settings, moving closer to the router, forgetting and reconnecting to the network, and keeping your software up to date.
Now that you’re familiar with the steps and troubleshooting techniques, you can confidently connect your Apple Watch to Wi-Fi and make the most of its features and functionalities.
Remember, if you ever need further assistance, you can always refer back to this guide or reach out to Apple support for additional help.
Enjoy the convenience and connectivity that Wi-Fi brings to your Apple Watch, and make the most of your wearable device!