Introduction
Resin 3D printers have gained immense popularity in the world of additive manufacturing due to their ability to produce high-resolution and intricate models. However, one crucial aspect that often gets overlooked is the cleaning process. Keeping your resin 3D printer clean is essential for maintaining its performance and the quality of your prints.
Regular cleaning is necessary to ensure that the printer’s components, such as the resin vat, build platform, and resin cartridge, are free from any residue or debris. Failing to clean your printer can result in clogging, failed prints, and even damage to the machine.
In this guide, we will take you through the step-by-step process of cleaning a resin 3D printer. Whether you are a beginner or an experienced user, understanding the proper cleaning techniques will help you maintain the longevity and efficiency of your printer.
Before we dive into the cleaning process, it’s important to mention that different resin 3D printers may have slight variations in their cleaning requirements. Therefore, it is essential to consult your printer’s user manual for specific instructions from the manufacturer.
Now let’s explore why cleaning your resin 3D printer is so important and the tools and materials you will need to get started.
Why it’s important to clean a resin 3D printer
Keeping your resin 3D printer clean is crucial for several reasons. Here are some key reasons why regular cleaning is essential:
- Maintaining print quality: Resin printers rely on precise calibration and clean components to produce high-quality prints. Any residue or debris left from previous prints can affect the accuracy and quality of your models. Regular cleaning ensures that your prints are flawless and free from imperfections.
- Preventing clogs: Resin 3D printers have intricate pathways and chambers through which the resin flows. Over time, resin residue can accumulate and block these pathways, leading to clogs. Cleaning the printer prevents clogs and ensures smooth resin flow, reducing the chances of failed prints and costly repairs.
- Prolonging the lifespan of components: The resin vat, build platform, and other components of a resin 3D printer are exposed to harsh chemicals and resin. Regular cleaning helps prevent the build-up of resin, which can corrode or damage the components over time. By keeping your printer clean, you can extend the lifespan of these parts, saving you from costly replacements.
- Minimizing contamination: Resin is sensitive to contamination, such as debris or dust particles that may come into contact with the print during the process. Regular cleaning eliminates the chances of contaminants affecting your prints, resulting in cleaner and more precise models.
- Ensuring safety: Resin printers use UV light to cure the resin, which can be harmful if it comes into contact with uncured resin outside of the print area. By cleaning your printer regularly, you can minimize the risk of accidental exposure to uncured resin, protecting yourself and others.
By understanding the importance of cleaning your resin 3D printer, you can ensure the longevity of your machine and consistently produce high-quality prints. Now, let’s move on to the tools and materials you will need for the cleaning process.
Things you will need
Before you begin the process of cleaning your resin 3D printer, it’s important to gather the necessary tools and materials. Here are the items you will need:
- Nitrile gloves: Resin is a sticky and potentially hazardous material, so wearing nitrile gloves will protect your hands from direct contact.
- Safety goggles: Resin can cause irritation if it comes into contact with your eyes. Safety goggles provide essential eye protection during the cleaning process.
- Isopropyl alcohol (IPA): IPA is a vital cleaning agent for resin 3D printers. It helps remove uncured resin and residue from the vat, build platform, and other components. You can commonly find IPA with a concentration of 90% or higher.
- Clean lint-free cloth or paper towels: These will be used to wipe down the components and dry them after cleaning.
- Cleaning brush: A small, soft-bristled brush is useful for scrubbing away dried resin or stubborn residue.
- Resin strainer: A resin strainer or filter is optional but highly recommended. It helps remove cured resin chunks or debris that may have inadvertently entered the resin tank.
- Resin spatula: A resin spatula is useful for removing solidified resin from the vat or build platform.
- Empty and sealable container: You will need a container to store the used cleaning solution or to hold the parts that require cleaning.
By gathering these items, you will be well-prepared to clean your resin 3D printer thoroughly and efficiently. Now, let’s move on to the step-by-step guide for cleaning your printer.
Step-by-step guide to cleaning a resin 3D printer
Cleaning your resin 3D printer involves several steps to ensure that all the components are thoroughly cleaned. Follow this step-by-step guide to effectively clean your printer:
- Prepare your workspace: Find a well-ventilated area with good lighting. Ensure you have a clean surface to work on and keep all the necessary tools and materials nearby.
- Put on protective gear: Wear nitrile gloves and safety goggles to protect your hands and eyes during the cleaning process.
- Remove the resin vat: Carefully detach the resin vat from the printer and place it on a clean surface. Be cautious not to spill any resin.
- Empty the contents: Pour any unused or excess resin back into the resin bottle. Use a resin spatula to scrape off any solidified resin from the vat, and place it in a sealable container for disposal or reuse.
- Clean the resin vat: Fill the vat with isopropyl alcohol (IPA) to cover the bottom surface. Gently scrub the vat walls and the bottom with a soft brush to remove any resin residue. Pour out the IPA and rinse the vat with clean IPA.
- Clean the build platform: Remove the build platform and place it in a container with IPA. Allow it to soak for a few minutes to loosen any resin. Use a brush to gently scrub the platform, removing any residue. Rinse it with clean IPA and dry it thoroughly.
- Clear the resin tank: Wipe the inner walls of the resin tank with a clean cloth or paper towel dampened with IPA. Remove the resin tank’s silicone layer (if applicable) and clean it separately using a mild detergent and water. Rinse and dry it before reattaching it to the tank.
- Clean the resin cartridge: If your printer uses a resin cartridge, detach it from the printer and wipe it down with a clean cloth or paper towel soaked in IPA. Make sure to clean the nozzle and any resin remnants around the cartridge.
- Remove excess resin: Check the printer’s outer surfaces for any spilled or dripped resin. Clean these areas using IPA and a cloth or paper towel.
- Dispose of waste properly: Store the used cleaning solution in a sealable container and dispose of it according to your local regulations. Do not pour it down the drain.
By following this step-by-step guide, you can effectively clean your resin 3D printer and maintain its optimal performance. Remember to consult your printer’s user manual for any specific cleaning instructions recommended by the manufacturer.
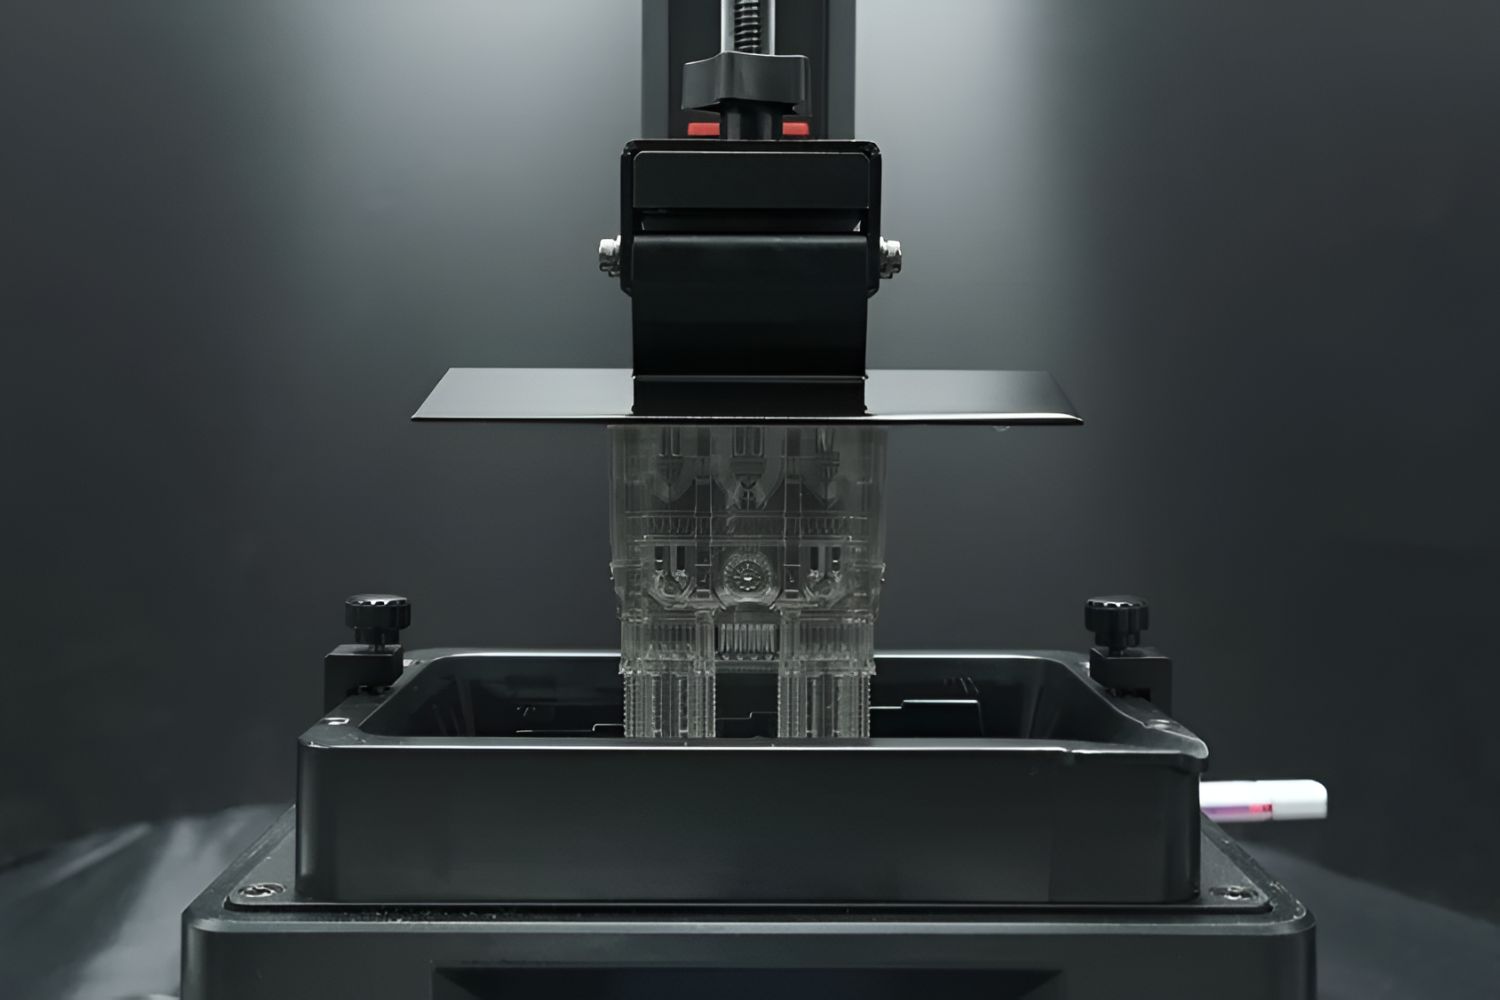
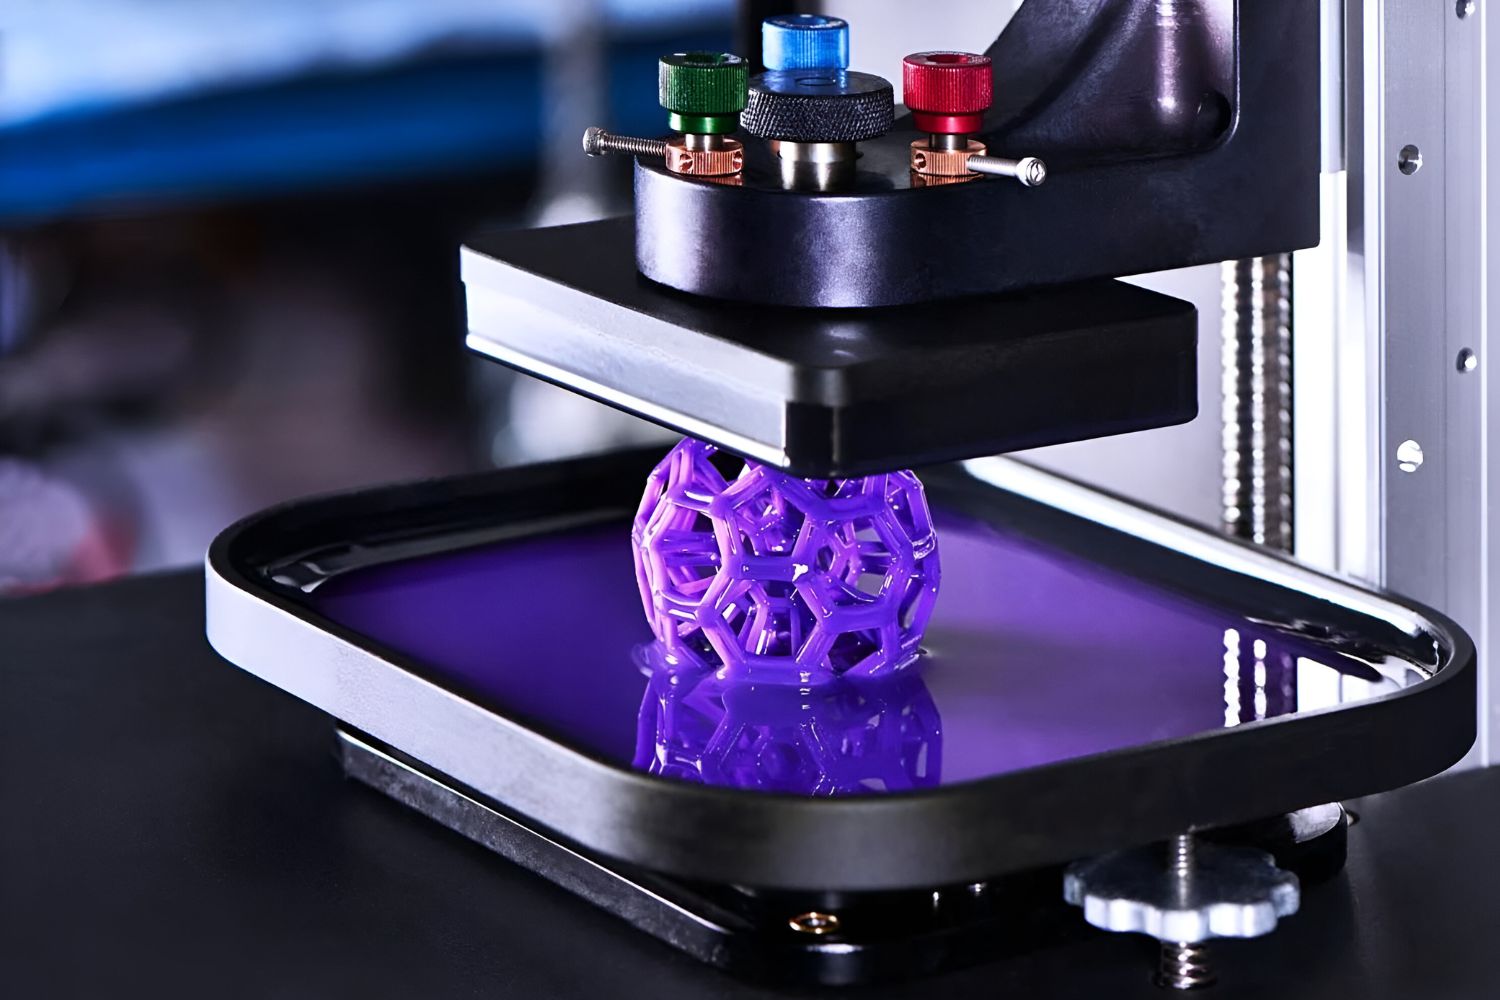
Cleaning the resin vat
The resin vat is a crucial component of your resin 3D printer, as it holds the liquid resin during the printing process. Keeping the resin vat clean is essential for achieving high-quality prints and ensuring the longevity of the vat. Here is a step-by-step guide on how to clean the resin vat:
- Remove the resin vat: Carefully detach the resin vat from the printer and place it on a clean surface. Be cautious not to spill any resin.
- Empty the contents: Pour any unused or excess resin back into the resin bottle. Use a resin spatula to scrape off any solidified resin from the vat and place it in a sealable container for disposal or reuse.
- Clean the vat interior: Fill the vat with isopropyl alcohol (IPA) to cover the bottom surface. Make sure the IPA is enough to cover any resin residue. Let it sit for a few minutes to dissolve the resin.
- Gently scrub the vat walls: Use a soft brush or sponge to scrub the walls and the bottom surface of the vat. Be careful not to scratch or damage the surface. Pay extra attention to areas with stubborn resin residue.
- Rinse with clean IPA: Pour out the IPA that contains dissolved resin and rinse the vat with fresh IPA. This helps remove any remaining residue and ensures a clean surface.
- Dry the vat: After rinsing, use a clean lint-free cloth or paper towel to dry the vat thoroughly. Make sure there is no moisture left in the vat before reassembling it.
It is important to note that some resin vats may have a detachable silicone layer. If your vat has one, remove the silicone layer and clean it separately using a mild detergent and water. Rinse it thoroughly to remove any soap residue and ensure it is completely dry before reattaching it to the vat.
Regularly cleaning the resin vat, especially between prints or when changing resin types, is essential for maintaining print quality and preventing any resin residue from affecting future prints. By following these steps, you can effectively clean your resin vat and ensure optimal performance from your resin 3D printer.
Cleaning the build platform
The build platform of a resin 3D printer plays a crucial role in supporting and positioning the model during the printing process. To maintain the quality and accuracy of your prints, it is important to regularly clean the build platform. Here is a step-by-step guide on how to clean the build platform:
- Remove the build platform: Carefully detach the build platform from the printer and place it on a clean surface. Be cautious not to touch the model or any uncured resin.
- Check for excess resin: Inspect the build platform for any residual resin. If there are any solidified resin remnants, use a resin spatula to gently scrape them off.
- Prepare cleaning solution: Fill a container with isopropyl alcohol (IPA) and submerge the build platform. Ensure that the platform is fully covered by the IPA.
- Soak the build platform: Allow the build platform to soak in the IPA for a few minutes. This will help loosen any remaining resin and make it easier to remove.
- Scrub the platform: After soaking, use a small, soft-bristled brush to gently scrub the build platform. Pay attention to the areas with stubborn resin residue, such as support structures or intricate details.
- Rinse with clean IPA: Remove the build platform from the IPA solution and rinse it thoroughly with fresh IPA. This will help remove any remaining residue and ensure a clean surface.
- Dry the build platform: Use a clean lint-free cloth or paper towel to dry the build platform. Make sure there is no moisture left before reattaching it to the printer.
It is worth noting that some build platforms may have removable surfaces or coatings. If your platform has one, follow the manufacturer’s instructions for cleaning and maintenance. Additionally, if the build platform has any damage or excessive wear and tear, consider replacing it to ensure optimal print quality.
Regularly cleaning the build platform between prints or when changing resin types is essential for maintaining a clean, flat surface for your models. By following these steps, you can effectively clean the build platform and ensure the best results from your resin 3D printer.
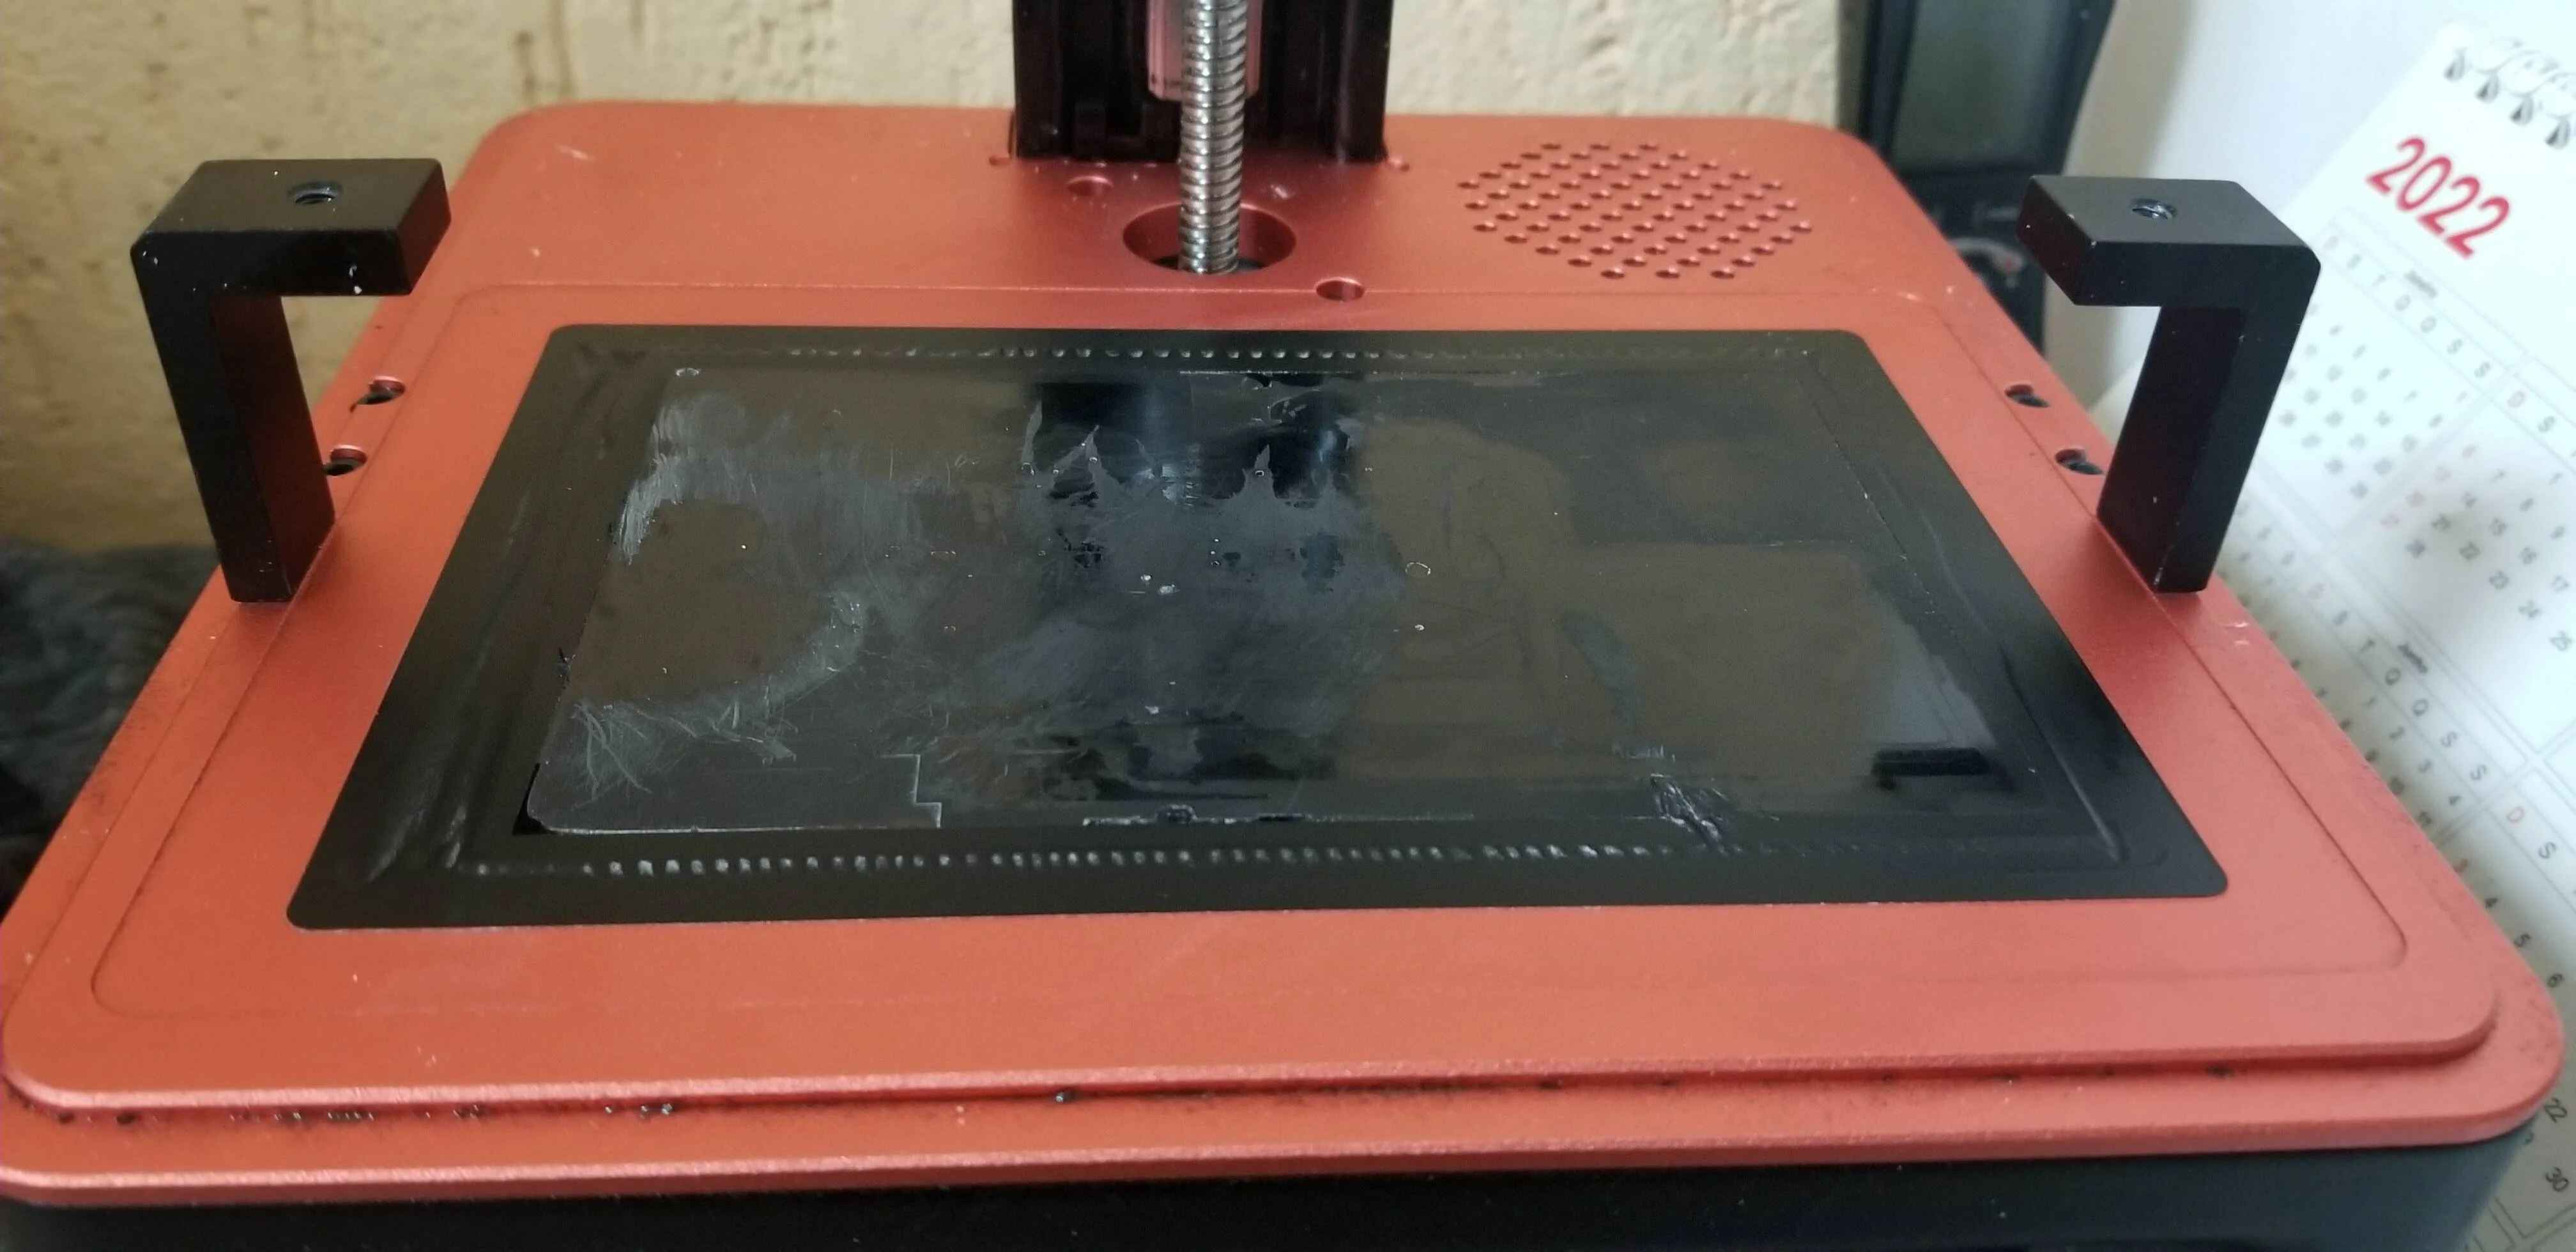
Clearing the resin tank
The resin tank is a vital component of a resin 3D printer that holds the liquid resin during the printing process. Over time, resin residue and debris can accumulate in the tank, affecting print quality and potentially causing clogs. Regularly clearing the resin tank is essential to maintain optimal performance. Here’s a step-by-step guide on how to clear the resin tank:
- Remove the resin tank: Carefully detach the resin tank from the printer and place it on a clean surface. Handle it with care to avoid spills or accidentally touching the uncured resin.
- Inspect the tank: Examine the resin tank for any solidified resin chunks, debris, or residue. Use a small spatula or similar tool to remove any visible contaminants.
- Wipe the tank: Use a clean cloth or paper towel dampened with isopropyl alcohol (IPA) to wipe the inner walls of the resin tank. This will help remove any residue or remaining residue particles.
- Remove the silicone layer (if applicable): Some resin tanks have a detachable silicone layer. Follow the manufacturer’s instructions to remove the layer, and clean it separately using mild detergent and water. Rinse thoroughly and make sure it is completely dry before reattaching it to the tank.
- Ensure a clean surface: After cleaning, visually inspect the resin tank to ensure there are no remaining debris or residue. If necessary, repeat the wiping process with clean IPA until the tank is thoroughly clean.
- Comprehensive cleaning (optional): Periodically, it is recommended to perform a more comprehensive cleaning of the resin tank. This may involve soaking the tank in a mixture of IPA and hot water or using a specialized resin tank cleaner. Refer to your printer’s user manual or manufacturer’s guidelines for specific instructions.
- Dry the resin tank: Use a clean lint-free cloth or paper towel to dry the resin tank. Ensure there is no moisture left before reassembling it and returning it to the 3D printer.
Regularly clearing the resin tank helps ensure consistent print quality and reduces the likelihood of clogs or resin-related issues. Keep in mind that resin tanks have a limited lifespan, and excessive wear or damage may necessitate replacing the tank to maintain optimal performance. Consult your printer’s manual or manufacturer for specific recommendations on resin tank maintenance and replacement.
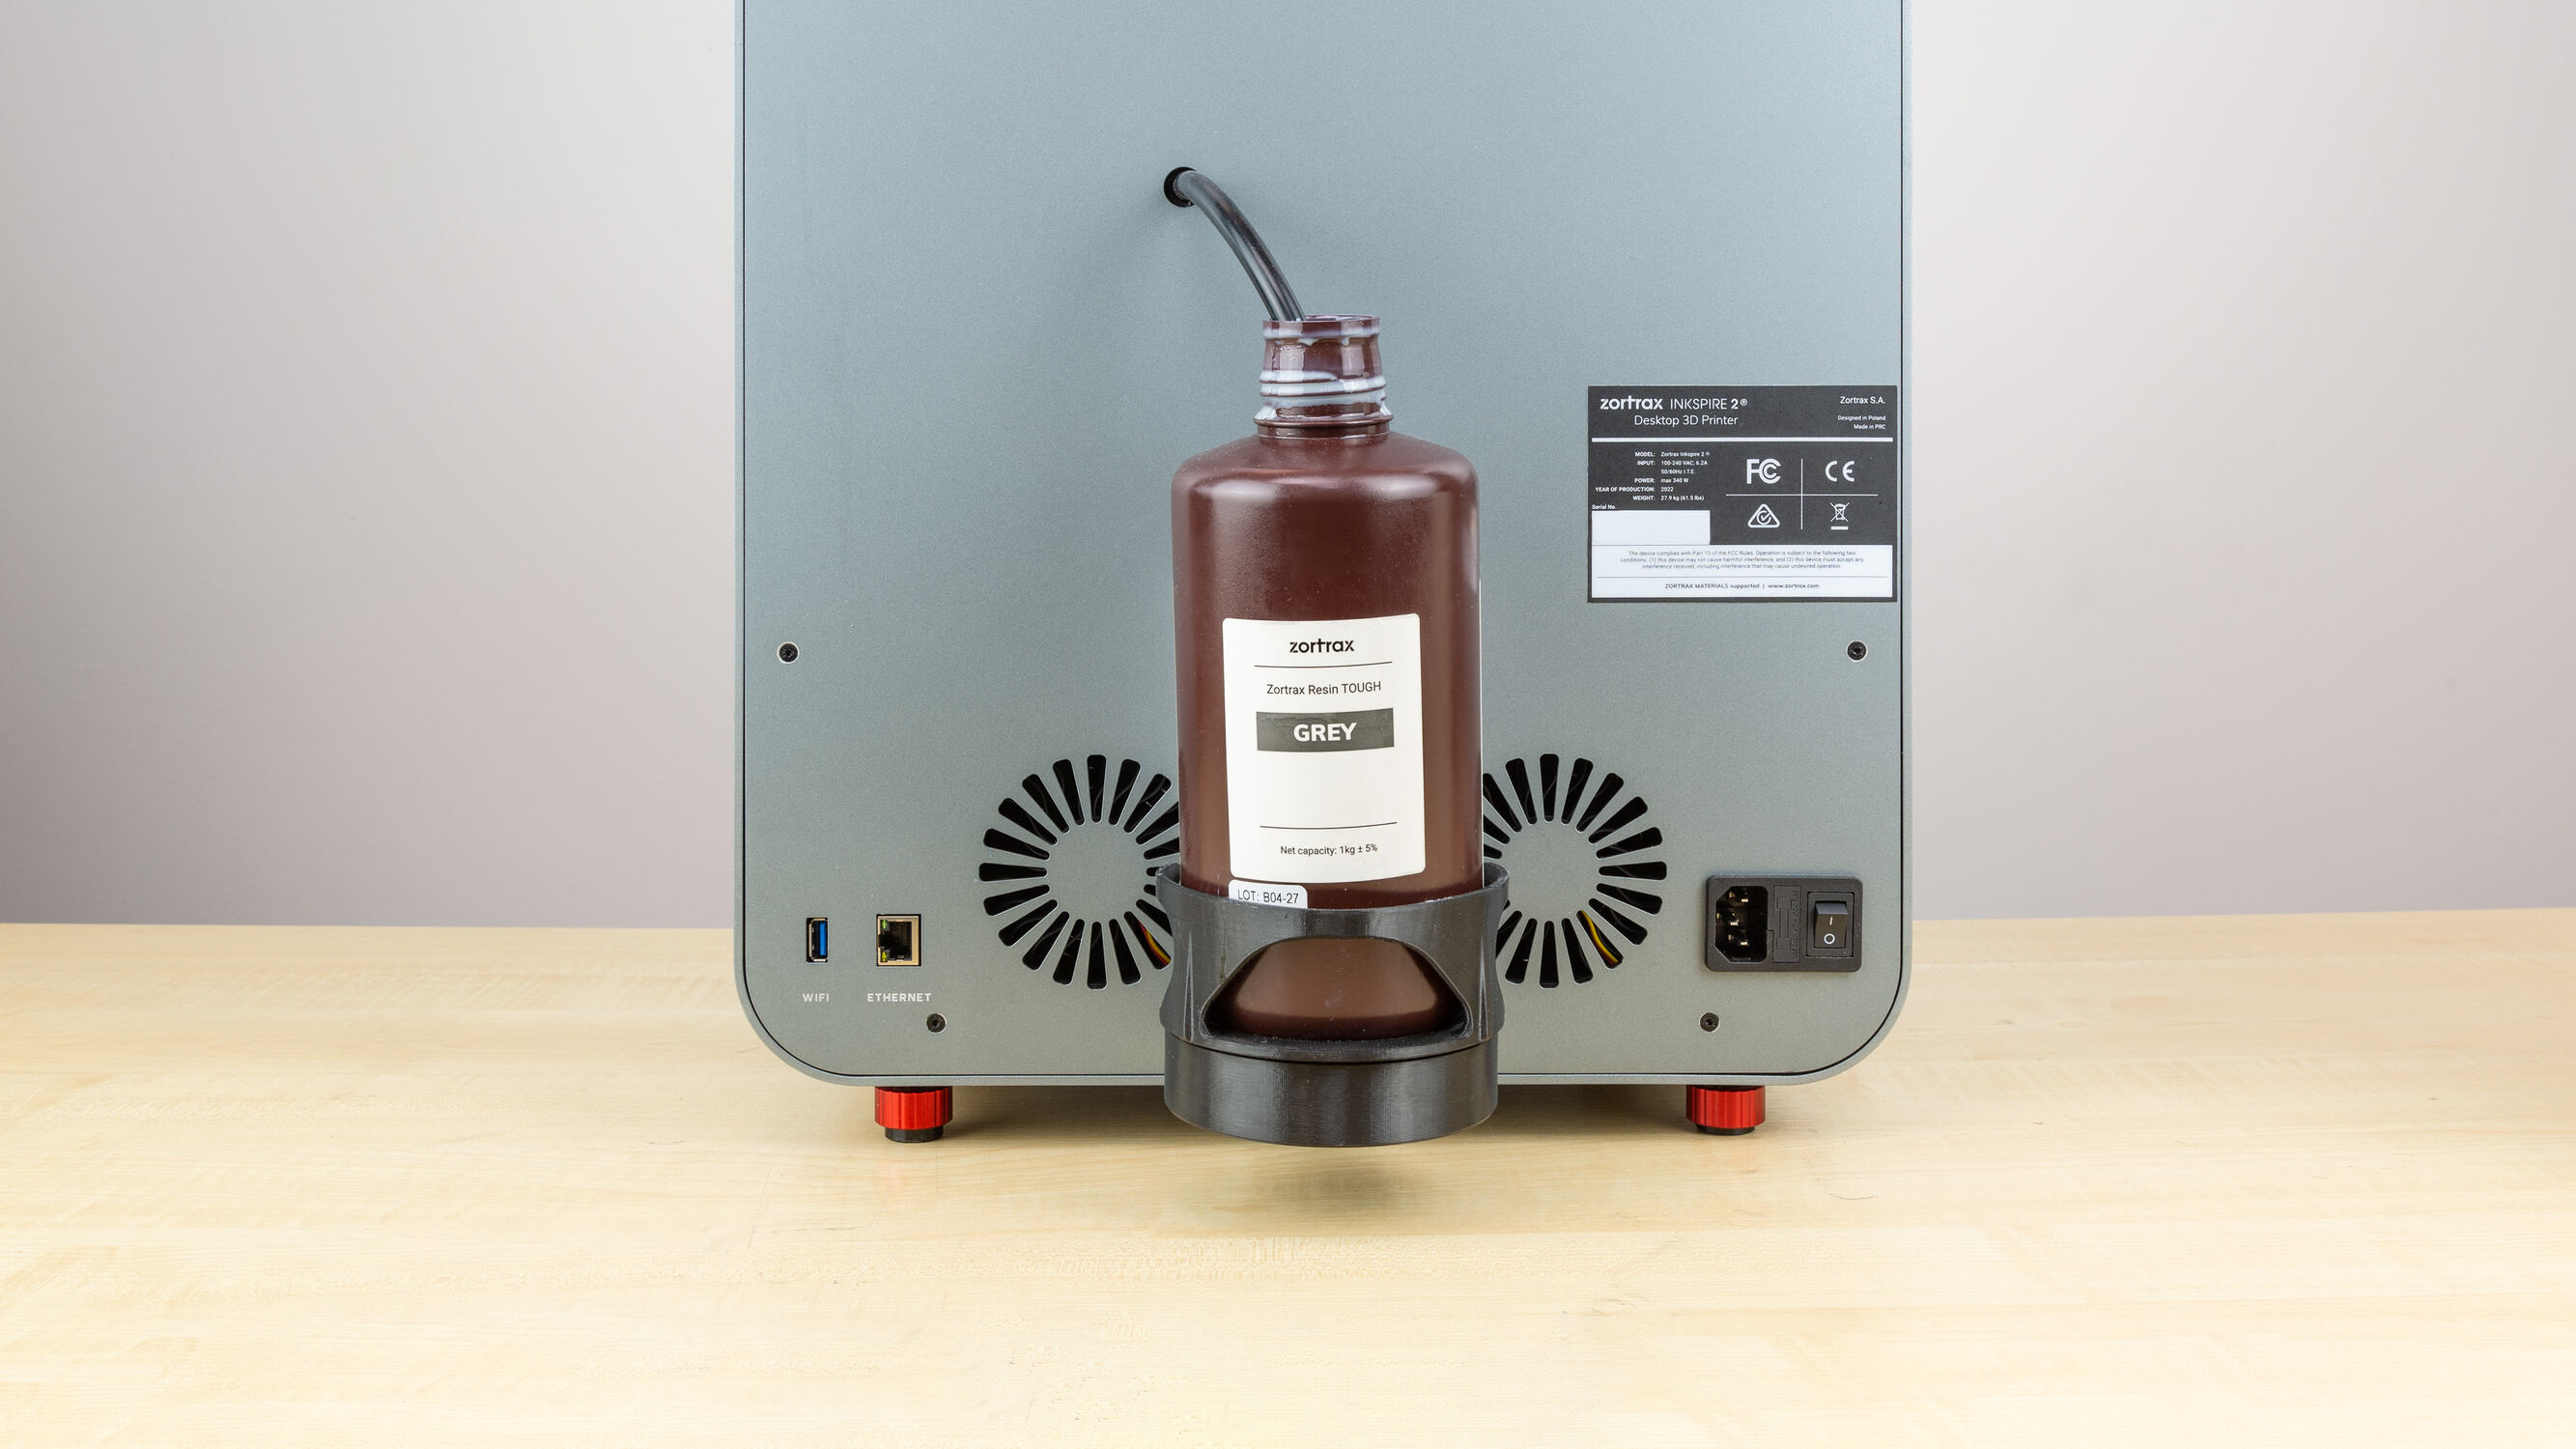
Cleaning the resin cartridge
If your resin 3D printer uses a resin cartridge, it is important to keep it clean to ensure smooth resin flow and prevent any contamination. Cleaning the resin cartridge is a straightforward process that can help maintain the performance of your printer. Here’s a step-by-step guide on how to clean the resin cartridge:
- Remove the resin cartridge: Carefully detach the resin cartridge from the printer. Take precautionary measures to avoid skin contact with the resin.
- Inspect the cartridge: Examine the cartridge for any spilled or hardened resin on its outer surface. If there are any solidified resin remnants or resin around the nozzle area, gently wipe them off using a clean cloth or paper towel.
- Wipe with cleaning solution: Dampen a cloth or paper towel with isopropyl alcohol (IPA). Gently wipe the entire surface of the cartridge, focusing on the areas that need cleaning. This will help remove any dirt, resin residue, or dust that may have accumulated.
- Clean the nozzle (if applicable): If your cartridge has a nozzle that dispenses resin, ensure that it is clean and free from any residue. Use a small brush, such as a brush with soft bristles or a cotton swab soaked in IPA, to clean the nozzle carefully.
- Dry the cartridge: Allow the cartridge to air dry, or use a clean lint-free cloth to gently dry it. Make sure there is no moisture remaining on the surface before reinserting it into the printer.
Regularly cleaning the resin cartridge not only promotes smooth operation but also helps prevent contamination of the resin inside. Keeping the cartridge clean ensures that only clean resin flows through the printer, minimizing the risk of any impurities affecting the print quality.
If you encounter any issues with the resin cartridge or suspect that it is not functioning optimally, it may be necessary to consult your printer’s user manual or contact the manufacturer for further guidance or possible replacement.
Removing excess resin from the printer
After completing a print or when switching to a different resin, it is important to remove any excess resin from your resin 3D printer. This helps prevent potential contamination, maintain a clean printing environment, and ensure the longevity of your printer. Here’s a step-by-step guide on how to remove excess resin from the printer:
- Prepare your workspace: Find a clean and well-ventilated area to work in. Clear any debris or spilled resin from the area around the printer.
- Put on protective gear: Wear nitrile gloves to avoid direct contact with the resin and ensure safety.
- Inspect the printer: Check the outer surfaces of the printer for any spilled or dripped resin. If you notice any resin, use a clean cloth or paper towel dampened with isopropyl alcohol (IPA) to gently wipe it away.
- Empty the resin vat: Carefully pour any unused or excess resin back into the resin bottle. Use a resin spatula to scrape off any solidified resin stuck to the vat walls or the build platform. Place any solidified resin in a sealable container for disposal.
- Clean the build platform: If there is any resin residue on the build platform, refer to the “Cleaning the build platform” section to remove it using IPA and a soft brush or cloth.
- Wipe down the resin tank: Use a clean cloth or paper towel dampened with IPA to wipe the inner walls of the resin tank, removing any traces of resin or residue. Ensure that the tank is completely dry before reassembling it.
- Clean any spillage: Inspect the printer’s resin chamber, tray, or any other components that may have come into contact with resin during the printing process. Clean these areas using a cloth or paper towel dampened with IPA. Ensure that no resin remains on the surfaces.
- Dispose of waste properly: Store used cleaning materials, such as paper towels or cloth, containing resin residue in a sealable container. Dispose of the container according to your local regulations for hazardous waste.
By removing excess resin from your printer, you maintain a clean and well-maintained printing environment. This not only reduces the risk of contamination but also helps extend the lifespan of your printer components and ensures consistent print quality.
Remember to consult your printer’s user manual or manufacturer guidelines for any specific instructions on removing excess resin or cleaning your particular model of resin 3D printer.
Safety precautions to keep in mind
When working with a resin 3D printer, it is essential to prioritize safety to protect yourself, others, and your equipment. Here are some important safety precautions to keep in mind:
- Wear protective gear: Always wear nitrile gloves and safety goggles when handling resin or cleaning the printer. Protecting your hands and eyes from direct contact with resin and harmful chemicals is crucial.
- Ventilation: Operate your resin 3D printer in a well-ventilated area or use a fume extractor to minimize exposure to fumes and odors. Proper ventilation helps prevent inhalation of harmful vapors and enhances air quality.
- Storage and handling of resin: Follow the manufacturer’s guidelines for storing and handling resin. Ensure that resin bottles are tightly sealed when not in use and stored away from direct sunlight. Always handle resin with caution and avoid spillage or contact with skin or eyes.
- Use of isopropyl alcohol (IPA): IPA is flammable, so exercise caution when using it to clean your printer. Keep it away from open flames or heat sources and use it in a well-ventilated area. Dispose of used IPA properly according to local regulations.
- Proper disposal of waste: Dispose of any waste materials, such as solidified resin or used cleaning materials, following proper waste disposal guidelines. Follow your local regulations for the disposal of hazardous waste or consult with recycling centers that accept resin-based materials.
- Follow manufacturer guidelines: Refer to your printer’s user manual and manufacturer guidelines for specific safety instructions and recommended practices. Different printers may have unique safety considerations, so always follow the instructions provided by the manufacturer.
- Regular maintenance: Perform regular maintenance on your resin 3D printer as recommended by the manufacturer. This includes cleaning, calibrating, and inspecting the printer for any signs of wear or damage. Maintaining your printer properly helps ensure safe and efficient operation.
By following these safety precautions, you can minimize risks and create a safe working environment when using a resin 3D printer. Prioritizing safety not only protects you but also helps maintain the integrity of your equipment and ensures the best possible results from your prints.
If you have any concerns or questions regarding safety, refer to your printer’s manual or contact the manufacturer for further assistance.
Conclusion
Cleaning your resin 3D printer is an essential task that should not be overlooked. By following the step-by-step guide and safety precautions outlined in this article, you can maintain the performance, longevity, and print quality of your resin printer.
Regularly cleaning the resin vat, clearing the resin tank, and cleaning the build platform are crucial to prevent clogs, maintain accurate prints, and extend the lifespan of your printer components. Additionally, cleaning the resin cartridge and removing excess resin from the printer further ensure a clean printing environment.
It is important to remember to prioritize safety throughout the cleaning process. Wearing protective gear, working in a well-ventilated area, proper storage and handling of resin, and following manufacturer guidelines are key to ensuring a safe working environment when using a resin 3D printer.
By incorporating regular printer cleaning into your maintenance routine, you can minimize the risk of issues, maintain consistent print quality, and prolong the life of your resin 3D printer. Take the time to clean your printer properly and follow the recommended guidelines to achieve the best results from your resin prints.
Remember to consult your printer’s user manual and manufacturer guidelines for specific cleaning instructions and any unique considerations for your printer model. Happy cleaning and happy printing!