Introduction
Cleaning your Macbook keyboard is an important maintenance task that can help ensure its smooth operation and prolong its lifespan. Over time, dust, crumbs, and other debris can accumulate between the keys, causing them to become sticky or unresponsive. Regularly cleaning your keyboard not only improves its functionality but also promotes good hygiene.
Cleaning a Macbook keyboard may seem like a daunting task, but with the right supplies and techniques, it can be a straightforward process. In this guide, we will walk you through a step-by-step process to effectively clean your Macbook keyboard, removing dirt and restoring its original functionality. Whether you use your Macbook for work, school, or leisure, a clean keyboard can greatly enhance your typing experience.
Before we jump into the cleaning process, it’s important to note that while the steps mentioned in this guide are applicable to most Macbook models, it’s always a good idea to consult your device’s user manual or website for specific instructions. Additionally, make sure to power down your Macbook and disconnect it from any power source before you begin cleaning. Safety should always be a priority.
Supplies Needed
Before you start cleaning your Macbook keyboard, it’s essential to gather all the necessary supplies. Here’s a list of items you’ll need to effectively clean your keyboard:
- Compressed air: This can be in the form of a canister or an electronic air blower. Compressed air is essential for removing dust and debris from between the keys.
- Lint-free cloth: Choose a soft, non-abrasive cloth to wipe down the keys and surfaces of your Macbook. Microfiber cloths work well for this purpose.
- Isopropyl alcohol: A small bottle of isopropyl alcohol, with a concentration of at least 90%, is useful for sanitizing the keyboard and removing any sticky residue.
- Cotton swabs: These small, disposable swabs are handy for cleaning hard-to-reach areas, such as around the edges of the keys.
- Keyboard cleaning gel: Optional but highly recommended, a keyboard cleaning gel helps to remove dirt and grime from the surface of the keys. It is especially useful for textured or concave keys.
Having these supplies ready will make the cleaning process more efficient and ensure that you can tackle any dirt or debris effectively. Now that you have everything prepared, let’s move on to the step-by-step process of cleaning your Macbook keyboard.
Step 1: Power Down Your Macbook
Before you begin cleaning your Macbook keyboard, it’s important to power it down completely. Shutting down the device ensures that no accidental keystrokes occur during the cleaning process and reduces the risk of causing any damage.
To power down your Macbook, follow these steps:
- Save any open documents or programs and close all applications.
- Click on the Apple menu located at the top left corner of your screen.
- From the drop-down menu, select “Shut Down”.
- Wait for the Macbook to completely power down. You can verify this by ensuring that the screen is dark and there are no lights or sounds coming from the device.
Taking this precautionary measure will ensure the safety of your Macbook and prevent any accidental damage to the internal components while cleaning the keyboard. Once your Macbook is powered down, you can proceed to the next steps of the cleaning process.
Step 2: Remove Loose Dirt and Debris
Before diving into a deep clean, it’s important to remove any loose dirt and debris from your Macbook keyboard. This step will prevent these particles from being pushed further into the keyboard during the cleaning process.
To remove loose dirt and debris, follow these steps:
- Gently turn your Macbook upside down to allow any loose particles to fall out. Give it a few gentle taps on the bottom to shake out any stubborn debris.
- Using a soft-bristled brush or a clean, dry toothbrush, gently brush the keys and the spaces in between. Be cautious not to apply too much pressure or use a brush with hard bristles, as this may damage the keys.
- If there are any visible crumbs or debris on the surface of the keys, carefully remove them using your fingers or a pair of tweezers. Take extra care not to push any debris further into the keyboard.
By removing loose dirt and debris, you’ll ensure that your cleaning efforts are more effective in the next steps. This simple yet crucial step prepares your keyboard for a more thorough cleaning, eliminating larger particles that may hinder the performance of your keys. Once you’re satisfied that you’ve removed as much loose dirt as possible, you’re ready to proceed to the next step.
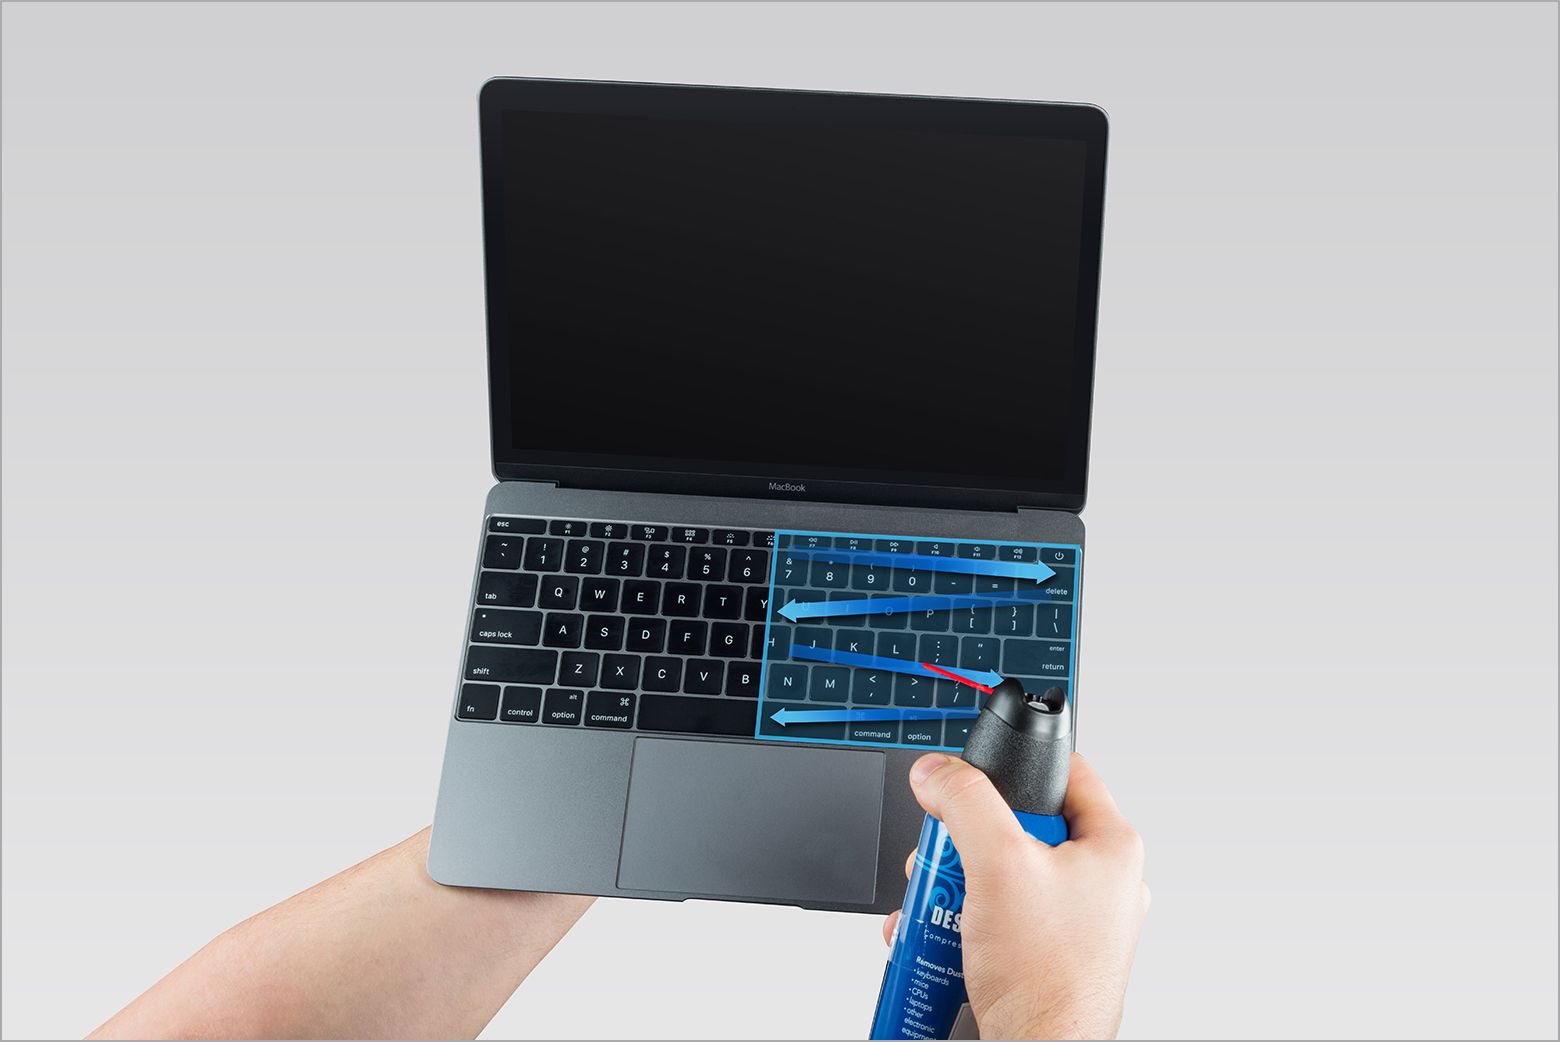
Step 3: Use Compressed Air to Clean Between Keys
Now that you have removed the loose dirt and debris from your Macbook keyboard, it’s time to clean between the keys using compressed air. Compressed air is an effective tool for dislodging and removing stubborn dust and dirt particles that may be trapped in hard-to-reach areas.
To clean between the keys with compressed air, follow these steps:
- Hold the canister or electronic air blower in an upright position.
- Position the nozzle close to the first key, ensuring not to touch the key surface directly.
- Press the trigger or button on the canister to release short bursts of air into the space between the keys.
- Move across the entire keyboard, repeating the process in a systematic pattern to cover all areas thoroughly.
- Pay extra attention to areas where dust or debris may be more concentrated, such as around the edges of the keys.
As you use compressed air, you may notice small particles being dislodged from between the keys. This is normal and indicates that the cleaning process is effective. The compressed air should remove most of the visible dust and debris, leaving your keyboard cleaner and more responsive.
It’s important to note that when using compressed air, avoid tilting the canister or air blower at extreme angles, as this may cause the propellant to escape and potentially damage your Macbook. Additionally, always follow the manufacturer’s instructions for safe and effective use of compressed air.
Once you’re satisfied with the removal of dust and debris, you can proceed to the next step to sanitize your Macbook keyboard.
Step 4: Sanitize the Keyboard with a Cleaning Solution
After removing the visible dirt and debris from your Macbook keyboard, it’s time to sanitize the keys using a cleaning solution. This step not only ensures a clean and hygienic keyboard but also helps remove any remaining residue or stains that may be present.
To sanitize the keyboard with a cleaning solution, follow these steps:
- Moisten a lint-free cloth or cotton pad with isopropyl alcohol.
- Gently wipe the surface of each key, ensuring to cover all areas. Pay extra attention to any sticky or stained areas.
- Avoid soaking the cloth or using excessive amounts of alcohol, as this can damage the keys or seep into the internal components of your Macbook.
- For textured or concave keys, consider using a small amount of keyboard cleaning gel. Apply the gel to the key surface and use a soft-bristled brush or your fingers to gently scrub the key.
- Use cotton swabs dipped in isopropyl alcohol to clean the edges and crevices around the keys. This will help remove any dirt or grime that may have accumulated in these hard-to-reach areas.
Isopropyl alcohol is an effective cleaning agent that evaporates quickly, leaving no residue behind. It not only helps sanitize your keyboard but also reduces the potential for the growth of bacteria or germs on the surface. As you clean each key, you’ll notice that it becomes cleaner and more hygienic-looking.
Remember to take your time and be gentle when cleaning the keys. Avoid excessive pressure or scrubbing, as this can damage the key surface or remove any printed labels. Once you have thoroughly cleaned and sanitized the keyboard, you’re ready to proceed to the next step to address any sticky or stubborn keys.
Step 5: Focus on Sticky or Stubborn Keys
If you have encountered sticky or stubborn keys during the cleaning process, don’t worry. This step will guide you through effectively addressing those problematic keys and ensure they regain their proper functionality.
To focus on sticky or stubborn keys, follow these steps:
- Examine the sticky or stubborn keys closely to identify the source of the problem. It could be sticky residue, dust, or debris that is causing the key to stick.
- Dip a cotton swab in isopropyl alcohol and gently rub it around the edges of the sticky key. This will help dissolve any sticky residue and facilitate smoother movement.
- You can also use a small amount of keyboard cleaning gel on stubborn keys. Apply the gel to the key surface and use a gentle, circular motion to loosen any dirt or grime.
- If necessary, use compressed air to blow away any loosened debris from the key mechanism.
- Test the key by pressing it multiple times to ensure it no longer sticks. If there is still resistance or stickiness, repeat the cleaning process.
By focusing on sticky or stubborn keys individually, you can address the specific issues and restore their proper functionality. Remember to be patient and thorough during this process, as it may take some time to completely resolve the problem.
Once you have successfully resolved any sticky or stubborn keys, you’re ready to move on to the next step to ensure your keyboard dries thoroughly.
Step 6: Dry the Keyboard Thoroughly
After cleaning and addressing any sticky or stubborn keys, it’s crucial to ensure that your Macbook keyboard is thoroughly dry before reassembling and using it. Water or moisture residue can lead to malfunctioning keys or damage to your device’s internal components, so proper drying is essential.
To dry your keyboard thoroughly, follow these steps:
- Take a clean, lint-free cloth and gently pat the keys and surrounding areas to absorb any excess moisture. Avoid rubbing the keys vigorously, as this may remove any labels or cause damage.
- If necessary, use compressed air in short bursts to blow out any remaining moisture or trapped droplets between the keys.
- Allow your Macbook to air dry for at least 1-2 hours before reassembling and using it. Placing it near a gentle airflow, like an open window, can help speed up the drying process.
- Make sure the keyboard is completely dry to the touch before proceeding to reassemble and power on your Macbook.
Ensuring that your keyboard is completely dry will help maintain its functionality and prevent any potential damage. Rushing the drying process can lead to water getting trapped inside the keyboard, risking long-term issues. Take the time to ensure that your keyboard is thoroughly dried before moving on to the final step.
Once the keyboard is dry, you can now proceed to reassembling your Macbook and preparing it for use.
Step 7: Reassemble Your Macbook
Now that you have thoroughly cleaned and dried your Macbook keyboard, it’s time to reassemble your device, allowing you to resume using it with a fresh and responsive keyboard.
To reassemble your Macbook, follow these steps:
- Ensure that your keyboard is completely dry and free from any moisture or residue.
- Gently position the keys back in their respective places, aligning them with the key slots.
- Press down on each key gently until you feel or hear a slight click, indicating that it is properly seated.
- If any keys appear misaligned or are not clicking into place, gently remove them and realign them correctly.
- Once all the keys are securely in place, power on your Macbook and test the functionality of each key. Press each key multiple times to make sure they are responding properly.
By reassembling your Macbook carefully, you can ensure that the keys are properly aligned and seated, allowing for optimal performance and a satisfying typing experience.
Congratulations! You have successfully cleaned and reassembled your Macbook keyboard. It may be a good idea to establish a regular cleaning routine to maintain the cleanliness and functionality of your keyboard. With regular maintenance, you can keep your keyboard in top condition for an extended period, enhancing your overall productivity and enjoyment of using your Macbook.
Remember to consult your device’s user manual or website for any specific instructions or precautions related to cleaning your Macbook keyboard. Different models may have unique considerations that you should be aware of to avoid any accidental damage.
Conclusion
Cleaning your Macbook keyboard is an essential task to maintain its functionality, hygiene, and overall performance. By following the step-by-step process outlined in this guide, you can effectively remove dirt, debris, and sticky residue, giving you a clean and responsive keyboard.
Remember to gather the necessary supplies, power down your Macbook, remove loose dirt and debris, use compressed air to clean between the keys, sanitize the keyboard with a cleaning solution, address any sticky or stubborn keys, dry the keyboard thoroughly, and reassemble your Macbook with care.
Regular maintenance and cleaning of your Macbook keyboard can prevent keys from sticking, improve typing accuracy, and prolong the lifespan of your device. It’s a simple yet crucial step in maintaining the overall performance and longevity of your Macbook.
If you encounter any persistent issues with your keyboard, such as unresponsiveness or significant damage, it’s recommended to contact a professional technician or Apple support for further assistance.
By incorporating regular cleaning into your Macbook maintenance routine, you can ensure that your keyboard remains in optimal condition, allowing you to work efficiently and enjoy the full potential of your device. So, take the time to clean your Macbook keyboard regularly and experience a smooth and satisfying typing experience.
We hope this guide has been helpful in providing you with the necessary steps and tips to clean your Macbook keyboard effectively. Enjoy your clean and refreshed keyboard!