Introduction
Welcome to this guide on how to change the polling rate on your Logitech mouse. Whether you’re a gamer looking for improved responsiveness or simply seeking to customize your mouse settings for a smoother user experience, changing the polling rate can make a significant difference. In this article, we will explain what polling rate is, why you might want to change it, and provide step-by-step instructions on how to do so specifically for Logitech mice.
Before we dive into the details, let’s clarify what polling rate means. The polling rate refers to how often your mouse sends information to your computer. It is measured in Hertz (Hz) and represents the number of times the mouse reports its position to the computer per second. A higher polling rate means your mouse communicates with your computer more frequently, resulting in smoother and more accurate cursor movements.
Now, you might be wondering why you would need to change the polling rate in the first place. Well, the default polling rate set by the manufacturer is usually sufficient for most users. However, certain scenarios may call for adjusting the polling rate to better suit your needs.
If you’re a gamer, having a higher polling rate can be advantageous. It reduces input lag and provides faster response times, enhancing your gaming performance. This can be particularly beneficial in competitive gaming where every millisecond can make a difference. On the other hand, if you’re performing tasks that require precision, such as graphic design or video editing, a lower polling rate may be more suitable as it allows for smoother and more controlled movements.
While it’s worth noting that not all mice allow you to change the polling rate, Logitech mice offer this customization option through their software. Logitech is a reputable brand known for its high-quality gaming peripherals and its user-friendly software interface, which makes it relatively easy to make adjustments to the polling rate settings.
In the next sections, we will guide you through the steps to change the polling rate on Logitech mice. We will also address common troubleshooting issues you may encounter along the way. So, without further ado, let’s get started!
What is polling rate?
Before we delve into the process of changing the polling rate on your Logitech mouse, let’s take a closer look at what polling rate actually means.
The polling rate, also known as report rate, is the speed at which your mouse sends information to your computer. It is measured in Hertz (Hz), indicating the number of times the mouse reports its position to the computer per second. A higher polling rate means that the mouse communicates with your computer more frequently, resulting in smoother and more precise cursor movements.
Imagine you’re driving a car and the polling rate is like the frequency at which your car updates its location on a GPS. If the polling rate is low, it means that the car’s GPS updates infrequently, causing a lag in response time. On the other hand, if the polling rate is high, the GPS updates more frequently, providing real-time information and a more accurate representation of the car’s location.
For gaming enthusiasts, a higher polling rate can be crucial. It reduces input lag and ensures that your actions are reflected on the screen almost instantaneously. This can be particularly advantageous in fast-paced games where split-second reactions can be the difference between victory and defeat.
On the other hand, for tasks that require precision movements, such as graphic design or video editing, a lower polling rate may be preferred. This allows for smoother and more controlled cursor movements, giving you the accuracy needed for intricate work.
It’s important to note that the polling rate is not the same as the DPI (Dots Per Inch) setting on your mouse. DPI determines the sensitivity of your mouse, while the polling rate determines how frequently that sensitivity is communicated to the computer.
Now that you have a clearer understanding of what polling rate is and its significance, let’s move on to why you might want to change it and how to do so specifically for Logitech mice.
Why change polling rate?
You might be wondering why you would need to change the polling rate on your Logitech mouse. While the default polling rate set by the manufacturer is usually suitable for most users, there are specific scenarios where adjusting the polling rate can bring benefits.
For gamers, having a higher polling rate can significantly enhance their gaming experience. A higher polling rate means that the mouse communicates with the computer more frequently, resulting in faster and more responsive cursor movements. This can make a noticeable difference in games that require quick reflexes and precise aiming, giving gamers a competitive edge in online multiplayer battles or fast-paced action games.
Furthermore, a higher polling rate reduces input lag, which refers to the delay between a physical action on your mouse and the corresponding action appearing on your screen. By reducing input lag, a higher polling rate provides a more immediate response to your movements, improving overall gameplay fluidity.
On the other hand, if you’re involved in tasks that require precision and fine control, such as graphic design or video editing, a lower polling rate may be more suitable. Lower polling rates allow for smoother and more controlled cursor movements, enabling you to make precise adjustments and intricate designs with ease.
It’s important to note that the benefits of changing the polling rate may vary depending on your personal preferences and the specific requirements of your activities. Some users may not notice a significant difference, while others may find it transformative.
Fortunately, Logitech mice provide the flexibility to adjust the polling rate to best suit your needs. This customization option, typically offered through Logitech’s easy-to-use software interface, allows you to fine-tune your mouse settings and optimize your user experience.
Now that we’ve explored the reasons why you might want to change the polling rate, let’s move on to the next section to learn about the supported polling rates on Logitech mice and how to change them.
Supported polling rates on Logitech mice
Logitech mice are known for their versatility and customization options, and changing the polling rate is no exception. Depending on the specific model of your Logitech mouse, you may have a range of polling rate options available to choose from.
Logitech mice typically offer polling rate options that range from 125Hz to 1000Hz. The polling rate options may vary based on the mouse model and the software version you are using. The higher the polling rate, the more frequently the mouse communicates with your computer, resulting in smoother and more responsive cursor movements.
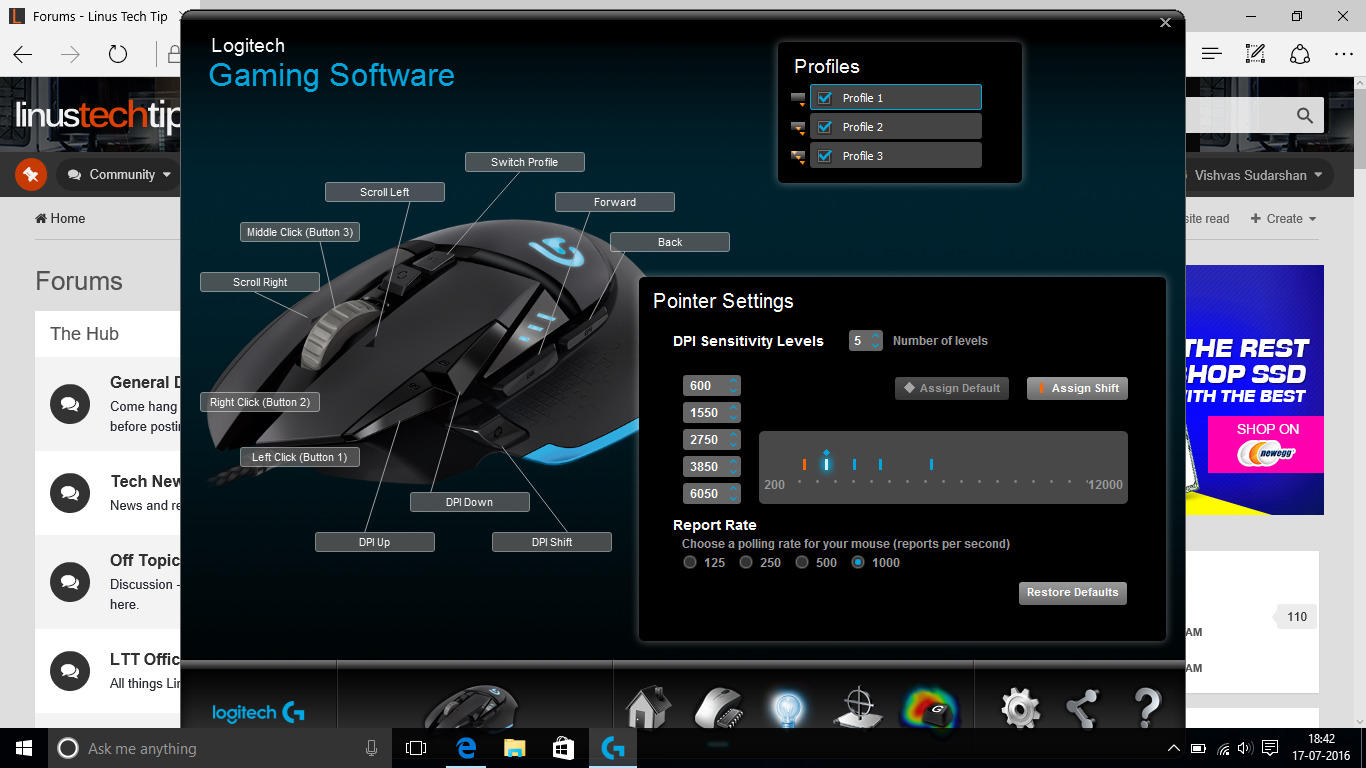
To check the supported polling rates on your Logitech mouse, you will need to access the Logitech software that accompanies your mouse. This software allows you to customize various settings, including the polling rate. The name of the software can vary depending on your mouse model, but common software programs include Logitech G HUB and Logitech Gaming Software.
Once you open the software, navigate to the settings or options section that pertains to your mouse. Look for the polling rate settings, where you should find a drop-down menu or slider that allows you to select the desired polling rate. The available options can vary from mouse to mouse, so make sure to choose the polling rate that best suits your preferences and needs.
While higher polling rates can provide smoother and more responsive cursor movements, it’s important to note that setting your polling rate to the highest option may require more resources from your computer. This might be a concern for users with older systems or those running resource-intensive applications simultaneously. If you experience any performance issues after changing the polling rate, consider lowering it to a more optimal level for your system.
Logitech mice offer a wide range of polling rate options, allowing you to find the setting that suits your specific requirements. Now that you are aware of the supported polling rates, it’s time to learn how to change the polling rate on your Logitech mouse. We will guide you through the step-by-step process in the next section.
Steps to change polling rate on Logitech mice
Changing the polling rate on your Logitech mouse is a straightforward process that can be done through the Logitech software that accompanies your mouse. Follow these step-by-step instructions to customize the polling rate to your desired setting:
- Ensure that your Logitech mouse is connected to your computer and that the Logitech software is installed. If you haven’t installed the software yet, you can download it from the Logitech website and follow the installation instructions.
- Open the Logitech software on your computer. The name of the software may vary depending on your mouse model, but commonly used software programs include Logitech G HUB and Logitech Gaming Software.
- Navigate to the settings or options section that pertains to your mouse. Look for the polling rate settings. It is usually located in the mouse settings or advanced settings section.
- Once you’ve found the polling rate settings, you should see a drop-down menu or slider that allows you to adjust the polling rate. Click on the drop-down menu or drag the slider to select your desired polling rate.
- Choose the polling rate that best suits your needs and preferences. Keep in mind that higher polling rates provide smoother and more responsive cursor movements, while lower polling rates can offer more precise control for tasks that require accuracy.
- After selecting the desired polling rate, click on the “Apply” or “Save” button to save the changes.
- Test the new polling rate by moving your mouse and observing the cursor movement. If the polling rate has been successfully changed, you should notice a difference in the mouse responsiveness based on the selected setting.
It’s worth mentioning that the exact steps and options may differ slightly depending on the Logitech software version and the specific model of your mouse. However, the general process described above should be applicable to most Logitech mice.
If you encounter any issues while changing the polling rate or if you don’t see the expected results, refer to the troubleshooting section in the next part of this article for common solutions.
Now that you know how to change the polling rate on your Logitech mouse, let’s move on to the next section to explore some common troubleshooting issues you may encounter and how to address them.
Troubleshooting common issues
While changing the polling rate on your Logitech mouse is a relatively simple process, you may encounter some common issues along the way. Here are a few troubleshooting steps you can follow to address those issues:
- Mouse not recognized: If your Logitech mouse is not being recognized by the software, try reconnecting the mouse to a different USB port on your computer. Additionally, make sure that the mouse is powered on and that the Logitech software is up to date. If the issue persists, try restarting your computer and launching the software again.
- No polling rate options available: If you’re unable to find the polling rate settings in the software or if there are no options available to adjust the polling rate, ensure that you are using the correct version of the Logitech software that supports your mouse model. Double-check the compatibility of your mouse with the software, and if necessary, update the software to the latest version.
- Performance issues: If you experience performance issues after changing the polling rate, such as mouse lag or system slowdown, try lowering the polling rate to a lower setting. Higher polling rates require more system resources, and your computer may struggle to keep up with the demands if it is not powerful enough.
- Inconsistent cursor movements: If you notice inconsistent cursor movements after changing the polling rate, make sure that your mousepad or surface is clean and free from any obstructions. Additionally, check if there are any conflicting software applications running in the background that may interfere with the mouse’s performance.
- Reverting to default settings: If you want to revert to the default polling rate, simply open the Logitech software, navigate to the polling rate settings, and select the default option. This will restore the original polling rate that came with your Logitech mouse.
If the troubleshooting steps mentioned above do not resolve your issue, it may be helpful to consult the Logitech support website or reach out to their customer support for further assistance. They have a dedicated support team who can provide specific guidance based on your mouse model and software version.
Now that you are equipped with troubleshooting steps, you should be able to overcome any common issues that may arise while changing the polling rate on your Logitech mouse. In the next section, we will conclude this guide and summarize the key takeaways.
Conclusion
In conclusion, changing the polling rate on your Logitech mouse can significantly enhance your gaming performance or improve precision for tasks that require fine control. A higher polling rate reduces input lag and provides faster response times, while a lower polling rate allows for smoother and more controlled cursor movements.
Logitech mice offer the flexibility to customize the polling rate through their user-friendly software interface. By following the step-by-step instructions provided in this guide, you can easily adjust the polling rate to your desired setting.
However, it’s important to note that not all mice support changing the polling rate, and the available options may vary depending on your specific Logitech mouse model and software version.
If you encounter any issues or have questions regarding the polling rate or your Logitech mouse, consult the Logitech support website or seek assistance from their customer support team.
Remember to consider your own preferences and requirements when deciding on the optimal polling rate for your mouse. Experiment with different settings and observe the impact on your cursor movements and overall user experience.
Ultimately, by customizing the polling rate on your Logitech mouse, you can take control of your gaming or design experience, ensuring that your mouse movements are precisely translated on the screen. Enjoy the enhanced responsiveness and improved performance that come with adjusting the polling rate on your Logitech mouse.