Introduction
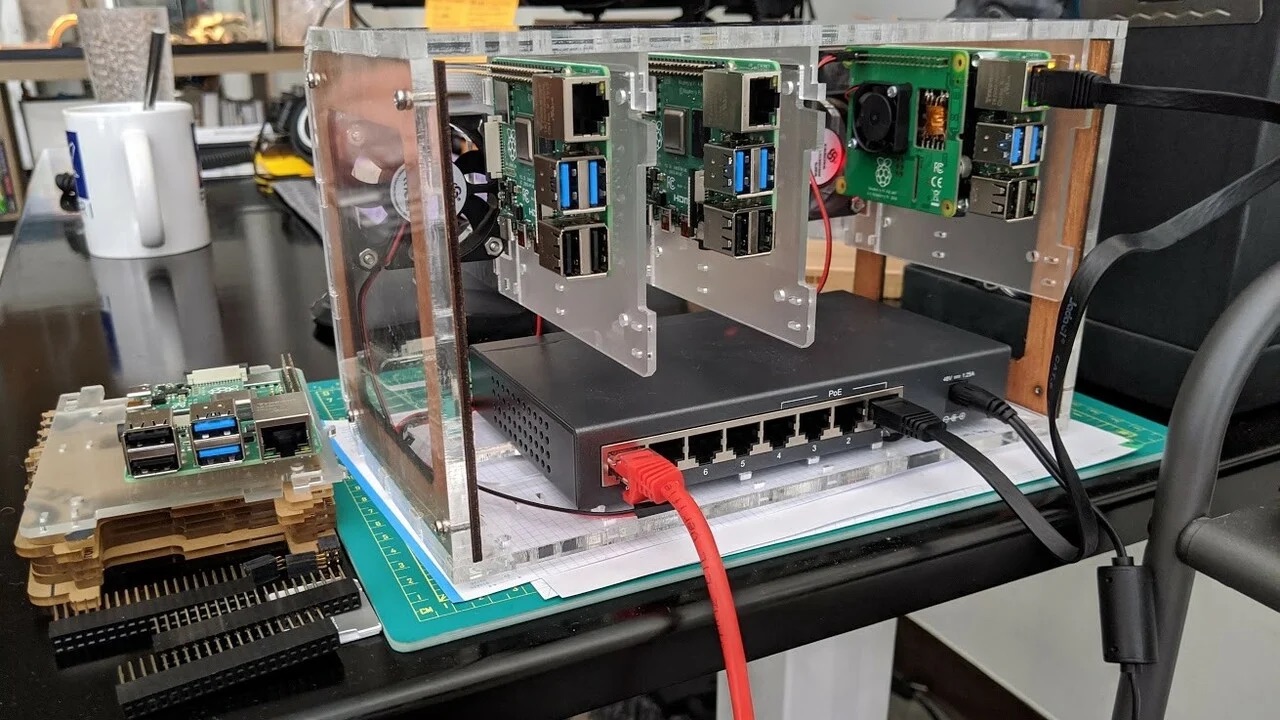
Welcome to the world of high-performance computing! If you’re ready to take your computing power to the next level, building a GPU cluster might be the perfect solution. A GPU cluster is a powerful network of computers that work together to handle complex calculations and data processing tasks. Whether you’re a researcher, a data scientist, or a computer enthusiast, this guide will provide you with the necessary steps to build your own GPU cluster.
A GPU cluster consists of multiple GPUs (Graphics Processing Units) interconnected to form a powerful computing resource. GPUs are well-suited to handle parallel processing tasks, making them ideal for applications like scientific simulations, machine learning, and 3D rendering. By harnessing the combined power of multiple GPUs, you can significantly increase the processing speed and efficiency of your tasks.
In this guide, we will walk you through the process of building a GPU cluster from scratch. We will cover everything from choosing the right hardware components to configuring the software framework for optimal performance. Whether you’re starting with a few GPUs or planning to scale up to a larger cluster, this guide will provide you with all the essential information you need.
Before we dive into the technical details, it’s important to note that building a GPU cluster requires some level of technical expertise. You should have a good understanding of computer hardware, networking, and software configuration. Additionally, you should be comfortable working with the command line interface and have a basic knowledge of Linux operating systems.
Building a GPU cluster can be an exciting and rewarding project. It not only gives you access to immense computing power but also allows you to customize and optimize your hardware and software setup according to your specific needs. So, without further ado, let’s get started on the journey of building your very own GPU cluster!
Choosing the Right Hardware
When it comes to building a GPU cluster, selecting the right hardware components is crucial to ensure optimal performance and scalability. Here are some factors to consider when choosing the hardware for your cluster:
1. GPUs: The most important component of a GPU cluster is, of course, the GPUs themselves. Look for GPUs that offer high computational power and memory capacity. Consider factors such as CUDA cores, memory bandwidth, and VRAM size. NVIDIA GPUs, such as the Tesla or GeForce series, are commonly used in GPU clusters.
2. CPUs: While GPUs handle most of the computing tasks in a GPU cluster, it’s important to have a capable CPU to manage the overall operation. Look for CPUs that offer good multi-threading performance and sufficient cores. Intel Xeon or AMD Ryzen processors are popular choices for CPU in GPU clusters.
3. Motherboard: Select a motherboard that supports multiple GPUs and has sufficient PCIe slots. Ensure compatibility with both your chosen GPUs and CPUs. Consider options with solid VRM design and good power delivery for stable performance.
4. RAM: GPU-intensive applications often require a large amount of memory. Choose RAM modules with high capacity and fast speeds to allow for efficient data processing. Consider at least 16GB or more, depending on your specific needs.
5. Power Supply: GPUs are power-hungry components, so it’s essential to choose a high-quality power supply unit (PSU) that can deliver sufficient power to all the components in your cluster. Consider the power requirements of your GPUs and choose a PSU with enough wattage to accommodate them.
6. Storage: Depending on your requirements, opt for fast and reliable storage options. Solid State Drives (SSDs) are preferable for faster data access and improved performance. Consider having a separate SSD for the operating system and applications.
7. Networking: For efficient communication between the nodes in your cluster, ensure you have a high-speed networking solution. Gigabit Ethernet is commonly used for small clusters, while InfiniBand or 10 Gigabit Ethernet is preferred for larger deployments.
8. Cooling: GPUs generate a lot of heat when under heavy load. Proper cooling is essential to prevent overheating and ensure stable operation. Consider using aftermarket cooling solutions, such as liquid cooling or high-performance fans, to maintain optimal temperatures.
By carefully selecting the right hardware components, you can ensure that your GPU cluster performs optimally and meets your specific computing needs. Keep scalability and future expansion in mind, as you may want to add more GPUs or upgrade components as your requirements evolve. Now that you have an understanding of the hardware considerations, let’s move on to setting up the network for your GPU cluster.
Setting Up the Network
Building a GPU cluster requires a well-configured network to enable efficient communication between the nodes. Here are the steps to set up the network for your GPU cluster:
1. Network Topology: Determine the network topology based on the number of nodes in your cluster. For a small cluster, a simple star or mesh topology using Ethernet switches can suffice. For larger deployments, consider using high-speed networking technologies like InfiniBand.
2. IP Addressing: Assign static IP addresses to each node in your cluster. This ensures that each node can be uniquely identified on the network. Consider using a subnet for your cluster and a separate subnet for management purposes to isolate network traffic.
3. Switch Configuration: Configure the network switches to enable communication between the nodes. Set up VLANs or virtual interfaces to segregate traffic and improve network performance. Ensure that the switches have sufficient bandwidth to handle the traffic between the nodes.
4. Firewall and Security: Implement appropriate firewall rules and security measures to protect your cluster from unauthorized access and data breaches. Consider using firewalls and access control lists to control incoming and outgoing network traffic.
5. Network File System: Set up a network file system (NFS) or distributed file system (DFS) to enable shared storage between the nodes in your cluster. This allows for easy access to files and data across the cluster, ensuring seamless collaboration and data sharing.
6. DNS and Hostname Resolution: Configure DNS or host files to enable hostname resolution across the cluster. This ensures that each node can be identified by its hostname, simplifying communication and management tasks.
7. Network Monitoring: Implement network monitoring tools to monitor the performance and health of your cluster’s network infrastructure. This helps in identifying and resolving any network-related issues that may arise.
By setting up a robust and well-configured network for your GPU cluster, you ensure smooth communication between the nodes and enable efficient sharing of resources. It is essential to plan the network architecture and address any potential bottlenecks or security concerns early on in the setup process. With the network infrastructure in place, you are now ready to move on to installing the operating system on your GPU cluster.
Installing the Operating System
Installing the operating system is a crucial step in setting up your GPU cluster. Here’s a step-by-step guide to installing the operating system on the nodes of your cluster:
1. Choose the Operating System: Select a suitable operating system for your GPU cluster. Linux distributions like Ubuntu, CentOS, or Fedora are popular choices due to their stability, compatibility with GPU drivers, and support for high-performance computing.
2. Create Installation Media: Download the ISO file of the chosen operating system and create installation media, such as a bootable USB drive or DVD. Ensure that all necessary drivers and software packages are included in the installation media.
3. Configure BIOS/UEFI Settings: Access the BIOS/UEFI settings on each node and configure them to boot from the installation media. Verify that the necessary hardware components, such as GPUs and storage devices, are detected correctly.
4. Install the Operating System: Boot from the installation media and follow the on-screen instructions to install the operating system on each node. Partition the storage devices according to your requirements and allocate sufficient space for the OS and any additional software.
5. System Updates and Software Installation: After the OS installation is complete, perform system updates to ensure that you have the latest security patches and bug fixes. Install any additional software packages and dependencies required for your cluster’s applications.
6. Network Configuration: Configure the network interfaces on each node to ensure proper connectivity. Assign the IP addresses, subnet masks, default gateway, and DNS settings that were planned during the network setup phase.
7. Node Identification: Assign unique hostnames to each node in the cluster. This simplifies management and troubleshooting tasks by allowing you to refer to each node by its hostname.
8. SSH Configuration: Set up SSH (Secure Shell) for secure remote access and control. Generate SSH keys, configure SSH settings, and restrict SSH access to authorized users for enhanced security.
9. Test Connectivity: Test the network connectivity between the nodes by pinging each other’s IP addresses or hostnames. Ensure that all nodes can communicate with each other successfully.
By following these steps, you can successfully install the operating system on each node of your GPU cluster. Once the operating system is up and running, the next step is to configure the GPUs for optimal performance, which we will cover in the next section.
Configuring the GPUs
Configuring the GPUs in your GPU cluster is essential to ensure their proper functioning and optimal performance. Here’s a guide to help you configure the GPUs:
1. Identify and Verify GPUs: Use system utilities or GPU management tools to identify and verify the GPUs installed in each node. Confirm that all GPUs are detected correctly, and their specifications, such as VRAM size and CUDA cores, are accurately reflected.
2. GPU BIOS Modifications: In some cases, modifying the BIOS settings of the GPUs can yield better performance or compatibility with specific applications. However, be cautious when making BIOS modifications and ensure that you understand the implications and potential risks.
3. GPU Power and Thermal Management: GPUs generate a significant amount of heat when under heavy load. Configure power and thermal management settings on each GPU to ensure that they are operating within safe temperature ranges. This may involve adjusting fan speeds, temperature thresholds, or power limits as per manufacturer recommendations.
4. Overclocking and Underclocking: Depending on your requirements, you may want to overclock or underclock the GPUs to achieve better performance or reduce power consumption. However, proceed with caution and monitor the stability of your cluster after making any changes.
5. GPU Driver Installation: Install the appropriate GPU drivers for your GPUs and operating system. These drivers enable communication between the OS and the GPUs, ensuring smooth operation and compatibility with GPU-related libraries and frameworks.
6. GPU Monitoring and Management: Utilize GPU monitoring and management tools to keep track of GPU temperatures, usage, and performance metrics. These tools can help you identify any anomalies, optimize GPU utilization, and detect potential issues or bottlenecks.
7. GPU Cluster Synchronization: Ensure that the GPUs across all the nodes are synchronized to avoid any discrepancies. Synchronization can be achieved through software tools or by configuring the appropriate settings in the GPU management software.
8. GPU Performance Tuning: Fine-tune the GPU settings to optimize performance for specific applications or workloads. This may involve adjusting memory clocks, core clocks, or power targets to strike the right balance between performance and power consumption.
9. GPU Firmware Updates: Regularly check for GPU firmware updates and apply them as recommended by the manufacturer. Firmware updates can bring performance improvements, bug fixes, and security enhancements to your GPUs.
By following these steps, you can configure the GPUs in your GPU cluster for optimal performance and ensure that they are operating within safe limits. The next important step is installing the necessary GPU drivers, which we will cover in the next section.
Installing GPU Drivers
Installing the correct GPU drivers is a crucial step in setting up your GPU cluster, as it ensures proper communication between the operating system and the GPUs. Here’s how to install GPU drivers on your cluster:
1. Determine the Compatibility: Identify the specific GPU models installed in your cluster and ensure compatibility with the operating system you have installed. Check the GPU manufacturer’s website for driver compatibility information.
2. Download the Drivers: Visit the official website of the GPU manufacturer (such as NVIDIA) to download the appropriate GPU drivers for your operating system. Make sure to select the correct driver version for the GPUs you have installed.
3. Blacklist Nouveau (Linux): If you are using a Linux distribution, such as Ubuntu, you may need to blacklist the open-source Nouveau driver to prevent conflicts with the proprietary GPU drivers. Follow the instructions provided by your Linux distribution to blacklist Nouveau.
4. Driver Installation (Windows): On Windows, simply run the downloaded GPU driver installer and follow the on-screen instructions. The installer will guide you through the installation process, including accepting the license agreement and selecting the installation location.
5. Driver Installation (Linux): On Linux, open a terminal and navigate to the directory where you downloaded the GPU driver installer. Use the appropriate command to make the installer executable (e.g., “chmod +x ./NVIDIA-Linux-x86_64-xxx.xx.run”) and then run the installer with administrative privileges (e.g., “sudo ./NVIDIA-Linux-x86_64-xxx.xx.run”). Follow the prompts to complete the installation.
6. Driver Post-Installation (Linux): After the GPU driver installation on Linux, it’s important to update the kernel module dependencies. Use the appropriate command to initiate the update process (e.g., “sudo update-initramfs -u”) and reboot the system for the changes to take effect.
7. Verify the Installation: After installing the GPU drivers, verify their installation and functionality. Use system utilities or GPU management tools to check if the drivers are properly detected and recognized by the operating system.
8. Driver Updates: Periodically check for updates from the GPU manufacturer and install the latest driver versions to benefit from performance improvements, bug fixes, and compatibility enhancements.
By properly installing the GPU drivers on each node of your GPU cluster, you ensure that the operating system can effectively communicate with the GPUs and utilize their full potential. The next step is setting up the software framework and libraries to maximize the capabilities of your GPU cluster.
Setting Up the Software Framework
Setting up the software framework for your GPU cluster is crucial to unlock the full potential of your GPUs and enable efficient execution of GPU-accelerated applications. Here’s how to set up the software framework:
1. CUDA Toolkit: Install the CUDA (Compute Unified Device Architecture) toolkit from NVIDIA. The CUDA toolkit includes libraries, compilers, and tools that enable developers to leverage the power of GPUs for general-purpose computing.
2. cuDNN: If you plan to use deep learning frameworks like TensorFlow or PyTorch, install the cuDNN (CUDA Deep Neural Network) library. cuDNN provides highly optimized implementations of deep neural network operations for accelerated training and inference on GPUs.
3. Framework-specific Dependencies: Depending on the software framework you plan to use (such as TensorFlow, PyTorch, or Caffe), install any additional dependencies required by the framework. These dependencies can include libraries like OpenCV, BLAS, or MPI.
4. Framework Installation: Install the desired framework by following the official documentation or guidelines provided by the framework’s developers. This typically involves running specific command-line commands or using package managers like pip or conda to install the frameworks and their dependencies.
5. Configuration and Verification: Once the frameworks are installed, configure them to work with the GPUs in your cluster. Follow the documentation specific to each framework to set the necessary environment variables, specify device IDs, and verify that the frameworks can detect and utilize the GPUs.
6. Software Libraries and Toolkits: Install any additional software libraries or toolkits that are relevant to your applications. These can vary depending on your specific use case and requirements. Examples include OpenMP, MPI, or specialized libraries for computer vision or data analytics.
7. Testing the Setup: Test the software framework setup by running sample or benchmark applications included with the frameworks. This helps ensure that the installation and configuration are successful and that the frameworks can effectively leverage the power of your GPU cluster.
8. Documentation and Tutorials: Familiarize yourself with the official documentation and tutorials provided by the framework’s developers. This will help you understand the framework’s features, usage, and any best practices specific to GPU-accelerated computing.
By setting up the software framework and libraries appropriately, you create a solid foundation for developing and running GPU-accelerated applications on your cluster. The next step is configuring the cluster manager, which facilitates efficient scheduling and resource utilization across the nodes in your GPU cluster.
Configuring the Cluster Manager
A cluster manager plays a vital role in efficiently managing and utilizing the resources of your GPU cluster. Here’s how to configure the cluster manager for optimal performance:
1. Choose a Cluster Manager: There are various cluster managers available, such as Kubernetes, Apache Mesos, or Slurm. Evaluate your specific requirements and choose a cluster manager that best aligns with your needs.
2. Install and Configure the Cluster Manager: Follow the documentation provided by the cluster manager to install and configure it on your cluster. Set up the necessary configuration files, security settings, and resource allocation policies based on your requirements.
3. Resource Scheduling and Management: Configure the cluster manager to effectively schedule and manage resources across the nodes in your GPU cluster. This includes specifying resource requirements for jobs, setting up queues or partitions, and managing priorities for different tasks.
4. High Availability and Fault Tolerance: Implement mechanisms for high availability and fault tolerance to ensure that your cluster continues to operate even in the event of node failures or network issues. Configure the cluster manager to automatically recover and redistribute tasks in case of failures.
5. Monitoring and Metrics: Set up monitoring and metrics collection tools to track the performance and health of your cluster. This helps identify any bottlenecks, resource utilization issues, or performance degradations, allowing you to optimize the cluster manager’s configuration accordingly.
6. Job Scheduling Policies: Define job scheduling policies based on your workload and requirements. Consider factors such as job priority, fair resource allocation, and constraints on job dependencies. This ensures efficient utilization of resources and effective sharing of the cluster’s computational power.
7. Integration with Other Tools: Integrate the cluster manager with other tools and services in your workflow, such as monitoring systems, log aggregators, or application-specific frameworks. This enhances the overall management and monitoring capabilities of the GPU cluster.
8. Scalability and Flexibility: Configure the cluster manager to scale dynamically based on workload and resource demands. Ensure that it can seamlessly handle the addition or removal of nodes from the cluster without interrupting running tasks or impacting performance.
9. Periodic Evaluation and Optimization: Continuously evaluate the performance and efficiency of your cluster manager’s configuration. Monitor key metrics, review job logs, and analyze resource utilization to identify opportunities for optimization and fine-tuning.
By properly configuring the cluster manager, you enable efficient resource allocation, fault tolerance, and scalability in your GPU cluster. The next crucial step is to test and validate the cluster by running sample tasks and evaluating its performance.
Testing the Cluster
Once you have set up the hardware, network, operating system, GPU drivers, software framework, and cluster manager, it’s crucial to test the functionality and performance of your GPU cluster. Here are some key steps to effectively test your cluster:
1. Sample Applications: Run sample applications or benchmarks specific to your intended use case. These applications help assess the overall functionality and performance of your cluster. It is recommended to use well-known benchmarks to ensure reproducibility and accurate performance comparisons.
2. Scalability Evaluation: Test the scalability of your cluster by gradually increasing the number of tasks or workload. Monitor the cluster’s performance and resource utilization to identify any potential bottlenecks or limitations as you scale up.
3. Parallelization Efficiency: Evaluate the parallelization efficiency of your applications by measuring the speedup achieved with multiple GPUs. Compare the performance of running tasks on a single GPU versus distributing them across multiple GPUs in the cluster.
4. Stability and Reliability: Run long-duration tests or stress tests to evaluate the stability and reliability of your cluster. Ensure that the cluster manager can effectively handle failures, restart tasks, and maintain overall system stability during prolonged testing periods.
5. Resource Allocation: Monitor the resource allocation and utilization patterns of your cluster during testing. Verify that tasks are being distributed evenly across the available GPUs and that the cluster manager is effectively managing resources according to the defined policies.
6. Metrics Collection: Set up metrics collection systems to capture performance metrics, resource utilization, and system behavior during testing. Analyze these metrics to identify any areas for improvement and optimization.
7. Real-world Use Cases: Test your cluster with real-world use cases or applications that closely resemble your intended workload. This helps validate the cluster’s performance and functionality in scenarios similar to what you will encounter in production environments.
8. Benchmarking and Comparison: Compare the performance of your GPU cluster with industry-standard benchmarks or against similar configurations reported in research or professional communities. This allows you to understand the relative performance of your cluster and identify potential areas for performance optimization.
9. User Validation: Collect feedback from users or stakeholders who have used the cluster for their specific tasks. Evaluate their experience, performance gains, and any challenges they encountered during their testing. Incorporate this feedback into ongoing improvements and optimizations.
By thoroughly testing your GPU cluster, you can ensure its proper functionality, performance, and stability. This testing phase allows you to address any potential issues, fine-tune configurations, and optimize the cluster for your specific workload requirements. With successful testing complete, your GPU cluster is now ready for production use.
Conclusion
Building and configuring a GPU cluster is a complex but rewarding endeavor that can significantly enhance your computing power and enable you to tackle intensive tasks requiring parallel processing. Throughout this guide, we have covered the key steps involved in building a GPU cluster from choosing the right hardware to configuring the software framework and cluster manager.
By carefully selecting the hardware components, including GPUs, CPUs, and networking equipment, you can ensure the cluster’s performance and scalability. Installing the operating system, GPU drivers, and necessary software frameworks are pivotal for unlocking the full potential of your GPU cluster.
Configuring the cluster manager and optimizing its settings play a vital role in resource allocation, scheduling, and managing the cluster’s tasks efficiently. Proper testing, both with sample applications and real-world use cases, ensures the stability, reliability, and performance of the cluster under various workloads.
It is important to remember that building and maintaining a GPU cluster requires continuous monitoring and optimization. Keep your cluster up-to-date with the latest firmware updates, GPU drivers, and software versions to make the most of advancements in GPU technology and software ecosystem.
Finally, don’t forget to explore online resources, forums, and communities to stay connected with other GPU cluster enthusiasts, share your experiences, and seek help when needed.
Now that you have completed this guide, you have the knowledge and insights to embark on the exciting journey of building and configuring your own GPU cluster. Enjoy the power, speed, and versatility of your newly created GPU cluster as you tackle complex computational tasks and propel your projects to new heights.