Introduction
Welcome to this comprehensive guide on how to build your own drone! Drones have become increasingly popular in recent years, with their ability to capture stunning aerial footage and their wide range of applications. Building a drone from scratch not only gives you a deeper understanding of how these amazing devices work, but it also allows you to customize and tailor your drone to suit your specific needs and preferences.
Whether you’re a photography enthusiast looking to capture breathtaking shots, an aspiring drone racer wanting to join the exhilarating world of drone racing, or simply curious about the technical aspects behind these flying machines, this guide will provide you with all the information you need to start your drone building journey.
In this guide, we’ll cover everything from the basic components of a drone to the step-by-step process of assembling and testing your creation. We’ll explore the different types of drone frames available and explain the importance of selecting the right one for your needs. We’ll also delve into the world of drone motors and electronic speed controllers, highlighting their role in providing power and control to your drone.
Additionally, we’ll discuss the crucial role of the flight controller, which acts as the brain of the drone, and how to choose the right one for optimal performance. We’ll also look at the selection of propellers and delve into the world of drone batteries and chargers, ensuring you have a reliable power source for your aerial adventures.
Furthermore, we’ll guide you through the installation and configuration of the drone’s radio transmitter and receiver, essential for controlling your drone remotely. We’ll walk you through the step-by-step process of assembling the drone frame, as well as the wiring and connection of all the important components.
Finally, we’ll discuss the crucial step of installing and configuring the flight controller software and guide you through the process of calibrating your drone for optimal performance. We’ll also cover testing and troubleshooting, ensuring that you’re ready to take your drone to the skies with confidence.
By the end of this guide, you’ll not only have a fully functional drone ready to fly but also a deeper understanding of the intricate components and processes involved in building and operating a drone. So, without further ado, let’s dive into the exciting world of drone building!
Overview of Drone Parts
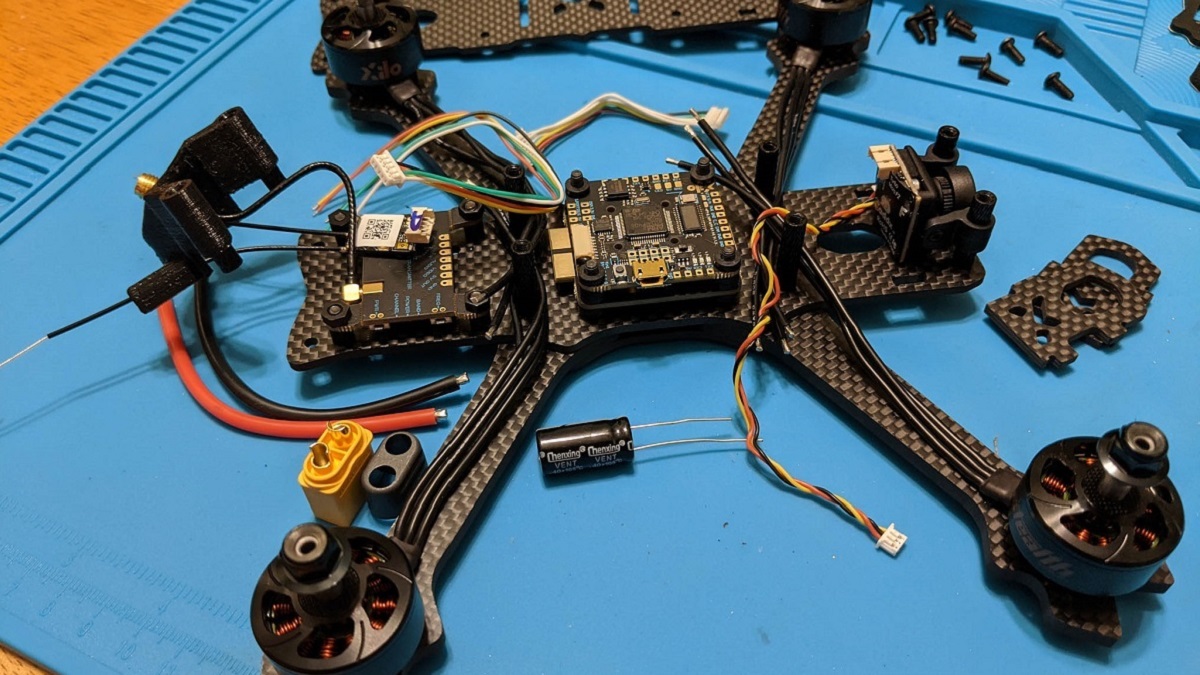
Before diving into the nitty-gritty details of building a drone, it’s important to familiarize yourself with the various parts that make up these marvelous flying machines. Understanding the purpose and function of each component will give you a solid foundation as you embark on your drone-building journey.
1. Drone Frame: The drone frame serves as the structure or chassis that holds all the electronic components together. It provides stability, durability, and aerodynamic properties to the drone. Frames are commonly made of materials such as carbon fiber, aluminum alloy, or even plastic. The size and shape of the frame will determine the overall size and flying characteristics of your drone.
2. Drone Motors: Motors are responsible for propelling the drone and generating lift. They are typically brushless motors, chosen for their high power-to-weight ratio and efficiency. The number of motors your drone requires will depend on its configuration; quadcopters, for example, have four motors, while hexacopters have six. It’s important to select motors that match the voltage and propeller size requirements of your drone.
3. Electronic Speed Controllers (ESCs): ESCs control the speed and rotation of the motors. They receive commands from the flight controller and adjust the power delivered to each motor accordingly. ESCs also provide a mechanism for the flight controller to stabilize the drone and execute precise maneuvers.
4. Flight Controller: The flight controller is the “brain” of the drone, responsible for interpreting pilot inputs and sensor data to control the motor speeds and stabilize the drone’s flight. It uses a combination of gyroscopes, accelerometers, and barometers to maintain stability and handle advanced flight modes.
5. Propellers: Propellers are crucial for generating thrust and lift needed for the drone to take off and fly. They come in various sizes and configurations, each optimized for different flight characteristics. It’s important to select the appropriate propellers for your drone’s size, motor specifications, and desired flight performance.
6. Drone Batteries and Chargers: As drones rely on electrical power to function, having reliable batteries and chargers is essential for extended flight times. Lithium Polymer (LiPo) batteries are commonly used for their high energy density. Chargers must be compatible with the battery specifications and provide necessary safety features.
7. Radio Transmitter and Receiver: These components facilitate remote control of the drone. The transmitter, held by the pilot, sends signals to the receiver on the drone, commanding various flight movements. It’s important to choose a transmitter and receiver pair with sufficient range and features to suit your needs.
These are just the basic components that make up a drone. There are also additional components such as cameras, GPS modules, and sensors that can be added depending on the intended use of the drone.
Now that you have a solid understanding of the different parts that make up a drone, you’re ready to delve deeper into each component and learn how to choose the right ones for your specific drone-building project. So, let’s move on to the next section and explore the process of selecting the suitable drone frame.
Choosing the Right Drone Frame
When it comes to building a drone, selecting the right frame is a crucial decision that will impact the overall performance and stability of your aerial device. The frame serves as the foundation, providing structural integrity and supporting all the other components. Here are some important factors to consider when choosing a drone frame:
- Size and Shape: Drone frames come in various sizes and shapes, each with its own advantages and characteristics. Smaller frames are typically lighter, more agile, and consume less power, making them suitable for racing or acrobatic flying. Larger frames, on the other hand, offer stability and more payload capacity, making them ideal for aerial photography or heavy-lift applications. Consider your specific use case and requirements to determine the appropriate size and shape for your drone.
- Material: Drone frames are commonly made from materials such as carbon fiber, aluminum alloy, or plastic. Carbon fiber frames are lightweight, sturdy, and offer excellent vibration dampening properties, making them popular among drone enthusiasts. Aluminum alloy frames are strong and durable, providing better protection for the internal components. Plastic frames, while less expensive, tend to be less rigid and may impact the flight stability. Choose a material that strikes a balance between weight, strength, and cost based on your needs.
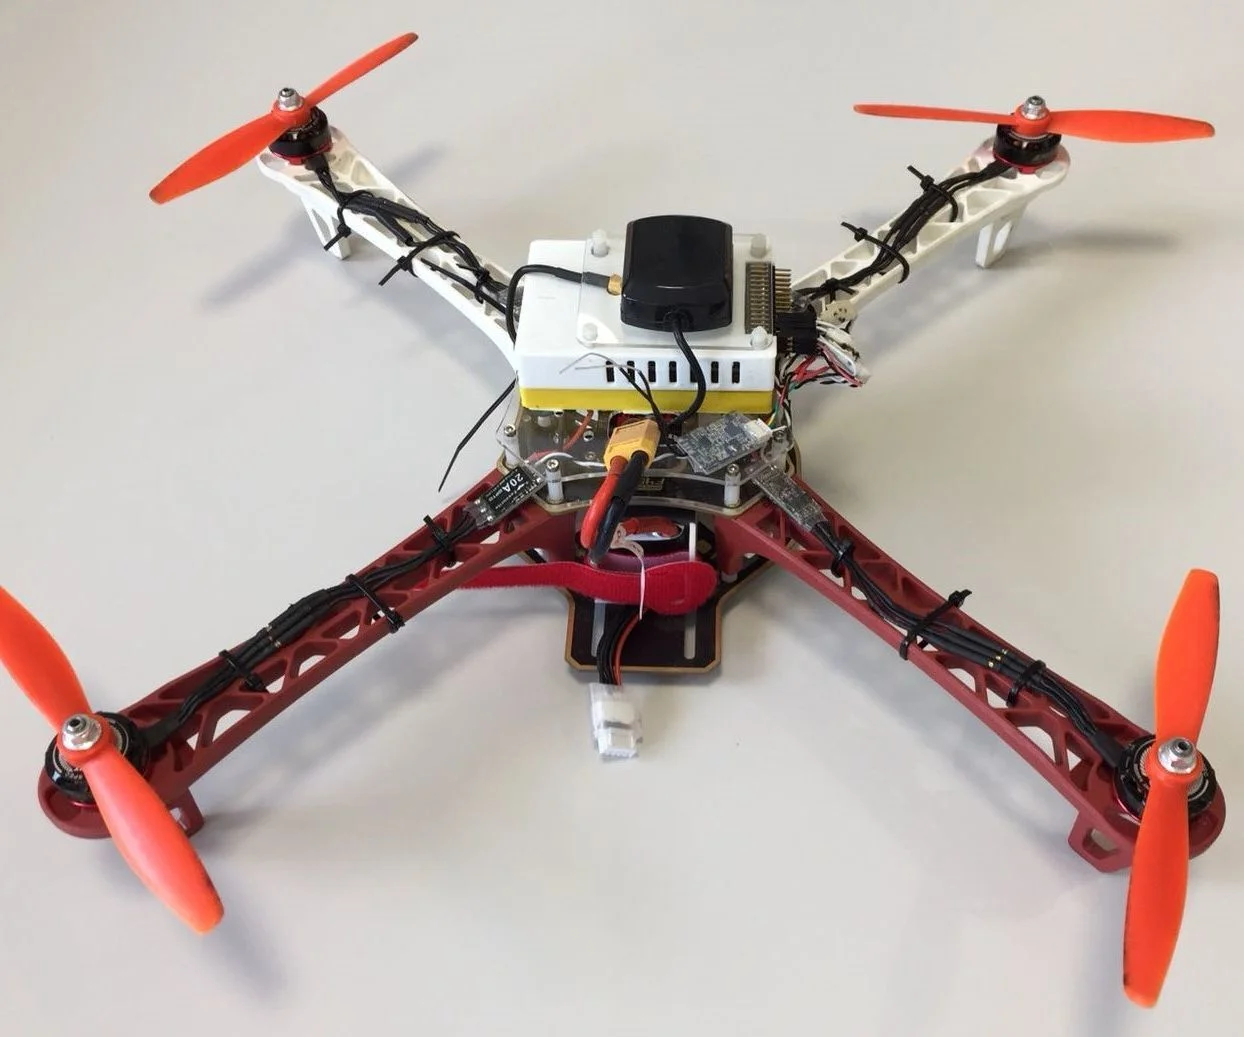
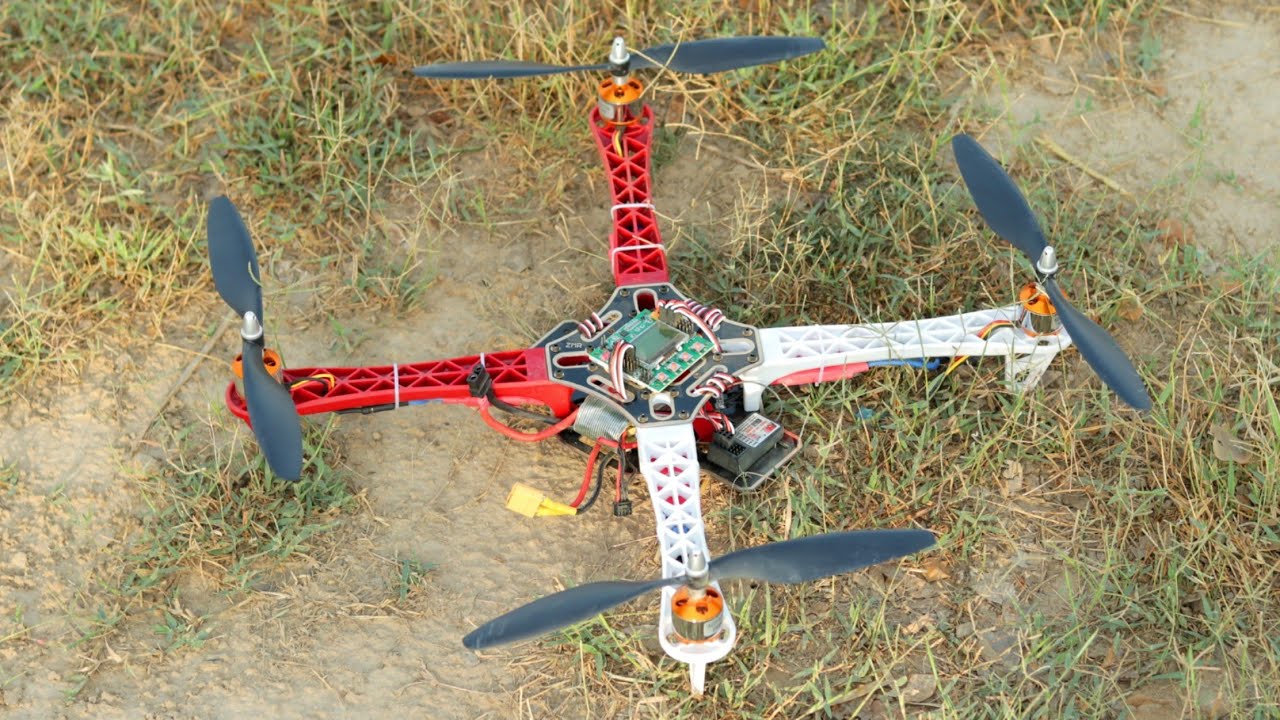
- Configuration: Another important consideration is the configuration of the frame. The most common configurations are quadcopters (four motors), hexacopters (six motors), and octocopters (eight motors). The number of motors will determine the lift capability, stability, and maneuverability of your drone. Quadcopters are generally easier to build and maintain, while hexacopters and octocopters offer redundancy and improved stability. Choose a configuration that best suits your intended use and flying preferences.
- Mounting Options: Consider the available mounting options on the frame. These will allow you to attach additional components such as cameras, gimbals, or specialized sensors. Look for frames that provide multiple mounting points and offer flexibility in positioning the components to meet your specific requirements.
Additionally, it’s a good idea to research and read reviews from other drone builders to gain insights into the performance and durability of different frame options. Consider factors such as weight distribution, ease of assembly, and compatibility with other components.
Once you have identified your priorities and have a clear understanding of your drone’s intended use, budget, and required specifications, you can confidently choose a drone frame that fits your needs. Remember that the frame is the foundation of your drone, so investing time in selecting the right one will pay off in terms of the overall performance and satisfaction with your finished build.
In the next section, we’ll explore another essential component of drone building: selecting the suitable drone motors. So, let’s continue our journey towards creating a fully functional and high-performing drone.
Selecting the Suitable Drone Motors
Choosing the right drone motors is crucial as they are responsible for generating the necessary thrust and lift to propel your drone into the sky. The motor selection process involves considering factors like power, efficiency, weight, and compatibility with other components. To help you make an informed decision, here are some key points to keep in mind:
- Power Requirements: Determine the power requirements of your drone by considering its weight, payload capacity, and intended use. Heavier drones or those carrying additional equipment will require more powerful motors to achieve adequate lift. Keep in mind that using underpowered motors can result in poor flight performance, while overpowering the drone may drain the battery quickly and reduce flight time.
- Motor Types: Brushless motors are commonly used in drone applications due to their higher power-to-weight ratio, efficiency, and durability. They require a separate electronic speed controller (ESC) to control their speed and rotation. Brushless motors offer better performance and longer lifespan compared to brushed motors.
- Motor Size: The size of the motor is generally represented by a four-digit number, such as “2205” or “2306”. The first two digits indicate the stator width, while the last two digits represent the height of the motor. Larger motors generate more thrust, but they also weigh more and consume more power. Consider the size and weight limitations of your drone frame when selecting the motor size.
- KV Rating: The KV rating refers to the motor’s RPM (Revolutions Per Minute) per Volt of applied power. Higher KV motors spin faster and provide more thrust, while lower KV motors are better suited for applications that require lower RPM and higher torque. Consider the desired flight characteristics and payload requirements of your drone to determine the appropriate KV rating.
- Battery Compatibility: Ensure that the motors you choose are compatible with the voltage of your drone’s battery. Higher voltage enables the motors to spin faster, resulting in increased thrust. However, using motors with a voltage rating higher than your battery can cause damage to both the motors and the battery.
In addition to these considerations, it is recommended to choose motors from reputable manufacturers known for their quality and reliability. Reading reviews and seeking advice from experienced drone builders can provide valuable insights into the performance and durability of different motor options.
Keep in mind that selecting the suitable drone motors is a balance between power, efficiency, and weight. Finding the right combination will ensure optimal flight performance and maximize the overall capabilities of your drone.
In the next section, we’ll explore another critical component of a drone: the Electronic Speed Controllers (ESCs). So, let’s continue our journey towards building a high-performance drone!
Understanding Drone Electronic Speed Controllers (ESCs)
Drone electronic speed controllers (ESCs) play a vital role in controlling the speed and rotation of the motors. They receive commands from the flight controller and adjust the power delivered to each motor accordingly. Understanding how ESCs work and their important features will help you make informed decisions when choosing the right ESCs for your drone. Here are some key points to consider:
- Motor Compatibility: Ensure that the ESCs you select are compatible with the motors you have chosen. ESCs are typically designed to work with specific motor types and sizes. Matching the ESCs to your motors will ensure optimal performance and compatibility.
- Current Rating: The current rating of an ESC indicates the maximum amount of current it can safely handle. It is essential to choose ESCs with an appropriate current rating that can handle the power requirements of your motors. Selecting ESCs with a higher current rating than required can provide a safety margin, but oversizing can add unnecessary weight and cost to your build.
- Number of Rotors: Choose ESCs that match the number of rotors on your drone. For example, a quadcopter requires four ESCs, while a hexacopter needs six ESCs. It is crucial to wire and configure the ESCs correctly according to the specified drone configuration.
- BEC (Battery Eliminator Circuit): Some ESCs incorporate a built-in BEC that provides regulated power to the flight controller and other electronic components. This eliminates the need for a separate power distribution board or voltage regulator. However, if your drone has high power demand or additional components, an external BEC or power distribution board may be necessary.
- Programming and Firmware: ESCs often come with firmware that can be updated and programmed. This allows you to configure various settings such as motor timing, throttle response, and braking. Some ESCs also support advanced features like active braking to improve flight control and responsiveness. Consider the programming options and firmware compatibility when selecting ESCs to ensure they meet your specific requirements.
- Quality and Reliability: It is important to choose ESCs from reputable manufacturers known for their quality and reliability. Researching customer reviews and seeking recommendations can provide valuable insights into the performance and durability of different ESC models.
When installing ESCs, ensure proper wiring, and follow the manufacturer’s guidelines for calibration and setup. It is essential to connect the ESCs correctly to the flight controller, motors, and power distribution system to ensure proper communication and functionality.
Understanding the role of electronic speed controllers and considering factors such as motor compatibility, current rating, number of rotors, BEC capability, programming options, and reliability will help you select the appropriate ESCs for your drone and ensure smooth and efficient operation of your motors.
In the next section, we’ll discuss another critical component of a drone: the flight controller. So, let’s continue our exploration of building a high-performance drone!
Picking the Right Flight Controller
The flight controller is the “brain” of your drone, responsible for interpreting pilot inputs and sensor data to control the motor speeds and stabilize the drone in flight. Picking the right flight controller is essential for achieving optimal performance and functionality. Here are some key considerations when selecting a flight controller for your drone:
- Sensor Types: Flight controllers typically utilize a combination of sensors such as gyroscopes, accelerometers, and barometers to gather data about the drone’s orientation, motion, and altitude. Understanding the type and quality of sensors used in a flight controller is crucial as it directly affects the accuracy and stability of your drone’s flight. Look for flight controllers with high-quality sensors that provide reliable and precise data.
- Processing Power: Consider the processing power and capabilities of the flight controller. A more powerful processor can handle complex algorithms and flight modes, allowing for more advanced functionalities such as autonomous flight and waypoint navigation. Assess the needs of your intended drone application and select a flight controller with sufficient processing power to meet your requirements.
- Compatibility: Ensure that the flight controller is compatible with the other components in your drone system. Check for compatibility with the ESCs, radio transmitter, receiver, and other peripherals you plan to use. It is essential to have proper communication and compatibility between components to ensure smooth operation and control.
- Flight Modes and Features: Different flight controllers offer various flight modes and features. Common modes include Manual, Stabilized, Altitude Hold, GPS Hold, Mission Planning, and Return-to-Home. Consider the flight modes and features that align with your needs and flying style. For aerial photography, features like GPS hold and return-to-home can be beneficial, while drone racing may require more agile and responsive flight characteristics.
- Community Support and Firmware Updates: Research the support and community around the flight controller you are considering. Flight controllers with an active user community often have extensive documentation, tutorials, and forums where you can find valuable information and assistance. Additionally, firmware updates are crucial for improving performance, adding features, and maintaining compatibility with the latest technology and protocols.
- Reliability and Build Quality: Choose a flight controller from reputable manufacturers known for their reliability and build quality. Reading customer reviews and seeking recommendations from experienced drone builders can help you assess the reliability of different flight controllers. Opting for a reliable and well-built flight controller is vital to ensure the stability and safety of your drone in flight.
Since the flight controller is a critical component of your drone, take the time to research and compare different options based on your specific requirements and budget. It’s important to find a flight controller that strikes the right balance between performance, compatibility, features, and reliability.
Once you have selected a flight controller, familiarize yourself with its installation and configuration processes. Follow the manufacturer’s instructions and guidelines for wiring, connections, and firmware updates to ensure proper functioning and integration with the rest of your drone’s components.
In the next section, we’ll discuss another essential component in your drone build: selecting the appropriate drone propellers. So, let’s continue our exploration of building a high-performance drone!
Selecting the Appropriate Drone Propellers
Selecting the right drone propellers is crucial for achieving optimal flight performance and efficiency. Propellers play a key role in generating thrust and lift, and choosing the appropriate ones for your drone can significantly impact its stability, agility, and power consumption. Here are some important factors to consider when selecting drone propellers:
- Size and Pitch: Propellers come in various sizes, typically denoted by two numbers, such as “5×3” or “8×4.5”. The first number represents the diameter of the propeller in inches, while the second number represents the pitch, which is the distance the propeller would theoretically move forward in one revolution. Larger propellers generally generate more thrust, while propellers with higher pitch are better suited for high-speed flights. Consider the weight, size, and motor power of your drone when selecting the appropriate size and pitch for your propellers.
- Number of Blades: Propellers can have two, three, four, or more blades. Two-bladed propellers are generally more efficient and provide higher speeds, while three-bladed or four-bladed propellers offer improved stability and maneuverability. The number of blades can affect the flight characteristics of your drone, so choose based on your flying style and desired performance.
- Material: Propellers are typically made from materials like plastic, carbon fiber, or composite materials. Plastic propellers are affordable and readily available, suitable for beginners and low-budget builds. Carbon fiber propellers are lightweight, durable, and offer better performance but can be more expensive. Consider the trade-offs between cost, performance, and durability when choosing the material for your propellers.
- Thrust and Efficiency: Consider the thrust and efficiency characteristics of the propellers. Thrust refers to the force that propels the drone, while efficiency refers to how effectively the propellers convert power into thrust. It’s recommended to choose propellers with a balance between thrust and efficiency that matches the power and weight requirements of your drone.
- Compatibility: Ensure that the propellers you choose are compatible with your drone’s motors and frame. Check the specifications provided by the manufacturer for motor size, KV rating, and propeller mounting options. Using propellers that are not compatible with your motor or frame can result in poor performance, increased power consumption, or even damage to your drone.
It is advisable to experiment with different propellers to find the combination that works best for your drone and specific flying requirements. Consider factors such as hover efficiency, speed, agility, and stability when evaluating the performance of different propellers.
Lastly, always inspect your propellers for damage or wear regularly. Damaged or worn-out propellers can significantly affect the flight performance and safety of your drone. Replace any propellers that show signs of damage, deformation, or imbalance.
By carefully considering factors such as size, pitch, number of blades, material, thrust, and compatibility, you can make an informed decision when selecting the appropriate drone propellers. So now, let’s move on to our next section, where we will dive into the world of drone batteries and chargers!
Understanding Drone Batteries and Chargers
Drone batteries and chargers are essential components that power your drone’s flight. Understanding the intricacies of drone batteries and chargers will help you make informed decisions when it comes to selecting the right ones for your drone and ensuring safe and reliable operation. Here are some key points to understand:
- Battery Types: The most common type of battery used in drones is the Lithium Polymer (LiPo) battery. LiPo batteries are known for their high energy density, lightweight, and high discharge rates, making them ideal for the power demands of drones. Other battery chemistries, such as Lithium-Ion (Li-ion) or Nickel Metal Hydride (NiMH), are less commonly used due to lower power density and weight limitations.
- Voltage: Drone batteries are typically rated using the number of cells they contain, such as 3S (11.1V) or 4S (14.8V). The voltage rating determines the power output of the battery, with higher voltage batteries delivering more power and potentially offering longer flight times. However, it’s important to ensure that your drone’s electronic components, including motors and ESCs, are compatible with the battery’s voltage rating.
- Capacity: Battery capacity is measured in milliampere-hours (mAh). Higher capacity batteries generally offer longer flight times but can also be heavier, affecting the overall weight and flight characteristics of your drone. Consider the desired flight duration and weight limitations of your drone when selecting the battery capacity.
- C Rating: The C rating represents the discharge rate capability of a battery. It indicates how fast the battery can safely release its energy. Higher C ratings allow for high-amperage draw, essential for drones that require sudden bursts of power for maneuvers and acceleration. Ensure that the battery’s C rating matches or exceeds the power demands of your drone.
- Battery Safety: Drone batteries require proper care and handling to ensure safety. Guidelines such as storing batteries in fireproof bags, avoiding overcharging or discharging, and monitoring battery condition and temperature are crucial to prevent accidents and prolong battery lifespan. Familiarize yourself with the manufacturer’s recommendations and guidelines for safe battery use and maintenance.
- Battery Chargers: Selecting the right battery charger is essential for safely and efficiently charging your drone batteries. Look for chargers that offer features such as balancing, multiple charging modes, adjustable charging current, and compatibility with various battery types. Consider the number of battery ports and charging speed to accommodate your battery requirements and minimize downtime.
When using battery chargers, always follow the manufacturer’s instructions and guidelines. Avoid leaving batteries unattended while charging, and never attempt to modify or tamper with the charging process. Using recommended charging cables and accessories will ensure compatibility and safety.
It’s recommended to have multiple batteries to extend your flight time and enjoy uninterrupted flying sessions. Be sure to label and keep track of each battery’s usage and charge cycles to monitor their health and performance. Replace any damaged or swollen batteries immediately.
Understanding the characteristics and considerations related to drone batteries and chargers will enable you to select the appropriate ones for your drone, ensuring reliable power and safe operation. In the next section, we’ll discuss another crucial component for your drone: the installation of the drone radio transmitter and receiver. Let’s continue building our knowledge and skills in drone construction!
Installing the Drone Radio Transmitter and Receiver
The radio transmitter and receiver are key components in controlling your drone remotely. The transmitter, held by the pilot, sends commands to the receiver on the drone, enabling precise control of flight movements. Understanding how to properly install and set up the radio transmitter and receiver is vital for a successful and safe flight. Here are the essential steps to follow:
- Selecting a Compatible Transmitter and Receiver: Ensure that the radio transmitter and receiver you choose are compatible with each other and the flight controller in your drone. Consider factors such as range, number of channels, modes, and compatibility with your drone’s flight controller. It’s essential to have a reliable and seamless communication link between the transmitter and receiver.
- Binding: Binding refers to the process of establishing a secure connection between the transmitter and receiver. Follow the manufacturer’s instructions for binding, which usually involves putting the transmitter and receiver into bind mode and initiating the binding process. The bind process may vary depending on the specific transmitter and receiver you are using.
- Installation: Mount the receiver securely inside the drone’s frame, ensuring it is well protected and positioned away from any potential interference. Use zip ties, double-sided tape, or other suitable mounting methods to secure the receiver in place. Keep the receiver’s antennas in a position where they have clear line-of-sight without any obstructions.
- Wiring: Connect the receiver to the appropriate ports on the flight controller as per the manufacturer’s guidelines. Most modern flight controllers feature dedicated ports for the receiver’s PWM or PPM signal, power, and ground connections. Ensure proper polarity and secure connections to prevent any signal loss or interference.
- Configuration: Once the radio transmitter and receiver are physically installed and connected, configure the flight controller settings to map the receiver’s channels to specific flight controls, such as throttle, roll, pitch, and yaw. Use the flight controller software or programming interface to set up and calibrate the radio transmitter inputs to ensure accurate and responsive control of your drone.
- Range Testing: After installation and configuration, perform range testing to ensure a reliable communication link between the radio transmitter and receiver. Test the range in an open area, gradually moving away from the drone while monitoring the control response. This step is crucial to identify any signal loss or interference issues that may require adjustments or troubleshooting.
Always follow the manufacturer’s instructions and guidelines for your specific radio transmitter and receiver. Pay attention to any firmware updates or configuration settings that may enhance the performance and reliability of the radio system. Regularly check the batteries in your transmitter and receiver to ensure they have sufficient power for uninterrupted communication.
By correctly installing and setting up the radio transmitter and receiver, you can establish a secure and responsive control link between you and your drone, allowing for precise and enjoyable flight maneuvers. In the next section, we will dive into the process of assembling the drone frame. So, let’s continue our journey of building a fully functional drone!
Assembling the Drone Frame
Assembling the drone frame is an exciting step in the process of building your drone. The frame serves as the structural backbone, holding all the components together and providing stability and durability. Proper assembly ensures a solid foundation for your drone. Here are the steps to follow:
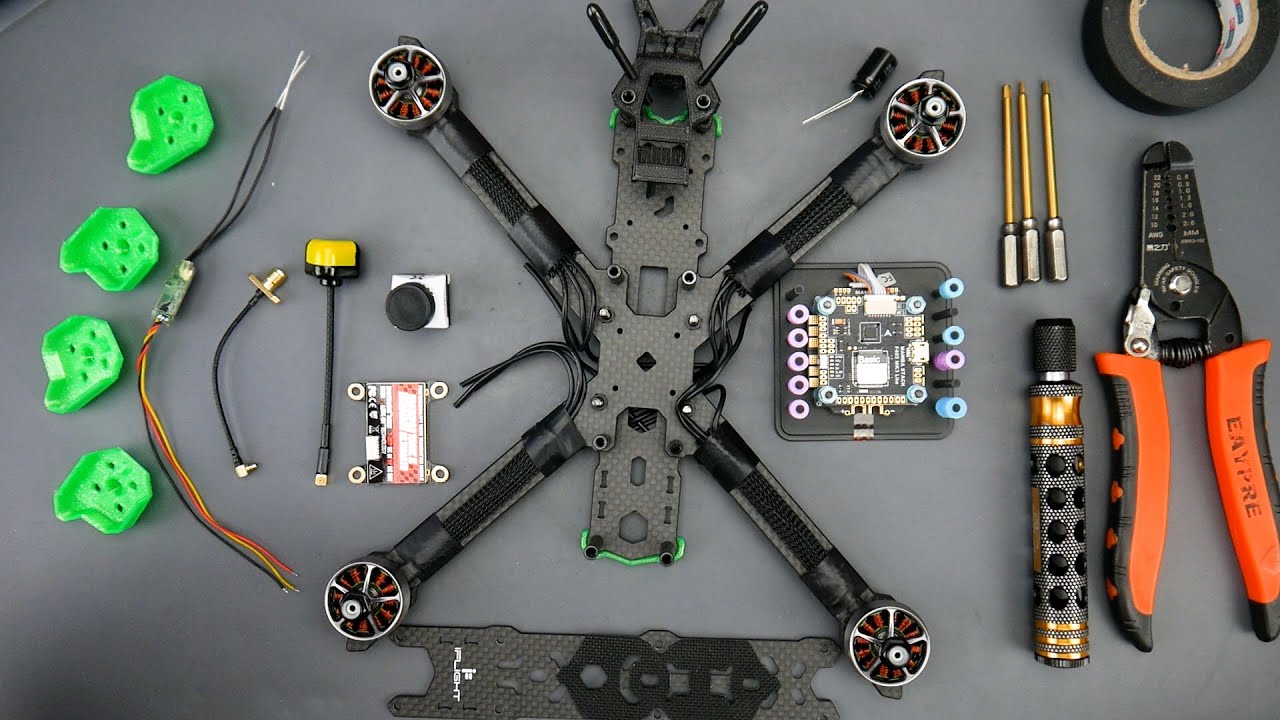
- Gather the Components: Collect all the necessary components for the drone frame assembly. This includes the frame itself, motor mounts, screws, standoffs, and any additional accessories or mounting hardware that may be included with the frame.
- Prepare the Frame: Carefully inspect the frame for any defects or damage. Clean the frame if necessary and ensure that all screw holes and mounting points are clear and free of debris or obstructions.
- Attach the Motor Mounts: Install the motor mounts onto the arms of the drone frame. It’s important to follow the specific instructions provided by the frame manufacturer for proper installation. Typically, this involves securing the mounts with screws and ensuring they are tight and aligned with the arms.
- Mount the Motors: Attach the motors to the motor mounts using the screws provided. Take care to align the motor wires according to the recommended orientation and ensure that the motors are securely fitted onto the mounts.
- Secure the Escs: Depending on the design of your frame and ESCs, mount the electronic speed controllers (ESCs) on the frame using either adhesive pads or zip ties. Ensure that the ESCs are securely fastened and positioned in a way that allows for proper cooling and wire management.
- Connect the Motors to the ESCs: Connect the wires from each motor to the corresponding ESCs. Follow the color-coded labels or instructions provided by the motor and ESC manufacturers for proper wire connections.
- Attach the Flight Controller: Install the flight controller onto the frame using vibration-damping standoffs or foam pads to reduce the effects of vibrations caused by the motors. Ensure that the flight controller is positioned properly and securely fastened.
- Secure Other Components: Depending on your specific drone setup, mount any additional components such as GPS modules, cameras, or other sensors. Follow the manufacturer’s instructions for their proper installation and secure attachment to the frame.
- Check Connections and Wiring: Double-check all wire connections to ensure they are tight and properly secured. Verify that all components are correctly plugged into the flight controller and that there are no loose or exposed wires that could potentially cause a short-circuit.
During the assembly process, refer to the manufacturer’s instructions and guidelines for the specific drone frame you are using. Take your time and pay attention to details to ensure a sturdy and well-aligned frame. Properly assembled frames result in improved flight stability, performance, and longevity of your drone.
With the drone frame now assembled, we move one step closer to completing our drone build. In the next section, we’ll cover the crucial task of wiring and connecting the various drone components. So, let’s continue our journey in constructing our fully functional drone!
Wiring and Connecting Drone Components
Wiring and connecting the various components of your drone is a critical step in the building process. Properly organizing and securing the wiring ensures reliable communication and power distribution among the components. Here are the steps to follow when wiring and connecting your drone components:
- Plan the Wiring Layout: Before starting the wiring process, plan the layout of your drone’s components. Consider the shortest and cleanest routing paths for the wires, taking care to avoid potential sources of interference or damage.
- Connect the Power Distribution: Connect the battery to the power distribution board or the flight controller’s power input. Ensure that the positive and negative terminals are securely connected and that the polarity is correct. It’s recommended to use solder or reliable connectors for a secure connection.
- ESC Connections: Connect each electronic speed controller (ESC) to the corresponding motor output on the flight controller. Follow the recommended connection pattern provided by the flight controller’s manufacturer. Ensure that the signal wires are correctly aligned and securely connected.
- Wire the Flight Controller: Connect the flight controller to the appropriate ports on the power distribution board or directly to the battery. Make sure to connect the ground, power, and signal pins correctly, and secure the connectors properly to prevent accidental disconnection.
- Wire Other Components: Connect any additional components, such as cameras, GPS modules, or sensors, according to their respective wiring instructions. Pay attention to any specific power and signal requirements, and ensure that the wiring remains neat and organized.
- Secure and Neatly Route Wires: Use zip ties, heat shrink tubing, or cable management clips to secure and organize the wires. Avoid overlapping or twisting wires to prevent signal interference. Neatly routing the wires along the frame or using wire channels can help enhance the drone’s overall aesthetics and functionality.
- Double-Check Connections: After wiring all the components, double-check the connections to ensure they are secure and correctly aligned. Ensure that there are no loose wires or connectors that could come undone during flight. Verify that the wires do not obstruct any moving parts, such as the propellers or gimbal mechanisms.
- Perform Continuity and Voltage Checks: Before the first flight, perform continuity checks using a multimeter to ensure that the connections are properly soldered or secured. Additionally, conduct voltage checks to ensure that the power is correctly distributed to all the components.
Properly wiring and connecting the drone components not only ensures reliable functionality but also helps in troubleshooting and maintenance. Taking the time to organize and secure the wiring will make future repairs or upgrades more manageable and less time-consuming.
Once you have followed these steps and verified all the connections, you are one step closer to completing your drone build. In the next section, we will explore the installation and configuration of flight controller software. So, let’s dive into the digital aspect of our drone construction journey!
Installing and Configuring Flight Controller Software
Installing and configuring the flight controller software is a crucial step in getting your drone up and running. This software acts as the “brain” of your drone, controlling its flight, stability, and advanced functionalities. Here’s a step-by-step guide on how to install and configure the flight controller software:
- Select the Flight Controller Software: Identify the appropriate flight controller software for your specific flight controller board. Popular options include Betaflight, Cleanflight, and iNav. Visit the official website of the software to download the latest stable version compatible with your flight controller.
- Connect the Flight Controller to Your Computer: Use a USB cable to connect the flight controller board to your computer. Ensure that the flight controller is properly recognized by your computer.
- Install USB Drivers: If required, download and install the necessary USB drivers specific to your flight controller board. These drivers enable communication between the flight controller and your computer.
- Open the Flight Controller Software: Launch the software and locate the correct port for your flight controller within the software’s connection settings. Connect to the flight controller by selecting the appropriate port.
- Calibrate Sensors: Access the sensor calibration settings within the flight controller software. Follow the on-screen instructions to calibrate the gyroscopes and accelerometers for accurate measurements of your drone’s orientation and motion.
- Configure Flight Modes and Features: Configure the flight modes and features offered by the flight controller software. This includes selecting stabilization modes, adjusting PID (Proportional, Integral, and Derivative) settings for optimal flight performance, and customizing additional features such as OSD (On-Screen Display) layouts.
- Map RC Channels: Assign the transmitter’s channels to their corresponding functions within the flight controller software. Ensure that the control inputs from your radio transmitter are correctly mapped and calibrated in the software, allowing for precise control of your drone.
- Set Up Failsafe: Configure the failsafe settings to ensure a proper response from the flight controller in case of signal loss or transmitter failures. This ensures a safe and controlled behavior of your drone during unexpected situations.
- Test Configuration: Disconnect the flight controller from your computer and power up your drone. Thoroughly test the configuration by carefully monitoring the drone’s response to different control inputs and flight modes. Make any necessary adjustments to the configuration to achieve desired flight behavior.
- Perform Firmware Updates: Regularly check for firmware updates for both the flight controller software and the flight controller board itself. Updating to the latest stable firmware can improve performance, introduce new features, and address any known issues or bugs.
Remember to refer to the specific documentation and resources provided by the flight controller software and board manufacturers for detailed instructions and support.
With the flight controller software installed and configured, your drone is ready to take to the skies! However, thorough testing, calibration, and fine-tuning may still be necessary to achieve optimal performance. In the next section, we’ll discuss the vital process of calibrating your drone for stability and accuracy. So, let’s continue our journey of drone building!
Calibrating the Drone
Calibrating your drone is a fundamental step in ensuring stable flight performance and accurate sensor readings. Calibration helps the flight controller understand the drone’s orientation and respond accurately to pilot inputs. Here’s a step-by-step guide on how to calibrate your drone:
- Gyro Calibration: Start by calibrating the gyroscopes, which measure the drone’s angular velocity. Place the drone on a level surface and follow the instructions provided by the flight controller software. This process ensures accurate readings and helps maintain stable flight.
- Accelerometer Calibration: The accelerometer measures the drone’s acceleration and tilt. Follow the flight controller software’s instructions to calibrate the accelerometer. Typically, this involves placing the drone in various orientations and allowing the flight controller to detect and compensate for any biases or offsets.
- Compass Calibration: If your drone has a compass module, follow the flight controller software’s compass calibration process. Move the drone in a circular motion, ensuring there are no magnetic or metallic objects nearby that could interfere with the compass reading.
- Radio Transmitter Calibration: Calibrate the radio transmitter sticks and switches to ensure precise control of the drone. Follow the instructions provided by the transmitter manufacturer or the flight controller software to map the transmitter’s inputs accurately to the flight controller.
- ESC Calibration: Most flight controllers allow for ESC calibration to ensure that all motors start and operate synchronously. Follow the software’s instructions to trigger the ESC calibration process, which typically involves arming the drone and adjusting throttle input.
- Verify Control Inputs: Double-check the control inputs from the radio transmitter to ensure that they correspond correctly to the flight controller commands. Make sure the drone responds appropriately to throttle, roll, pitch, and yaw inputs.
- Test Flight Maneuvers: With all the calibrations complete, conduct a test flight to verify the stability and responsiveness of the drone. Perform basic maneuvers, such as hover, forward/backward flight, and turns, to ensure proper control and stability.
- Observe Flight Stability: Monitor the drone’s behavior during flight to ensure it maintains stability and does not drift or exhibit any erratic behavior. If necessary, fine-tune the PID settings and other flight controller parameters to optimize the drone’s flight performance.
Proper calibration is necessary whenever you change or update components, as well as periodically to maintain accurate readings and stable flight performance. Always follow the flight controller software’s instructions and guidelines for calibration procedures specific to your drone and flight controller board.
By calibrating your drone, you ensure precise control and reliable flight behavior. Make it a regular practice to recalibrate whenever necessary to maintain optimal performance in different flight conditions. In the next section, we’ll dive into testing and troubleshooting your drone, addressing any issues that may arise. So, let’s continue our journey of building a fully operational drone!
Testing and Troubleshooting the Drone
Once you have completed the assembly, calibration, and configuration of your drone, it’s time to move on to testing and troubleshooting. Testing is a crucial step to ensure that your drone is functioning properly and ready for flight. Here are some key points to consider:
- Pre-Flight Checklist: Before each flight, go through a pre-flight checklist to ensure that all components are secure, batteries are charged, and firmware is up-to-date. Perform a visual inspection to check for any loose connections, damage, or foreign objects that could affect flight safety.
- Ground Testing: Conduct a series of ground tests to verify that all systems are functioning as intended. Activate different flight modes to check for proper response from the flight controller and servo movements. Test the return-to-home functionality, if available, to ensure accurate positioning and altitude hold.
- Hover Test: Gradually increase the throttle to lift your drone off the ground and verify that it hovers in a stable manner. Observe the drone for any unusual vibrations, uncontrollable drift, or abnormal behavior during hover. Take note of any unexpected noises or irregular motor speeds.
- Flight Maneuvers: During flight, perform basic maneuvers such as forward flight, turns, and altitude changes. Evaluate the drone’s response and stability in each maneuver. Note any inconsistencies, unexpected behavior, or deviations from your control inputs.
- Range Testing: Test the range of your radio transmitter by gradually moving away from the drone while maintaining control. Observe the response of the drone to ensure that the signal remains strong and the controls remain responsive within the intended operating range.
- Battery Performance: Monitor the battery performance during flight, including voltage levels and flight duration. Optimize flight time by ensuring proper charging, battery care, and using batteries with sufficient capacity for your intended flight duration.
- Temperature and Weather Conditions: Consider the temperature and weather conditions during your test flights. Extreme cold or hot temperatures can affect battery performance and flight dynamics. Avoid flying in strong winds or adverse weather conditions that may pose risks to the drone’s stability and safety.
- Troubleshooting: In case of issues or unexpected behavior, consult the flight controller software’s documentation or online forums for troubleshooting guidance. Monitor flight logs or error messages to identify potential issues. Analyze motor performance, sensor readings, and control inputs to diagnose any problems.
- Safety First: Prioritize safety throughout the testing and troubleshooting process. Always fly in safe areas away from people, buildings, and aircraft. Be prepared to land immediately if you encounter any issues or unsafe conditions during flight.
Testing and troubleshooting are ongoing processes as you continue to use and modify your drone. Maintain a log of any issues, flight observations, and changes made to the drone’s configuration to aid in future troubleshooting and improvements.
By conducting thorough testing and troubleshooting, you can ensure a safe and reliable drone that performs optimally. Regular evaluations and maintenance will help you address issues promptly, enhance flight performance, and enjoy memorable drone flights. In the next section, we’ll conclude our guide with a summary and final thoughts on building your own drone. So, let’s wrap up our journey and reflect on our accomplishments!
Conclusion
Congratulations on completing our comprehensive guide on building your own drone! Throughout this journey, we’ve covered the various components, considerations, and processes involved in creating a fully functional and high-performance drone. From understanding the drone parts and selecting the right frame, motors, and flight controller, to wiring and configuring the components, calibrating, and troubleshooting, you have gained valuable insights into every aspect of drone building.
Building a drone from scratch provides a deep understanding of its inner workings and allows you to customize it to suit your specific needs and preferences. By following the steps outlined in this guide and paying attention to details, you have built a drone that is stable, responsive, and ready for flight.
Remember to always prioritize safety and adhere to local regulations when flying your drone. Be mindful of the environment, respect privacy, and always fly in open areas away from restricted airspace and populated areas.
As you continue to explore and use your drone, keep in mind that learning and improving is an ongoing process. Experiment with different flight modes, practice different maneuvers, and continue to fine-tune your drone to achieve optimal performance.
Lastly, don’t forget to share your experiences and knowledge with fellow drone enthusiasts. Engage with online communities, attend local meetups, and inspire others to embark on their own drone-building journeys.
We hope that this guide has provided you with the necessary knowledge and guidance to successfully build your own drone. Enjoy the exciting world of drone piloting, aerial photography, racing, or any other adventure you embark on with your unique creation. Happy flying!