Introduction
Adding a printer to your Windows 10 computer is a simple task that allows you to print documents, photos, and other files with ease. Whether you’re setting up a new printer or connecting to an existing one, Windows 10 offers multiple methods to accomplish this. In this article, we will guide you through various ways to add a printer to your Windows 10 operating system, ensuring that you can start printing in no time.
Having a printer connected to your computer is especially convenient if you frequently need to print documents or if you prefer having physical copies of important files. Regardless of whether your printer is wireless or connected via a USB cable, you can configure it on Windows 10 without much hassle. By following the step-by-step methods outlined in this article, you’ll be able to easily add any type of printer, including local, network, or wireless printers.
Before proceeding, ensure that your printer is compatible with Windows 10. Most modern printers are compatible and come with the necessary drivers to install on your computer. Additionally, make sure your printer is powered on and properly connected to your computer or network.
In the following sections, we will discuss four different methods to add a printer to Windows 10. Each method caters to different printer types and connection options, allowing you to choose the most suitable one for your setup. So, let’s dive in and explore how to add a printer to your Windows 10 computer!
Method 1: Add a Printer using Windows Settings
If you have a local USB printer or a network printer, you can easily add it to your Windows 10 computer using the Windows Settings app. Follow these steps to add a printer using Windows Settings:
- Open the Windows Settings app by clicking on the “Start” menu and selecting the gear icon.
- In the Settings window, click on “Devices.”
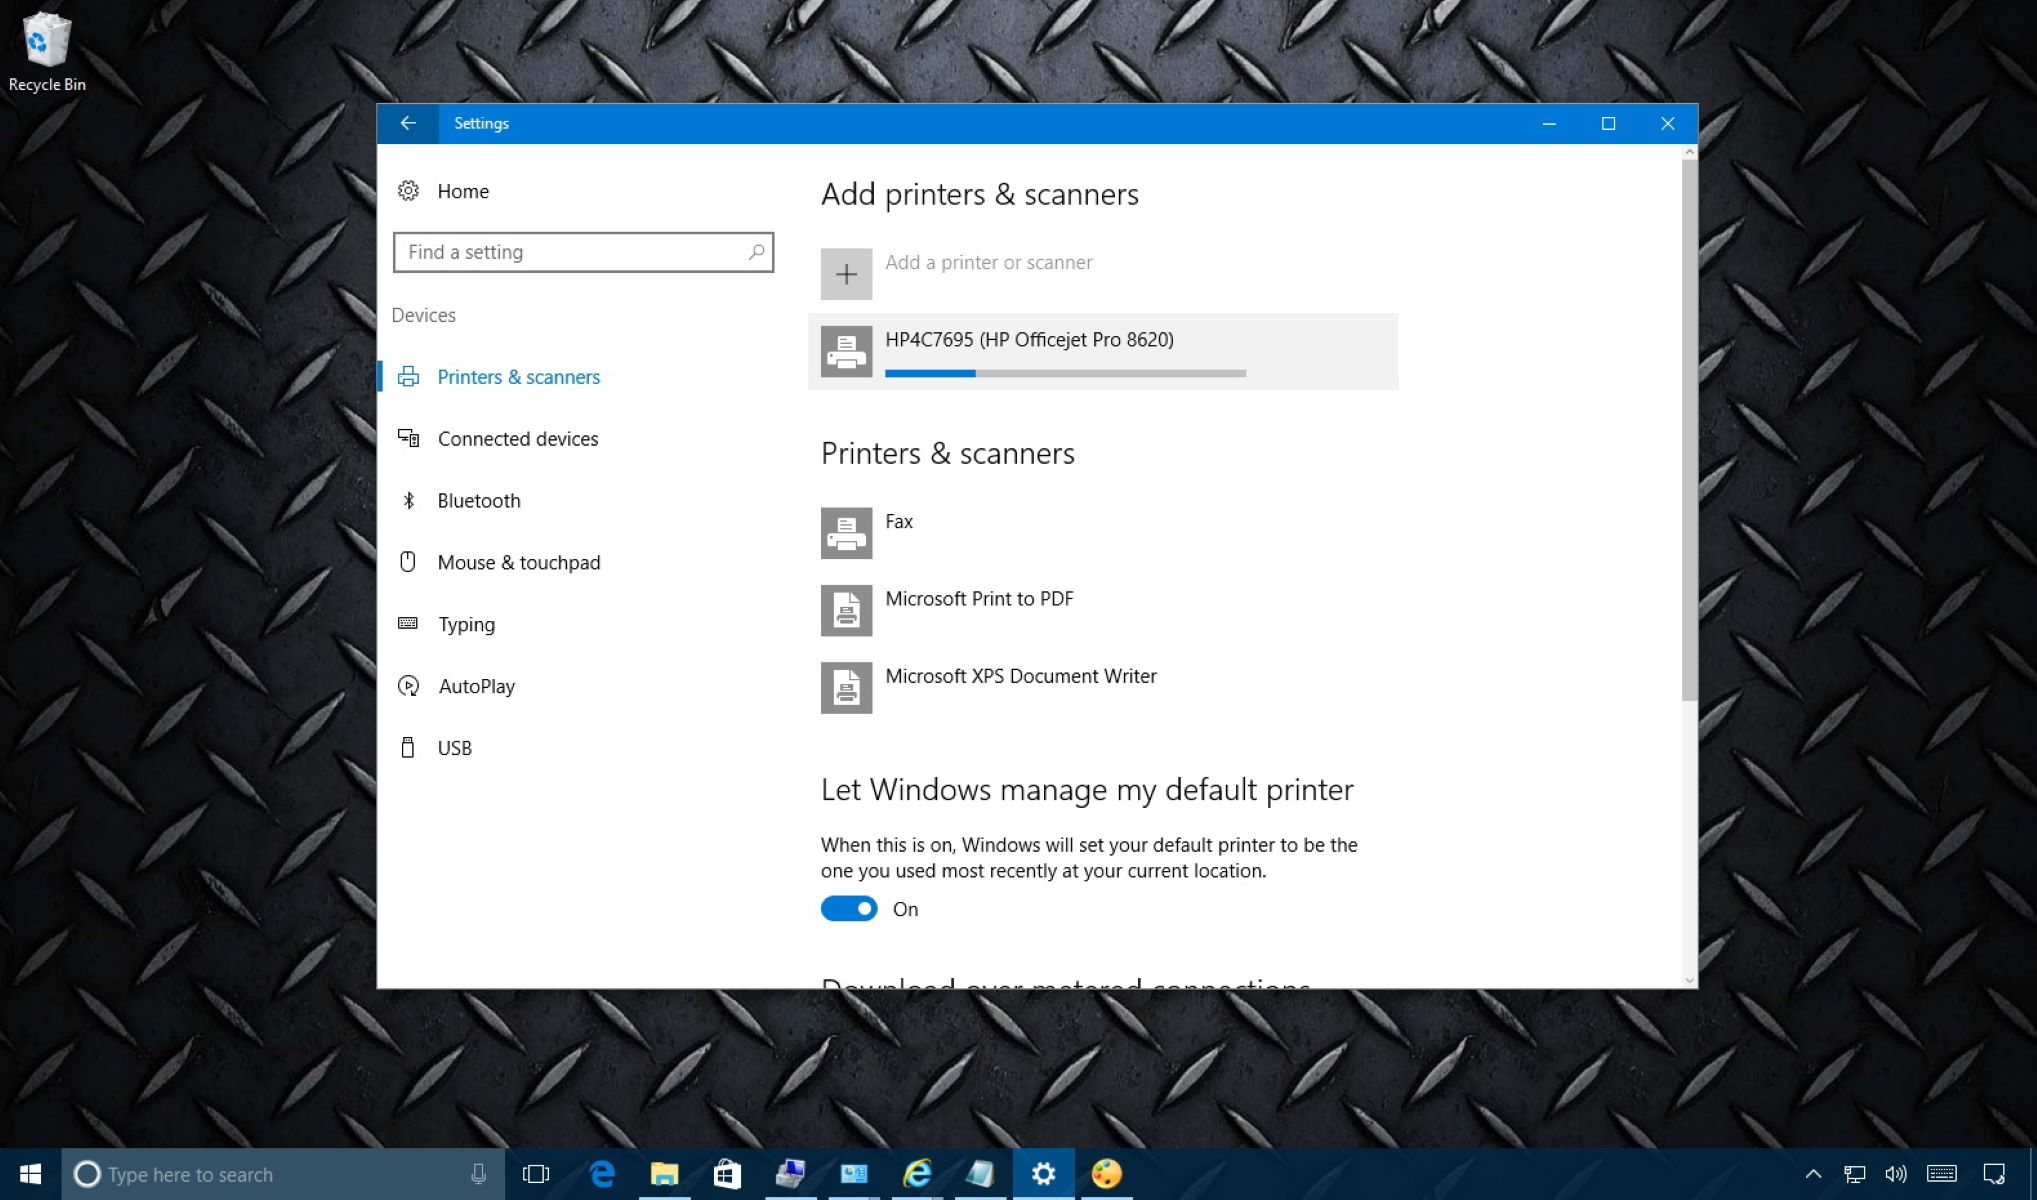
- From the left-hand menu, select “Printers & scanners.”
- Under the “Printers & scanners” section, click on the “Add a printer or scanner” option.
- Windows will now start searching for available printers. If your printer is connected and powered on, it should appear in the list of detected printers. Select your printer from the list.
- If the printer you want to add is not listed, click on the “The printer that I want isn’t listed” link. In the next screen, select the “Add a local printer or network printer with manual settings” option.
- Choose the desired connection method: “Local Printer” or “Network Printer.”
- Choose the port and manufacturer of your printer, then click “Next.”
- Select the printer model from the list or click “Have Disk” if you have a specific driver to install.
- Follow the on-screen instructions to complete the installation.
- Select the printer from the list of available devices on the network, then click “Next.”
- Windows will automatically install the necessary drivers and complete the setup process.
- Open the Control Panel by typing “Control Panel” in the search bar and selecting the corresponding result.
- In the Control Panel window, click on “Devices and Printers.”
- Click on the “Add a printer” button located at the top of the window.
- Windows will now start searching for available printers. If your printer is connected and powered on, it should appear in the list of detected printers. Select your printer from the list.
- If the printer you want to add is not listed, click on the “The printer that I want isn’t listed” link.
- In the next screen, select either the “Add a local printer” or “Add a network, wireless or Bluetooth printer” option.
- Choose the port and manufacturer of your printer, then click “Next.”
- Select the printer model from the list or click “Have Disk” if you have a specific driver to install.
- Follow the on-screen instructions to complete the installation.
- Wait for Windows to detect available printers on the network, then select your printer from the list.
- Click “Next” and follow the on-screen instructions to complete the installation.
- Make sure your printer is turned on and connected to the same Wi-Fi network as your computer.
- On your Windows 10 computer, open the Windows Settings app by clicking on the “Start” menu and selecting the gear icon.
- In the Settings window, click on “Devices.”
- From the left-hand menu, select “Printers & scanners.”
- Under the “Printers & scanners” section, click on the “Add a printer or scanner” option.
- Windows will start searching for available printers. Wait for a moment to allow Windows to detect your wireless or network printer.
- Once your printer is detected, click on its name to select it.
- Windows will automatically install the necessary drivers and complete the setup process. This may take a few minutes.
- After the installation is complete, your wireless or network printer will be ready for use.
- Ensure that your printer is connected to your computer and powered on.
- Insert the installation CD or DVD that came with your printer into your computer’s optical drive. If you don’t have an installation CD, you can usually find the software and drivers on the manufacturer’s website.
- The installation program should start automatically. If not, navigate to the CD drive in File Explorer and run the setup file manually.
- Follow the on-screen instructions provided by the installation program. This may include agreeing to terms and conditions, selecting the installation type, and choosing your desired settings.
- After the installation is complete, your printer should be added to your list of available printers in the Windows 10 operating system.
If you select the “Local Printer” option:
If you select the “Network Printer” option:
Once the printer is installed, Windows 10 will set it as the default printer. You can change this setting later by going to the “Printers & scanners” section in the Windows Settings app.
By following these steps, you can easily add a local USB or network printer to your Windows 10 computer using the Windows Settings app. This method is recommended for most printer setups as it allows for seamless integration with Windows 10’s printing system.
Method 2: Add a Printer using Control Panel
If you prefer using the Control Panel interface for adding a printer to your Windows 10 computer, you can follow these steps:
If you select the “Add a local printer” option:
If you select the “Add a network, wireless or Bluetooth printer” option:
Once the printer is installed, it will be added to the list of printers in the Control Panel’s “Devices and Printers” section. You can set it as the default printer or configure its properties by right-clicking on the printer icon.
Using the Control Panel to add a printer provides an alternative method for those who prefer the traditional interface. It offers similar functionality to the Windows Settings app but may have some additional options depending on your printer model and driver.
Method 3: Add a Wireless or Network Printer
If you have a wireless or network printer that is connected to your local network, you can add it to your Windows 10 computer using the following steps:
Now you can enjoy the convenience of printing wirelessly to your printer from any device connected to your local network. Whenever you need to print a document or photo, simply select the wireless or network printer as the printing destination.
Adding a wireless or network printer is an excellent option if you have multiple devices in your home or office that need to access the same printer. It eliminates the need for physically connecting the printer to each device, offering flexibility and convenience.
Method 4: Add a Printer using the Printer Software
If you have a printer that comes with specific software or drivers provided by the manufacturer, you can use it to easily add the printer to your Windows 10 computer. Follow these steps:
Using the specific software or drivers provided by the printer manufacturer ensures that you have access to all the features and capabilities of your printer. It may offer additional functionalities such as printer maintenance, ink level monitoring, and advanced printing settings.
It’s important to periodically update the printer software and drivers to ensure compatibility with Windows 10 and to take advantage of any bug fixes or performance improvements. Visit the manufacturer’s website or use their software to check for updates.
By following these steps, you can easily add a printer using the software provided by the printer manufacturer. This method is recommended if you want to utilize all the features and functionality of your specific printer model.
Conclusion
Adding a printer to your Windows 10 computer is a straightforward process that can be done using various methods. Whether you prefer the Windows Settings app, Control Panel, wireless connection, or specific printer software, Windows 10 provides flexibility and convenience to meet your printing needs.
By following the step-by-step instructions outlined in this article, you can easily set up and configure different types of printers, including local USB printers, network printers, and wireless printers. Whether you need to print documents for work, school, or personal use, having a printer connected to your Windows 10 computer enables you to generate physical copies of your files whenever you need them.
Remember to check the compatibility of your printer with Windows 10 and ensure it is connected and powered on before attempting to add it. Additionally, keep the printer drivers and software up to date to maximize functionality and address any issues that may arise.
With your printer successfully added, you can enjoy the convenience of printing directly from your Windows 10 computer. Whether it’s printing important documents, creative projects, or cherished photographs, a printer is an indispensable tool for many users.
Now that you have learned the various methods to add a printer to Windows 10, you can confidently set up and configure printers to suit your specific needs. Print away and enjoy the convenience of having physical copies of your digital files at your fingertips.