Introduction
Welcome to our comprehensive guide on how to add a class in QuickBooks. QuickBooks is renowned for its robust accounting features and flexibility, and one of its powerful organizational tools is the ability to create and assign classes to transactions. Classes allow you to categorize and track your income, expenses, and other financial data in a way that makes sense for your business.
In this article, we will walk you through the process of creating classes in QuickBooks, adding classes to transactions, and running class-based reports. Whether you’re a small business owner or an accounting professional, understanding how to effectively use classes can provide valuable insights into your financial data and help you make informed decisions for your business.
We will also discuss the reasons why using classes in QuickBooks is beneficial, along with best practices for utilizing classes effectively. By the end of this guide, you will have a solid understanding of how to add classes, optimize their usage, and take advantage of all the features QuickBooks has to offer.
So, let’s kickstart our journey into the world of QuickBooks classes and discover how this powerful tool can streamline your business’s financial management.
What is a class in QuickBooks?
A class in QuickBooks is a categorization feature that allows you to organize your financial data based on different business segments or departments. It is a way of grouping transactions and accounts to provide more detailed reporting and analysis.
For example, if you run a retail business with multiple locations, you can create classes representing each location. When you record transactions, such as sales or expenses, you can assign a specific class to each transaction to track the performance of each location separately.
Classes can be used to categorize transactions by various criteria, such as department, project, location, service type, or any other relevant business segment. This flexibility allows you to tailor the classification system to meet the specific needs and structure of your business.
QuickBooks offers the option to create a hierarchical class structure, where you can create parent classes and sub-classes. This nested structure enables you to organize your data in a more granular way, providing deeper insights into the financial performance of your business.
Overall, classes provide a way to analyze your financial data from different perspectives, allowing you to track performance by various dimensions and make more informed decisions based on the detailed insights.
Why use classes in QuickBooks?
The utilization of classes in QuickBooks offers several benefits for businesses of all sizes. Understanding why you should use classes can help you harness the full power of this feature. Here are some of the key reasons:
Organize and track data: Classes allow you to segment your financial data in a way that aligns with your business structure. By categorizing transactions by department, location, project, or any other relevant criteria, you can easily track income, expenses, and profitability for each segment. This organization helps you gain a comprehensive view of your business’s financial health.
Customize reporting: Using classes enables you to generate detailed reports tailored to specific business segments. This customization allows you to compare performance across different classes, identify trends, and make data-driven decisions. You can easily assess the profitability of different departments or locations, track project expenses, or analyze the performance of specific services or product lines.
Identify areas for improvement: By tracking data through classes, you can identify areas of your business that are performing well and areas that need improvement. For example, if you assign classes to sales transactions based on different sales channels, you can identify which channels are generating the most revenue and focus your efforts accordingly. This insight helps optimize resource allocation and drive growth.
Enhanced budgeting and forecasting: Classes allow you to create budgets and forecasts specific to each segment of your business. You can set different financial goals and targets for each class, making it easier to monitor progress and analyze variances. This level of detail can help you make informed decisions about resource allocation and identify opportunities for cost savings or revenue growth.
Streamline tax preparation: When it comes to tax time, using classes can simplify the process. You can easily generate reports that provide a breakdown of income and expenses for each class, ensuring accurate and efficient tax preparation. This feature can save you time and effort, as well as reduce the chances of errors or missed deductions.
In summary, classes in QuickBooks offer a powerful way to organize your financial data, customize reporting, identify areas for improvement, facilitate budgeting and forecasting, and streamline tax preparation. By utilizing classes effectively, you can gain valuable insights, make informed decisions, and drive the success of your business.
How to create a class in QuickBooks?
Creating a class in QuickBooks is a simple and straightforward process. Here’s a step-by-step guide to help you:
- Login to your QuickBooks account and navigate to the home screen.
- Click on the “Gear” icon in the top right corner and select “All Lists” under the “Lists” column.
- Choose “Classes” from the available list of options.
- Click on the “New” button to create a new class.
- In the “Class Name” field, enter the name of the class. Make sure to choose a descriptive name that clearly represents the segment or category you want to track.
- If you want to create a sub-class under an existing class, select the parent class from the “Subclass of” drop-down menu.
- Optionally, you can provide a description for the class in the “Description” field. This can be useful for providing additional context or details about the class.
- Click “Save” to create the class.
Once you have created a class, it will be available for selection when recording transactions or running reports in QuickBooks. You can create multiple classes to represent different business segments, departments, locations, or any other relevant categories specific to your business structure.
Note that you can also edit or delete classes at any time. Simply navigate to the “Classes” list from the “Gear” icon, find the class you want to modify, and select the appropriate action from the available options.
By creating classes in QuickBooks, you can effectively organize and track your financial data, enabling you to generate comprehensive reports, analyze performance, and make informed decisions for your business.
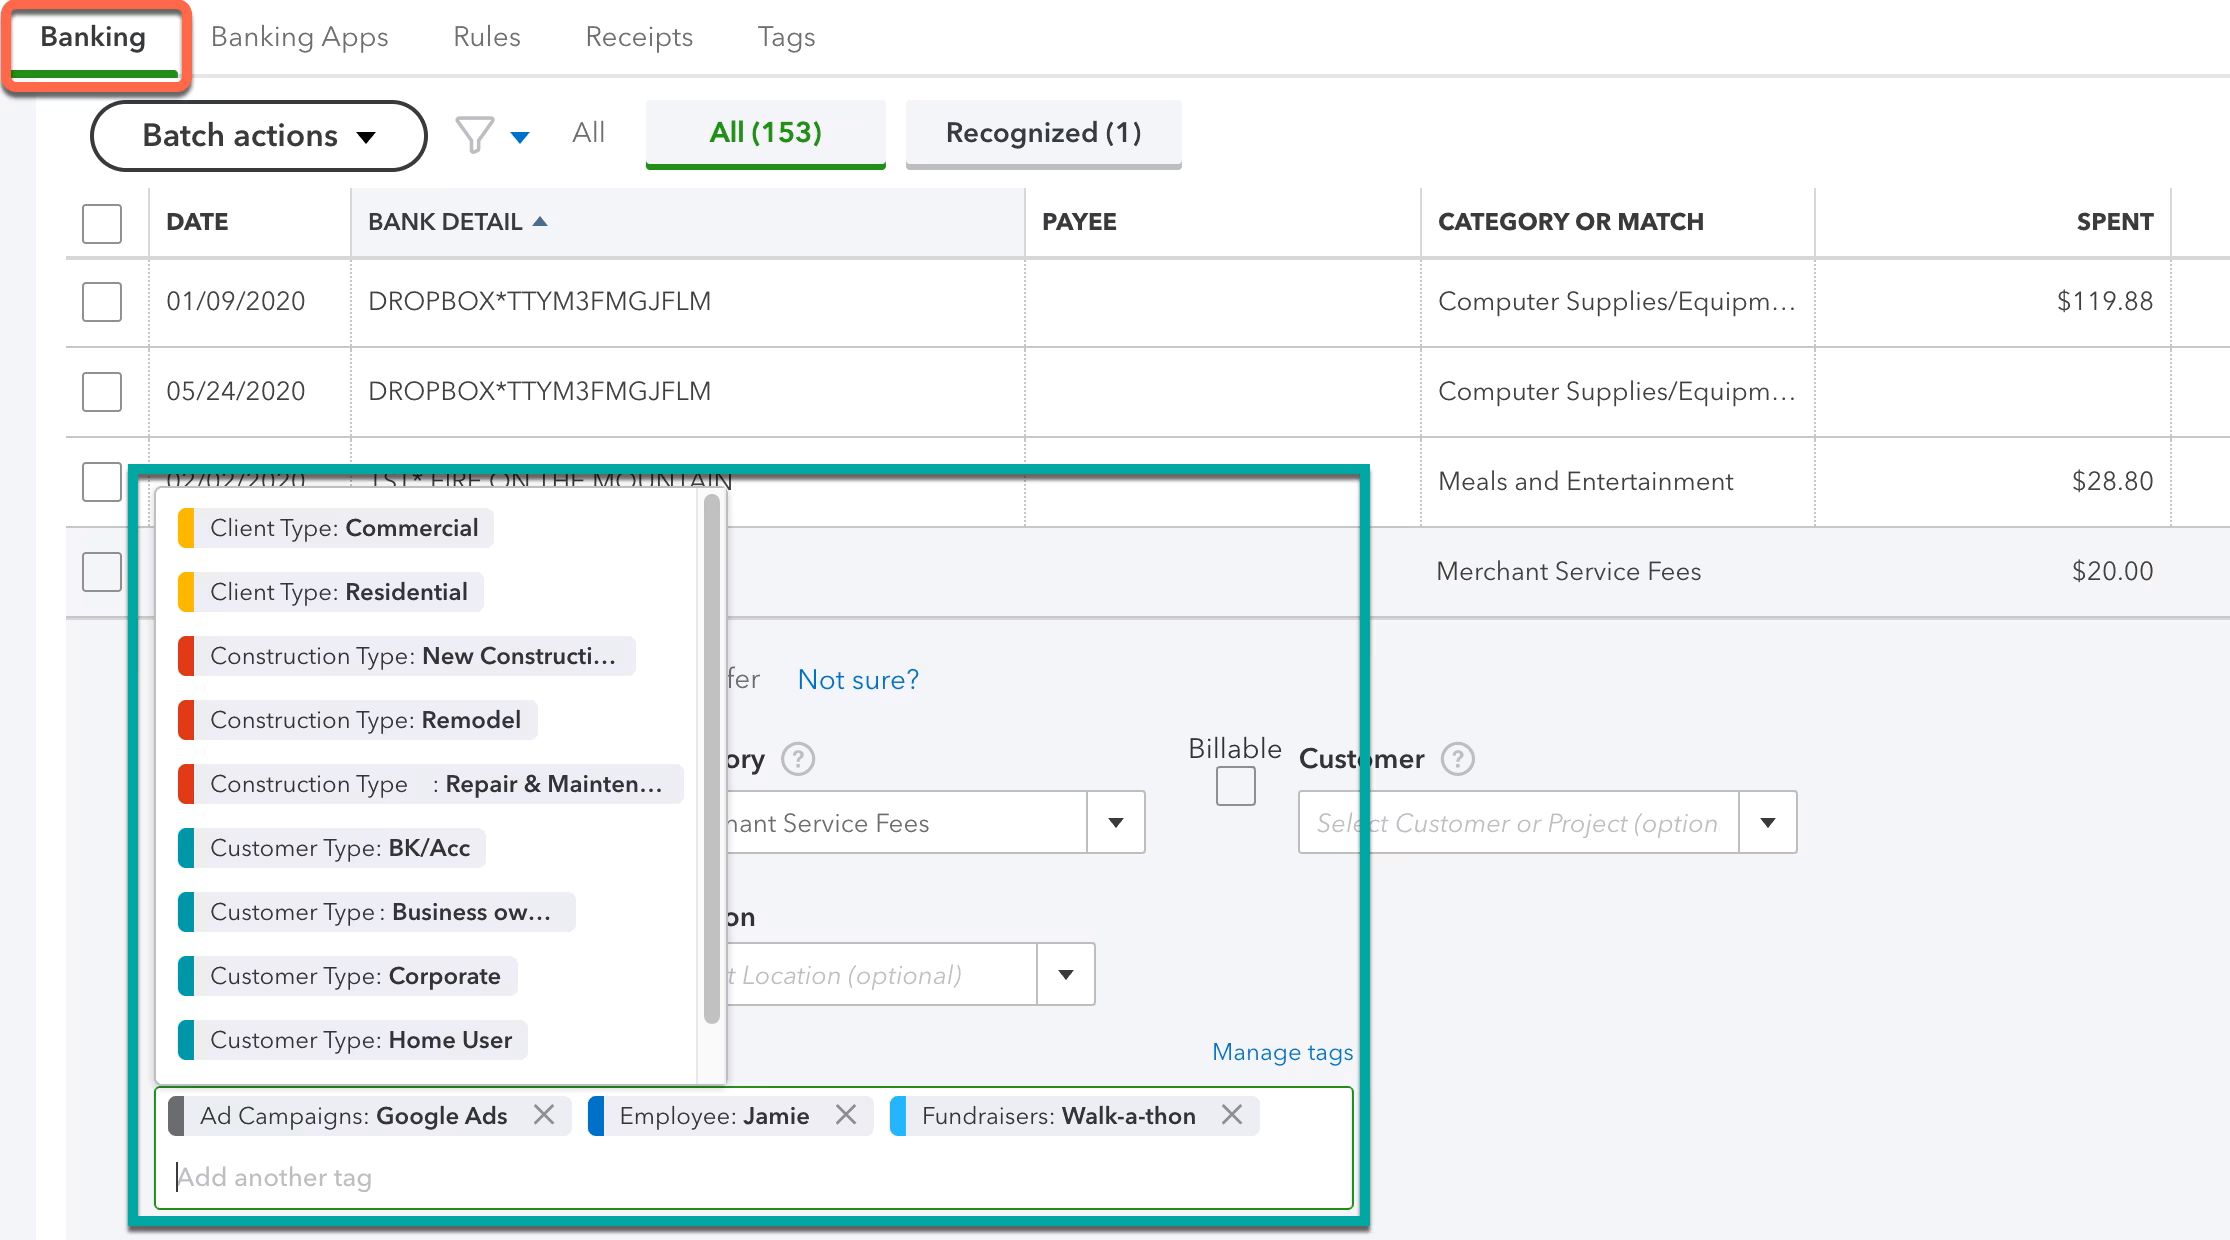
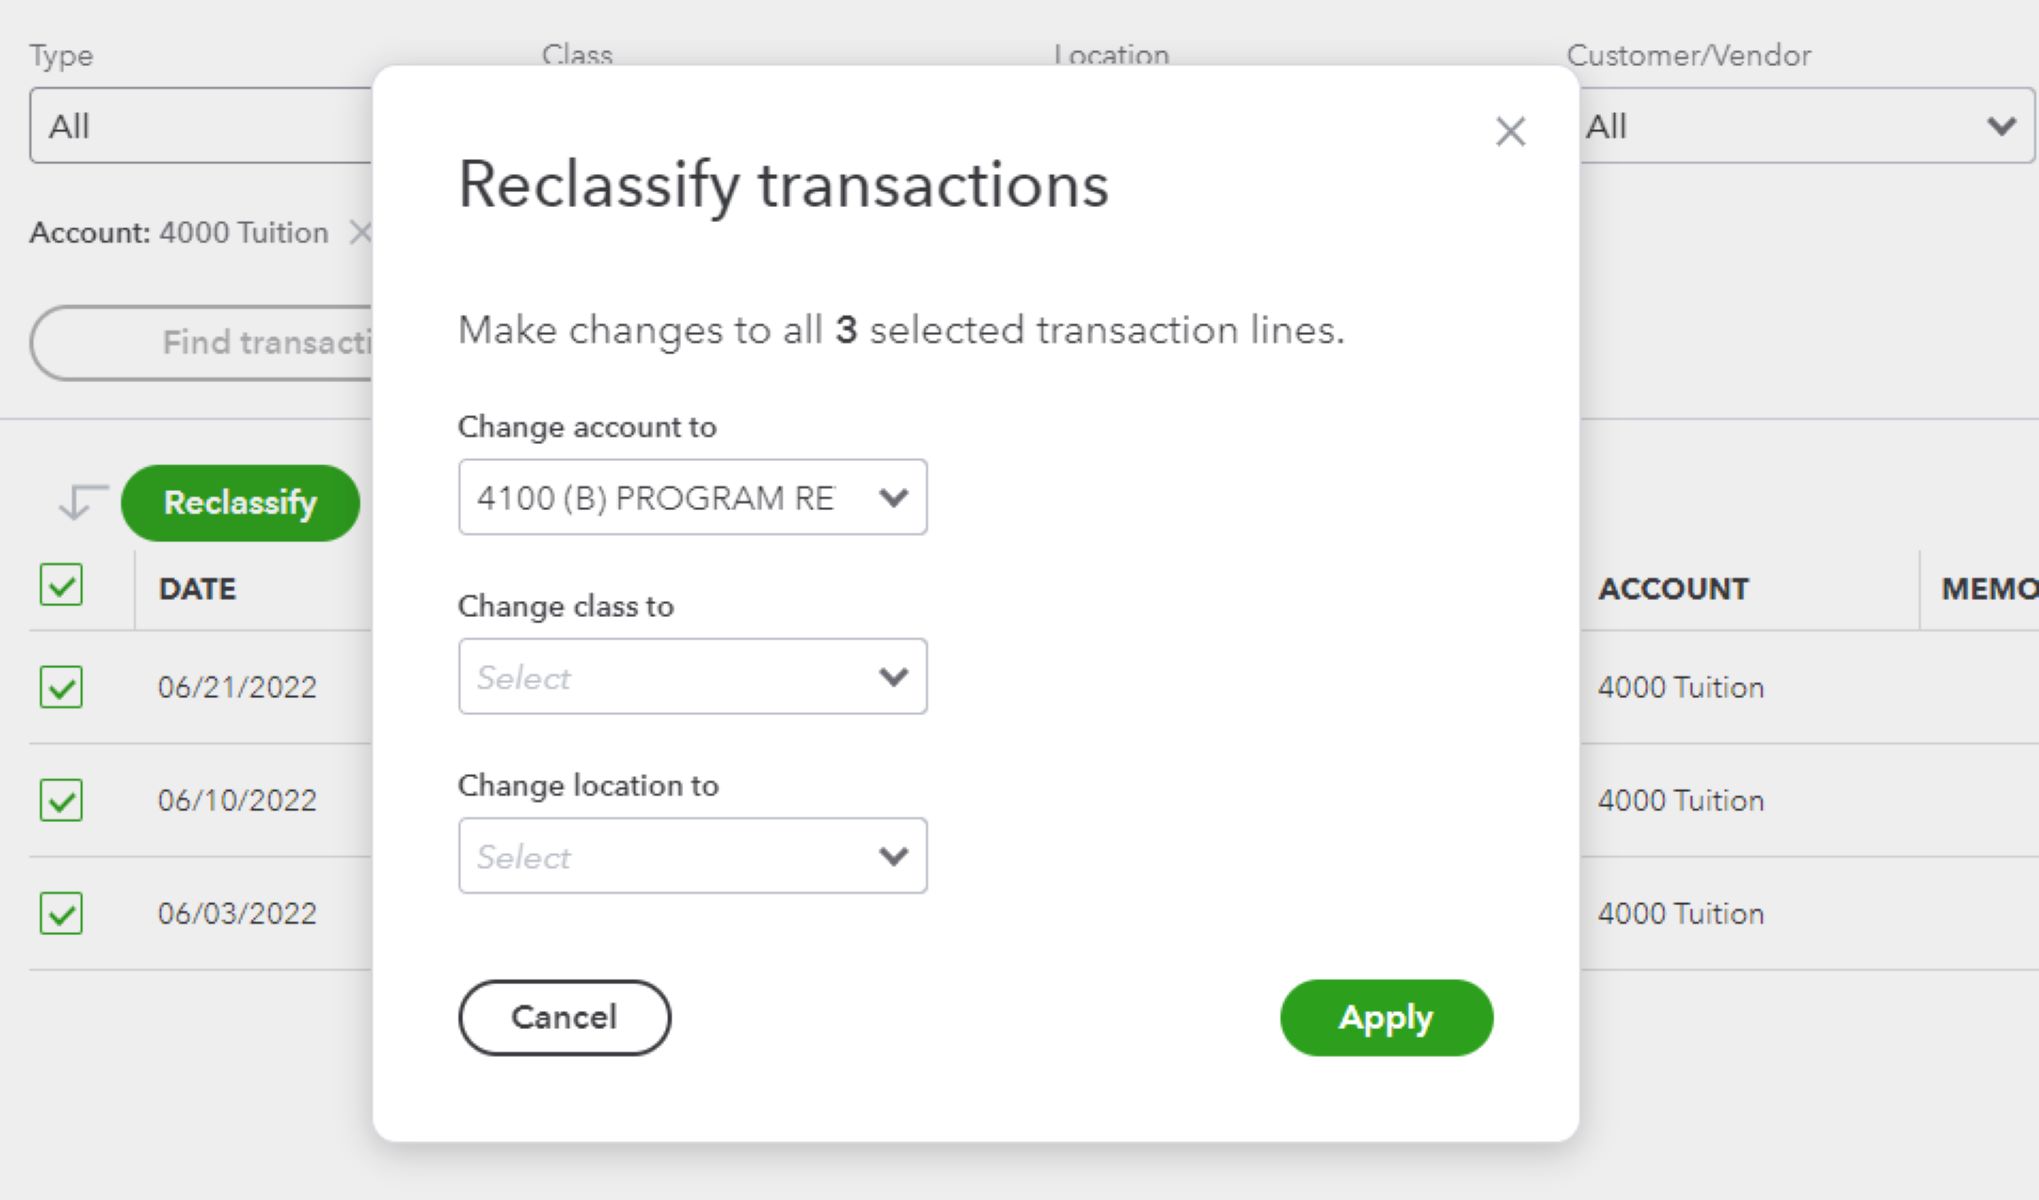
How to add a class to transactions in QuickBooks?
Adding a class to transactions in QuickBooks allows you to categorize and track your income and expenses based on specific segments or categories. Here’s a step-by-step guide on how to add a class to transactions:
- Login to your QuickBooks account and navigate to the transaction you want to add a class to, such as a sales transaction or an expense entry.
- Fill in the necessary details for the transaction, including the date, amount, and other relevant information.
- Look for the “Class” field within the transaction form. This field is typically located near the bottom of the form, under the “Account” or “Category” fields.
- Click on the drop-down menu in the “Class” field and select the appropriate class that you want to assign to the transaction. If you have created sub-classes under a parent class, you can choose the specific sub-class as well.
- Finish completing the transaction form by entering any remaining required information.
- Save the transaction to apply the class assignment.
By adding a class to each transaction, you can ensure that the income and expenses are properly categorized and tracked based on the specific segment or category associated with the class. This classification allows for accurate reporting and analysis of your financial data.
Note that you can add classes to various types of transactions in QuickBooks, such as invoices, sales receipts, bills, checks, and more. Depending on the transaction type, the “Class” field may be displayed differently or located in a different section of the form. However, the process of adding a class remains the same.
It’s important to consistently assign classes to your transactions to ensure accurate reporting and analysis. This practice allows you to generate class-based reports that provide insights into the financial performance of each segment or category of your business.
How to run class-based reports in QuickBooks?
Running class-based reports in QuickBooks allows you to analyze the financial performance of specific segments or categories. This feature provides valuable insights into the revenue, expenses, and profitability of each class. Here’s how you can generate class-based reports:
- Login to your QuickBooks account and navigate to the home screen.
- Click on the “Reports” tab located on the left navigation menu.
- In the search bar at the top, type the name of the report you want to run, such as “Profit and Loss by Class”.
- QuickBooks will display a list of relevant reports. Choose the report that aligns with the specific information you want to analyze.
- Once you select the report, the customization window will appear. Here, you can modify the report settings to match your preferences.
- Look for the “Class” section within the customization window. Select the desired classes you want to include in the report. You can choose one or multiple classes based on your reporting needs.
- Adjust any other report settings, such as the date range, display options, and filters, according to your requirements.
- Click on the “Run” button to generate the class-based report.
- Review the report results, which will provide a detailed breakdown of the income, expenses, and profitability of each class you selected.
Running class-based reports helps you gain a comprehensive understanding of how each segment or category is performing financially. By comparing revenue and expenses across different classes, you can identify trends, patterns, and areas for improvement.
QuickBooks provides a variety of class-based reports, such as Profit and Loss by Class, Balance Sheet by Class, and Sales by Class. These reports allow you to assess the financial health and profitability of your business from a class-specific perspective.
Remember to regularly run class-based reports to stay informed about the performance of each segment or category of your business. This information can guide business decisions, optimize resource allocation, and drive growth and profitability.
Best practices for using classes in QuickBooks
To maximize the benefits of using classes in QuickBooks and efficiently organize your financial data, it’s important to follow some best practices. Here are some tips for effectively utilizing classes:
- Consistency: Establish a consistent naming convention for classes to ensure clarity and accuracy. Use descriptive names that clearly represent each segment or category you want to track. Consistency in naming makes it easier to generate reports and analyze data.
- Thoughtful design: Plan and create your class structure carefully. Take time to consider the different segments or categories that are relevant to your business. This thoughtful design ensures that your classes align with your business’s organizational structure and reporting needs.
- Training and communication: If multiple people are accessing and entering data in QuickBooks, provide proper training on how to assign classes consistently. It’s essential to communicate the importance of accurate class assignment to maintain data integrity and generate reliable reports.
- Regular review: Periodically review and update your class list to ensure its relevance. Business structures and needs can change over time, and it’s important to adapt your classes accordingly to accurately reflect your business segments.
- Budget allocation: Use classes to allocate budgets to different segments or categories of your business. This allows you to set financial goals and targets for each class, providing insights into performance variances and helping you make informed decisions for resource allocation.
- Class-based reporting: Regularly run class-based reports to gain insight into the financial performance of each segment or category. Analyze the reports to identify areas of improvement, capitalize on strengths, and make data-driven decisions for your business.
- Consult with an expert: If you are unsure about how to best utilize classes in QuickBooks or need assistance in designing your class structure, consider consulting with an accounting professional or QuickBooks expert. They can provide guidance tailored to your specific business needs.
By following these best practices, you can effectively leverage classes in QuickBooks to organize your financial data, generate meaningful reports, and gain valuable insights into your business’s performance. Utilizing classes in a systematic and consistent manner will enable you to make informed decisions and drive the success of your business.
Frequently Asked Questions (FAQs)
Here are some common questions and answers about using classes in QuickBooks:
Q: Can I create sub-classes within classes in QuickBooks?
A: Yes, QuickBooks allows you to create a hierarchical class structure by creating sub-classes under parent classes. This nested structure provides additional levels of organization and helps you track your financial data in a more granular way.
Q: Can I assign multiple classes to a single transaction in QuickBooks?
A: No, QuickBooks currently allows you to assign only one class to each transaction. If you need to track multiple segments or categories for a single transaction, you may consider using other features such as customer or item tracking.
Q: Can I edit or delete a class in QuickBooks?
A: Yes, you can edit or delete classes in QuickBooks. Simply navigate to the “Classes” list, find the class you want to modify, and select the appropriate action. However, keep in mind that deleting a class will remove it from all associated transactions and reports, so exercise caution when making changes.
Q: Can I run class-based reports for a specific date range?
A: Yes, when generating class-based reports in QuickBooks, you can specify the date range for which you want the report to display data. This allows you to analyze the financial performance of each class within a specific time period.
Q: Can I use classes to track both income and expenses in QuickBooks?
A: Yes, you can assign classes to both income and expense transactions in QuickBooks. This allows you to track and analyze the revenue, expenses, and profitability of each class, providing insights into the financial performance of different segments of your business.
Q: Can I assign a class to an existing transaction in QuickBooks?
A: Yes, you can edit an existing transaction in QuickBooks and assign a class to it. Simply open the transaction, locate the “Class” field, select the appropriate class, and save the changes. The class assignment will be applied to the transaction.
If you have any further questions or encounter specific issues with classes in QuickBooks, it’s recommended to refer to the QuickBooks Help Center or reach out to the QuickBooks support team for assistance.
Conclusion
In conclusion, utilizing classes in QuickBooks can greatly enhance your ability to organize and track financial data based on different segments or categories of your business. By creating classes, assigning them to transactions, and running class-based reports, you can gain valuable insights into the performance and profitability of each segment or category.
When creating classes, it’s important to establish a consistent naming convention that accurately reflects your business structure. This ensures clarity and ease of use when generating reports and analyzing data.
By assigning classes to transactions, you can accurately categorize income and expenses, enabling you to track performance and make informed decisions about resource allocation and growth strategies.
Running class-based reports in QuickBooks provides detailed insights into the financial health of each segment or category. By analyzing these reports, you can identify areas for improvement, capitalize on strengths, and make data-driven decisions for your business.
Remember to follow best practices, such as maintaining consistency, regularly reviewing your class list, and consulting with experts if needed. These practices will help you optimize the use of classes in QuickBooks and ensure accurate financial tracking and reporting.
In summary, effectively using classes in QuickBooks allows you to streamline your financial management, gain valuable insights, and make informed decisions. Start harnessing the power of classes in QuickBooks today and take your financial tracking and reporting to the next level!