Introduction
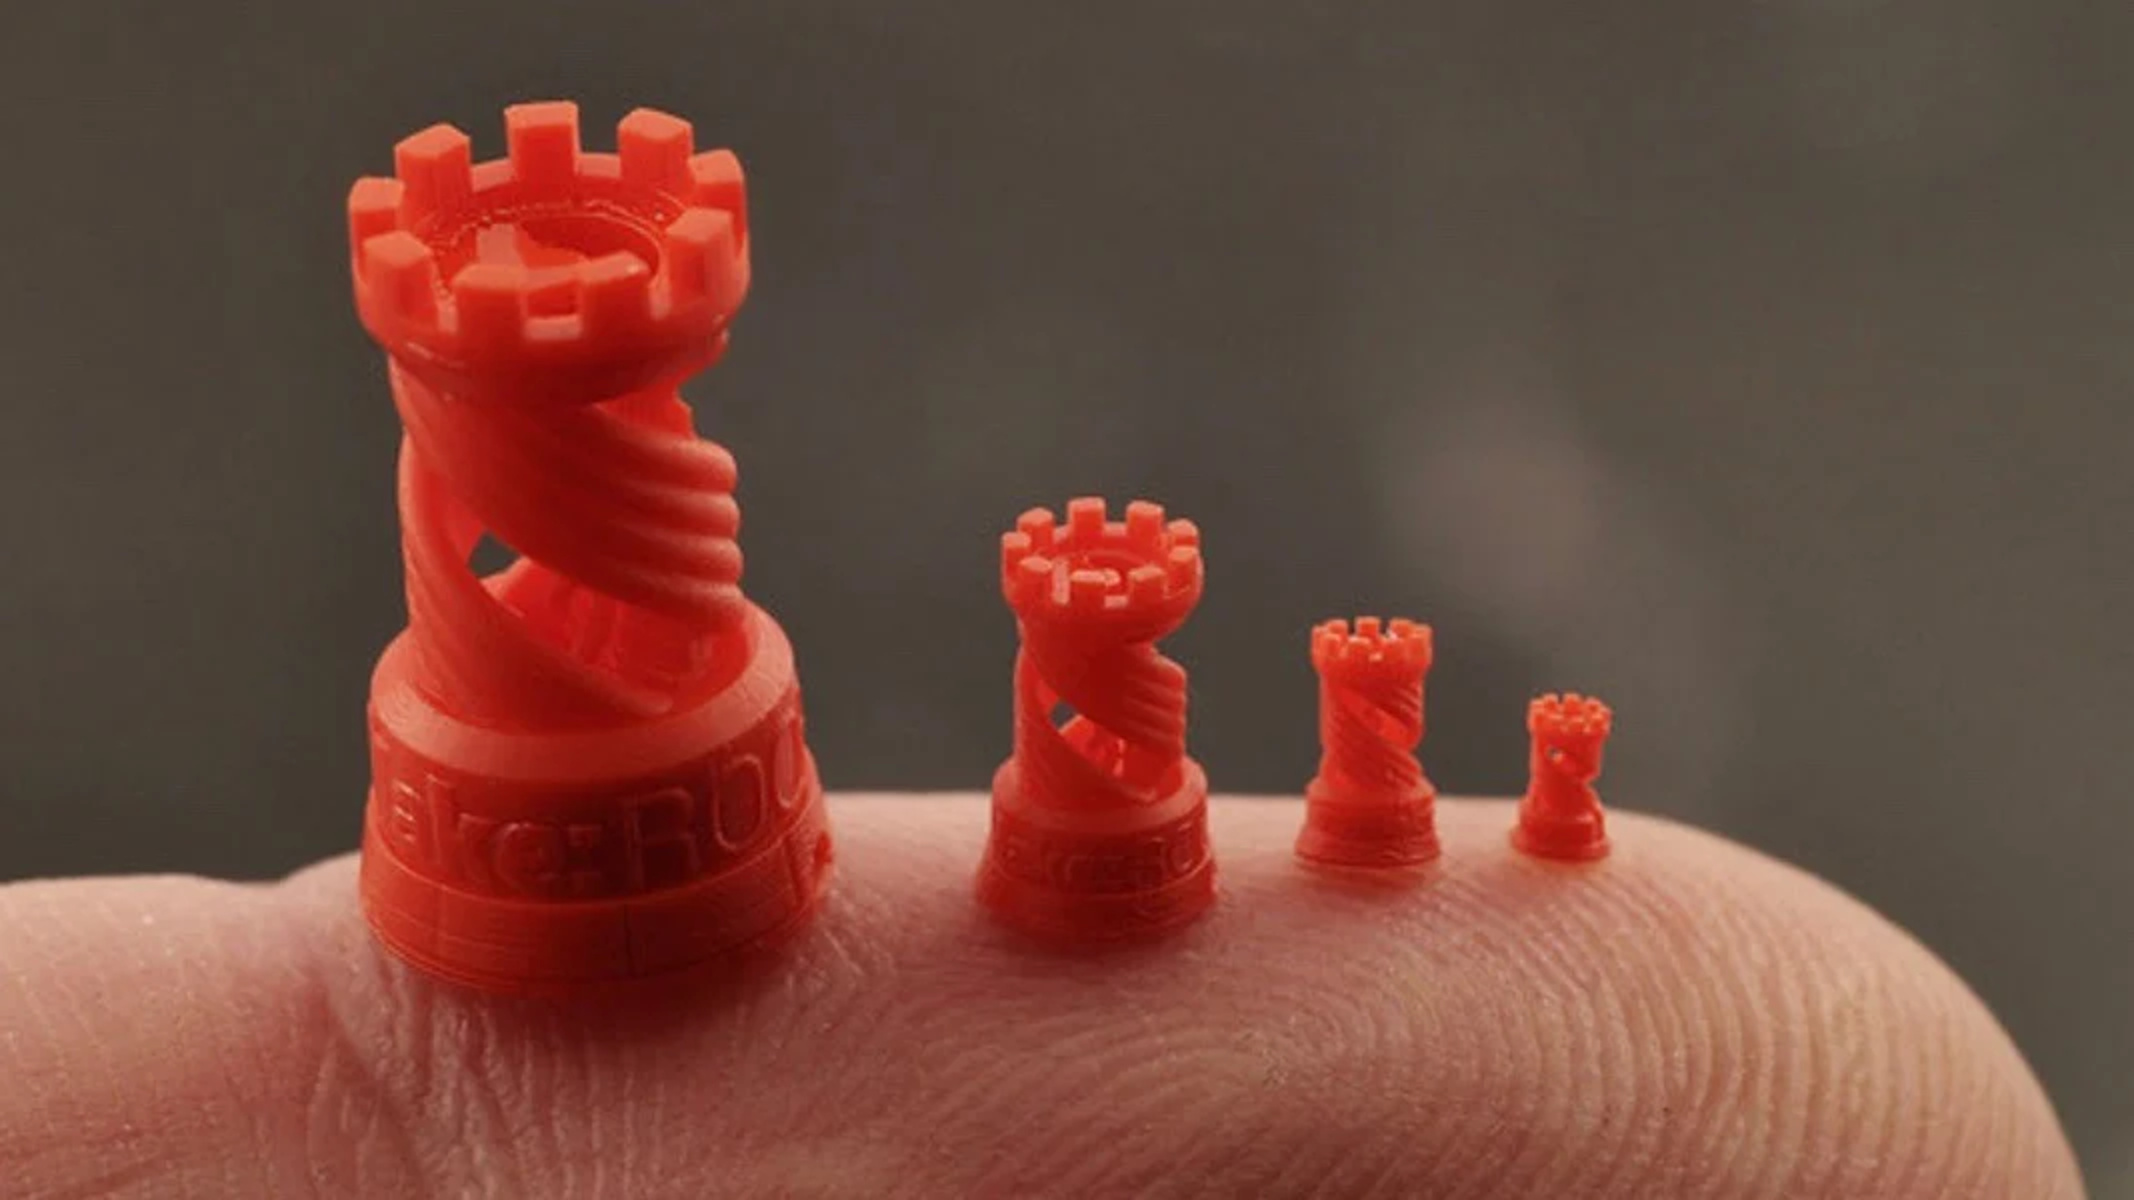
3D printing has revolutionized the manufacturing industry, allowing users to create intricate and customized objects with ease. One question that often arises is how small a 3D printer can print. The answer depends on several factors, including the printer’s specifications, calibration, and the materials used.
While there is no definitive size limit for 3D printing, various factors can affect how small a printer can accurately produce objects. These factors include nozzle size, layer height, calibration, bed adhesion, and material type. Understanding these variables can help users optimize their printing settings to achieve the best possible results when working with small objects.
It’s important to note that printing smaller objects often presents unique challenges. Warping, detail loss, and fragility are common issues that can arise when trying to print at a reduced scale. However, with the right techniques and adjustments, these challenges can be mitigated to produce high-quality small prints.
In this article, we will explore the factors that affect the minimum print size and address the common challenges associated with printing small objects. We will also discuss techniques that can improve the quality of small prints, allowing you to achieve greater precision in your 3D printing projects.
Factors affecting the minimum print size
When it comes to printing small objects with a 3D printer, there are several important factors to consider. Let’s take a closer look at each of these factors and how they can impact the minimum print size.
1. Nozzle size: The nozzle size determines the diameter of the extruded filament. A smaller nozzle allows for finer details and more precise prints. However, it also reduces the speed of the printing process.
2. Layer height: The layer height refers to the thickness of each layer that is deposited during the printing process. A smaller layer height results in more detailed prints but requires more time to complete the print job.
3. Calibration: Proper calibration of the 3D printer is crucial for achieving accurate and consistent prints. Misaligned or improperly calibrated printers can lead to inconsistencies and errors, especially when working with small objects.
4. Bed adhesion: Ensuring good bed adhesion is important for preventing small prints from detaching or warping during the printing process. Use of a heated bed, appropriate adhesives, and proper bed leveling can help improve bed adhesion and reduce print failures.
5. Material type: Different materials have varying characteristics and requirements when it comes to printing small objects. Some materials, such as PLA, are easier to print at small sizes due to their lower shrinkage and better bed adhesion. Other materials, like ABS, may present challenges due to their higher shrinkage rates.
It’s important to consider these factors when determining the minimum print size achievable with your 3D printer. Each factor interacts with the others, and finding the right balance is crucial for achieving satisfactory results.
Nozzle size
The nozzle size of a 3D printer plays a significant role in determining the level of detail and accuracy achievable in prints, especially when working with small objects. The nozzle diameter directly affects the width of the extruded filament, which in turn affects the precision of the printed layers.
Smaller nozzle sizes, such as 0.2mm or 0.3mm, enable fine details to be captured in the print. The smaller opening allows for more precise extrusion, resulting in sharper edges and intricate features. However, it’s important to note that printing with smaller nozzles also requires longer printing times due to the reduced extrusion rate.
Conversely, larger nozzle diameters, such as 0.4mm or 0.5mm, can handle faster print speeds but sacrifice some of the fine details. These nozzle sizes are commonly used for larger prints where speed takes precedence over intricate details.
When printing small objects, it’s generally recommended to use a smaller nozzle size to achieve better accuracy. However, it’s important to take into consideration the limitations of the printer and the requirements of the specific object. If the object does not have intricate details and time is a constraint, using a larger nozzle size may be a more practical choice.
It’s worth noting that changing the nozzle size of your 3D printer requires careful adjustment of other printing parameters. The layer height, print speed, and extrusion temperature may need to be recalibrated to optimize the printing process for the new nozzle size.
In summary, nozzle size is a crucial factor that determines the level of detail and accuracy achievable when printing small objects. Smaller nozzle sizes offer finer details but require longer printing times. It’s important to consider the balance between detail and speed when selecting the appropriate nozzle size for your specific printing needs.
Layer height
The layer height of a 3D printer refers to the thickness of each layer that is deposited during the printing process. It is an important parameter that affects the level of detail, surface quality, and printing speed of a print, especially when working with small objects.
When printing with a smaller layer height, such as 0.1mm or 0.2mm, more layers are required to build up the object, resulting in higher resolution and finer details. This is particularly beneficial for small prints where intricate features need to be accurately represented.
On the other hand, using a larger layer height, such as 0.3mm or 0.4mm, reduces the number of layers needed to complete the print and can significantly speed up the printing process. However, the drawback is that the details may be less defined, and the surface finish may be rougher compared to prints with smaller layer heights.
When considering the layer height for small prints, it is important to strike a balance between detail and printing time. If the object does not require high levels of detail, using a slightly larger layer height can help shorten the printing time. However, for intricate or complex small prints, a smaller layer height is generally preferred to ensure accurate representation of fine details.
It is also essential to consider the capabilities of your 3D printer when selecting the layer height. Some printers may have limitations in terms of the minimum layer height they can reliably achieve. Printing at excessively small layer heights may result in poor print quality, clogging, or failed prints.
Experimenting with different layer heights and understanding the capabilities of your printer will help you determine the optimal setting for achieving the desired level of detail and printing time for small objects.
In summary, the layer height in 3D printing affects the level of detail, surface quality, and printing speed of small prints. Smaller layer heights offer higher resolution and finer details but can increase printing time. Finding the balance between detail and printing time is crucial for achieving satisfactory results when working with small objects.
Calibration
Proper calibration of your 3D printer is essential for achieving accurate and consistent prints, particularly when working with small objects. Calibration refers to the process of ensuring that all the components of the printer are properly aligned and functioning optimally. Here are a few key aspects of calibration to consider:
Leveling the build plate: One crucial aspect of calibration is leveling the build plate. This ensures that the first layer of the print adheres properly and is evenly deposited across the surface. A leveled build plate is especially important for small prints, as any slight deviations can lead to adhesion issues or misalignment. Regularly check and adjust the build plate’s leveling to maintain accurate prints.
Extruder calibration: Calibrating the extruder ensures that the filament is being pushed through the nozzle with the correct amount of force. Inaccurate extrusion can result in under-extrusion or over-extrusion, leading to print defects or failed prints. Calibrating the extruder is particularly important when working with small objects where precision is crucial.
Belt tension: Proper belt tension ensures that the printer’s belts are properly engaged and the movement of the print head is accurate and precise. Loose belts can result in shifting or inconsistent layers, leading to poor print quality, especially for small and intricate prints. Regularly check the tension of the belts and adjust as necessary.
Flow rate calibration: Calibrating the flow rate ensures that the printer is extruding the correct amount of filament consistently. This calibration can help in achieving accurate dimensions and reducing the chances of over-extrusion or under-extrusion. Proper flow rate calibration is particularly vital for small objects where dimensional accuracy is crucial.
By regularly calibrating your 3D printer, you can maintain its optimal performance and achieve accurate prints, even on a small scale. It is recommended to consult your printer’s manual or follow online guides specific to your printer model for detailed instructions on calibration procedures.
In summary, calibration plays a significant role in achieving accurate and consistent prints, especially when working with small objects. Proper leveling of the build plate, extruder calibration, belt tension, and flow rate calibration are essential for ensuring optimal performance and achieving high-quality prints.
Bed Adhesion
Bed adhesion is a crucial factor when it comes to 3D printing small objects. It refers to how well the first layer of the print sticks to the print bed during the printing process. Proper bed adhesion is essential to prevent warping, shifting, or detachment of the object during printing. Here are some key considerations for achieving good bed adhesion:
Heated bed: Using a heated bed can greatly improve bed adhesion, especially when working with certain materials like ABS. The heat helps the filament adhere to the bed and reduces the chances of warping. Ensure that the bed reaches and maintains the appropriate temperature for the material being used.
Bed surface: The choice of bed surface can also impact bed adhesion. Different surfaces such as glass, adhesive sheets, or specialized coatings may provide better adhesion for specific materials. Experimenting with different bed surfaces can help find the one that works best for your specific requirements.
Adhesive substances: Using adhesive substances like glue sticks, hairspray, or specialty adhesives can help improve bed adhesion. These substances create a thin layer between the print bed and the first layer of the print, enhancing adhesion. Apply the adhesive sparingly and evenly to avoid excessive buildup or smearing of the print.
Bed leveling: Proper leveling of the print bed is critical for achieving consistent bed adhesion. An uneven or poorly leveled bed can result in uneven layers or poor adhesion, leading to printing defects. Regularly check and adjust the bed leveling to ensure proper alignment with the nozzle.
Print surface preparation: Before starting a print, ensure that the print bed surface is clean and free from any debris or residue. A clean surface helps promote better adhesion. Use isopropyl alcohol or a similar cleaning agent to remove any dirt or oils from the bed surface before printing.
By paying attention to bed adhesion, you can greatly improve the success rate of printing small objects. Properly adhered prints result in better accuracy, reduced warping, and higher quality prints.
In summary, achieving good bed adhesion is crucial when it comes to 3D printing small objects. Factors such as a heated bed, appropriate bed surface, adhesive substances, bed leveling, and print surface preparation all contribute to creating a strong bond between the print bed and the first layer of the print.
Material Type
The choice of material for 3D printing small objects can greatly impact the print quality, dimensional accuracy, and overall success of the print. Different materials have varying characteristics, shrinkage rates, and printing requirements. Here are some key considerations when selecting the material for small prints:
PLA (Polylactic Acid): PLA is one of the most commonly used materials in 3D printing due to its easy printing nature and compatibility with a wide range of printers. It has low shrinkage, good bed adhesion, and minimal warping tendencies, making it suitable for small prints that require high precision. PLA is a good choice for small objects with intricate details.
ABS (Acrylonitrile Butadiene Styrene): ABS is another widely used material in 3D printing but has different characteristics compared to PLA. ABS tends to have higher shrinkage and can be more challenging to print without proper temperature control and adequate bed adhesion. It is generally recommended for larger prints, but with careful adjustment of printing parameters, ABS can be used for smaller prints as well.
Specialized Filaments: There are various specialty filaments available that offer specific properties for small prints. For example, flexible filaments like TPU or TPE provide flexibility and elasticity, making them suitable for small objects that require certain levels of flexibility. Composite filaments, like carbon fiber or wood-filled filaments, can add strength and unique aesthetics to small prints.
Experimental Materials: With advancements in 3D printing technology, there are constantly new materials being developed and introduced. These materials offer unique properties and characteristics that can be beneficial for small prints. Conductive filaments, glow-in-the-dark filaments, or even food-safe filaments are examples of more specialized materials that can be explored for small-scale printing projects.
When choosing a material for small prints, it is important to consider the specific requirements of the object and the capabilities of your 3D printer. Factors such as shrinkage rates, printing temperature, bed adhesion, and post-processing requirements should all be taken into account to ensure successful printing.
Experimenting with different materials and understanding their unique properties will allow you to select the most suitable material for your small-scale printing projects, enabling you to achieve the desired level of detail, strength, and aesthetic appeal.
In summary, the choice of material for 3D printing small objects is an important consideration. Each material has its own characteristics and requirements that can impact the quality and success of the print. Understanding these factors will help you select the optimal material for achieving high-quality small prints.
Common Challenges When Printing Small
While 3D printing small objects opens up a world of possibilities, it also comes with its own set of challenges. Understanding these challenges can help you anticipate and address them effectively. Here are some common challenges encountered when printing small:
1. Warping: Warping occurs when the material subjected to thermal stress starts to shrink and pull away from the print bed, resulting in warped or distorted prints. This issue is more pronounced when printing small objects due to the higher ratio of surface area to volume. Ensuring good bed adhesion, using a heated bed, and adjusting temperature settings can help mitigate warping.
2. Detail Loss: Achieving fine details in small prints can be challenging. Small layer heights and smaller nozzle sizes can help improve detail, but the intricacy of the design and the limitations of the printer can influence the level of detail achievable. It’s important to optimize printing settings, choose appropriate materials, and adjust the design if necessary to maintain the intended level of detail.
3. Fragility: Small prints can be inherently fragile due to their scale and delicate structures. Thin walls, tiny features, and easily breakable sections can make the prints more susceptible to damage. Reinforcing critical areas, increasing wall thickness, or using stronger materials can help improve the durability of small prints.
4. Print Stability: Small prints may be prone to instability during the printing process. Vibrations, sudden moves, or excessive accelerations can cause the print to shift or move out of alignment. Ensuring a sturdy printer setup, reducing print speeds, and optimizing acceleration and jerk settings can help improve print stability and reduce errors.
5. Support Structures: Small prints with complex geometries may require support structures to maintain stability during printing. Removing support structures cleanly and without damaging the print can be more challenging on smaller objects. Optimizing support settings and carefully removing supports can help preserve the integrity of the print.
It’s important to note that these challenges are not insurmountable, and with careful adjustments and techniques, high-quality small prints can be achieved. Experimentation, iterative testing, and learning from each print can help you develop strategies to overcome these challenges and improve your small-scale printing skills.
In summary, printing small objects poses specific challenges such as warping, detail loss, fragility, print stability, and support structure removal. By understanding these challenges and implementing appropriate adjustments and techniques, you can overcome these obstacles and achieve successful and precise small prints.
Warping
Warping is a common challenge encountered when 3D printing small objects, particularly those with a high surface area to volume ratio. It occurs when the material undergoes thermal stress, causing it to shrink and pull away from the print bed during the cooling process. This can result in warped or distorted prints and affect their dimensional accuracy. Understanding the causes of warping and implementing strategies to mitigate it is essential for successful small-scale printing.
Several factors contribute to warping, including the choice of material, printing temperature, cooling rate, and adhesion to the print bed. Here are some techniques to address warping:
1. Enclosed Print Chamber: Creating a controlled and enclosed environment around the printer can help maintain a more consistent temperature throughout the printing process. This can reduce temperature fluctuations and minimize the risk of warping.
2. Heated Print Bed: Using a heated print bed is beneficial for helping the printed object adhere to the surface and reduce warping. Heat helps the bottom layers of the print stay at an elevated temperature, minimizing the temperature differential throughout the object.
3. Raft or Brim: Adding a raft or a brim to the print can provide additional stability and help distribute the stress caused by cooling. These features create a larger contact area with the print bed, improving adhesion and reducing the chances of warping.
4. Bed Surface Preparation: Ensuring the print bed is clean and properly prepared is crucial for good adhesion. Applying adhesive substances such as glue sticks, hairspray, or specialty adhesives can enhance adhesion and reduce warping.
5. Temperature Calibration: Proper temperature calibration for the printing material is essential. Adjusting the printing temperature based on the material’s recommendations can help prevent warping. Additionally, adjusting cooling settings, such as fan speed, can also influence the cooling rate and reduce the risk of warping.
It’s important to note that the specific causes and solutions for warping may vary depending on the material being used and the printer model. Experimentation, iterative adjustments, and understanding the behavior of your specific setup are key to successfully overcoming warping challenges when printing small objects.
In summary, warping is a common issue when 3D printing small objects. By utilizing techniques such as an enclosed print chamber, a heated print bed, incorporating a raft or brim, preparing the print bed properly, and calibrating temperature settings, you can mitigate warping and achieve more successful small-scale prints.
Detail Loss
When 3D printing small objects, preserving fine details can be a challenge. The intricate features and delicate structures of small prints can sometimes result in a loss of detail. Understanding the factors that contribute to detail loss and implementing appropriate techniques can help mitigate this issue, ensuring accurate and precise small-scale prints.
Several factors can contribute to detail loss, including the nozzle size, layer height, design complexity, and printer capabilities. Here are some techniques to address detail loss when printing small objects:
1. Smaller Nozzle Size: Using a smaller nozzle size can improve detail reproduction. A smaller nozzle allows for finer extrusion, enabling the printer to achieve more precise features and sharper edges. However, it’s important to consider the trade-off between smaller nozzle sizes and longer printing times.
2. Lower Layer Height: Choosing a lower layer height contributes to capturing finer details in the print. With a smaller layer height, the printer can create thinner layers, resulting in higher resolution and better detail reproduction. However, using a lower layer height may increase the overall print time.
3. Print Speed and Acceleration: Slowing down the print speed and reducing acceleration can help improve detail reproduction. Decreasing the speed allows the printer to accurately navigate intricate sections without sacrificing precision. Adjusting acceleration settings can also help reduce vibrations and improve overall print quality.
4. Design Optimization: Simplifying the design or modifying it to accommodate small-scale printing can help improve detail reproduction. Reducing the complexity of intricate features and increasing wall thickness can minimize the risk of details being lost or compromised during the printing process. It’s also important to ensure that the design is suitable for the capabilities and limitations of your specific printer model.
5. Print Calibration: Proper calibration of the printer is crucial for preserving detail. Ensuring accurate extrusion, proper bed leveling, and precise movement of the print head all contribute to achieving finer details in small-scale prints. Regular calibration and periodic maintenance of the printer are essential for consistent and accurate results.
It’s important to note that achieving fine details may require a balance between various techniques and settings. Experimentation, testing, and iterative adjustments are necessary to perfect the printing process for small objects.
In summary, detail loss is a challenge when 3D printing small objects. By utilizing techniques such as using a smaller nozzle size, lower layer height, adjusting print speed and acceleration, optimizing designs, and ensuring proper printer calibration, it is possible to improve detail reproduction and achieve higher precision in small-scale prints.
Fragility
Fragility is a common concern when 3D printing small objects. The reduced size and delicate structures of small prints can make them inherently more fragile. It’s important to address this challenge to ensure the durability and functionality of the printed objects. Understanding the causes of fragility and implementing appropriate techniques can help strengthen small-scale prints.
Several factors contribute to the fragility of small prints, including thin wall thickness, delicate features, and the choice of material. Here are some techniques to address fragility when 3D printing small objects:
1. Increasing Wall Thickness: Increasing the wall thickness of small prints can significantly improve their strength and durability. Thicker walls provide more structural integrity and reduce the risk of breakage. Designing small objects with appropriately thick walls helps increase their resilience and resistance to external forces.
2. Reinforcing Critical Areas: Identifying and reinforcing critical areas of the print can help reduce fragility. These areas may include thin or weak points that are prone to breaking. Strategies such as adding supports, ribs, or braces to these sections can enhance the strength and stability of the printed object.
3. Choosing Stronger Materials: The choice of printing material can impact the strength and fragility of small prints. Certain materials, such as ABS or nylon, offer greater strength and durability compared to others. Assess the specific requirements of your small print and select a material known for its strength and resistance to breakage.
4. Post-Processing: Post-processing techniques can be employed to reinforce small prints and enhance their durability. Techniques such as sanding, strengthening with epoxy resin or adhesives, or post-curing with UV light can help fortify the structure of the print, reducing fragility and increasing overall robustness.
5. Material Flexibility: Some small objects may require a certain level of flexibility to withstand external forces. Consider choosing a flexible filament, such as TPU or TPE, that offers elasticity and resilience. These materials can help improve the print’s ability to absorb impact or deform without breaking.
By incorporating these techniques, you can minimize the fragility of small prints and ensure the longevity and functionality of the printed objects. Balancing design considerations, material selection, and post-processing techniques will help achieve a suitable level of strength for your specific small-scale printing needs.
In summary, addressing the fragility of small prints is essential for maximizing their functionality and durability. Techniques such as increasing wall thickness, reinforcing critical areas, selecting stronger materials, employing post-processing techniques, and considering material flexibility can all contribute to reducing fragility and increasing the overall strength of small-scale prints.
Techniques to Improve Small Print Quality
When it comes to 3D printing small objects, achieving high-quality prints with precise details can be a challenging task. However, there are several techniques and adjustments that can improve the print quality and enhance the overall appearance of small prints. Let’s explore some of these techniques:
1. Slow Down Print Speed: Slowing down the print speed can greatly improve the quality of small prints. By reducing the speed, the printer has more time to accurately deposit each layer, resulting in finer details and smoother surfaces. Lowering the print speed also helps mitigate the risk of vibrations or misalignment, both of which can impact the print quality.
2. Use a Smaller Nozzle: Using a smaller nozzle increases the level of detail that can be achieved in small prints. The smaller orifice size allows for finer extrusion, enabling the printer to capture intricate features with greater precision. However, it’s important to note that using a smaller nozzle may increase the printing time due to the reduced flow rate.
3. Reduce Layer Height: Decreasing the layer height results in finer layer increments, leading to improved detail reproduction. Smaller layer heights allow for the creation of smoother surfaces and more accurate contours. However, it is essential to find the right balance as reducing the layer height may increase the overall printing time.
4. Improve Bed Leveling: Proper bed leveling is crucial for achieving good bed adhesion and consistent layer deposition, especially for small prints. Ensuring that the print bed is level and properly calibrated helps prevent uneven layers and reduces the risk of failed prints due to poor adhesion. Regularly check and adjust the bed leveling to optimize print quality.
5. Use a Different Material: Experimenting with different materials can bring about notable improvements in small print quality. Some materials, such as engineering-grade filaments or resins, offer greater precision and improved surface finish. These materials often have superior mechanical properties, allowing for better dimensional accuracy and finer details in small prints.
Implementing these techniques requires calibration, experimentation, and a willingness to fine-tune the printing process. It’s important to remember that every printer and material combination may have unique characteristics and optimal parameters. By understanding your printer’s capabilities and experimenting with these techniques, you can optimize the print quality for small objects.
In summary, achieving high-quality small prints requires a combination of carefully adjusting printing parameters and optimizing the printer’s performance. Slowing down the print speed, using a smaller nozzle, reducing the layer height, improving bed leveling, and exploring different materials are effective techniques for obtaining fine detail and exceptional print quality in small-scale 3D printing projects.
Slow Down Print Speed
One technique that can significantly improve the quality of small prints is to slow down the print speed. When printing small objects, reducing the print speed allows for more accurate and precise deposition of the filament, resulting in finer details and smoother surfaces. By giving the printer more time to carefully extrude each layer, you can achieve better print quality and enhance the overall appearance of the final product.
Slowing down the print speed offers several advantages when working with small prints. First, it helps mitigate the risk of vibrations and mechanical inaccuracies that can occur at higher speeds. Small and intricate details require precise movements, and reducing the print speed can minimize potential errors or misalignments that may compromise the accuracy of the print.
Additionally, slower print speeds provide more time for each layer to cool and solidify before the printer moves on to the next layer. This reduces the likelihood of warping, especially with materials that have a tendency to shrink during the cooling process. Improved layer adhesion and reduced warping contribute to a higher-quality print with better dimensional accuracy.
It’s worth noting that slowing down the print speed may impact overall printing time, as each layer takes longer to complete. However, the trade-off between speed and quality is important to consider when aiming for optimal results with small prints. The slight increase in printing time is often worthwhile for obtaining the desired level of detail and surface finish.
When implementing a slower print speed, it’s crucial to find the balance that works best for your specific printer and material. Experimentation and incremental adjustments are necessary to determine the optimal speed for achieving the desired quality. Start by reducing the speed gradually and evaluate the impact on print quality. Bear in mind that other parameters, such as cooling settings and extrusion temperature, might need to be adjusted accordingly when slowing down the print speed.
In summary, slowing down the print speed is a valuable technique for improving the quality of small prints. It allows for finer details, smoother surfaces, and mitigates the risk of vibrations and warping. Though it may increase printing time, the benefits in achieving higher print quality make it a worthwhile adjustment to optimize the results of your small-scale 3D printing projects.
Use a Smaller Nozzle
Using a smaller nozzle is an effective technique to improve the quality and precision of small prints. The nozzle size directly impacts the level of detail that can be achieved, making it an important consideration when working with intricate designs. By opting for a smaller nozzle, you can enhance the accuracy, resolution, and overall appearance of your small-scale 3D prints.
Smaller nozzles, typically ranging from 0.2mm to 0.3mm, enable finer extrusion and better control over the deposition of filament. The smaller orifice size allows for more precise movements, resulting in sharper edges, finer features, and improved overall detail reproduction. With a smaller nozzle, you can capture intricate design elements with greater accuracy.
One important factor to keep in mind when using a smaller nozzle is the trade-off between detail and printing time. Smaller nozzles have a reduced extrusion volume per unit of time, leading to longer printing durations. It’s crucial to consider the balance between achieving finer details and the increased time investment required for the printing process.
A smaller nozzle size is particularly advantageous when working with small objects that have intricate geometric features or textures. Fine lines, curves, and minute surface details can be more accurately represented, resulting in a higher fidelity print. However, for larger objects or prints with less emphasis on intricate details, using a larger nozzle might be a more efficient choice to maintain a balance between print time and acceptable levels of detail.
When using a smaller nozzle, it’s important to reassess and potentially adjust other printing parameters as well. Parameters such as layer height, print speed, and extrusion temperature may need to be fine-tuned to optimize the printing process for the smaller nozzle size. Additionally, periodic maintenance of the printer, such as nozzle cleaning and calibration, is essential to ensure consistent and reliable performance.
Overall, employing a smaller nozzle is a valuable technique for enhancing the quality and precision of small prints. It allows for finer details, sharper edges, and a more refined overall appearance. However, it’s crucial to carefully consider the balance between detail and printing time to make informed decisions about nozzle size for each printing project.
Reduce Layer Height
Reducing the layer height is a technique that can significantly improve the quality and level of detail in small 3D prints. Layer height refers to the thickness of each layer that is deposited during the printing process. By decreasing the layer height, you can achieve finer layers and enhance the overall resolution and precision of your small-scale prints.
When working with small objects, reducing the layer height allows for greater accuracy in capturing intricate details. A smaller layer height means more layers are required to build up the object, resulting in higher resolution and improved detail reproduction. The finer layers help create smoother surfaces and finer contours, resulting in a higher fidelity print.
However, it’s important to consider the trade-off between layer height and printing time. As you decrease the layer height, more layers are necessary to complete the print, leading to increased printing time. Thus, finding the right balance between detail and printing efficiency is crucial, as excessively small layer heights may result in impractically long print times.
Aside from improved detail reproduction, reducing the layer height can also minimize the visibility of layer lines on the final print. Smaller layers blend together more seamlessly, resulting in smoother surfaces and a more polished appearance. This is particularly beneficial for small prints that require a high degree of visual quality and accuracy.
It’s worth noting that reducing the layer height means more precise nozzle movements and potential challenges in terms of printer limitations. A lower layer height may require adequate printer calibration, stable mechanics, and appropriate extrusion settings to optimize print quality. Regular maintenance and upkeep of the printer, including cleaning and calibration, are important to ensure optimal performance when working with smaller layer heights.
Experimentation and adjusting the layer height within the capabilities of your printer will help you find the optimal balance for achieving the desired level of detail and surface finish in your small-scale prints. Consider the intricacy of the design, the material being used, and the time constraints associated with the print to make informed decisions about the appropriate layer height.
In summary, reducing the layer height is a powerful technique to enhance the resolution and level of detail in small prints. Finer layers offer improved detail reproduction, smoother surfaces, and reduced visibility of layer lines. However, it is important to strike a balance between detail and printing time, taking into consideration the capabilities of your printer and the specific requirements of each printing project.
Improve Bed Leveling
Proper bed leveling is a crucial aspect of achieving high-quality prints, especially when it comes to small objects. Bed leveling refers to the process of ensuring that the print bed is perfectly aligned with the printer’s nozzle, allowing for consistent layer deposition and optimal adhesion. Improving bed leveling can greatly enhance the overall print quality and accuracy of small-scale prints.
When the print bed is not properly leveled, it can lead to a range of problems, including uneven first layers, misalignment, and overall poor adhesion. These issues can result in poor print quality, warping, or even failed prints. However, by taking the time to improve bed leveling, these issues can be minimized or eliminated altogether.
One technique to improve bed leveling is to utilize manual or automated calibration processes provided by the printer manufacturer. These processes typically involve adjusting the leveling screws or using built-in software routines to ensure that the print bed is perfectly aligned. Following the manufacturer’s guidelines and regularly performing these calibration procedures is essential for maintaining optimal bed leveling.
In addition to proper calibration, another technique to improve bed leveling for small prints is the use of a high-quality, reliable leveling system. Various aftermarket leveling systems are available that can help achieve more precise and consistent results. These systems often provide improved adjustability, increased stability, and better overall control over the bed leveling process.
A properly leveled bed helps ensure an even first layer, optimizing adhesion between the print and the bed. This is particularly important for small prints, as they have a smaller contact area with the bed, making bed adhesion crucial to prevent warping and shifting during the print. Good bed adhesion promotes accurate and consistent layer deposition, resulting in higher print quality with well-defined details.
Regularly monitoring and adjusting bed leveling is important since environmental factors, such as temperature fluctuations or mechanical wear, can affect the stability of the print bed over time. Routinely checking and re-leveling the bed can help maintain consistent print quality, particularly for small-scale prints where precision is key.
In summary, improving bed leveling is a critical technique for achieving high-quality small prints. Proper bed leveling ensures even first layers, promotes good bed adhesion, and facilitates consistent layer deposition. By following the manufacturer’s calibration procedures, utilizing aftermarket leveling systems, and regularly monitoring bed stability, you can achieve optimal bed leveling and enhance the print quality of your small-scale 3D prints.
Use a Different Material
The choice of material plays a significant role in the quality and characteristics of 3D prints, especially when it comes to small objects. Using a different material can offer various benefits and improve the overall outcome of small-scale prints. By selecting a material that is better suited for small prints, you can enhance the print quality, detail reproduction, and even the mechanical properties of the final object.
One reason to consider using a different material for small prints is to achieve better dimensional accuracy. Some materials have lower shrinkage rates, which can result in reduced warping and distortion during the cooling process. Materials such as PLA generally exhibit minimal shrinkage and better bed adhesion, making them suitable for small-scale prints where accurate dimensions are crucial.
Another advantage of using a different material is the potential for improved detail reproduction. Certain materials, such as resins or specialty filaments, offer better flow characteristics and finer resolution, allowing for enhanced detail capture in small prints. These materials may have higher tolerances for smaller nozzle sizes and layer heights, resulting in crisper, more intricate details in the final print.
Additionally, materials with specific properties can be chosen to meet the requirements of small prints. For example, flexible filaments like TPU or TPE can add elasticity to small objects, making them more durable and resistant to snapping or breaking. Specialty materials such as conductive filaments or composite filaments can also add unique functionality or aesthetically pleasing characteristics to small prints.
When using a different material, it’s important to consider its specific printing requirements and characteristics. Each material may have different temperature settings, extrusion rates, or post-processing requirements. Adapting to these requirements and ensuring your printer is compatible with the chosen material is essential for successful small-scale printing.
It’s worth noting that experimenting with different materials for small prints allows you to explore various possibilities and optimize the results for your specific application. By understanding the properties and limitations of different materials, you can choose the most appropriate material to enhance the print quality, aesthetics, and performance of your small-scale prints.
In summary, using a different material can significantly impact the quality and characteristics of small prints. Consider materials with lower shrinkage rates for improved dimensional accuracy, materials with better flow characteristics for enhanced detail reproduction, and specialty materials to meet specific needs or add unique properties. By selecting the right material for your small-scale prints, you can elevate the overall quality and functionality of the final objects.
Conclusion
3D printing small objects presents unique challenges and considerations. However, by implementing the techniques discussed in this article, the quality and precision of small prints can be greatly improved. Factors such as nozzle size, layer height, bed leveling, material selection, and print speed all contribute to achieving optimal results when working on a smaller scale.
Using a smaller nozzle and reducing the layer height allows for finer details and increased resolution in small prints. Slowing down the print speed and improving bed leveling ensure better accuracy, while selecting the appropriate material helps achieve the desired characteristics and mechanical properties. Additionally, addressing challenges such as fragility and warping through proper design modifications, reinforcement techniques, and material flexibility can further improve small print quality.
Ultimately, achieving high-quality small prints requires a combination of careful adjustments, calibration, and experimentation. Each 3D printer and material combination may have unique specifications and limitations, so it’s important to understand and work within those boundaries. Regular maintenance and monitoring of the printer are essential to ensure consistent performance and optimal results.
By following the techniques outlined in this article, you can elevate the quality, precision, and overall appearance of your small-scale 3D prints. Experimentation, iteration, and a willingness to fine-tune the printing process will allow you to explore the full potential of your 3D printer and bring your small print projects to life with exceptional detail and accuracy.


