Introduction
Making Chrome the default browser on your Android device can significantly enhance your browsing experience. Chrome offers a seamless and feature-rich browsing environment, allowing you to access your favorite websites, save bookmarks, and enjoy personalized settings across devices. By setting Chrome as your default browser, you can streamline your online activities and take advantage of its robust capabilities.
Whether you're drawn to Chrome's user-friendly interface, extensive library of extensions, or its integration with other Google services, making it your default browser can bring numerous benefits. From faster page loading times to enhanced security features, Chrome is designed to provide a smooth and secure browsing experience on your Android device.
In this guide, you'll learn how to set Chrome as your default browser on your Android device. By following a few simple steps, you can ensure that all web links and browsing activities automatically open in Chrome, allowing you to harness its full potential as your go-to browser. Let's dive into the process of making Chrome the default browser on your Android device and unlock the full range of features and conveniences it has to offer.
Step 1: Open Settings on Your Android Device
To begin the process of setting Chrome as your default browser on your Android device, you'll first need to access the device settings. The settings menu is where you can customize various aspects of your device, including app preferences, display settings, and security options. Here's how you can open the settings on your Android device:
-
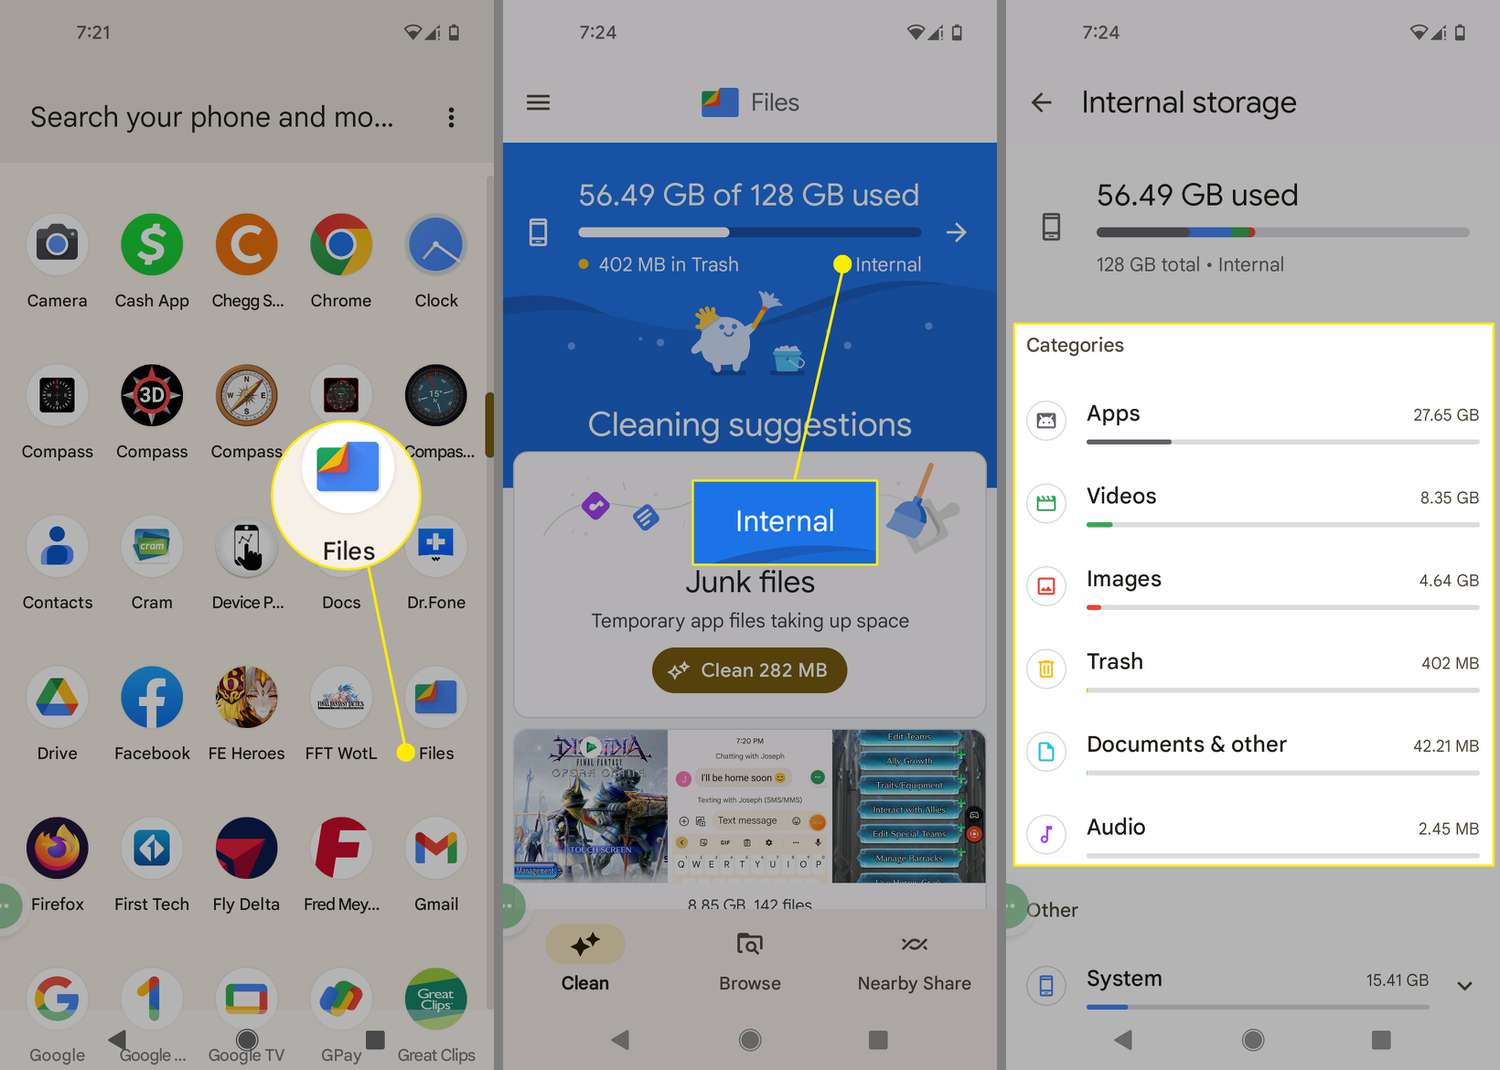
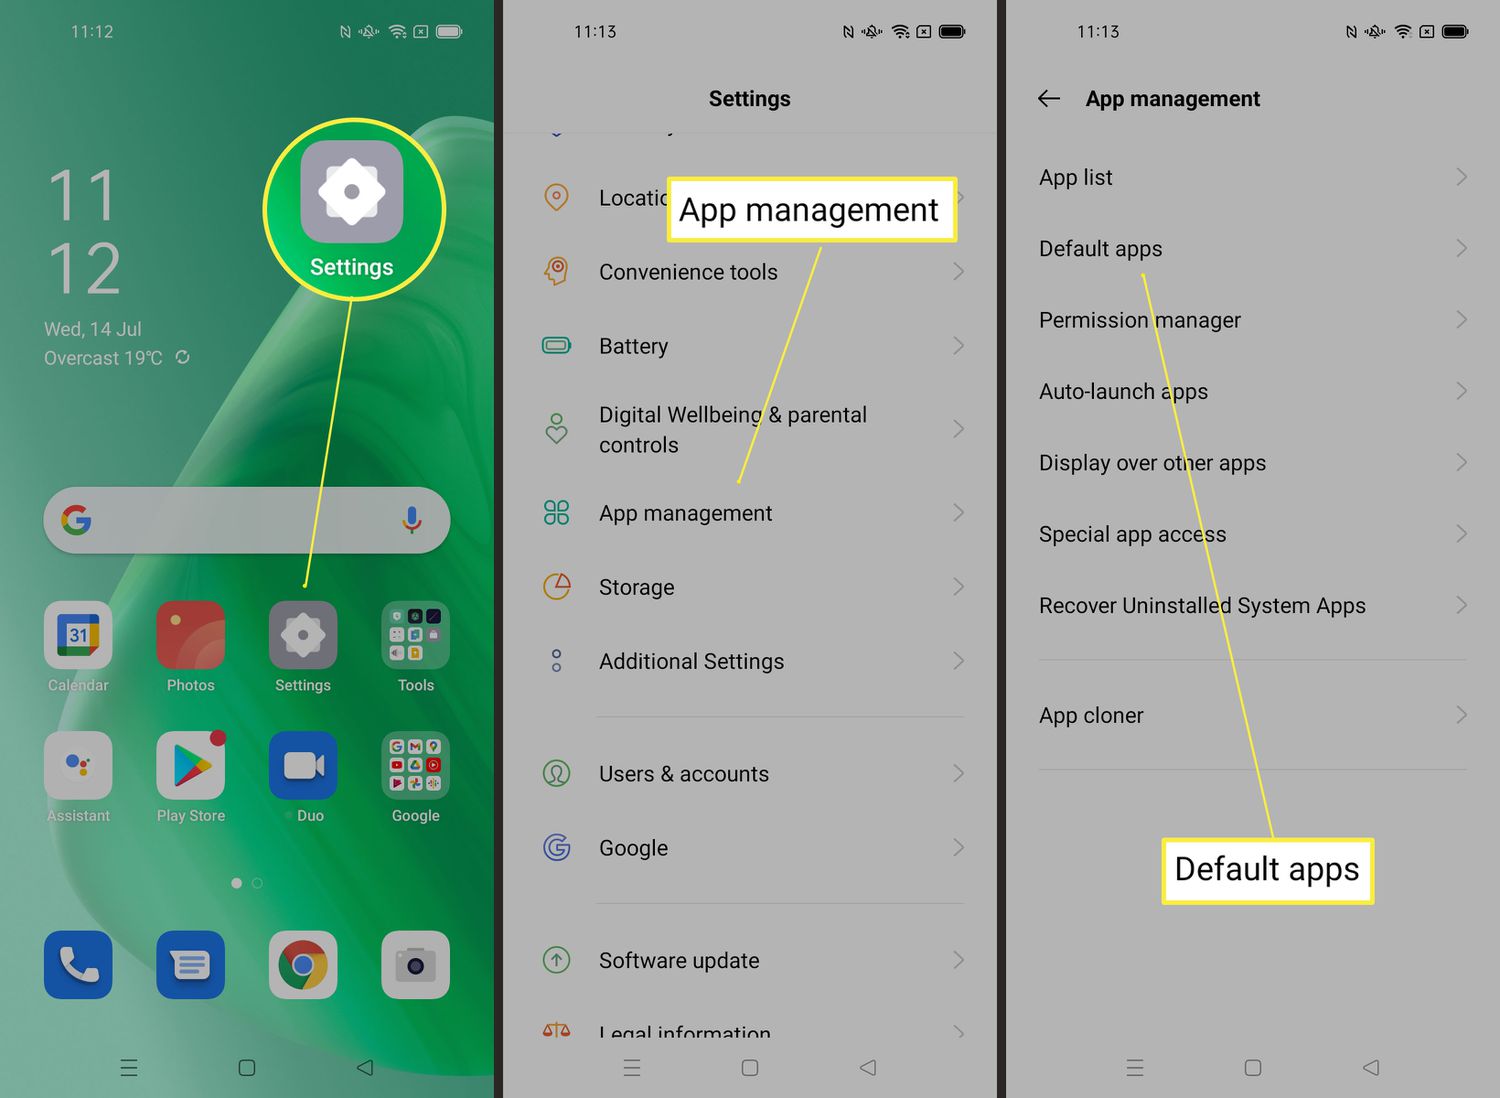
Locate the Settings Icon: On your Android device, the settings icon is typically represented by a gear or cogwheel symbol. You can usually find this icon on your home screen or in the app drawer. Tap on the settings icon to launch the settings menu.
-
Swipe Down and Tap the Gear Icon: Alternatively, you can swipe down from the top of the screen to access the notification panel and then tap the gear icon to open the settings.
-
Using Voice Command: If your device supports voice commands, you can simply say "Open settings" to launch the settings menu.
Once you've successfully accessed the settings menu, you're ready to proceed to the next step in the process of making Chrome your default browser on your Android device. Opening the settings is the initial step that sets the stage for customizing your device preferences and making Chrome the primary browser for your browsing needs.
By navigating to the settings on your Android device, you gain access to a wide range of options that allow you to tailor your device to suit your preferences. Whether you're adjusting network settings, managing app permissions, or configuring display preferences, the settings menu serves as the control center for your Android device.
With the settings menu at your fingertips, you're one step closer to harnessing the full potential of Chrome as your default browser. The next steps will guide you through the process of selecting Chrome as your preferred browser, ensuring that all your web links and browsing activities seamlessly open in Chrome by default.
Now that you've successfully opened the settings on your Android device, let's move on to the next step in the process of setting Chrome as your default browser.
Step 2: Select "Apps" or "Applications"
After accessing the settings menu on your Android device, the next step in setting Chrome as your default browser involves navigating to the "Apps" or "Applications" section. This is where you can manage and customize the settings for all the apps installed on your device, including the default browser. Here's a detailed guide on how to proceed:
-
Locate the "Apps" or "Applications" Option: Within the settings menu, scroll down to find the "Apps" or "Applications" option. The location of this option may vary slightly depending on the device model and the version of the Android operating system. It is commonly found under the "Device," "Apps & notifications," or "Apps & notifications" section.
-
Tap on "Apps" or "Applications": Once you've located the "Apps" or "Applications" option, tap on it to access the list of all the installed apps on your device. This section provides a comprehensive overview of the apps, including system apps and those downloaded from the Google Play Store.
-
Explore the App Settings: Upon entering the "Apps" or "Applications" section, you'll have the opportunity to explore the settings and details of each app. You can view information such as storage usage, permissions, and default settings for various app-related functions.
-
Select "Default Apps" or "Default Applications": Within the "Apps" or "Applications" section, look for the option labeled "Default Apps" or "Default Applications." This is the gateway to customizing the default settings for specific app categories, including the default browser.
Navigating to the "Apps" or "Applications" section allows you to gain insight into the apps installed on your device and manage their settings effectively. By locating the "Default Apps" or "Default Applications" option within this section, you're one step closer to designating Chrome as your default browser. This pivotal step sets the stage for seamlessly integrating Chrome into your browsing experience, ensuring that it becomes the primary browser for all your web-related activities.
As you proceed through the process of setting Chrome as your default browser, the "Apps" or "Applications" section serves as a central hub for managing app preferences and customizing default settings. By selecting the "Default Apps" or "Default Applications" option, you're poised to take the next crucial steps in making Chrome the go-to browser for your Android device.
With the "Apps" or "Applications" section at your disposal, you're well-equipped to navigate the settings and make informed decisions about your default browser preferences. This brings you closer to fully integrating Chrome into your browsing ecosystem, allowing you to enjoy its seamless performance and feature-rich capabilities as the default browser on your Android device.
Step 3: Find and Open the "Default Apps" or "Default Applications" Option
Upon entering the "Apps" or "Applications" section within the settings menu on your Android device, the next crucial step in the process of setting Chrome as your default browser involves finding and opening the "Default Apps" or "Default Applications" option. This pivotal step allows you to customize the default settings for specific app categories, including the default browser, and seamlessly integrate Chrome into your browsing experience.
Here's a detailed guide on how to proceed:
-
Locate the "Default Apps" or "Default Applications" Option: Within the "Apps" or "Applications" section, navigate through the list of available options to find the "Default Apps" or "Default Applications" entry. This option is instrumental in customizing default settings for various app categories, empowering you to designate Chrome as your preferred browser for web-related activities.
-
Tap on "Default Apps" or "Default Applications": Once you've located the "Default Apps" or "Default Applications" option, tap on it to access the settings related to default app preferences. This step opens the door to customizing default settings for specific app categories, including the default browser, and sets the stage for designating Chrome as the primary browser for your browsing needs.
-
Explore Default App Settings: Upon entering the "Default Apps" or "Default Applications" section, take a moment to explore the settings and options available for customizing default app preferences. This section provides valuable insights into managing default settings for various app categories, allowing you to tailor your device to suit your preferences effectively.
By finding and opening the "Default Apps" or "Default Applications" option within the "Apps" or "Applications" section, you're poised to take the next crucial steps in making Chrome the go-to browser for your Android device. This pivotal stage in the process empowers you to customize default settings for specific app categories, ensuring that Chrome seamlessly integrates into your browsing ecosystem as the default browser.
As you navigate through the "Default Apps" or "Default Applications" section, you gain valuable insights into managing default app preferences and customizing settings to align with your browsing habits. This brings you closer to fully integrating Chrome into your browsing experience, allowing you to harness its full potential as the default browser on your Android device.
Step 4: Choose "Browser" or "Browser App"
After accessing the "Default Apps" or "Default Applications" section within the settings menu on your Android device, the next crucial step in the process of setting Chrome as your default browser involves choosing the "Browser" or "Browser App" option. This pivotal step allows you to specify Chrome as the default browser for all your web-related activities, ensuring that it seamlessly integrates into your browsing experience.
Here's a detailed guide on how to proceed:
-
Locate the "Browser" or "Browser App" Option: Within the "Default Apps" or "Default Applications" section, navigate through the available options to find the "Browser" or "Browser App" entry. This option is instrumental in customizing the default settings for the browser category, empowering you to designate Chrome as your preferred browser for all web links and browsing activities.
-
Tap on "Browser" or "Browser App": Once you've located the "Browser" or "Browser App" option, tap on it to access the available browser choices. This step opens the door to customizing the default browser setting, allowing you to select Chrome as the primary browser for your browsing needs.
-
Select "Chrome" as the Default Browser: Upon entering the "Browser" or "Browser App" section, you'll be presented with a list of available browsers installed on your device. Look for "Chrome" in the list and tap on it to set it as the default browser. This crucial selection ensures that all web links and browsing activities automatically open in Chrome, streamlining your browsing experience and allowing you to take full advantage of Chrome's feature-rich environment.
By choosing the "Browser" or "Browser App" option and selecting Chrome as the default browser within this section, you're poised to complete the process of making Chrome the go-to browser for your Android device. This pivotal stage empowers you to seamlessly integrate Chrome into your browsing ecosystem, ensuring that it becomes the default browser for all your web-related activities.
As you navigate through the "Browser" or "Browser App" section, you gain valuable insights into customizing the default browser setting and aligning it with your browsing preferences. This brings you closer to fully integrating Chrome into your browsing experience, allowing you to harness its full potential as the default browser on your Android device.
Step 5: Select "Chrome" from the List of Available Browsers
After tapping on the "Browser" or "Browser App" option within the "Default Apps" or "Default Applications" section, you will be presented with a list of available browsers installed on your Android device. This critical step allows you to select "Chrome" from the list and designate it as the default browser for all your web-related activities.
As you scroll through the list of available browsers, look for "Chrome" and tap on it to set it as the default browser. By selecting "Chrome" from the list of available browsers, you ensure that all web links and browsing activities automatically open in Chrome, streamlining your browsing experience and allowing you to take full advantage of Chrome's feature-rich environment.
Choosing "Chrome" as the default browser from the list of available options marks the final stage in the process of making Chrome the go-to browser for your Android device. This pivotal selection seamlessly integrates Chrome into your browsing ecosystem, ensuring that it becomes the default browser for all your web-related activities.
By designating "Chrome" as the default browser, you unlock a myriad of benefits, including seamless synchronization with your Google account, access to a vast library of extensions, and enhanced browsing performance. Chrome's intuitive interface, robust security features, and seamless integration with other Google services make it an ideal choice for users seeking a reliable and feature-rich browsing experience on their Android devices.
With "Chrome" selected as the default browser, you can enjoy a cohesive browsing experience, where all web links and browsing activities seamlessly open in Chrome by default. This streamlined approach allows you to leverage Chrome's full potential, including its ability to save bookmarks, manage tabs efficiently, and enjoy personalized settings across devices.
By completing the process of selecting "Chrome" from the list of available browsers, you solidify its position as the primary browser for your Android device, ensuring that you can harness its full range of features and conveniences as your go-to browser.
Conclusion
Setting Chrome as the default browser on your Android device is a simple yet impactful way to enhance your browsing experience. By following the steps outlined in this guide, you've successfully customized your device to seamlessly integrate Chrome into your browsing ecosystem. As a result, all web links and browsing activities will now automatically open in Chrome, allowing you to take full advantage of its feature-rich environment and robust capabilities.
By designating Chrome as your default browser, you've unlocked a myriad of benefits that contribute to a seamless and personalized browsing experience. Chrome's intuitive interface, extensive library of extensions, and seamless synchronization with your Google account make it an ideal choice for users seeking a reliable and feature-rich browsing experience on their Android devices.
With Chrome as your default browser, you can enjoy faster page loading times, enhanced security features, and the convenience of accessing your favorite websites with just a few taps. Additionally, Chrome's ability to save bookmarks, manage tabs efficiently, and provide personalized settings across devices ensures that your browsing experience remains tailored to your preferences.
Furthermore, by setting Chrome as your default browser, you're tapping into a browser that is continually evolving to meet the needs of modern internet users. From its built-in tools for productivity and organization to its seamless integration with other Google services, Chrome is designed to streamline your online activities and provide a secure and efficient browsing environment.
As you navigate the web with Chrome as your default browser, you can explore a wide range of features, including incognito mode for private browsing, voice search for hands-free navigation, and the ability to customize your browsing experience with a diverse selection of extensions.
In conclusion, by making Chrome your default browser on your Android device, you've taken a significant step toward optimizing your browsing experience. With its user-friendly interface, robust feature set, and seamless integration with other Google services, Chrome stands as a reliable and versatile browser that caters to the diverse needs of modern internet users. Embracing Chrome as your default browser opens the door to a world of seamless browsing, personalized settings, and enhanced productivity, ensuring that your online activities are streamlined and secure.