Introduction
Deleting your browsing history in the Chrome browser on your iPhone is a simple yet essential task. Whether you want to maintain your privacy, free up storage space, or ensure that your browsing habits remain confidential, clearing your browsing history can help achieve these objectives. This article will guide you through the step-by-step process of deleting your browsing history in Chrome on your iPhone, ensuring that you can navigate the digital realm with peace of mind.
By following the instructions outlined in this article, you can effectively remove traces of your online activities, including visited websites, searches, and cookies, from your Chrome browser. This can be particularly useful when using shared devices or when you simply want to keep your browsing habits private. Additionally, clearing your browsing history can contribute to a smoother browsing experience by reducing the clutter and potentially enhancing the browser's performance.
Understanding how to delete your browsing history in Chrome on your iPhone empowers you to take control of your digital footprint. It allows you to manage your online privacy and maintain a clutter-free browsing environment. With the following step-by-step guide, you will be equipped with the knowledge and tools to efficiently clear your browsing history, ensuring that your online activities remain confidential and secure. Let's delve into the process of clearing your browsing history in Chrome on your iPhone, empowering you to navigate the digital landscape with confidence and peace of mind.
Step 1: Open Chrome Browser
To initiate the process of deleting your browsing history in Chrome on your iPhone, the first step is to open the Chrome browser. This can be done by locating the Chrome app icon on your iPhone's home screen and tapping on it. Upon launching the Chrome browser, you will be greeted by the familiar interface, providing access to a wide array of features and functionalities.
Once the Chrome browser is open, you will be presented with the omnibox, which serves as both the address bar and search bar. This versatile tool allows you to enter website addresses, perform web searches, and access various browser functions. Additionally, the omnibox provides quick access to your frequently visited sites, bookmarks, and browsing history, streamlining your browsing experience.
By opening the Chrome browser on your iPhone, you gain access to a powerful and feature-rich platform for exploring the web, accessing your favorite websites, and managing your online activities. The intuitive interface and seamless navigation offered by Chrome ensure that you can effortlessly proceed with the next steps in the process of clearing your browsing history.
With the Chrome browser now open on your iPhone, you are ready to proceed to the next step in the process of deleting your browsing history, bringing you closer to maintaining your privacy and managing your digital footprint effectively. This initial step sets the stage for the subsequent actions that will enable you to take control of your online privacy and ensure a secure and personalized browsing experience.
Opening the Chrome browser on your iPhone marks the beginning of the journey towards managing your browsing history, empowering you to navigate the digital realm with confidence and peace of mind. This foundational step lays the groundwork for the subsequent actions that will contribute to a cleaner, more secure browsing environment, reflecting your preferences and priorities as an internet user.
By opening the Chrome browser on your iPhone, you are taking the first step towards actively managing your online activities and ensuring that your browsing history remains in line with your privacy and security preferences. This essential action sets the stage for the subsequent steps in the process of clearing your browsing history, ultimately enabling you to maintain a personalized and secure browsing experience on your iPhone.
Step 2: Access the Menu
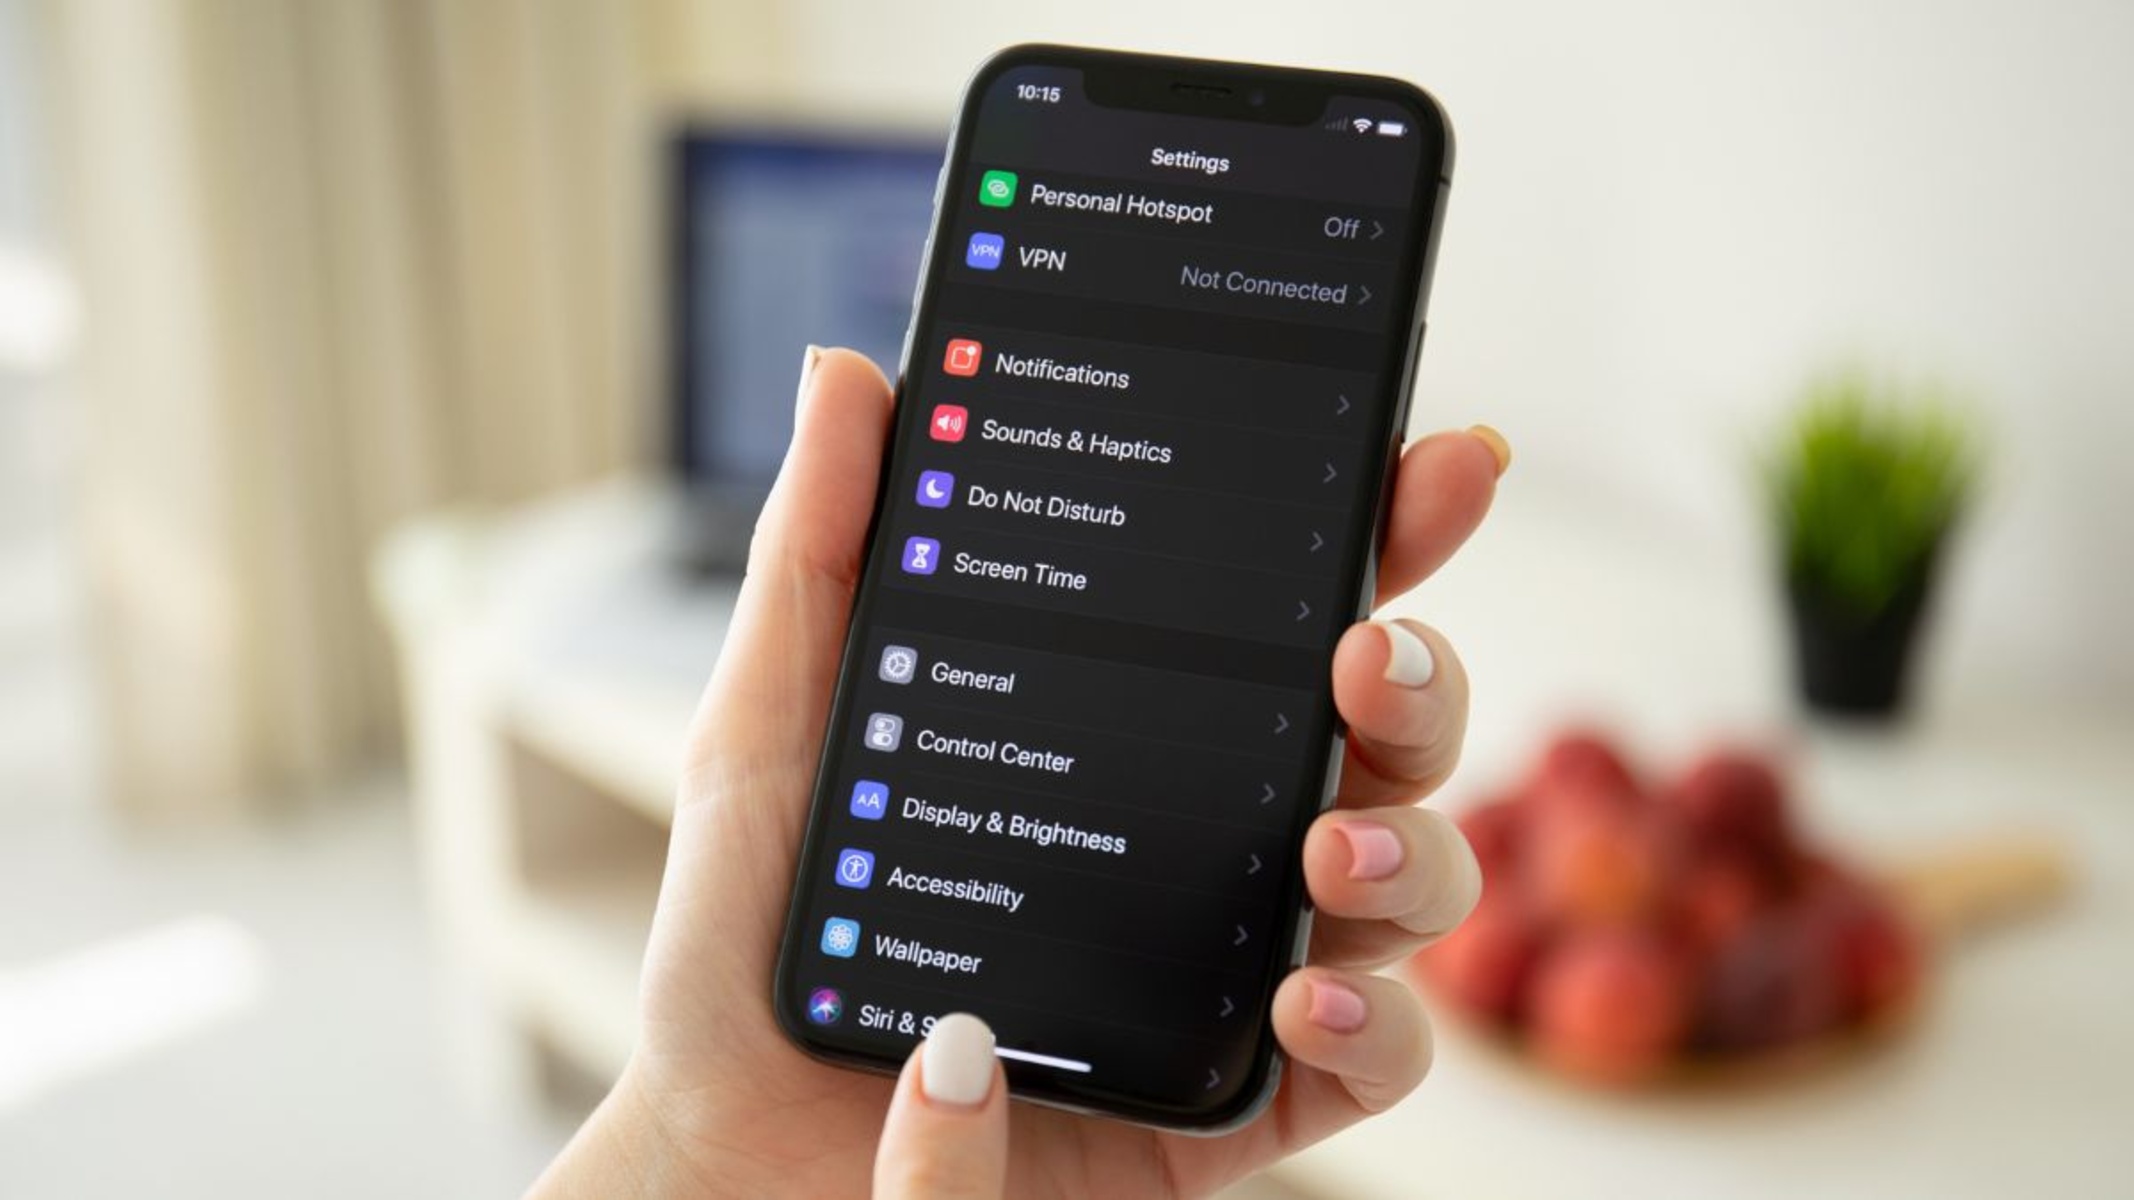
After successfully opening the Chrome browser on your iPhone, the next crucial step in the process of deleting your browsing history is to access the menu. The menu serves as a central hub for accessing various browser functions and settings, allowing you to customize your browsing experience and manage your online activities efficiently.
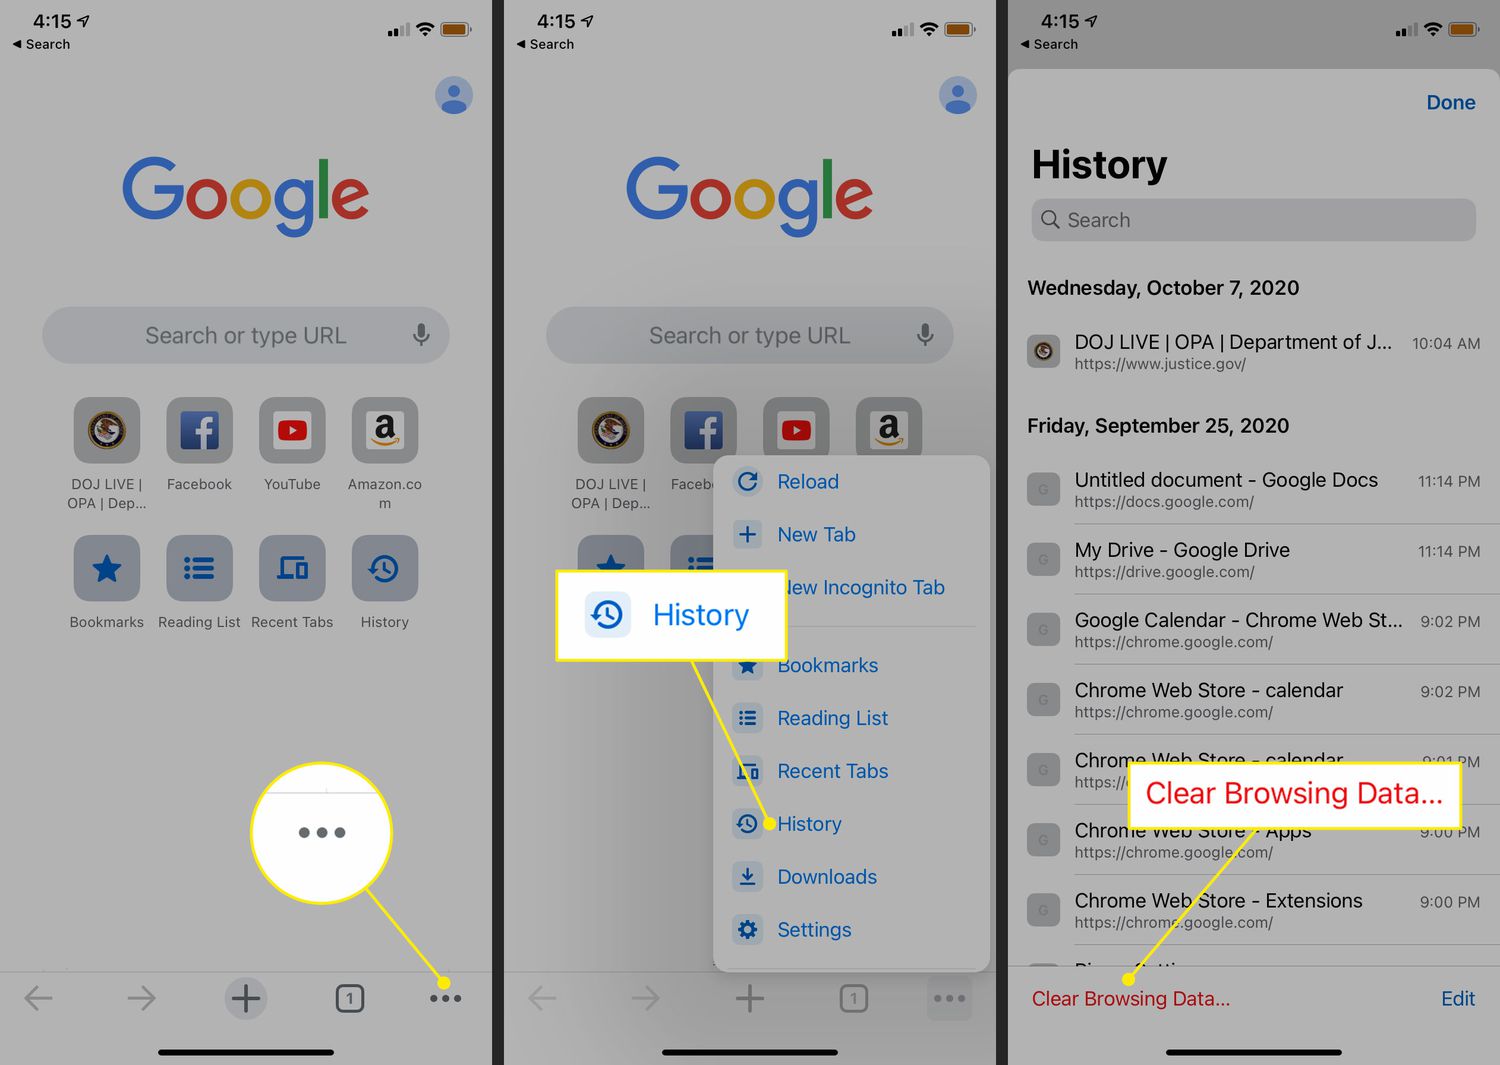
To access the menu in the Chrome browser on your iPhone, look for the three-dot icon located in the top-right corner of the browser interface. This icon represents the menu and serves as the gateway to a plethora of options and features that enable you to tailor your browsing environment to your preferences.
Upon tapping the three-dot icon, a dropdown menu will appear, presenting you with a range of choices and functionalities. This menu is designed to provide easy access to essential browser features, including settings, history, bookmarks, and more. By accessing the menu, you gain the ability to navigate through the various options and select the specific functions required to manage your browsing history effectively.
The menu in the Chrome browser on your iPhone serves as a versatile tool that empowers you to take control of your browsing experience. It offers a user-friendly interface that facilitates seamless navigation and quick access to essential functions, ensuring that you can proceed with the next steps in the process of clearing your browsing history with ease.
Accessing the menu in the Chrome browser on your iPhone is a pivotal moment in the journey towards managing your browsing history. It marks the transition from the initial interface to a realm of customizable options and features, allowing you to tailor your browsing environment to align with your privacy and security preferences.
By accessing the menu, you are granted entry to a realm of possibilities within the Chrome browser, enabling you to explore and utilize a wide array of functions and settings. This pivotal step sets the stage for the subsequent actions that will lead you closer to effectively clearing your browsing history and maintaining a secure and personalized browsing experience on your iPhone.
With the menu now accessible, you are poised to proceed to the next steps in the process of deleting your browsing history, bringing you closer to achieving your privacy and security objectives within the Chrome browser on your iPhone.
Step 3: Select "History"
Once you have accessed the menu in the Chrome browser on your iPhone, the next vital step in the process of deleting your browsing history is to select "History." This action allows you to delve into your browsing history, gaining insight into your past online activities and paving the way for the subsequent steps in the clearing process.
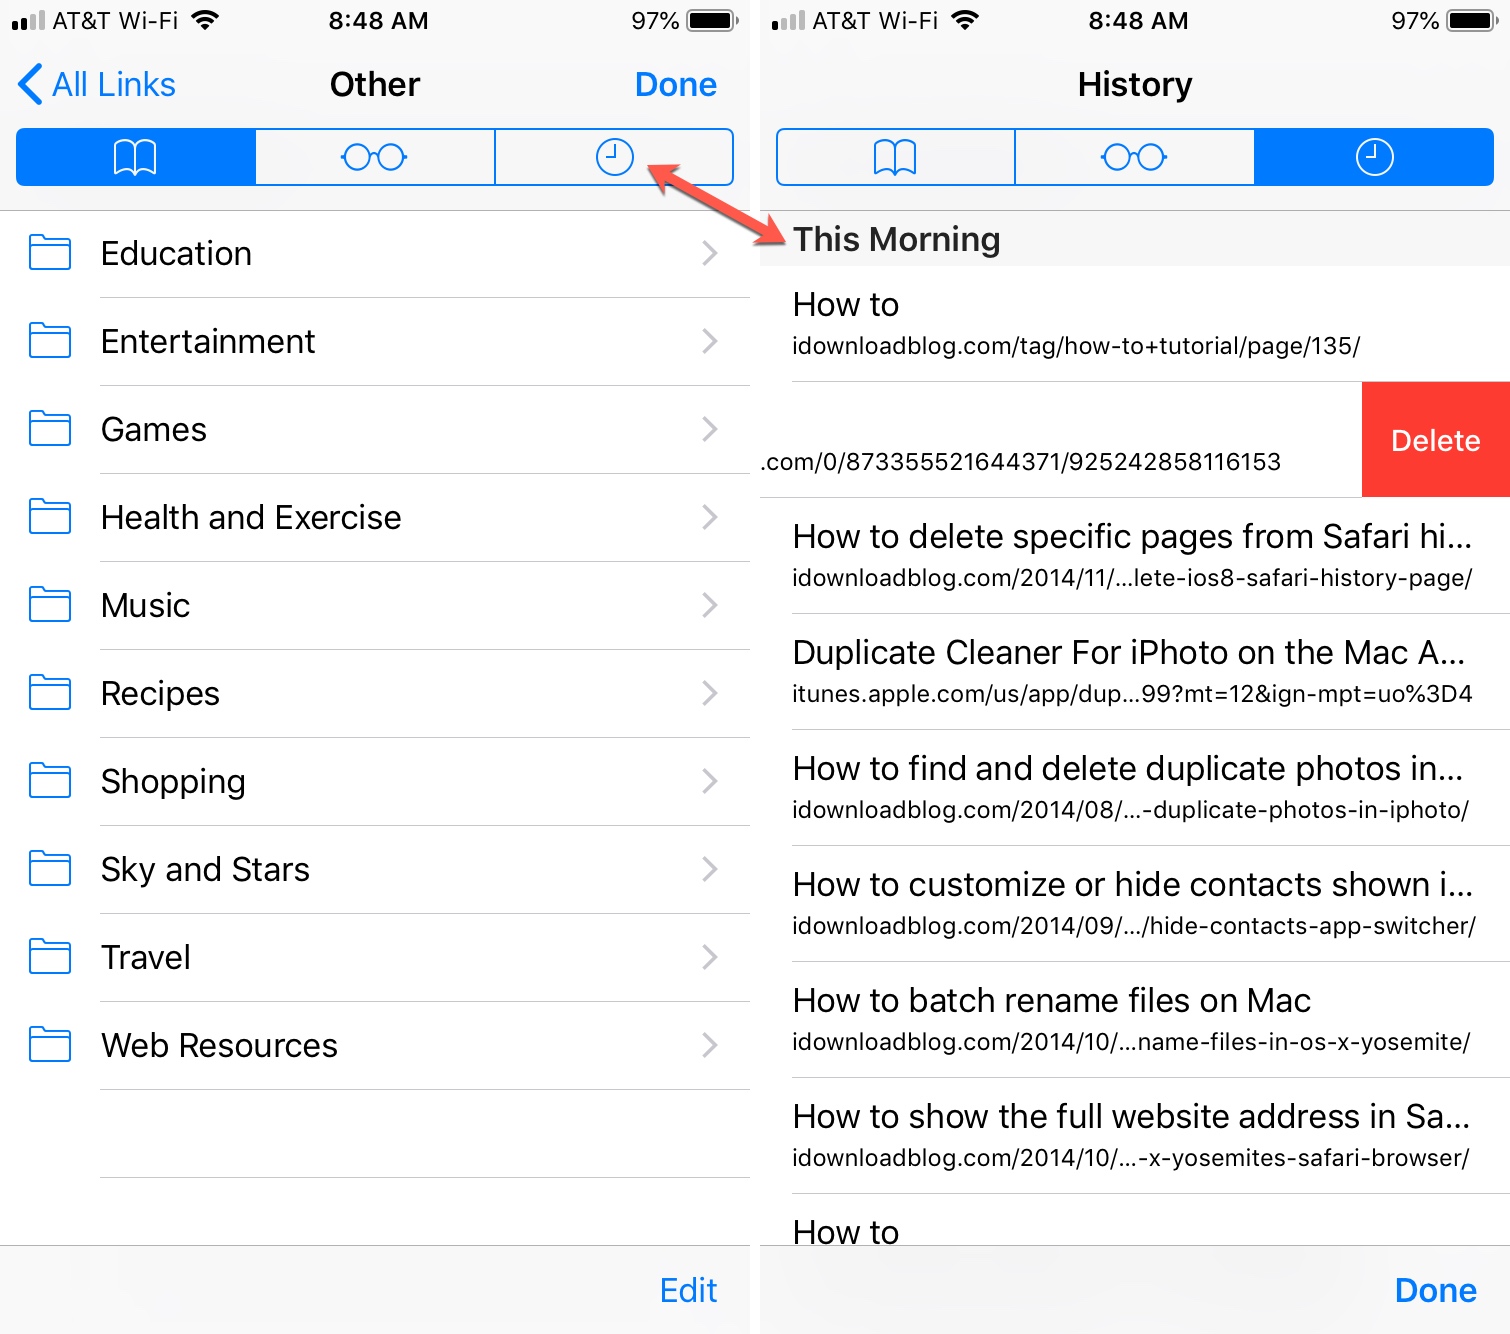
Upon tapping the menu icon, a dropdown menu will appear, presenting you with a range of options. Among these options, you will find "History," which serves as the gateway to a comprehensive overview of your browsing activities. By selecting "History," you gain access to a chronological record of websites visited, searches conducted, and interactions within the browser, providing valuable visibility into your digital footprint.
The "History" section in the Chrome browser on your iPhone offers a detailed timeline of your browsing activities, organized in a user-friendly and intuitive manner. This chronological display enables you to review your browsing history, identify specific entries to be removed, and gain a clear understanding of your online interactions.
By selecting "History," you are granted entry to a realm of insights and information that empowers you to make informed decisions regarding the management of your browsing history. This pivotal step sets the stage for the subsequent actions that will lead you closer to effectively clearing your browsing history and maintaining a secure and personalized browsing experience on your iPhone.
The "History" section serves as a valuable resource for understanding and managing your browsing activities, allowing you to review, analyze, and take control of your digital footprint within the Chrome browser. This level of visibility and control is essential for maintaining your privacy, managing your online activities, and ensuring a tailored browsing experience that aligns with your preferences and priorities.
With "History" now selected, you are poised to proceed to the next steps in the process of deleting your browsing history, bringing you closer to achieving your privacy and security objectives within the Chrome browser on your iPhone. This pivotal action marks a significant milestone in the journey towards managing your browsing history effectively, empowering you to navigate the digital realm with confidence and peace of mind.
Step 4: Clear Browsing Data
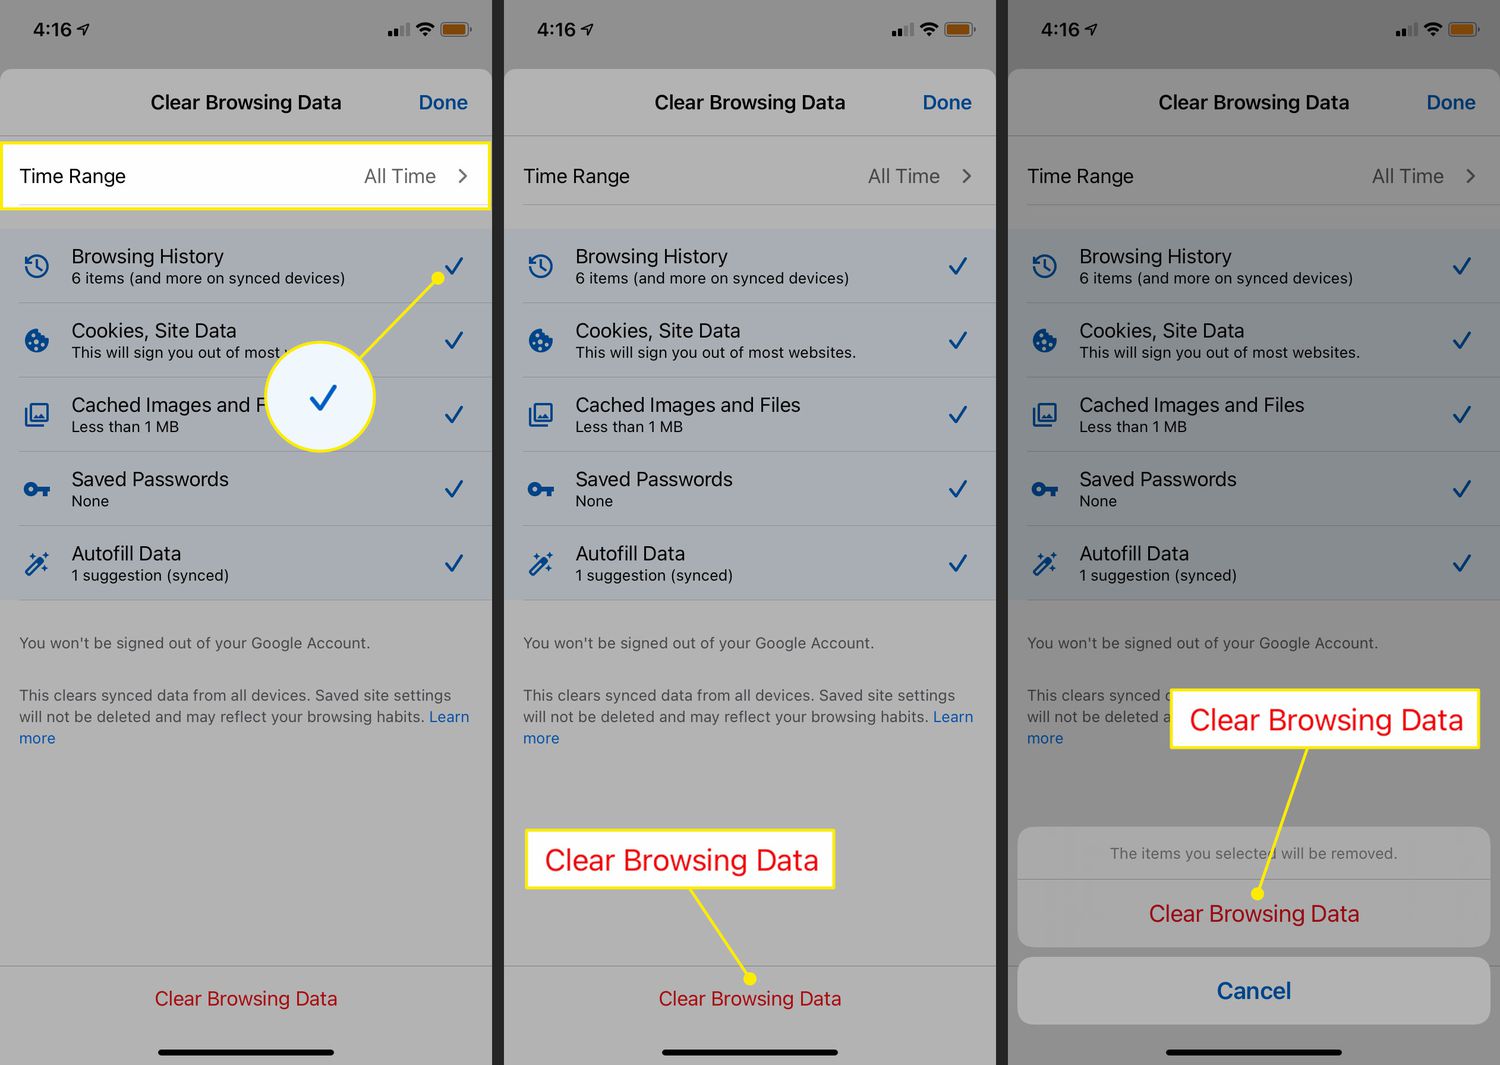
After selecting "History," the next critical step in the process of managing your browsing history in the Chrome browser on your iPhone is to clear your browsing data. This action enables you to remove specific elements from your browsing history, including visited websites, cookies, cached images and files, and other site data, ensuring that your online activities remain confidential and secure.
Upon accessing the "History" section, you will be presented with a range of options, including "Clear Browsing Data." By selecting this option, you gain the ability to specify the types of data to be removed from your browsing history. This level of customization allows you to tailor the clearing process according to your preferences and privacy requirements.
When you choose to clear your browsing data, you will typically encounter options to select the types of data to be removed, such as browsing history, cookies, cached images and files, and more. Additionally, you may have the opportunity to specify the time range for which the data should be cleared, providing flexibility and control over the clearing process.
Clearing your browsing data in the Chrome browser on your iPhone is a proactive measure that contributes to maintaining your privacy and managing your digital footprint effectively. By removing specific elements from your browsing history, you can ensure that your online activities remain confidential, reflecting your preferences and priorities as an internet user.
The process of clearing your browsing data is designed to be user-friendly and intuitive, allowing you to navigate through the available options and select the specific elements to be removed from your browsing history. This level of control empowers you to manage your online activities with precision, ensuring that your browsing history aligns with your privacy and security preferences.
By clearing your browsing data, you are taking an active step towards maintaining a personalized and secure browsing experience on your iPhone. This action reflects your commitment to managing your online privacy and ensuring that your browsing history remains in line with your preferences, contributing to a seamless and confidential digital experience.
With your browsing data now cleared, you are prepared to proceed to the next steps in the process of managing your browsing history, bringing you closer to achieving your privacy and security objectives within the Chrome browser on your iPhone. This pivotal action marks a significant milestone in the journey towards maintaining a secure and tailored browsing environment, empowering you to navigate the digital realm with confidence and peace of mind.
Step 5: Choose Time Range
After clearing your browsing data in the Chrome browser on your iPhone, the next crucial step in managing your browsing history involves choosing the time range for which you want to clear the data. This feature allows you to specify a specific period for which the browsing history, cookies, cached images and files, and other site data should be removed, providing you with flexibility and control over the clearing process.
When you select the option to choose the time range, you are presented with a range of predefined time intervals, such as the past hour, past day, past week, last 4 weeks, and all time. These options enable you to tailor the clearing process according to your specific requirements and preferences. For instance, if you only want to remove recent browsing data, you can select the past hour or past day option. On the other hand, if you wish to clear your entire browsing history, you can choose the all-time option.
The ability to choose the time range for clearing your browsing data empowers you to manage your digital footprint effectively. It allows you to maintain a personalized and secure browsing experience by ensuring that your online activities remain confidential and aligned with your privacy preferences. This level of customization reflects your commitment to managing your online privacy and security, contributing to a seamless and tailored digital experience.
By choosing the time range for clearing your browsing data, you are taking an active step towards maintaining a secure and confidential browsing environment on your iPhone. This feature provides you with the flexibility to manage your browsing history according to your specific needs, ensuring that your digital footprint reflects your preferences and priorities as an internet user.
With the time range now selected, you are prepared to proceed to the final step in the process of managing your browsing history, bringing you closer to achieving your privacy and security objectives within the Chrome browser on your iPhone. This pivotal action marks a significant milestone in the journey towards maintaining a secure and tailored browsing environment, empowering you to navigate the digital realm with confidence and peace of mind.
Step 6: Clear Browsing History
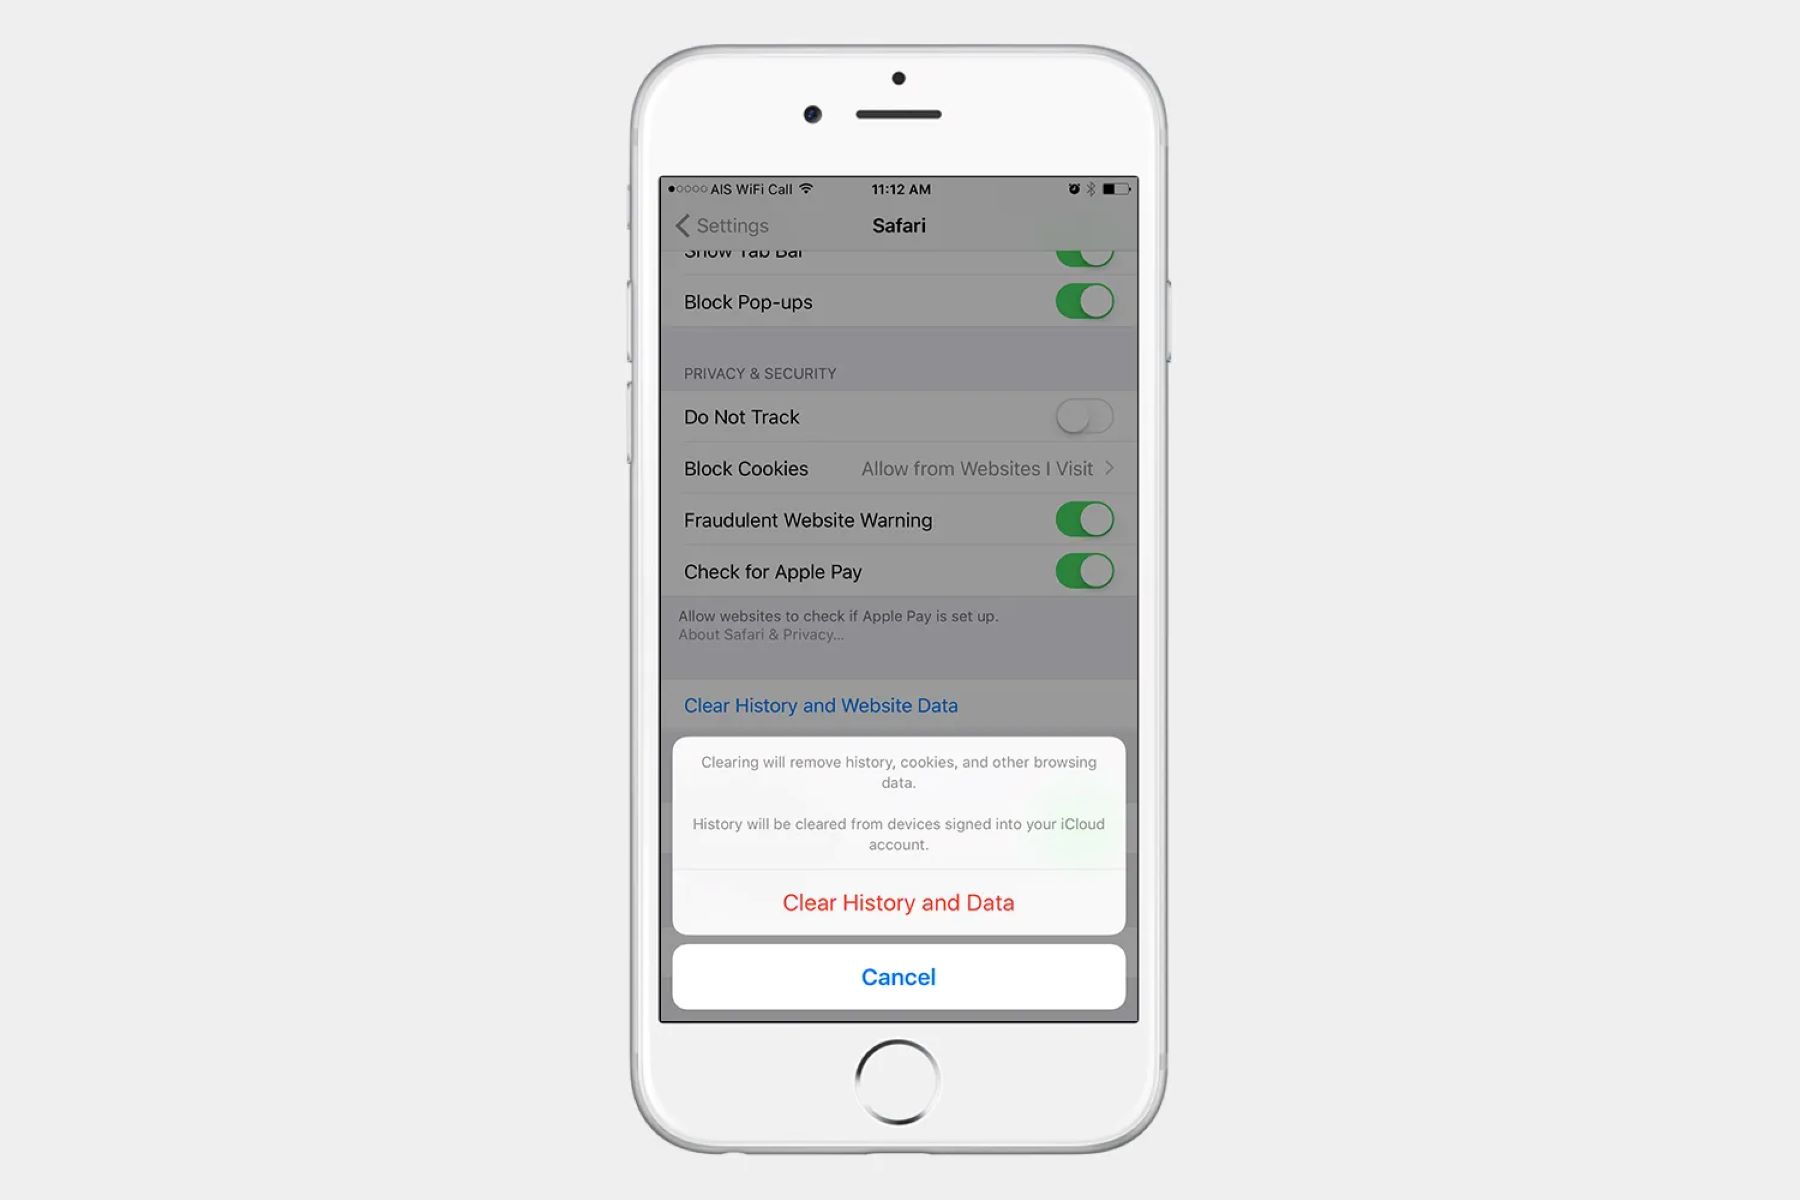
The final step in the process of managing your browsing history in the Chrome browser on your iPhone involves clearing your browsing history. This pivotal action enables you to remove the accumulated record of websites visited, searches conducted, and interactions within the browser, ensuring that your online activities remain confidential and secure.
When you choose to clear your browsing history, you are effectively wiping the slate clean, removing any traces of your past online activities from the browser. This proactive measure contributes to maintaining your privacy and managing your digital footprint effectively. By clearing your browsing history, you can ensure that your online activities remain confidential, reflecting your preferences and priorities as an internet user.
The process of clearing your browsing history is designed to be user-friendly and intuitive, allowing you to navigate through the available options and initiate the clearing process with ease. Upon selecting the option to clear your browsing history, the Chrome browser will prompt you to confirm the action, ensuring that you have the opportunity to proceed with full awareness of the implications.
Once the browsing history is cleared, you can rest assured that your past online activities within the Chrome browser on your iPhone have been effectively removed. This action contributes to a cleaner and more secure browsing environment, aligning with your privacy and security preferences. It empowers you to navigate the digital realm with confidence, knowing that your browsing history is managed in a manner that reflects your preferences and priorities.
By clearing your browsing history, you are taking an active step towards maintaining a personalized and secure browsing experience on your iPhone. This essential action sets the stage for a confidential and tailored digital experience, ensuring that your online activities remain in line with your privacy and security preferences.
With your browsing history now cleared, you have successfully completed the process of managing your browsing history in the Chrome browser on your iPhone. This final step marks a significant milestone in the journey towards maintaining a secure and tailored browsing environment, empowering you to navigate the digital realm with confidence and peace of mind.


