Introduction
Are you a Mac user looking to download Adobe Acrobat Reader? Look no further! Acrobat Reader is a versatile and widely used software that allows you to view, print, and interact with PDF documents. Whether you need to open important work files, read an eBook, or access digital documents, Acrobat Reader for Mac is the perfect tool for you.
In this guide, we will walk you through the step-by-step process of downloading and installing Acrobat Reader on your Mac. With just a few clicks, you’ll be up and running in no time.
But why choose Adobe Acrobat Reader, you might ask? Well, for starters, it’s a free software provided by Adobe Systems, a leading software developer renowned for its high-quality products. Acrobat Reader offers an extensive range of features designed to optimize your PDF viewing experience. From easy navigation and zoom capabilities to annotation tools and the ability to fill out forms, Acrobat Reader has got you covered.
So, without further ado, let’s dive into the process of downloading Acrobat Reader for Mac and get you one step closer to seamlessly accessing and managing your PDF files.
Step 1: Go to the official Adobe website
The first step in downloading Adobe Acrobat Reader for Mac is to visit the official Adobe website. This ensures that you are getting the genuine and latest version of the software. To do this, follow these simple instructions:
- Open your preferred web browser on your Mac.
- Type “Adobe” or “Adobe Acrobat Reader” into the search bar, and hit Enter.
- Click on the official Adobe website link that appears in the search results. Alternatively, you can directly visit the Adobe website by typing in the URL: https://www.adobe.com
By going to the official Adobe website, you can ensure the authenticity and safety of the software you are about to download. This is important as it helps protect your system from potential security risks associated with downloading software from unofficial sources.
Once you have successfully accessed the Adobe website, you are ready to move on to the next step in the process, which is choosing the correct version of Acrobat Reader specifically tailored for Mac users.
Step 2: Choose the Acrobat Reader version for Mac
Now that you’re on the official Adobe website, it’s time to select the appropriate version of Acrobat Reader for your Mac. Follow these steps:
- Look for the navigation menu on the Adobe website. It is usually located at the top or left side of the page.
- Find the “Products” or “Downloads” section in the navigation menu and hover over it.
- A drop-down menu will appear. Look for the “Acrobat Reader” option and click on it.
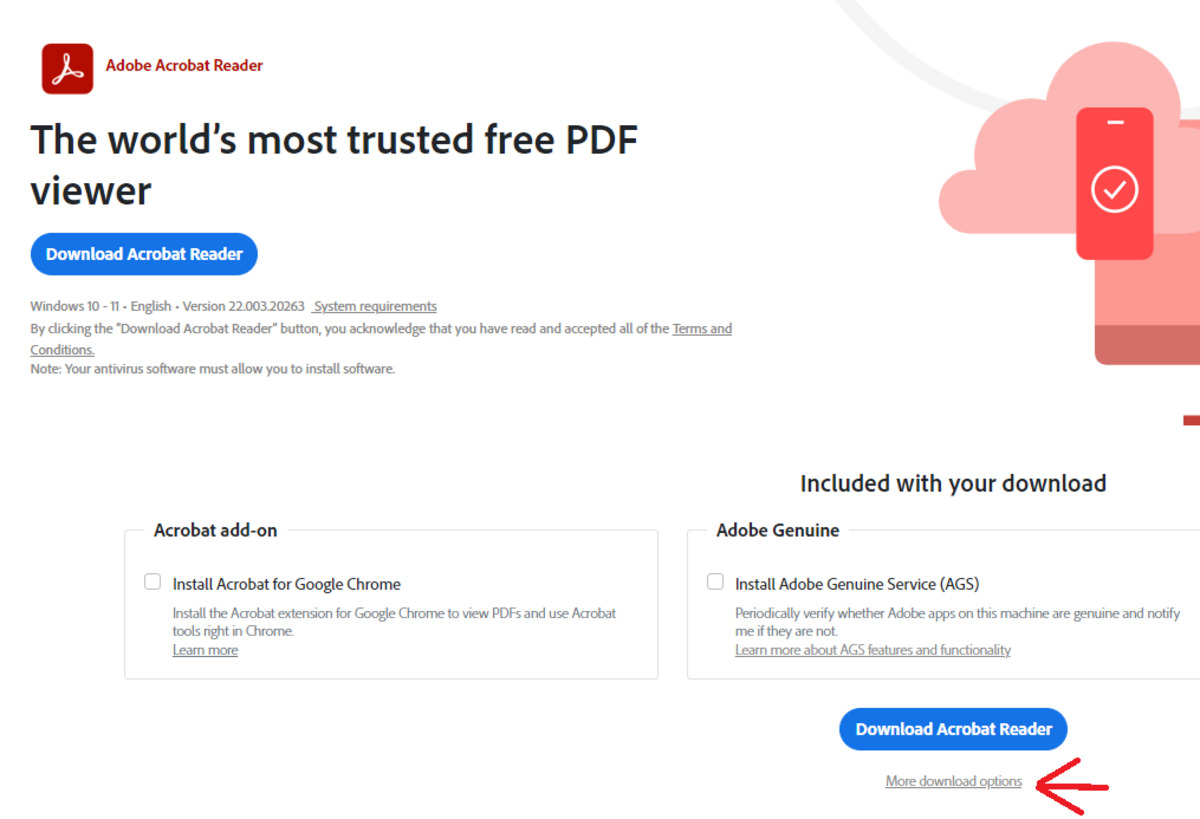
- You will be redirected to the Acrobat Reader download page.
On the Acrobat Reader download page, you will see different versions available for various operating systems. Make sure to choose the version specifically designed for Mac users. This ensures compatibility and optimal performance on your Mac.
Take a moment to review the system requirements for the latest version of Acrobat Reader for Mac. Ensure that your Mac meets these requirements to avoid any technical issues during the installation process.
Once you have identified the appropriate version for your Mac, you’re now ready to proceed to the next step, which is downloading the software onto your computer.
Step 3: Click on the “Download Now” button
Now that you have chosen the correct version of Adobe Acrobat Reader for Mac, it’s time to initiate the download process. Follow these simple steps:
- On the Acrobat Reader download page, you will see a prominent “Download Now” button. Click on it.
- Depending on your web browser, a pop-up window might appear, asking you to confirm the download or choose the destination folder for the downloaded file. Follow the prompts and make the necessary selections.
- The download will begin, and you will be able to monitor its progress through your web browser. The file size may vary, so the download time will depend on your internet speed.
- Once the download is complete, the installer file for Adobe Acrobat Reader will be saved in your designated location or the default Downloads folder on your Mac.
- Ensure that you have a stable internet connection during the download process to avoid any interruptions.
By clicking on the “Download Now” button, you acknowledge that you are agreeing to the Adobe Software License Agreement. It’s always a good idea to read through the agreement to understand the terms and conditions associated with using Acrobat Reader.
With the download of Adobe Acrobat Reader successfully initiated, let’s move on to the next step, which involves granting the necessary permissions to install the software on your Mac.
Step 4: Grant permissions and start the download
Now that you have downloaded the installer file for Adobe Acrobat Reader on your Mac, it’s time to grant the necessary permissions and begin the installation process. Follow these steps:
- Locate the downloaded installer file. It is typically located in the designated download folder or the default Downloads folder on your Mac.
- Double-click on the installer file to launch it. You may be asked to provide administrator permissions to run the installer. If prompted, enter your Mac password or use Touch ID to proceed.
- A security warning may appear, stating that the installer is downloaded from the internet. Click on “Open” to confirm and grant permission for the installation process to start.
- The installation process will now begin. Wait for the installer to extract the necessary files and components onto your Mac. This may take a few moments to complete.
- Once the extraction process is finished, the Adobe Acrobat Reader installer window will appear. Follow the on-screen instructions to proceed with the installation.
- Read through the license agreement, and if you agree to the terms and conditions, click on the “Agree” or “Accept” button to move forward.
- Select the desired installation location on your Mac. The default location is often preselected, but you can choose a different location if needed.
- Click on the “Install” or “Continue” button to start the installation process. Depending on your Mac’s speed and performance, this may take a few minutes to complete.
- Once the installation is finished, a confirmation message will appear. Congratulations! You have successfully installed Adobe Acrobat Reader on your Mac.
Now that you have granted the necessary permissions and completed the installation process, you are ready to start using Adobe Acrobat Reader on your Mac. Proceed to the next step to learn how to get started with the application.
Step 5: Install Acrobat Reader on your Mac
Now that you have successfully downloaded and granted the necessary permissions, it’s time to install Adobe Acrobat Reader on your Mac. Follow these steps to complete the installation process:
- Once the installation is complete, the Adobe Acrobat Reader icon will appear in your Applications folder or on your desktop, depending on your preferences and settings.
- Locate the Acrobat Reader icon and double-click on it to launch the application. Alternatively, you can also search for “Acrobat Reader” in the Spotlight search bar and click on the application when it appears in the results.
- When you launch the application for the first time, you may be asked to sign in with your Adobe ID. If you already have an Adobe ID, enter your email address and password. If you don’t have an Adobe ID, you can create one for free by clicking on the “Create an Adobe ID” or “Sign Up” option.
- After signing in, you will be greeted by the Adobe Acrobat Reader interface. Familiarize yourself with the features and options available, such as viewing, editing, and organizing PDF files.
- Take a moment to explore the various tools and settings within the application. You can customize the viewing preferences, access additional features, and personalize your Acrobat Reader experience according to your needs.
Congratulations! You have successfully installed Adobe Acrobat Reader on your Mac. Now you can easily open, view, and interact with PDF files. Whether it’s reading documents, annotating files, or filling out forms, Adobe Acrobat Reader provides you with the essential tools to manage your PDFs efficiently.
Remember to keep your Adobe Acrobat Reader updated to ensure you have access to the latest features and security enhancements. You can check for updates within the application or enable automatic updates to stay up-to-date with the latest version.
Now that you are familiarized with the installation process and ready to explore the capabilities of Adobe Acrobat Reader, you can start enjoying the benefits of this versatile software on your Mac.
Conclusion
Downloading and installing Adobe Acrobat Reader on your Mac is a straightforward process that can greatly enhance your PDF viewing and management experience. By following the steps outlined in this guide, you can ensure that you have the latest and authentic version of Acrobat Reader installed on your Mac.
Acrobat Reader for Mac offers a range of features and tools that allow you to open, view, and interact with PDF files seamlessly. With easy navigation, annotation capabilities, form filling, and more, Acrobat Reader empowers you to effectively work with digital documents.
By going to the official Adobe website, selecting the correct version for Mac, downloading the installer, granting permissions, and completing the installation, you can have Acrobat Reader up and running in no time.
Remember to familiarize yourself with the various features and options available within the application, customize your preferences, and keep your software updated for the best performance and security.
Now that you have successfully installed Adobe Acrobat Reader on your Mac, you can easily access and manage your PDF documents with confidence, opening up a world of possibilities for your digital workflow.
So, go ahead and get started with Adobe Acrobat Reader on your Mac today. Enjoy the convenience and versatility that this powerful software brings to your PDF handling needs!




![18 Best Online PDF Readers and Editors in 2022 [100% Working]](https://robots.net/wp-content/uploads/2020/06/PDF-image-300x196.jpg)


