Introduction
The Pixel 4A is a remarkable device that offers a seamless mobile experience. Whether you're upgrading to a new phone or simply need to replace or upgrade your SIM card, knowing how to remove the SIM card from your Pixel 4A is an essential skill. This step-by-step guide will walk you through the process, ensuring that you can effortlessly remove the SIM card without any hassle.
Understanding the intricacies of your device is crucial for maintaining its optimal functionality. By learning how to remove the SIM card from your Pixel 4A, you can easily switch to a new SIM card, troubleshoot connectivity issues, or transfer your SIM card to another device. This guide will equip you with the knowledge and confidence to handle this task with ease.
The following steps will provide clear instructions on how to safely remove the SIM card from your Pixel 4A. By following these steps, you can ensure that the process is smooth and stress-free. Let's dive into the step-by-step process to remove the SIM card from your Pixel 4A and empower you to manage your device with confidence.
Step 1: Power Off Your Pixel 4A
Before removing the SIM card from your Pixel 4A, it's crucial to power off the device to prevent any potential damage and ensure a safe removal process. Powering off your Pixel 4A is a simple yet essential step that sets the stage for the subsequent actions.
To power off your Pixel 4A, follow these steps:
-
Press and Hold the Power Button: Located on the right side of your Pixel 4A, the power button is easily accessible. Press and hold this button until the power off menu appears on the screen.
-
Tap "Power Off": Once the power off menu is displayed, tap on the "Power Off" option. This initiates the shutdown process, ensuring that your device is powered down safely.
-
Wait for the Device to Power Off: Allow your Pixel 4A to complete the power-off sequence. You may notice the screen turning off, indicating that the device is successfully powered down.
Powering off your Pixel 4A is a fundamental step that prepares the device for the SIM card removal process. By following this simple procedure, you can ensure that your device is in the optimal state for the subsequent steps, allowing for a smooth and hassle-free SIM card removal experience.
With your Pixel 4A powered off, you're now ready to proceed to the next step, where you'll locate the SIM card tray and prepare to remove the SIM card from your device. This foundational step sets the stage for a seamless SIM card removal process, ensuring that you can handle this task with confidence and ease.
Step 2: Locate the SIM Card Tray
Locating the SIM card tray on your Pixel 4A is the next crucial step in the process of removing the SIM card. The SIM card tray houses the SIM card and is designed for easy access, allowing you to swiftly remove or replace the SIM card as needed. Here's how to locate the SIM card tray on your Pixel 4A:
-
Identify the SIM Card Tray Slot: The SIM card tray slot is typically located on the left side of your Pixel 4A. It is a small, discreet slot that is designed to accommodate the SIM card tray. Look for a small pinhole or a tiny slot with a removable cover.
-
Use the SIM Eject Tool: The Pixel 4A comes with a SIM eject tool, a small pin-like tool that is provided by the manufacturer for the specific purpose of accessing the SIM card tray. This tool is essential for safely removing the SIM card tray without causing any damage to the device.
-
Insert the SIM Eject Tool: Take the SIM eject tool provided with your Pixel 4A and insert it into the pinhole or slot located next to the SIM card tray. Apply gentle pressure to ensure that the tool is securely inserted.
-
Feel for the Eject Mechanism: As you insert the SIM eject tool, you may feel a slight resistance, indicating that the tool has engaged with the eject mechanism. This mechanism is designed to release the SIM card tray when activated by the eject tool.
-
Prepare for SIM Card Tray Removal: Once the SIM eject tool has engaged with the eject mechanism, you are now ready to proceed to the next step of removing the SIM card tray from your Pixel 4A.
Locating the SIM card tray is a pivotal step that sets the stage for the subsequent actions involved in removing the SIM card from your Pixel 4A. By following these detailed instructions, you can confidently locate the SIM card tray and prepare for the safe removal of the SIM card, ensuring that the process is seamless and stress-free.
Step 3: Insert the SIM Eject Tool
Inserting the SIM eject tool is a critical step in the process of removing the SIM card from your Pixel 4A. This small yet essential tool, provided by the manufacturer, is specifically designed to facilitate the safe removal of the SIM card tray without causing any damage to the device. Here's a detailed guide on how to effectively insert the SIM eject tool and prepare for the next phase of the SIM card removal process.
-
Retrieve the SIM Eject Tool: Begin by locating the SIM eject tool that was included in the packaging of your Pixel 4A. This small pin-like tool is typically found within the accessory box or the package containing the user manual. Once you have the SIM eject tool in hand, you're ready to proceed with the next steps.
-
Identify the SIM Eject Tool Slot: On the left side of your Pixel 4A, adjacent to the SIM card tray slot, you'll find a small pinhole or slot designed to accommodate the SIM eject tool. This slot is strategically positioned to provide easy access for inserting the tool and initiating the SIM card tray removal process.
-
Align the SIM Eject Tool: Holding the SIM eject tool between your thumb and index finger, align the pointed end of the tool with the pinhole or slot next to the SIM card tray. Ensure that the tool is positioned perpendicular to the device, allowing for a smooth and secure insertion.
-
Apply Gentle Pressure: With the SIM eject tool aligned with the slot, gently apply pressure to insert the tool into the pinhole. It's important to exercise caution and avoid using excessive force, as the SIM eject tool is designed to engage with the eject mechanism without requiring significant pressure.
-
Confirm Secure Insertion: Once the SIM eject tool is inserted into the slot, take a moment to ensure that it is securely in place. You may feel a slight resistance as the tool engages with the eject mechanism, indicating that it is properly positioned for the next phase of the SIM card removal process.
By following these detailed instructions, you can effectively insert the SIM eject tool and prepare for the safe removal of the SIM card tray from your Pixel 4A. This pivotal step sets the stage for the subsequent actions involved in removing the SIM card, ensuring that the process is seamless and stress-free.
Step 4: Remove the SIM Card Tray
With the SIM eject tool securely inserted into the pinhole or slot adjacent to the SIM card tray, you are now ready to proceed with the next crucial step: removing the SIM card tray from your Pixel 4A. This step requires precision and care to ensure that the SIM card and tray are safely disengaged from the device. Follow these detailed instructions to seamlessly remove the SIM card tray:
-
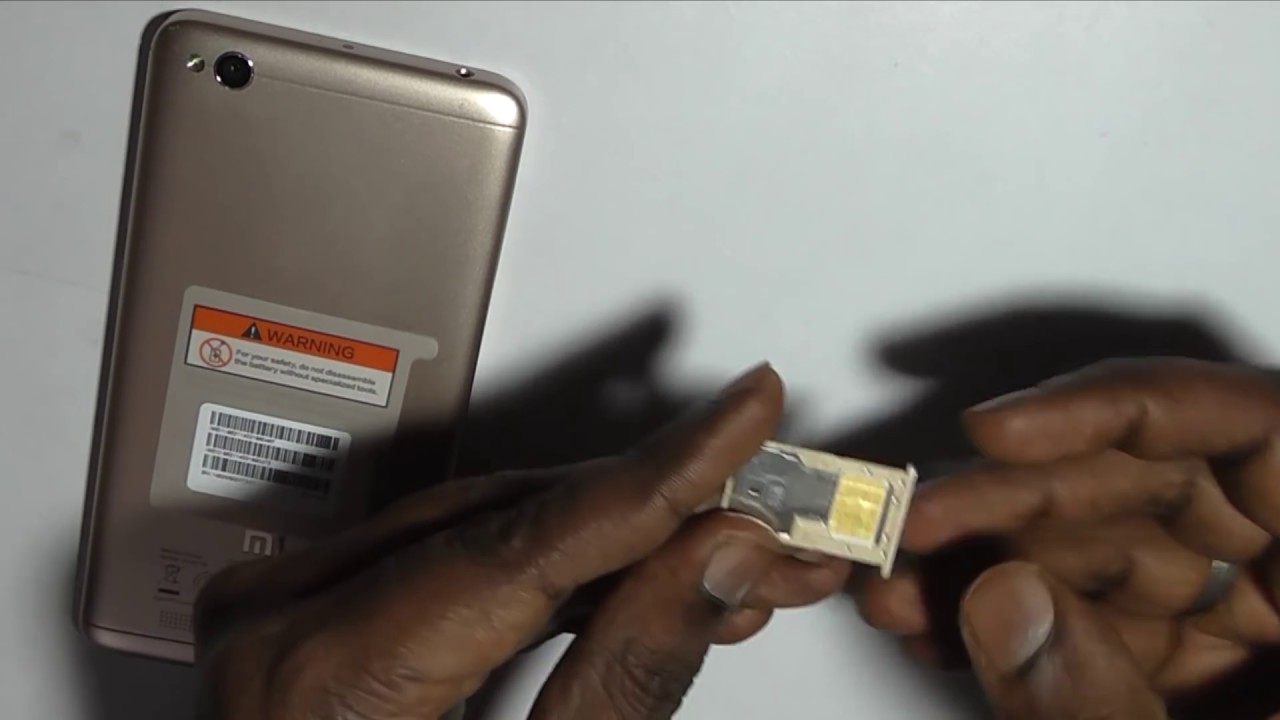
Eject the SIM Card Tray: Apply gentle pressure to the SIM eject tool, maintaining a steady hand as you initiate the ejection process. The SIM card tray is designed to disengage smoothly when the eject mechanism is activated by the tool. Exercise caution to avoid using excessive force, as the tray should slide out effortlessly once the mechanism is engaged.
-
Retrieve the SIM Card Tray: As the SIM card tray begins to slide out, carefully grasp the tray with your fingers, ensuring a firm yet gentle hold. Slowly and steadily pull the tray out of the device, allowing the SIM card to remain securely in place within the tray. It's important to maintain a steady grip on the tray to prevent any accidental drops or mishandling.
-
Inspect the SIM Card: Once the SIM card tray is fully removed from your Pixel 4A, take a moment to inspect the SIM card housed within the tray. Ensure that the SIM card is seated properly and examine it for any signs of damage or wear. This visual inspection allows you to assess the condition of the SIM card before proceeding with any further actions.
-
Set Aside the SIM Card Tray: After inspecting the SIM card, set the SIM card tray aside in a safe and easily accessible location. This ensures that the tray remains secure and readily available for reinstallation or any necessary SIM card replacements. Keeping the tray in a designated spot minimizes the risk of misplacing it during the SIM card removal process.
By following these detailed instructions, you can effectively remove the SIM card tray from your Pixel 4A with precision and care. This pivotal step sets the stage for the safe extraction of the SIM card from the tray, ensuring that the process is seamless and stress-free. With the SIM card tray successfully removed, you are now prepared to proceed to the final step of removing the SIM card from your Pixel 4A.
Step 5: Remove the SIM Card
With the SIM card tray successfully removed from your Pixel 4A, the next crucial step is to carefully remove the SIM card from the tray. This process requires precision and attention to ensure that the SIM card is handled with care and remains in optimal condition for future use. Follow these detailed instructions to seamlessly remove the SIM card from the tray:
-
Gently Remove the SIM Card: As the SIM card tray is now accessible, gently maneuver the SIM card within the tray to prepare for its removal. Using your fingertips, carefully grasp the edges of the SIM card and gently lift it out of the tray. Exercise caution to avoid bending or damaging the SIM card during this process.
-
Inspect the SIM Card: Once the SIM card is removed from the tray, take a moment to inspect it for any signs of damage or wear. Ensure that the gold contacts on the SIM card are clean and free from any debris or corrosion. This visual inspection allows you to assess the condition of the SIM card and address any potential issues before reinserting it into the device.
-
Store the SIM Card Securely: After removing the SIM card from the tray and inspecting it, it's essential to store the SIM card securely. Consider using a SIM card holder or a designated compartment in your wallet or phone case to keep the SIM card safe and easily accessible. Storing the SIM card in a secure location minimizes the risk of misplacement or damage.
-
Prepare for Reinstallation or Replacement: Whether you plan to reinsert the same SIM card or replace it with a new one, it's important to prepare for the next steps. If you're reusing the same SIM card, ensure that it remains in a secure location until you're ready to reinstall it. If you're replacing the SIM card, follow the necessary procedures provided by your mobile service provider to activate the new SIM card.
By following these detailed instructions, you can effectively remove the SIM card from the tray with precision and care. This pivotal step ensures that the SIM card is handled safely and remains in optimal condition for future use. With the SIM card successfully removed, you have completed the process of removing the SIM card from your Pixel 4A, empowering you to manage your device with confidence and ease.
Conclusion
Congratulations! You have successfully navigated through the step-by-step process of removing the SIM card from your Pixel 4A. By following these detailed instructions, you have gained the knowledge and confidence to handle this essential task with ease and precision. As you conclude this process, it's important to reflect on the significance of understanding the intricacies of your device and the practical skills you've acquired.
Removing the SIM card from your Pixel 4A is a fundamental aspect of device management, allowing you to seamlessly switch to a new SIM card, troubleshoot connectivity issues, or transfer your SIM card to another device. By mastering this process, you have empowered yourself to take control of your mobile experience and adapt to changing connectivity needs effortlessly.
As you reflect on the journey of removing the SIM card from your Pixel 4A, consider the valuable insights you've gained into the internal mechanisms of your device. The meticulous steps involved in powering off the device, locating the SIM card tray, inserting the SIM eject tool, removing the SIM card tray, and extracting the SIM card have provided you with a deeper understanding of the device's design and functionality.
Furthermore, the attention to detail and care exercised throughout the process underscore the importance of handling delicate components such as the SIM card and tray with precision and caution. By adhering to the step-by-step instructions, you have demonstrated a commitment to maintaining the integrity of your device while acquiring practical skills that extend beyond SIM card management.
In conclusion, the ability to remove the SIM card from your Pixel 4A is a valuable skill that enhances your overall device literacy and empowers you to adapt to evolving connectivity needs. Whether you're upgrading to a new SIM card, troubleshooting connectivity issues, or transferring your SIM card to another device, the knowledge and confidence you've gained through this process position you as a capable and informed device user.
As you embark on your mobile device journey, remember that understanding the intricacies of your device is a continuous process. By staying informed and proactive, you can confidently manage your device and leverage its capabilities to enrich your mobile experience. The skills you've acquired in removing the SIM card from your Pixel 4A serve as a foundation for ongoing device management and a testament to your ability to navigate the ever-changing landscape of mobile connectivity.