Introduction
Installing a SIM card in your Xperia XZ Premium is a fundamental step in setting up your device for mobile connectivity. The SIM card serves as the gateway to your mobile network, enabling you to make calls, send messages, and access the internet. This guide will walk you through the seamless process of installing a SIM card in your Xperia XZ Premium, ensuring that you can quickly and effortlessly get your device up and running.
The Xperia XZ Premium is designed with user convenience in mind, and the SIM card installation process is no exception. By following the simple steps outlined in this guide, you will be able to complete the setup in a matter of minutes, allowing you to enjoy the full functionality of your device without any unnecessary delays.
Whether you are setting up your Xperia XZ Premium for the first time or replacing an existing SIM card, this step-by-step tutorial will provide you with the necessary guidance to ensure a smooth and hassle-free installation process. With the SIM card properly installed, you will be ready to explore the myriad features and capabilities of your Xperia XZ Premium, from making crystal-clear calls to accessing high-speed mobile data on the go.
Now, let's dive into the process of installing a SIM card in your Xperia XZ Premium, empowering you to stay connected and engaged in today's fast-paced digital world.
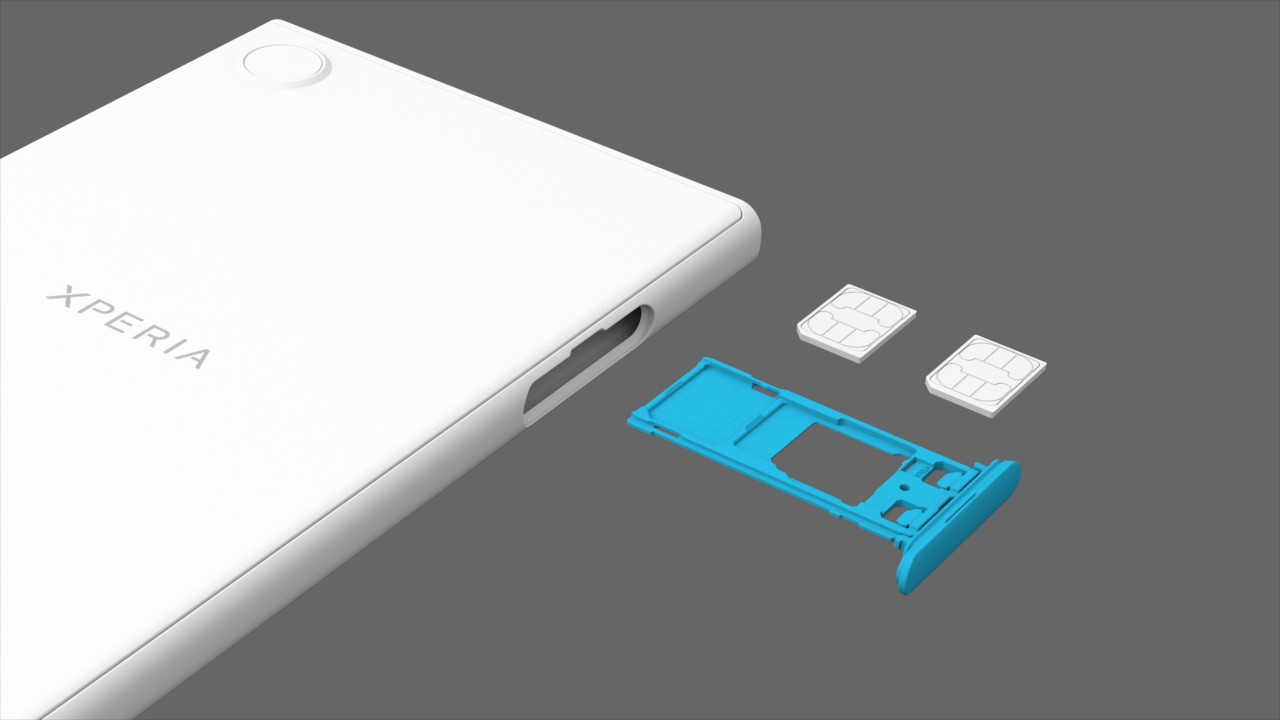
Step 1: Locate the SIM card tray
Locating the SIM card tray is the first crucial step in the process of setting up your Xperia XZ Premium for mobile connectivity. The SIM card tray on the Xperia XZ Premium is strategically positioned to ensure easy access while maintaining the device's sleek and seamless design. To begin the installation process, follow these simple steps to locate the SIM card tray:
-
Power Off the Device: Before locating the SIM card tray, it's essential to power off your Xperia XZ Premium. This ensures that the device is safely prepared for the SIM card installation process.
-
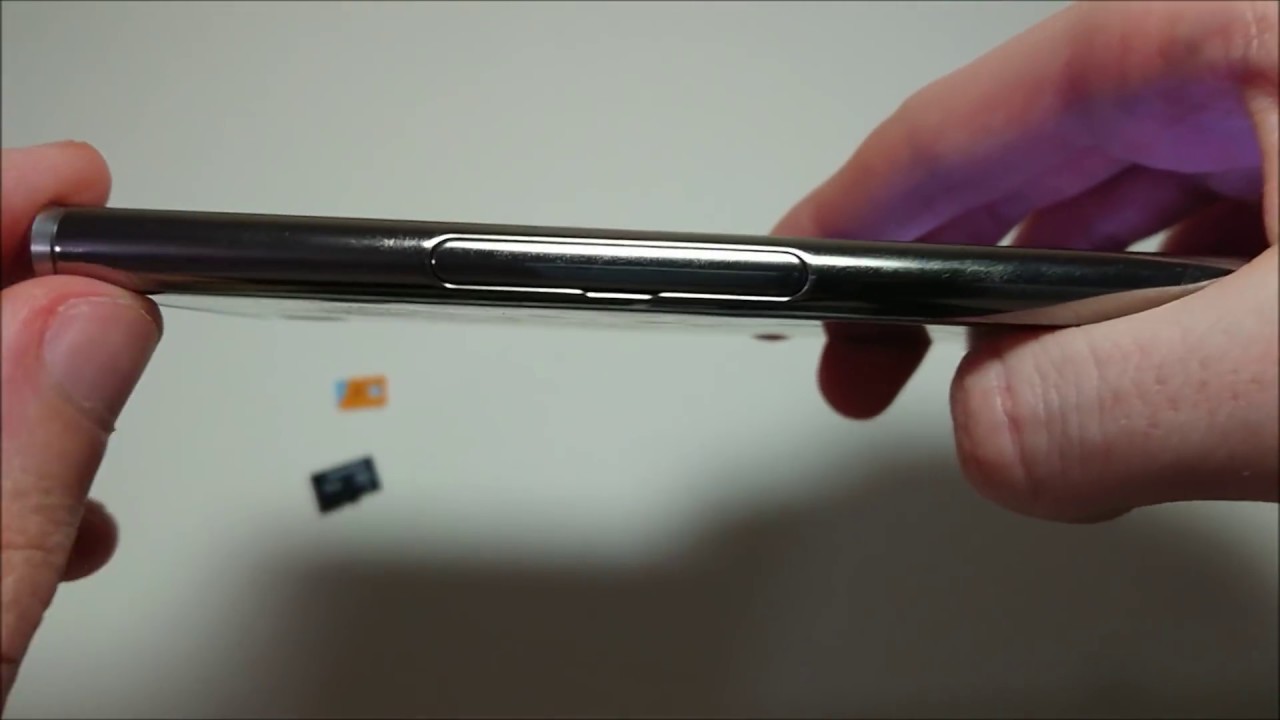
Identify the SIM Card Tray Slot: The SIM card tray slot is typically located on the side of the device. On the Xperia XZ Premium, the SIM card tray is situated on the left-hand side, adjacent to the volume control buttons. Look for a small pinhole or a tray with a tiny indentation, indicating the presence of the SIM card slot.
-
Use the Ejection Tool: To access the SIM card tray, you will need to use the provided ejection tool. This tool is usually included in the Xperia XZ Premium packaging. If you cannot locate the ejection tool, a small paperclip can be used as an alternative. Insert the ejection tool or paperclip into the pinhole adjacent to the SIM card tray slot.
-
Gently Eject the SIM Card Tray: Applying gentle pressure, push the ejection tool into the pinhole until the SIM card tray is partially ejected from the device. Once the tray is partially ejected, carefully remove it from the Xperia XZ Premium.
By following these steps, you will successfully locate the SIM card tray on your Xperia XZ Premium, setting the stage for the next phase of the installation process. With the SIM card tray in hand, you are now ready to proceed to the next step of inserting the SIM card, bringing you one step closer to unlocking the full potential of your Xperia XZ Premium for seamless mobile connectivity.
Step 2: Insert the SIM card
With the SIM card tray in hand, you are now ready to proceed with the next crucial step: inserting the SIM card into your Xperia XZ Premium. This step is pivotal in establishing the connection between your device and the mobile network, enabling you to harness the full range of communication and connectivity features offered by your Xperia XZ Premium. Follow these detailed instructions to seamlessly insert the SIM card:
-
Prepare the SIM Card: Before inserting the SIM card, ensure that it is compatible with the Xperia XZ Premium. The SIM card should match the size and form factor required by the device. Most modern SIM cards are designed to be easily adaptable to different devices, but it's essential to verify that you have the correct type for your Xperia XZ Premium.
-
Position the SIM Card: Examine the SIM card tray to identify the designated area for the SIM card. The tray is typically designed to accommodate the SIM card in a specific orientation, ensuring a secure and proper fit. Place the SIM card into the designated area on the tray, aligning it according to the provided guidelines. The SIM card should fit smoothly into the allotted space without any forceful manipulation.
-
Reinsert the SIM Card Tray: Once the SIM card is securely positioned on the tray, carefully reinsert the tray into the SIM card slot on your Xperia XZ Premium. Gently push the tray back into the slot until it is fully seated, ensuring that it is flush with the device's exterior. Take care to avoid applying excessive force during this process, as the SIM card and tray should slide into place smoothly.
-
Power On the Device: With the SIM card successfully inserted, power on your Xperia XZ Premium to initiate the device setup process. As the device boots up, it will detect the presence of the SIM card and proceed to establish the necessary network connections. Once the device is powered on, you will be ready to configure your mobile network settings and begin enjoying the full functionality of your Xperia XZ Premium.
By following these detailed steps, you have effectively inserted the SIM card into your Xperia XZ Premium, paving the way for seamless mobile connectivity. With the SIM card in place, your device is now primed to deliver a comprehensive mobile experience, allowing you to stay connected, communicate effortlessly, and access a wide array of mobile services with ease.
Step 3: Power on the device
Powering on your Xperia XZ Premium is the pivotal next step after successfully inserting the SIM card. This action initiates the device setup process and allows the Xperia XZ Premium to detect the newly installed SIM card, establishing the essential network connections required for seamless mobile connectivity.
To power on your Xperia XZ Premium, follow these straightforward steps:
-
Press and Hold the Power Button: Located on the right-hand side of the device, the power button is easily accessible and serves as the gateway to activating your Xperia XZ Premium. Press and hold the power button until you see the device's screen illuminate, indicating that it is powering on.
-
Wait for the Boot-Up Sequence: As the device powers on, the Xperia XZ Premium will undergo a boot-up sequence, initializing its operating system and preparing to detect the SIM card. During this process, you may see the Xperia logo displayed on the screen, signaling that the device is actively starting up.
-
Network Detection and Initialization: Once the device is powered on, it will automatically detect the presence of the SIM card and proceed to establish the necessary network connections. The Xperia XZ Premium is designed to seamlessly integrate with the mobile network, enabling you to access voice, messaging, and data services without any additional configuration.
-
Device Setup and Configuration: As the Xperia XZ Premium completes the power-on sequence, you will be guided through the initial device setup and configuration process. This may include language selection, Wi-Fi network setup, and other essential settings to personalize your device according to your preferences.
-
SIM Card Recognition: During the power-on process, the Xperia XZ Premium will recognize the inserted SIM card, displaying relevant information such as network signal strength, carrier name, and mobile data availability. This confirmation indicates that the SIM card has been successfully detected and integrated into the device's communication system.
By following these steps to power on your Xperia XZ Premium, you have seamlessly completed the essential setup process, ensuring that the device is ready to deliver a comprehensive mobile experience. With the SIM card recognized and the device powered on, you are now poised to explore the full range of features and capabilities offered by the Xperia XZ Premium, empowering you to stay connected, communicate effortlessly, and access a diverse array of mobile services with unparalleled convenience.
Conclusion
In conclusion, the process of installing a SIM card in your Xperia XZ Premium is a fundamental step that sets the stage for seamless mobile connectivity and empowers you to unlock the full potential of your device. By following the step-by-step instructions outlined in this guide, you have successfully navigated through the essential stages of locating the SIM card tray, inserting the SIM card, and powering on your Xperia XZ Premium, ensuring that the device is primed to deliver a comprehensive mobile experience.
With the SIM card securely in place, your Xperia XZ Premium is now equipped to seamlessly integrate with the mobile network, enabling you to make crystal-clear calls, send messages, and access high-speed mobile data on the go. The successful installation of the SIM card ensures that your device is fully prepared to keep you connected and engaged in today's fast-paced digital world.
Furthermore, the user-friendly design of the Xperia XZ Premium, coupled with the straightforward SIM card installation process, underscores Sony's commitment to delivering a seamless and intuitive user experience. The strategic placement of the SIM card tray, the clear guidelines for SIM card insertion, and the effortless power-on sequence collectively contribute to a hassle-free setup process, allowing you to quickly transition from unboxing your device to enjoying its full range of capabilities.
As you embark on your journey with the Xperia XZ Premium, the successful installation of the SIM card serves as a foundational step that lays the groundwork for a rich and immersive mobile experience. Whether you are leveraging the device for professional communication, staying connected with loved ones, or exploring the myriad entertainment and productivity features, the seamless setup of the SIM card ensures that your Xperia XZ Premium is ready to meet your diverse needs with unparalleled convenience.
In essence, the installation of the SIM card in your Xperia XZ Premium represents the gateway to a world of connectivity, communication, and digital exploration. With this essential setup process completed, you are now poised to harness the full potential of your device, leveraging its advanced capabilities to stay connected, productive, and entertained in every facet of your digital lifestyle.
By seamlessly integrating the SIM card into your Xperia XZ Premium, you have taken a significant step towards embracing the boundless possibilities offered by modern mobile technology, ensuring that your device is fully equipped to accompany you on your daily adventures and endeavors, keeping you connected and engaged every step of the way.