Introduction
Welcome to the digital age, where convenience and connectivity go hand in hand. With the constant evolution of technology, financial transactions are becoming increasingly seamless, and Facebook is at the forefront of this revolution. Facebook Pay is a secure and convenient way to make payments within the Facebook ecosystem. Whether you’re buying products, supporting causes, or sending money to friends and family, Facebook Pay offers a streamlined experience that eliminates the need for multiple payment methods.
Facebook Pay is available to users across the globe, making it accessible to millions of people. It brings together various payment options, including debit/credit cards, PayPal, and even digital wallets, to simplify and enhance the payment experience. By setting up a Facebook Pay account, you’ll be able to make payments with just a few taps, ensuring a smooth and hassle-free transaction process.
In this guide, we’ll walk you through the process of setting up a Facebook Pay account and harnessing its benefits. You’ll learn how to link your preferred payment methods, manage your account settings, and make secure payments within the Facebook platform. So, if you’re ready to experience the ease and convenience of Facebook Pay, let’s dive in!
What is Facebook Pay?
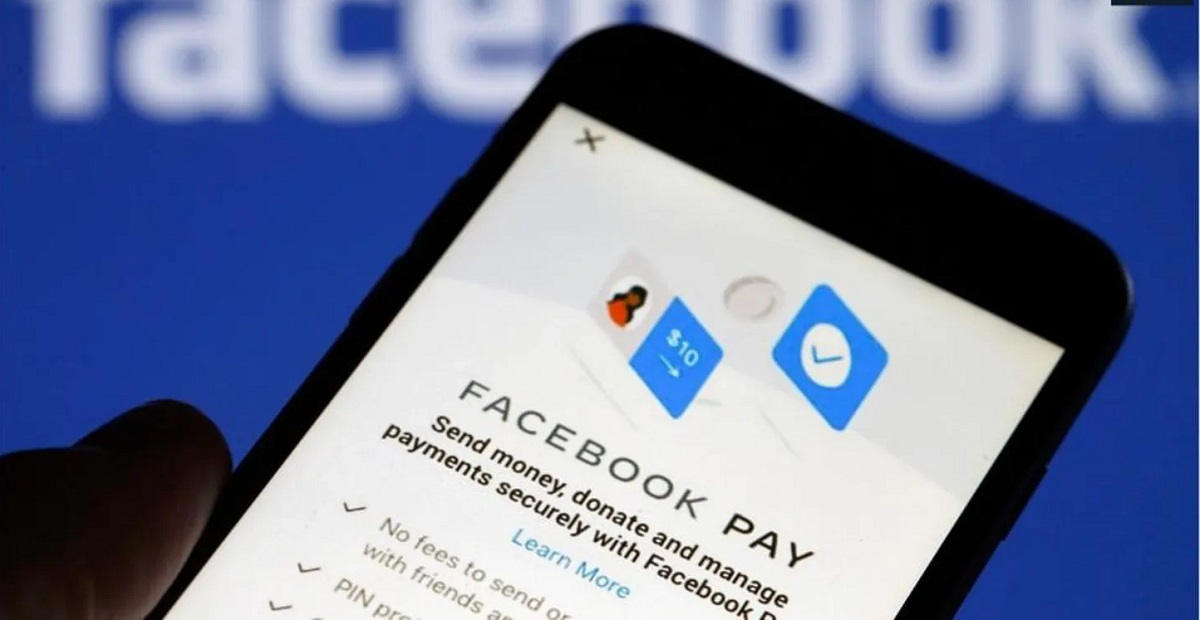
Facebook Pay is a digital payment platform introduced by Facebook to facilitate quick and secure financial transactions across its family of apps, including Facebook, Messenger, Instagram, and WhatsApp. It allows users to link their preferred payment methods and make purchases, donate to fundraisers, send money to friends, and pay for various services without leaving the Facebook platform. With Facebook Pay, users can easily manage their payment methods, view transaction history, and adjust their privacy settings to ensure a safe and personalized payment experience.
One of the key advantages of Facebook Pay is its convenience. By centralizing payment methods and transactions within the Facebook ecosystem, users no longer need to switch between multiple apps or websites to make payments. Whether it’s buying products from Facebook Marketplace, contributing to a charitable cause, or splitting bills with friends, Facebook Pay enables seamless and hassle-free transactions with just a few taps or clicks.
Another notable feature of Facebook Pay is its security. Facebook takes data protection seriously and employs advanced encryption techniques to safeguard users’ financial information. Additionally, Facebook Pay requires users to authenticate their transactions using biometric authentication or a secure PIN, adding an extra layer of security to the payment process.
It’s important to note that Facebook Pay is not a separate standalone app; rather, it is integrated into the existing Facebook apps. This integration brings the advantage of a familiar and user-friendly interface, allowing users to easily navigate and utilize the payment features without the need for additional downloads or installations.
Furthermore, Facebook Pay supports both one-time payments and recurring subscriptions, making it ideal for various purposes such as online shopping, subscription-based services, and recurring donations. Users can also choose to save their payment information for future use, simplifying the checkout process for subsequent transactions.
In summary, Facebook Pay is a digital payment platform that enhances convenience, security, and functionality for users within the Facebook ecosystem. By linking payment methods and utilizing Facebook Pay’s features, users can seamlessly make purchases, donate to causes, and send money to friends, all while enjoying the familiar interface and comprehensive security measures provided by Facebook.
Benefits of Setting Up a Facebook Pay Account
Setting up a Facebook Pay account comes with a range of benefits that enhance your payment experience and provide added convenience and security. Let’s explore some of the key advantages:
1. Seamless Transactions: By setting up a Facebook Pay account, you can enjoy a streamlined payment process. Whether you’re purchasing products, transferring money to friends, or supporting a cause, Facebook Pay allows you to complete transactions quickly and easily within the Facebook platform.
2. Centralized Payment Methods: With Facebook Pay, you can link different payment methods, such as credit/debit cards, PayPal, or digital wallets, to your account. This eliminates the need to repeatedly enter your payment information for each transaction, saving you time and effort.
3. Secure and Private: Facebook Pay prioritizes the security of your financial information. It implements advanced encryption technology and provides options for additional authentication, such as biometric identification or a secure PIN, to ensure that your transactions are safe and protected.
4. Comprehensive Transaction History: When you use Facebook Pay, you have access to a detailed transaction history. This allows you to easily track and monitor your purchases, donations, and transfers, providing transparency and helping you keep your finances in check.
5. Speedy Checkout Process: Once you have set up Facebook Pay, the checkout process for future transactions becomes quicker and more convenient. Your payment information is securely stored, reducing the time spent on entering your details every time you make a purchase.
6. One-Time and Recurring Payments: Facebook Pay supports both one-time payments and recurring subscriptions. Whether you’re making a one-off purchase or subscribing to a service, Facebook Pay offers flexibility and convenience, allowing you to manage your payments effortlessly.
7. Enhanced Integration: Since Facebook Pay is integrated into the Facebook family of apps, including Facebook, Messenger, Instagram, and WhatsApp, you can conveniently use the payment feature across different platforms without the need for separate payment apps or accounts.
8. Support for Fundraisers and Charitable Causes: With Facebook Pay, you can easily contribute to fundraisers and support charitable causes within the Facebook community. By simplifying the donation process, Facebook Pay encourages philanthropy and empowers users to make a positive impact.
9. Customized Privacy Settings: Facebook Pay provides privacy controls that allow you to manage your payment information and control who can see your transactions. You have the option to adjust your privacy settings according to your preferences, ensuring a personalized and secure payment experience.
Overall, setting up and utilizing a Facebook Pay account offers numerous benefits, ranging from convenience and security to flexibility and personalized control. By harnessing the power of Facebook Pay, you can enjoy a hassle-free payment experience while staying connected within the Facebook community.
Step 1: Accessing Facebook Pay
To begin using Facebook Pay, you first need to access the feature within the Facebook app. Follow these steps to find and access Facebook Pay:
1. Open the Facebook App: Launch the Facebook app on your mobile device. Ensure that you are logged in to your Facebook account.
2. Navigate to Settings: Locate the menu icon in the top-right corner of the app. Tap on it to open the side menu. Scroll down and find the “Settings & Privacy” option. Tap on it to expand the submenu.
3. Access Facebook Pay: Within the “Settings & Privacy” submenu, you will find the “Facebook Pay” option. Tap on it to access the Facebook Pay settings.
4. Set up Facebook Pay: If you have not set up Facebook Pay previously, you will be prompted to add a payment method and complete the setup process. Follow the on-screen instructions to link a payment method to your Facebook Pay account.
5. Verify Your Identity (if required): Depending on your location and the payment method you choose, you may be required to undergo an additional identity verification process. This step helps ensure the security and compliance of your Facebook Pay transactions.
6. Check Payment Method: Double-check that your preferred payment method is linked and properly set up. You can add or remove payment methods as needed within the Facebook Pay settings.
7. Explore Additional Settings: Within the Facebook Pay settings, you can also customize privacy settings and manage other aspects, such as managing automatic payments and subscriptions. Take the time to review and adjust these settings according to your preferences.
By following these steps, you can easily access Facebook Pay and set it up for your personal use. Once set up, you will be ready to make secure and convenient payments within the Facebook platform.
Step 2: Linking a Payment Method to Your Account
Once you have accessed Facebook Pay in the Facebook app, the next step is to link a payment method to your account. This will allow you to make seamless transactions and enjoy the convenience of Facebook Pay. Follow these steps to link a payment method:
1. Access Facebook Pay Settings: Open the Facebook app and navigate to the Facebook Pay settings by following the instructions mentioned in Step 1.
2. Tap on “Add Payment Method”: Within the Facebook Pay settings, you will find the option to “Add Payment Method.” Tap on it to begin the process of linking a payment method to your account.
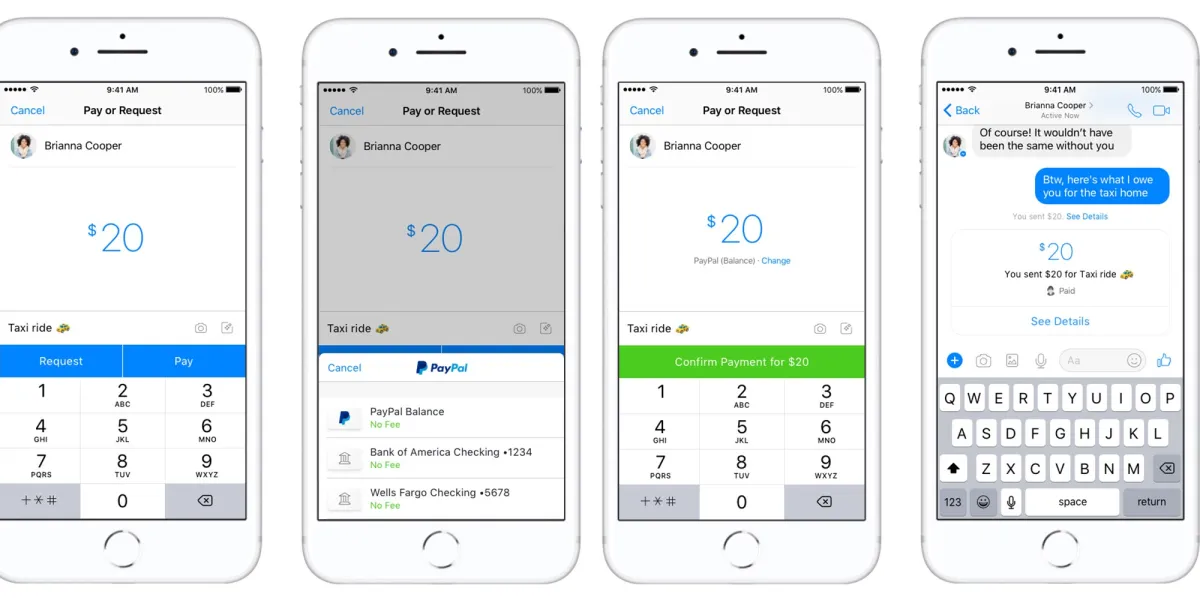
3. Choose Your Preferred Payment Method: In this step, you will be presented with various options to link a payment method. Facebook Pay supports credit/debit cards, PayPal, digital wallets, and more. Choose the payment method that you would like to link to your account by tapping on the respective option.
4. Follow the On-Screen Prompts: Depending on the payment method you have chosen, you will be guided through the necessary steps to add and link your payment information. This may involve entering card details, verifying your PayPal account, or providing any other required information.
5. Review and Confirm: Once you have entered the necessary information, review the details for accuracy. Make sure that all the information you have provided is correct. Then, confirm the addition of the payment method to your Facebook Pay account.
6. Repeat the Process (Optional): If you want to link multiple payment methods, you can repeat the above steps. This allows you to have flexibility in choosing the payment method for each transaction.
7. Set a Default Payment Method: Within the Facebook Pay settings, you have the option to set a default payment method. This is the payment method that will be automatically selected for your transactions unless you choose a different method during the checkout process.
8. Remove or Edit Payment Methods: If you need to remove or edit a payment method in the future, you can do so within the Facebook Pay settings. Simply locate the payment method you want to remove or edit and select the appropriate option.
By following these steps, you can easily link a payment method to your Facebook Pay account. This will enable you to make secure and convenient payments within the Facebook ecosystem, simplifying your transactions and providing you with a seamless payment experience.
Step 3: Managing Payment Methods
After linking a payment method to your Facebook Pay account, it’s important to know how to manage and maintain your payment methods. By familiarizing yourself with the management options, you can easily update, remove, or add new payment methods as needed. Follow these steps to manage your payment methods:
1. Access Facebook Pay Settings: Open the Facebook app and navigate to the Facebook Pay settings by following the instructions mentioned in Step 1.
2. View Linked Payment Methods: Within the Facebook Pay settings, you will find a list of the payment methods that are currently linked to your account. This includes credit/debit cards, PayPal, digital wallets, etc.
3. Remove a Payment Method: If you want to remove a payment method, tap on the option to remove or delete the specific payment method from your account. Confirm the removal when prompted by following the on-screen instructions.
4. Add a New Payment Method: To add a new payment method, look for the option to add or link a payment method within the Facebook Pay settings. Follow the on-screen prompts to provide the necessary information for the new payment method.
5. Set a Default Payment Method: Within the Facebook Pay settings, you have the option to set a default payment method. This is the payment method that will be automatically selected for your transactions unless you choose a different method during the checkout process. You can change this default setting if necessary.
6. Update Payment Method Details: If you need to update the details of a payment method, such as a new expiration date or billing address, select the specific payment method within the Facebook Pay settings. Look for the option to update or edit the details and follow the on-screen prompts to make the necessary changes.
7. Optimize Your Payment Methods: Regularly review your linked payment methods to ensure that they are up to date and aligned with your preferences. This includes verifying that the expiration dates, billing addresses, and other relevant details are accurate to avoid issues during transactions.
8. Security Considerations: It’s essential to keep your payment methods secure. Avoid sharing your payment information with unauthorized individuals and be cautious of suspicious emails or messages requesting your payment details. If you suspect any unauthorized activity, immediately remove the payment method from your Facebook Pay account and report any suspicious incidents to Facebook.
By following these steps and actively managing your payment methods, you can have greater control over your Facebook Pay account and ensure that your transactions are smooth and secure. Regularly review and update your payment methods to maintain an accurate and secure payment experience within the Facebook ecosystem.
Step 4: Setting Up Automatic Payments
Setting up automatic payments with Facebook Pay can save you time and ensure that your recurring transactions are processed smoothly. Whether you have subscriptions, recurring donations, or regular bills to pay, configuring automatic payments can simplify your financial management. Follow these steps to set up automatic payments:
1. Access Facebook Pay Settings: Open the Facebook app and navigate to the Facebook Pay settings by following the instructions mentioned in Step 1.
2. Explore Automatic Payments: Within the Facebook Pay settings, look for the option related to automatic payments. This may be labeled as “Manage Automatic Payments” or something similar. Tap on that option to proceed.
3. Review Existing Automatic Payments: If you have already set up automatic payments for any services or subscriptions, you will be able to view them in this section. Take a moment to review the existing automatic payments to ensure they are as per your requirements.
4. Add New Automatic Payment: To set up a new automatic payment, tap on the option to add or create a new automatic payment. You may be prompted to enter the necessary details, such as the payment amount, frequency, and duration of the automatic payment.
5. Select the Payment Method: Choose the payment method that you want to use for the automatic payment. Ensure that the selected payment method is linked and properly set up within your Facebook Pay account.
6. Confirm and Save: After entering the relevant details, review the information for accuracy. Once you are satisfied, confirm the setup of the automatic payment. The payment will now be processed automatically according to the frequency and duration specified.
7. Adjust or Remove Automatic Payments: If you need to make changes to an existing automatic payment or remove it altogether, navigate to the automatic payments section within the Facebook Pay settings. Select the specific automatic payment you wish to modify and update the details or remove the payment as needed.
8. Stay Informed: It’s important to monitor your automatic payments and keep track of any changes or updates. Regularly review your automatic payment settings to ensure that they align with your current needs and preferences.
Note: Remember that automatic payments may come with specific terms and conditions set by the service provider or merchant. Be sure to familiarize yourself with these terms and ensure that you have sufficient funds in your linked payment method to avoid any potential issues with the automatic payment process.
By following these steps and setting up automatic payments, you can conveniently manage recurring transactions within the Facebook ecosystem. The ability to automate payments not only saves you time but also ensures that your payments are made on time, providing you with peace of mind and a hassle-free financial experience.
Step 5: Making Payments with Facebook Pay
Making payments with Facebook Pay is a straightforward and convenient process. Whether you’re buying products, donating to fundraisers, or sending money to friends, Facebook Pay allows you to complete transactions with just a few taps or clicks. Follow these steps to make payments with Facebook Pay:
1. Select the Transaction: Depending on the context, choose the transaction you want to make within the Facebook app. This could be purchasing an item from Facebook Marketplace, making a donation, or sending money through Messenger or WhatsApp.
2. Add the Item to Cart or Specify Amount: If you’re purchasing a product, add it to your cart and proceed to the checkout page. If you’re sending money or making a donation, specify the amount you want to transfer.
3. Choose Facebook Pay as the Payment Option: On the checkout page or payment screen, look for the payment options available. Select Facebook Pay as your preferred payment method. If you have multiple payment methods linked, choose the appropriate one for the transaction.
4. Confirm Transaction Details: Review the transaction details, including the item, quantity, price, or the recipient’s information if you’re sending money. Ensure that everything is accurate before proceeding.
5. Authenticate the Transaction: Depending on your device settings and security preferences, you may be required to authenticate the transaction. This could involve biometric identification, such as fingerprint or facial recognition, or entering a secure PIN.
6. Complete the Payment: Once you have authenticated the transaction, tap or click on the “Confirm” or “Pay” button to complete the payment. You will receive a confirmation screen or notification indicating that the payment was successful.
7. Save the Receipt (Optional): If you want to keep a record of your transaction, you can save the receipt or take a screenshot for your reference. Some transactions may also provide an option to receive an email receipt.
8. Track Your Transactions: Facebook Pay provides a transaction history feature, allowing you to view and track your payment activities. You can access this within the Facebook Pay settings to review past transactions and monitor your financial history.
9. Reporting Issues or Disputes: If you encounter any issues with a transaction or need to resolve a dispute, you can contact the seller or recipient directly. If necessary, you can also reach out to Facebook’s support team for assistance in resolving payment-related concerns.
By following these steps, you can easily make payments with Facebook Pay. Enjoy the convenience and simplicity of completing transactions within the Facebook ecosystem, enhancing your overall online shopping, donating, and money transfer experiences.
Step 6: Managing Privacy and Security Settings
Managing your privacy and security settings is an important aspect of using Facebook Pay. By taking control of your privacy settings and implementing security measures, you can ensure a safe and personalized payment experience. Follow these steps to manage your privacy and security settings:
1. Access Facebook Pay Settings: Open the Facebook app and navigate to the Facebook Pay settings by following the instructions mentioned in Step 1.
2. Review Privacy Settings: Within the Facebook Pay settings, locate the privacy settings option. Tap on it to access and review the available privacy options.
3. Adjust Visibility: Determine who can see your payment activities on Facebook. You can choose to keep your transaction information private or allow specific groups of people, such as friends, to view your payment-related posts or activities. Customize these settings according to your preferences and the level of privacy you desire.
4. Control Transaction Notifications: Decide whether you want to receive notifications for each transaction or only for specific types of transactions. Facebook Pay allows you to adjust these notification settings, ensuring that you are aware of important payment updates while maintaining your desired level of privacy.
5. Enable Two-Factor Authentication: Enhance the security of your Facebook Pay account by enabling two-factor authentication. This adds an extra layer of protection by requiring you to provide an additional authentication factor, such as a unique code sent to your mobile device or an authentication app, when accessing your account or making transactions.
6. Set or Update PIN: If you prefer to use a PIN for account access or transaction authentication, you can set or update your PIN within the Facebook Pay settings. Choose a unique and secure PIN that is not easily guessable.
7. Regularly Review and Update Security Measures: Stay proactive about your security by regularly reviewing and updating your security settings. This includes changing your password periodically, keeping your device and apps up to date, and staying vigilant against phishing or fraudulent attempts.
8. Report Suspicious Activity: If you notice any suspicious transactions, unauthorized access, or unusual account activity, report it immediately to Facebook. This will help them investigate and take necessary measures to protect your account and financial information.
9. Stay Informed about Privacy Policies: Keep yourself updated on Facebook’s privacy policies and terms of service related to Facebook Pay. This will ensure that you are aware of how your data is being handled and stored, as well as any changes that may affect your privacy and security.
By following these steps and managing your privacy and security settings, you can maintain a safe and secure payment experience with Facebook Pay. Stay in control of your privacy preferences, implement robust security measures, and stay vigilant to protect your financial information and transactions.
Frequently Asked Questions (FAQs)
Here are some commonly asked questions about setting up and using Facebook Pay:
Q: Is Facebook Pay available to users worldwide?
A: Yes, Facebook Pay is available to users worldwide. However, the availability of certain features may vary depending on your location.
Q: Can I use multiple payment methods with Facebook Pay?
A: Yes, you can link multiple payment methods to your Facebook Pay account, including credit/debit cards, PayPal, and digital wallets. This allows you to choose the most convenient payment method for each transaction.
Q: Can I use Facebook Pay for purchases outside of the Facebook platform?
A: No, Facebook Pay is currently only available for transactions within the Facebook family of apps, including Facebook, Messenger, Instagram, and WhatsApp.
Q: Is Facebook Pay secure?
A: Yes, Facebook Pay prioritizes the security and privacy of your financial information. It uses advanced encryption techniques and allows for additional authentication, such as biometric identification or secure PIN, to ensure the safety of your transactions.
Q: Can I view my transaction history with Facebook Pay?
A: Yes, Facebook Pay provides a transaction history feature where you can view and track your payment activities. You can access this within the Facebook Pay settings to review past transactions and monitor your financial history.
Q: Are there any fees associated with using Facebook Pay?
A: Facebook Pay does not charge any fees for making personal payments or purchases. However, fees may apply for certain business transactions or additional services offered within the Facebook ecosystem.
Q: Can I cancel a payment made with Facebook Pay?
A: Once a payment with Facebook Pay is completed, it may not be possible to cancel it. It is recommended to double-check the transaction details before confirming the payment to avoid any unnecessary payments.
Q: What should I do if there is an issue with a transaction made through Facebook Pay?
A: If you encounter any issues with a transaction, such as a missing item, incorrect charge, or unauthorized activity, contact the seller or recipient directly to resolve the issue. If necessary, you can also reach out to Facebook’s support team for further assistance.
Q: How can I unlink a payment method from my Facebook Pay account?
A: To unlink a payment method, access the Facebook Pay settings, find the payment method you want to remove, and select the appropriate option to unlink or delete it from your account.
Q: Is Facebook Pay separate from the Facebook app?
A: No, Facebook Pay is integrated into the Facebook app. You can access and use Facebook Pay within the Facebook family of apps without the need for a separate standalone app.
These are just a few of the frequently asked questions about Facebook Pay. If you have more specific inquiries or need assistance, you can refer to Facebook’s official help center or reach out to their support team for further guidance.
Conclusion
Facebook Pay provides a convenient and secure payment solution within the Facebook family of apps, allowing users to make purchases, send money, and support causes with ease. By following the step-by-step guide outlined in this article, you can set up and utilize Facebook Pay efficiently.
We started by introducing Facebook Pay and discussing its benefits, highlighting its seamless integration, centralized payment methods, and comprehensive transaction history. Then, we walked through each step, including accessing Facebook Pay, linking payment methods, managing them, setting up automatic payments, making transactions, and managing privacy and security settings.
Throughout the process, it is important to maintain a balance between convenience and security. By regularly reviewing and updating your payment methods, keeping track of your automatic payments, and managing your privacy and security settings, you can optimize your Facebook Pay experience. Additionally, staying informed about Facebook’s terms of service and privacy policies ensures that you are aware of how your data is being handled.
Remember to stay vigilant against phishing attempts or any suspicious activity related to your Facebook Pay account. Report any unauthorized transactions or security concerns to Facebook for prompt resolution.
With Facebook Pay, you can enjoy seamless transactions, centralized payment management, and enhanced security within the Facebook ecosystem. Explore the features and functionalities available, and make the most of this convenient payment solution.
Now that you have the knowledge and understanding of how to set up and use Facebook Pay, feel free to dive in and experience the convenience and simplicity it offers. Enjoy the benefits of secure transactions, intuitive navigation, and the ease of managing your payments within the Facebook platform.