Introduction
When it comes to enhancing the performance of your computer, few upgrades can have as big of an impact as installing a solid-state drive (SSD). Whether you’re a casual user or a power user, an SSD can significantly improve the speed and responsiveness of your PC, making your overall computing experience much smoother and more enjoyable.
But what exactly is an SSD? In simple terms, it’s a type of storage device that uses flash memory to store data, unlike traditional hard disk drives (HDDs) that use spinning platters and read/write heads. This difference in technology gives SSDs a significant advantage in terms of speed and reliability.
There are several benefits to using an SSD in your PC. First and foremost, it dramatically reduces the boot time of your system. Instead of waiting for what feels like an eternity for your computer to start up, an SSD allows your PC to boot up in a matter of seconds. This means no more wasted time staring at a loading screen.
Furthermore, an SSD improves the overall performance of your computer by reducing file access time. This means that tasks such as opening and saving files, launching applications, and multitasking become much faster and more efficient. You’ll experience fewer delays and lags, allowing you to work or play without any frustrating interruptions.
SSDs also have the advantage of being more durable than traditional hard drives. Since they have no moving parts, they are less prone to mechanical failure caused by shocks, drops, or vibrations. This makes them a great option for laptops or portable devices that are subjected to more physical stress.
When it comes to choosing an SSD, there are different types available. The most common ones are SATA SSDs, M.2 SSDs, and PCIe SSDs. Each type has its own installation method and compatibility requirements, which we will explore in detail. Whether you have an older PC or a newer one, there’s likely an SSD option that will suit your needs.
In the following sections, we will dive deeper into each type of SSD and explore where you can install them in a PC. Whether you’re a tech-savvy enthusiast or a newbie to computer upgrades, this guide will provide you with the knowledge you need to make an informed decision about the right SSD for your system.
What is an SSD?
An SSD, or solid-state drive, is a type of storage device that uses flash memory to store data. It is a modern alternative to traditional hard disk drives (HDDs) that use spinning platters and read/write heads. Unlike HDDs, which have moving mechanical parts, SSDs are completely solid-state, which means they are more durable, faster, and more reliable.
The primary component of an SSD is the NAND flash memory, a type of non-volatile memory that retains data even when the power is turned off. This allows for quick access to stored data and eliminates the need for spinning platters and read/write heads found in HDDs. Instead, an SSD utilizes integrated circuits to store and retrieve data, resulting in significantly faster read and write speeds.
Another important component of an SSD is the controller, which acts as the brain of the drive. The controller manages the data flow between the NAND flash memory chips and the computer’s processor, ensuring efficient and reliable data transfers. It also performs functions such as wear leveling, error correction, and garbage collection to maximize the lifespan and performance of the SSD.
One of the key advantages of SSDs over HDDs is their speed. Due to their lack of moving parts, SSDs offer faster boot times, faster file transfers, and faster application launches. This makes them ideal for tasks that require quick access to data, such as gaming, video editing, and multitasking.
In addition to speed, SSDs also provide improved durability. Since there are no moving parts, they are less susceptible to mechanical failure caused by shocks, drops, or vibrations. This makes them more suitable for portable devices like laptops, as they can withstand the rigors of being moved around frequently.
Furthermore, SSDs are typically more energy-efficient than HDDs. They consume less power during operation, resulting in longer battery life for laptops and reduced electricity consumption for desktop computers. This energy efficiency not only benefits the environment but also reduces the cost of electricity usage over time.
Overall, SSDs offer a vast improvement in performance compared to traditional HDDs. Their speed, reliability, durability, and energy efficiency make them the preferred choice for many computer users looking to upgrade their storage solution. As technology continues to advance, SSDs will likely become even faster and more affordable, further solidifying their place as the go-to storage option for modern computers.
Benefits of Using an SSD
Using a solid-state drive (SSD) as your primary storage device offers a myriad of benefits that can significantly improve your computer’s performance and user experience. Here are some of the key advantages of using an SSD:
1. Faster Boot Times: An SSD can drastically reduce the time it takes for your computer to start up. Instead of waiting minutes for your operating system to load, an SSD allows your PC to boot in a matter of seconds. This means you can get right to work or play without any delays.
2. Improved Load Times: SSDs provide faster read and write speeds compared to traditional hard drives. As a result, applications load faster, files open quicker, and data is retrieved speedily. This translates to a more efficient and seamless computing experience, whether you’re running multiple programs or working on large files.
3. Enhanced Multitasking: With an SSD, you can switch between applications and tasks seamlessly. The faster read and write speeds allow for smooth multitasking, enabling you to work on multiple projects simultaneously without experiencing lag or slowdowns.
4. Reduced File Transfer Times: Copying, moving, and transferring files is much quicker with an SSD. Large files can be transferred in a fraction of the time it would take with a traditional hard drive. This is especially beneficial for professionals who deal with large media files, such as video editors, photographers, and graphic designers.
5. Better Gaming Performance: Gamers can greatly benefit from using an SSD. Games load faster, reducing the wait time between levels or matches. Additionally, textures and assets in games can load more quickly, resulting in smoother gameplay and reduced instances of texture pop-ins.
6. Improved System Responsiveness: An SSD can make your computer feel more responsive overall. Tasks such as opening programs, launching browsers, and accessing files become nearly instantaneous, providing a seamless and snappy user experience.
7. Energy Efficiency: SSDs consume less power compared to traditional hard drives. This leads to improved battery life for laptops and lower electricity costs for desktop computers, making them both environmentally friendly and cost-effective in the long run.
8. Greater Durability: Since SSDs have no moving parts, they are more resistant to physical shock and vibration. This makes them a reliable storage option for laptops and portable devices, as they can withstand the rigors of being transported without the risk of data loss or drive failure.
9. No Noise: Unlike traditional hard drives, SSDs produce no noise during operation. The absence of spinning disks and moving parts means a quieter computing experience, allowing you to work in a peaceful environment without the humming or clicking sounds commonly associated with HDDs.
With these numerous advantages, it’s no wonder that SSDs have become the go-to storage solution for many computer users. Their speed, efficiency, durability, and overall reliability make them an essential upgrade for anyone looking to optimize their computer’s performance.
Types of SSDs
When it comes to choosing an SSD, there are several different types available, each with its own form factor and interface. Understanding the different types will help you determine which SSD is compatible with your system and suits your specific needs. Let’s explore the most common types of SSDs:
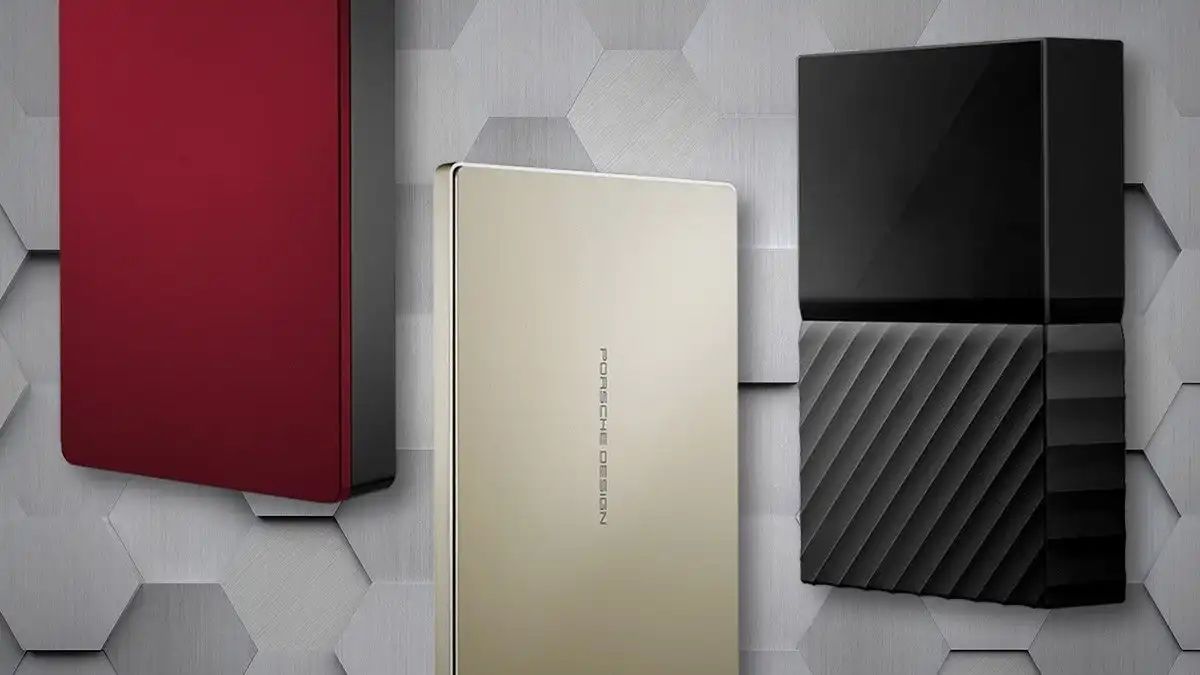
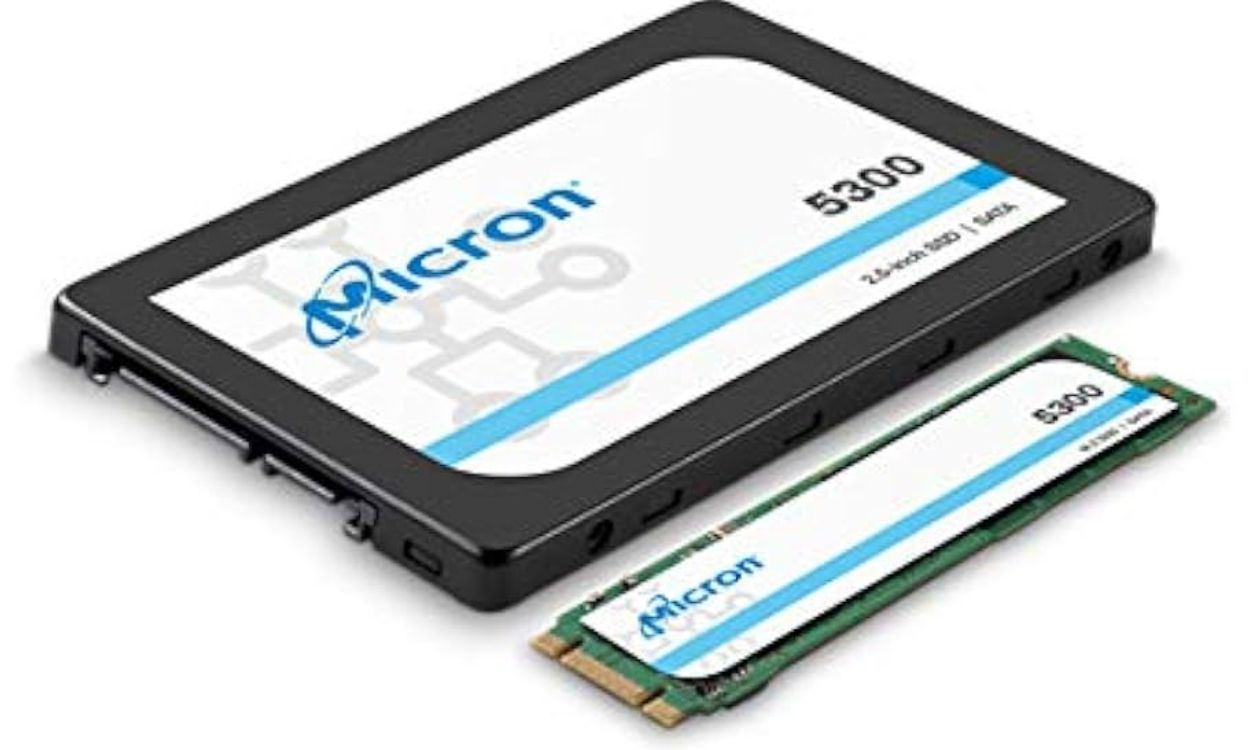
1. SATA SSD: SATA (Serial ATA) SSDs are the most widely used and readily available type of SSD. They are designed to be compatible with the traditional SATA interface commonly found in laptops and desktop computers. SATA SSDs come in various capacities and are typically installed by connecting them to the motherboard using a SATA cable. While SATA SSDs offer significant speed improvements over HDDs, they are limited by the SATA interface’s maximum data transfer rate.
2. M.2 SSD: M.2 SSDs are a compact and versatile form factor that plugs directly into a dedicated slot on the motherboard. They come in different lengths and widths and use either the SATA or PCIe interface. M.2 SATA SSDs offer similar performance to 2.5-inch SATA SSDs but in a smaller form factor. On the other hand, M.2 PCIe SSDs utilize the faster PCIe interface, delivering significantly faster speeds, making them ideal for demanding applications such as gaming or content creation.
3. PCIe SSD: PCIe (Peripheral Component Interconnect Express) SSDs are designed to take advantage of the high-speed PCIe interface found on modern motherboards. They come in different form factors, including add-in cards and M.2 drives. PCIe SSDs offer the fastest data transfer rates and provide exceptional performance, especially in sequential read and write operations. These SSDs are commonly used by professionals who require maximum speed for tasks like video editing, data analysis, or virtualization.
4. NVMe SSD: NVMe (Non-Volatile Memory Express) is a protocol specifically designed for SSDs to leverage the capabilities of PCIe. NVMe SSDs offer even faster speeds and lower latency compared to traditional SATA or AHCI-based SSDs. They are typically available in the M.2 form factor and are the preferred choice for high-end systems that demand the ultimate performance.
When choosing an SSD, it’s important to consider not only the type but also the capacity, speed, and price. SATA SSDs are often the most affordable option and provide a significant speed upgrade compared to HDDs. M.2 and PCIe SSDs offer superior performance but may come at a higher cost. Assess your needs and budget to select the SSD type that best suits your requirements.
By understanding the different types of SSDs available, you can make an informed decision about which one will be compatible with your system and provide the right balance of performance, capacity, and price.
Where Can You Install an SSD in a PC
Installing an SSD in your PC can significantly improve its performance and overall responsiveness. Depending on the type of SSD you have, there are different locations within your computer where you can install it. Let’s explore the three most common installation options:
1. SATA SSD Installation: SATA SSDs, whether in the 2.5-inch form factor or using an M.2 slot with SATA interface, can be installed in the same locations where traditional hard drives are typically mounted. Most cases have dedicated drive bays for 2.5-inch drives. To install the SSD, you’ll need to connect the drive to the motherboard using a SATA data cable and supply power with a SATA power cable. Once connected, you can secure the drive in the drive bay using screws. This installation method allows for easy replacement of an existing hard drive with an SSD.
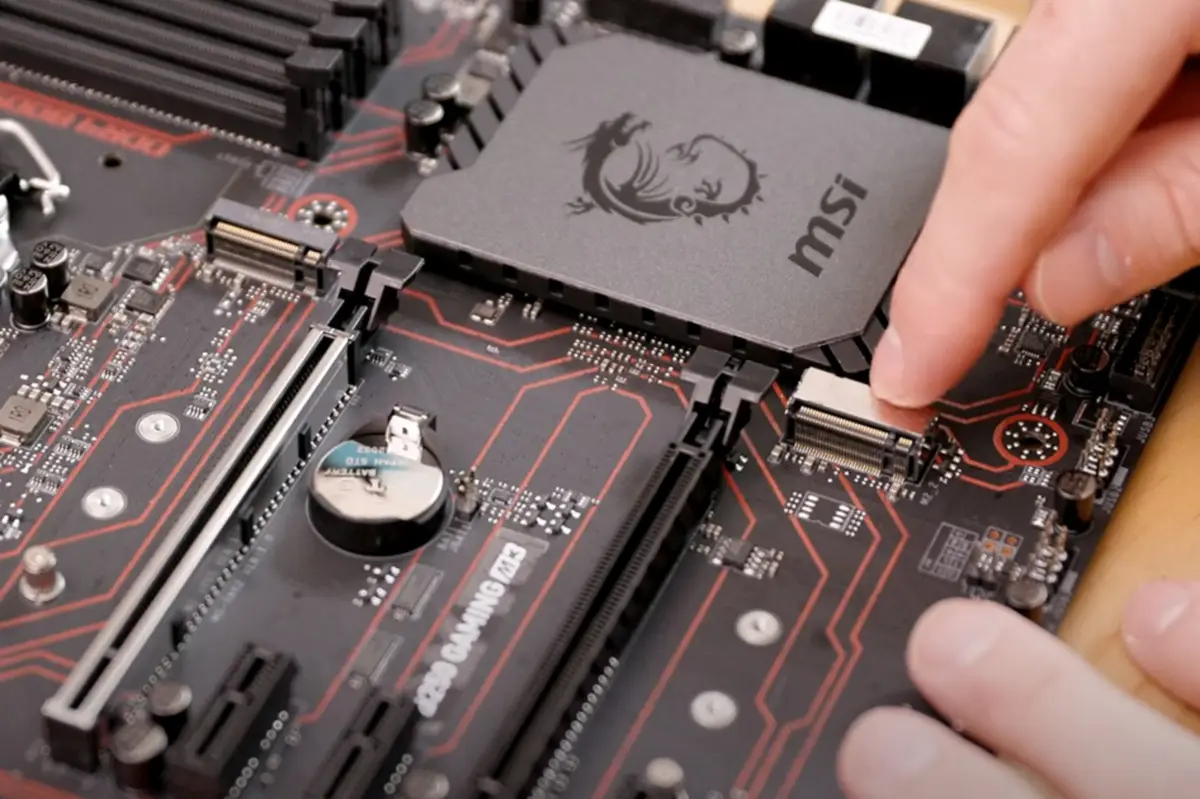
2. M.2 SSD Installation: M.2 SSDs, on the other hand, are designed to be plugged directly into the M.2 slot on the motherboard. These slots are typically located near the CPU socket or on the motherboard’s underside, depending on the motherboard model. To install an M.2 SSD, you’ll need to insert the drive into the slot at a slight angle and then secure it with a screw. Some M.2 slots support both SATA and PCIe interfaces, so make sure your motherboard and SSD are compatible. It’s worth noting that different M.2 lengths (such as 2230, 2242, 2260, or 2280) may also impact which slot you can use, so consult your motherboard’s manual for guidance.
3. PCIe SSD Installation: PCIe SSDs can be installed in multiple ways depending on the form factor. Some high-performance SSDs come in the form of PCIe add-in cards, which are installed in PCIe expansion slots on the motherboard. These cards are secured with screws and may require additional power connections. If you have an M.2 PCIe SSD, it can be installed in an available M.2 slot just like the M.2 SATA SSD. The key difference is that M.2 PCIe SSDs use the faster PCIe interface, resulting in even faster speeds.
Before installing an SSD, it’s important to consult your computer’s manual or motherboard documentation to ensure compatibility and to identify the specific installation options available to you. Keep in mind that some older motherboards may not have M.2 or PCIe support, limiting your installation options. Additionally, make sure to back up your important data and consider transferring your operating system to the new SSD to get the maximum performance benefits.
Installing an SSD in your computer is a relatively straightforward process, and it can greatly enhance your system’s speed and responsiveness. Whether you choose a SATA SSD, M.2 SSD, or PCIe SSD, finding the right installation location and method will allow you to enjoy the full benefits of this powerful storage upgrade.
SATA SSD Installation
Installing a SATA (Serial ATA) SSD in your PC is a common and straightforward process that can significantly improve your computer’s performance. Whether you’re upgrading from a traditional hard drive or adding a secondary storage device, here’s a step-by-step guide to installing a SATA SSD:
1. Prepare: Before installation, shut down your computer and unplug it from the power source. Make sure you have all the necessary tools, including a screwdriver and SATA cables.
2. Identify: Locate the drive bay where you plan to install the SATA SSD. Most cases have dedicated drive bays for 2.5-inch drives, which is the common form factor for SATA SSDs. Check your computer’s manual if you’re unsure about the drive bay locations.
3. Connect SATA Data Cable: Connect one end of the SATA data cable to the SATA port on the motherboard. These ports are usually labeled, so refer to your motherboard’s manual for the precise location. Connect the other end of the SATA data cable to the corresponding SATA port on the SSD.
4. Connect SATA Power Cable: Locate an available SATA power connector from the power supply unit (PSU) and connect it to the power port on the SSD. Ensure a secure connection.
5. Mount the SSD: Secure the SSD in the drive bay using screws. Align the SSD’s screw holes with those in the drive bay and tighten the screws to hold the drive firmly in place.
6. Cable Management: Properly organize the SATA cables and ensure they are neatly tucked away in the case to prevent any interference with other components or obstructing airflow.
7. Close the Case: Once the SSD is securely installed and the cables are properly managed, close the computer case and fasten any necessary screws to secure it in place.
8. Power On and Verify: Plug your computer back in and power it on. Enter the BIOS/UEFI settings to ensure the system recognizes the newly installed SSD. If necessary, make any required changes to prioritize the SSD as the boot drive.
With the SATA SSD successfully installed, you can now enjoy the benefits of faster boot times, improved load times, and enhanced overall system performance. Remember to transfer your operating system and frequently used applications to the SSD to maximize its advantages.
Installing a SATA SSD is a relatively simple and effective way to upgrade your system’s storage capabilities. Whether you’re a gamer, creative professional, or general computer user, the increased speed and responsiveness of an SSD will greatly enhance your computing experience.
M.2 SSD Installation
Installing an M.2 SSD is a popular choice for those looking to add or upgrade their storage in a convenient and compact form factor. M.2 SSDs offer faster speeds and take up minimal space within your PC. Here’s a step-by-step guide on how to install an M.2 SSD:
1. Check Compatibility: Ensure that your motherboard supports M.2 SSDs and has an available M.2 slot. Consult your motherboard manual or manufacturer’s website for compatibility and specifications.
2. Locate the M.2 Slot: Identify the M.2 slot on your motherboard. It is usually located near the CPU socket or on the motherboard’s underside, depending on the model. Refer to your motherboard manual if you’re unsure about the exact location.
3. Determine the Type: M.2 SSDs can utilize either the SATA or PCIe interface. Check the specifications of your M.2 SSD to identify which interface it uses. Ensure that the M.2 slot on your motherboard supports the same interface.
4. Insert the M.2 SSD: Insert the M.2 SSD into the M.2 slot at a slight angle. The keying or notch on the SSD should align with the corresponding slot on the motherboard. Gently press the SSD down until it is fully inserted.
5. Secure the M.2 SSD: Some M.2 slots have securing mechanisms, such as screws or clips, to hold the SSD in place. If your motherboard requires this, use the provided screw or clip to secure the SSD in the slot. Make sure it is secure but avoid overtightening.
6. Check the Orientation: Pay attention to the length or width specifications of your M.2 SSD. Some motherboards may have multiple M.2 slots of different lengths. Verify that you have installed the SSD in the appropriate slot.
7. Cable Management: One of the advantages of M.2 SSDs is their sleek and cable-free design. With the M.2 SSD installed, there are no additional SATA or power cables to connect. This results in cleaner cable management inside your PC.
8. Close the Case: Once the M.2 SSD is securely installed and you have verified its alignment, close the computer case by fastening any necessary screws to secure it in place.
9. Power On and Verify: Reconnect your computer to the power source and power it on. Enter the BIOS/UEFI settings to ensure that the system recognizes the newly installed M.2 SSD. If required, make any necessary changes to prioritize the SSD as the boot drive.
With the M.2 SSD successfully installed, you can now enjoy the benefits of faster speeds and reduced cable clutter. Make sure to transfer your operating system and frequently used applications to the M.2 SSD to take full advantage of its speed and efficiency.
Installing an M.2 SSD is a convenient and efficient way to upgrade your storage without taking up additional space in your PC. Whether you’re a gamer, content creator, or general user, the added speed and hassle-free installation of an M.2 SSD will greatly improve your computing experience.
PCIe SSD Installation
Installing a PCIe (Peripheral Component Interconnect Express) SSD allows you to take advantage of the high-speed PCIe interface for exceptional data transfer rates and improved system performance. If you have a PCIe SSD and want to install it in your PC, here’s a step-by-step guide:
1. Check Compatibility: Ensure that your motherboard supports PCIe SSDs and has an available PCIe slot that matches the form factor of your SSD. Consult your motherboard manual or manufacturer’s website for compatibility and specifications.
2. Locate an Available PCIe Slot: Identify an available PCIe slot on your motherboard that is compatible with your PCIe SSD. These slots are typically longer and will vary in size depending on the slot generation (e.g., PCIe x1, x4, x8, or x16). Refer to your motherboard manual for the exact location and specifications of the suitable PCIe slot(s).
3. Prepare the PCIe SSD: If your PCIe SSD is an add-in card, ensure that it is properly aligned with the slot and slot cover. Gently slide the PCIe SSD into the PCIe slot, making sure it is fully seated.
4. Secure the PCIe SSD: Once the SSD is aligned and seated in the PCIe slot, secure it in place using the appropriate screw or latch mechanism. This ensures the card remains firmly in place during operation.
5. Connect Additional Power (if required): Some high-performance PCIe SSDs may require additional power beyond what the PCIe slot can provide. If this is the case, locate the additional power connectors on the SSD and connect the corresponding power cables from the power supply unit (PSU) to provide sufficient power to the SSD.
6. Cable Management: Ensure that any cables connected to the PCIe SSD are neatly organized and secured using cable ties or clips. This will help maintain a clean and efficient cable management system within your computer case.
7. Close the Case: Once the PCIe SSD is securely installed and you have verified its alignment, close the computer case by fastening any necessary screws to hold it in place.
8. Power On and Verify: Reconnect your computer to the power source and power it on. Enter the BIOS/UEFI settings to ensure that the system recognizes the newly installed PCIe SSD. If necessary, make any required changes to prioritize the SSD as the boot drive.
With the PCIe SSD successfully installed, you can now experience blazing-fast speeds and improved overall system performance. Make sure to transfer your operating system and frequently used applications to the PCIe SSD for the best performance gains.
Installing a PCIe SSD is a great way to harness the power of the PCIe interface for lightning-fast data transfers. Whether you’re a professional requiring maximum speed for demanding tasks or a gamer looking for faster load times, a PCIe SSD will undoubtedly elevate your computer’s performance to new heights.
Conclusion
In today’s fast-paced digital world, upgrading to a solid-state drive (SSD) is one of the most impactful improvements you can make to your PC. By replacing a traditional hard drive with an SSD or adding an SSD to your existing storage setup, you can experience significant boosts in performance, efficiency, and speed.
SSDs offer numerous advantages over traditional hard disk drives (HDDs). With faster boot times, improved load times, and enhanced multitasking capabilities, SSDs allow you to work more efficiently and enjoy a smoother computing experience. Whether you’re a casual user, a creative professional, or a hardcore gamer, SSDs can revolutionize the way you interact with your computer.
There are several types of SSDs available, including SATA SSDs, M.2 SSDs, and PCIe SSDs. Each type has its own installation method and compatibility requirements. SATA SSDs are the most common and can be easily integrated into existing systems by connecting them via a SATA cable. M.2 SSDs are compact and plug directly into dedicated slots on the motherboard, while PCIe SSDs leverage the high-speed PCIe interface for maximum performance.
Installing an SSD in your PC requires careful consideration, such as checking compatibility, locating appropriate installation slots, and managing cables properly. Following the step-by-step installation guides provided for each SSD type will ensure a successful upgrade without any complications.
Once your SSD is installed, transfer your operating system and frequently used applications to the SSD to fully harness its benefits. This will result in faster boot times, quicker application launches, and seamless multitasking.
Ultimately, investing in an SSD is a worthwhile endeavor that can breathe new life into your computer. Whether you’re seeking to boost productivity, enhance gaming performance, or simply improve the overall user experience, an SSD can provide the speed, efficiency, and reliability you’re looking for.
Upgrade your PC with an SSD and unlock the full potential of your computer today. Experience the lightning-fast speeds and enjoy a smoother, more efficient computing experience that an SSD can deliver.